- How to Answer Calls without Swipe on Android
- 1. Using your Home Key to Answer
- Android Version 4.2 – Android “Jelly Bean”
- Android Version 6.0 – Android “Marshmallow”
- Android Version 7.0 – Android “Nougat”
- Newest Android Devices
- 2. Answering Calls with your Voice
- Android Version 4.2 – Android “Jelly Bean”
- Android Version 6.0 – Android “Marshmallow”
- Android Version 7.0 – Android “Nougat”
- Newest Android Devices
- Top 9 Ways to Fix Unable to Answer Calls on Android Phone
- Mehvish
- 1. Restart Phone
- 2. Answer Correctly
- 3. Remove SIM Card
- 4. Turn Airplane Mode on and Off
- 5. Clear Data and Cache for Phone App
- 6. Update Phone App
- 7. Check Third-Party Calling Apps
- 8. Check Theme
- 9. Reset App Preferences
- Alternate Way to Answer Calls
- Back to the Basics
- Read Next
- Top 17 Xiaomi Mi Band 3 or Band 4 FAQs Answered for Beginners
- How to Troubleshoot Your Pixel 2 Using Google Assistant
- 9 Best Fixes for Zoom Microphone Not Working on Windows 10
- A Guide to Presenting PowerPoint Presentation (PPT) in Google Meet on Phone and Laptop
- Top 7 Ways to Fix Camera App Not Working on Android
- Top 8 Ways to fix Unfortunately File Manager Has Stopped on Android
- Top 8 Ways to Fix WhatsApp Notification Sound Not Working
- Top 7 Ways to Fix Android Keyboard (AOSP) Has Stopped
- Did You Know
How to Answer Calls without Swipe on Android
It’s just your luck to get an important call when you’re busy eating or when you’re on the road. Wouldn’t it be nice to have an alternative way to answer your phone call without swiping? It’s a good thing there is.
Clearly, an employee had the same thought in mind when a few quality of life changes were implemented into your Android phone.
1. Using your Home Key to Answer
Unfortunately for many, this option doesn’t come with every Android incarnation. If you have Android version 4.2 and beyond, you should have access to this option. Below are several versions of Android. Choose the version that best fits your needs.
On a side note, Android should feed the person who’s naming the different versions of Android. They seem hungry.
Android Version 4.2 – Android “Jelly Bean”
1. Open your Settings app.
2. At the top, select the “My Device” tab.
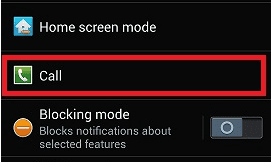
3. Scroll down until you locate “Call.” Select it.
4. Locate “Answering/ending calls,” and tap it. You’ll be given several options to review.
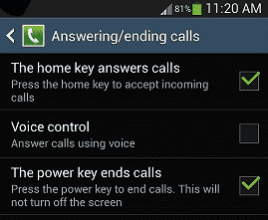
5. Check the box next to “The home key answers calls.” And if you so desire, “The power key ends calls.”
Android Version 6.0 – Android “Marshmallow”
1. Open the default Phone app.
2. Select More. It’s the three vertical dots located in the top-right corner. It will prompt a drop-down menu.
3. Select Settings.
4. Tap Call.
5. In Call settings, select “Answering and ending calls.”
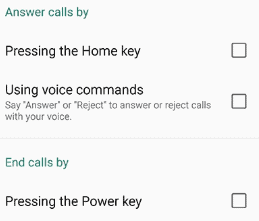
6. Check the box next to “Pressing the Home key,” and, if you so desire, “Pressing the Power key.”
Android Version 7.0 – Android “Nougat”
- Open the default Phone app.
2. Select More. It’s the three vertical dots located in the top-right corner. It will prompt a drop-down menu.
3. Select Settings.
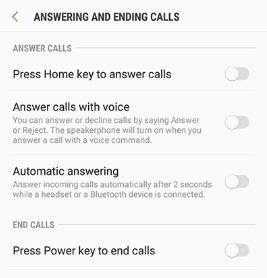
4. Locate “Answering and ending calls.” Tap it.
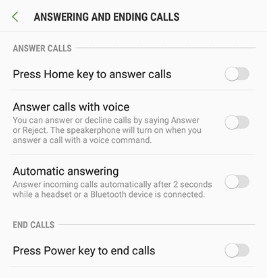
5. You’ll have several options to choose from. Tap the slider to turn ON the option “Press Home key to answer calls.” It will turn green. And, if you so desire, tap the slider to turn ON the option “Press Power key to end calls.” It will turn green.
Newest Android Devices
1. Open the default Phone app.
2. Select More. It’s the three vertical dots located in the top-right corner. It will prompt a drop-down menu.
3. Select Settings.
4. Locate “Answering and ending calls.” Tap it.
5. You’ll have several options to choose from. Tap the slider to turn ON the option “Press Home key to answer calls.” It will turn green. And, if you so desire, tap the slider to turn ON the option “Press Power key to end calls.” It will turn green.
2. Answering Calls with your Voice
As technology advances, the nifty smartphone in your pocket has the ability to pick up on your voice commands. This option doesn’t come with every single Android incarnation, but if you have Android 4.2 and up then it should be a feature.
Android Version 4.2 – Android “Jelly Bean”
1. Open your Settings app.
2. At the top, select the “My Device” tab.
3. Scroll down until you locate “Call.” Select it.
4. Locate “Answering/ending calls,” and tap it.
5. Check the box next to “Voice control.” There’s several applications voice control can be utilized with.
Android Version 6.0 – Android “Marshmallow”
1. Open the default Phone app.
2. Select More. It’s the three vertical dots located in the top-right corner. It will prompt a drop-down menu.
3. Select Settings.
4. Tap Call.
5. In Call settings, select “Answering and ending calls.”
6. Check the box next to “Using voice commands.”
Android Version 7.0 – Android “Nougat”
1. Open the default Phone app.
2. Select More. It’s the three vertical dots located in the top-right corner. It will prompt a drop-down menu.
3. Select Settings.
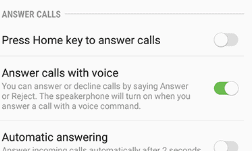
4. Locate “Answering and ending calls.” Tap it.
5. Tap the slider to the right to turn ON the option “Answer calls with voice.”
Newest Android Devices
1. Open the default Phone app.
2. Select More. It’s the three vertical dots located in the top-right corner. It will prompt a drop-down menu.
3. Select Settings.
4. Locate “Answering and ending calls.” Tap it.
5. Tap the slider to the right to turn ON the option “Answer calls with voice.”
Источник
Top 9 Ways to Fix Unable to Answer Calls on Android Phone
Mehvish
01 Mar 2020
Typically, when you receive a call on your phone, you swipe the screen to answer it. But, sometimes, that doesn’t happen. Even though the user can see who is calling, answering, or rejecting the call doesn’t take place after repeated attempts. That can be frustrating. Don’t worry, though. In this post, we will tell you how to fix cannot answer incoming calls issue on your Android phone.

The inability to not being able to answer calls can be quite frustrating. While for some users, the phone hangs and freezes while receiving calls, others can make the action of answering calls, but it doesn’t answer the call.
Spooky but not a major issue. You can easily fix it with the solutions mentioned below.
1. Restart Phone
If it’s a new issue and it happened for the first time, begin by restarting your phone. Sometimes, that is enough to fix any issue on your phone, including the one related to unable to answer calls.
2. Answer Correctly
Android phones let you answer calls in different ways. On some devices, you have to swipe up on the answer (or green) button, while others make you swipe right. Try both methods.
If you have a Samsung phone, things are a bit different now. Earlier, one could tap on the answer (or green) button to accept the call. But the functionality has been removed now. So if you are trying to answer the call in the same way, it’s incorrect. You will have to swipe up on the green button.

In case you want the Tap to answer feature back, you can do that by going to Settings on your Samsung phone. Then, go to Accessibility > Interaction & Dexterity>Assistant Menu. Turn on the toggle next to off on the next screen. Then, you will find the Single tap to swipe option. Enable it. Now, you can answer calls with a single tap.


Even though you get the feature, enabling the Assistant Menu has a drawback as it adds a floating menu icon. To hide that, increase the Transparency of the menu in the settings. Alternatively, long-tap the floating icon and drag it towards the Hide button that appears. It will then stay in your notification panel.

Tip: Bought a Samsung phone recently? Try our useful compilation of Samsung phone calling tips and tricks.
Also on Guiding Tech

How to Fix Missed Call Notification Not Showing in Android
3. Remove SIM Card
Even though this kind of issue is usually related to your Android phone, you should try removing the SIM card from your phone to fix any network issue. Once you remove it, clean the SIM tray and your SIM card with a cloth and then insert it again.
4. Turn Airplane Mode on and Off
Another way to fix it is by enabling the Airplane mode. Doing that will restrict the network connectivity on your phone and solve the network-related issue. To enable the airplane mode, open quick settings, and tap on Airplane mode to enable. Once enabled, wait for a minute and then disable it.

5. Clear Data and Cache for Phone App
Clearing cache and data for the Phone app has proved beneficial for many Android users who were going through the same trouble. Don’t worry, clearing cache or data of the Phone app will not delete any of your personal data. Your files, contacts, and even call history will remain untouched.
To clear cache and data for the Phone app, follow these steps:
Step 1: Open Settings on your Android phone and go to Apps & notifications or App.

Step 2: Tap on the Phone app that came preinstalled on your phone under All apps.

Step 3: Tap on Storage. Then, tap on Clear cache first. Restart your phone. If the issue persists, tap on Clear data or Clear storage depending on the option available on your phone.


On phones running Android 7.1 Nougat and above, you can long-tap on the Phone app icon on the home screen or in the app drawer to reveal app shortcuts. Then, tap on the ‘i’ or App info icon. You will directly be taken to step 3 mentioned above. Tap on Storage followed by Clear cache.

6. Update Phone App
At times, the issue is with the app itself. The developers are quick to release an update that fixes the calling problem. You should open the Play Store and update the Phone app. For future use, learn how to know if an app needs an update on Android and iPhone.
Also on Guiding Tech
# troubleshooting
7. Check Third-Party Calling Apps
Do you use a third-party calling or dialer app on your phone? That might be interfering with the calling functionality on your phone. Either disable it for a while or make the pre-installed dialer app as your default phone calling app.
For that, open Settings on your phone and go to Apps. Tap on Default apps. If the option isn’t visible, tap on the three-dot icon at the top and select Default apps.
Tip: Use the search box in Settings to find default apps settings.


Tap on the Phone app and select the system default phone app. You should also take a look at the Caller ID & spam app setting. Either select the system app or choose None.

8. Check Theme
If you use themes on your Android phone, switch to the default theme to test the incoming call. Sometimes, the answer and reject buttons are reversed in a theme, or they do not work at all. To fix it, you will need to disable the custom theme and use the system default theme.
9. Reset App Preferences
If the issue persists, reset app preferences on your phone. Doing so will not delete any data but will reset the settings to their default values, thus fixing any issue that might be interfering with the incoming calls. If you are worried about what settings might be changed, check our guide on what happens when you reset app preferences.
To reset app preferences, open Settings on your phone and go to Apps. Tap on the three-dot icon at the top and select Reset app preferences.


Tip: If you can’t find the Reset app preferences option, go to Settings > System > Reset options > Reset app preferences.
Alternate Way to Answer Calls
If the touch buttons do not let you answer calls, you can use the hardware buttons to answer calls. While the Power key lets you end the call, the volume up key can be used to answer calls. The latter feature is limited to some phones only.
To enable physical buttons, go to Settings > Accessibility. You will find the required options. Alternatively, open the Settings for the Phone app. Then, go to Answering and ending calls. Enable the required buttons.

Also on Guiding Tech

How to Fix Incoming Call Not Showing on Screen (Android)
Back to the Basics
We hope one of the above methods would have helped you in answering the incoming calls. If you are still unable to answer the incoming calls, check the block list and do not disturb mode. You should also check the screen where the answer and reject buttons are located. It could be a display issue if other apps also don’t work at the required place.
Next up: Make the best use of the Google’s Phone app with the tips and tricks mentioned in our post. Check the next post.
Last updated on 13 Mar, 2020
The above article may contain affiliate links which help support Guiding Tech. However, it does not affect our editorial integrity. The content remains unbiased and authentic.
Read Next

Top 17 Xiaomi Mi Band 3 or Band 4 FAQs Answered for Beginners
Did you just receive your Mi Band 3 or 4? Check out these FAQs that will help you in setting up and knowing the Mi Band in a better way.

How to Troubleshoot Your Pixel 2 Using Google Assistant
Want to troubleshoot issues on your Pixel 2 and Pixel 2 XL? # Google Assistant will now help you do that over a few voice commands.

9 Best Fixes for Zoom Microphone Not Working on Windows 10
Are you facing issues with # audio on the # Zoom app on # Windows 10? Find out how to fix the # Zoom microphone not working on your # Windows 10 PC.

A Guide to Presenting PowerPoint Presentation (PPT) in Google Meet on Phone and Laptop
Are you wondering how to share your presentation with every one over a # Google Meet call? Here’s a guide for sharing # PowerPoint presentation in # Google Meet on Android, iPhone, iPad, Mac, and Windows.

Top 7 Ways to Fix Camera App Not Working on Android
Are you facing issues accessing the # Camera app on # Android? Here’s how you can fix the issue and use the # camera again.

Top 8 Ways to fix Unfortunately File Manager Has Stopped on Android
# Android file manager stopping right in the middle of work may spoil the mood for you. Here’s how you can fix the issue.

Top 8 Ways to Fix WhatsApp Notification Sound Not Working
Are you getting # WhatsApp notifications without any # sound? Here’s how you can fix # WhatsApp notification sound not working on # iPhone and # Android.

Top 7 Ways to Fix Android Keyboard (AOSP) Has Stopped
Are you facing Android keyboard has stopped error on your phone? Here’s how you can troubleshoot Android keyboard (AOSP) has stopped.
Did You Know
Twitter’s logo is named Larry after Larry Bird, the iconic basketball player.
Источник


