- Tek Eye
- What is the Android Icon Size for an App?
- Android Screen Densities
- Android Launcher Icon Name and Location
- Android Icon Margins
- Android Bitmap Assets Ratios
- Android Icon Size Table
- See Also
- Do you have a question or comment about this article?
- How to Get App Package Name on Android [3 Methods]
- Method 1: Get Android App Package Name via Play Store URL
- On PC
- On Mobile
- Method 2: Get Android App Package Name via a Third-Party App
- Method 3: Get Android App Package Name via ADB Commands
- About Chief Editor
- Sadique Hassan
Tek Eye
The icon for your app is quite important. It is the thing that represents your app on the Android device screen. Therefore, a professional and unique icon should be produced for your app. Making a set of app icons could be time consuming. However, Android Studio now has the Launcher Icon Generator to help with the process. Though using a graphics package like Inkscape to make Android icons can produce higher quality images. The Android icon size table in this article summarizes all the relevant information for the required icon sizes.
What is the Android Icon Size for an App?
Android launcher icons can be in jpeg (JPG) format, or more commonly in the Portable Network Graphics (PNG) format. For all the launcher icons you will need two lots of six sizes of PNG or JPG files. One set of six icons are square, plus for newer versions of Android, one set of icons are round. Also, there is the high resolution icon to be produced for the Google Play store listing. The six sizes in pixels are 36×36, 48×48, 72×72, 96×96, 144×144 and 192×192. The Play store high-res icon is 512×512. These sizes are the absolute sizes of the icons. It was recommended in the past to allow for a small margin, hence the area the icon is drawn in will be a bit smaller.
For the, now rarely used, low density screens the 36×36 icon is used. However, Android Studio will not generate the default 36×36 icon. Instead, if the app is run on a device with a low density screen, and the 36×36 icon is not present, then Android will use the 72×72 icon scaled down by half. If required, the 36×36 icon can be included in the app for completeness.


Android Screen Densities
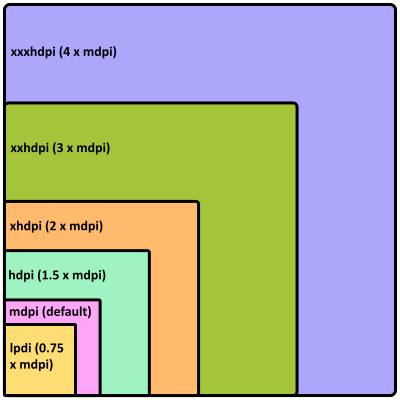
The number of dots (pixels) per inch that an Android device’s screen holds determines how sharp the image on the screen looks. The more Dots Per Inch (DPI) the sharper the image. Android will group screen densities into several classes, medium, high, extra high, extra extra high and extra extra extra high! These are referred to as MDPI, HDPI, XHDPI, XXHDPI and XXXHDPI. There is also a low density class, LDPI, however not many new devices have a low density screen and thus LDPI is no longer important. MDPI is around 160 DPI, HDPI around 240 DPI, XHDPI around 320 DPI, XXHDPI around 480 DPI and XXXHDPI around 640 DPI. (LDPI is around 120 DPI). It is the screen density that determines the Android icon size used.
Android Launcher Icon Name and Location
When a new Android project is created in Android Studio the launcher icon files are called ic_launcher.png and ic_launcher_round.png. You can choose to change the default icon using Android Studio’s built in Asset Studio:
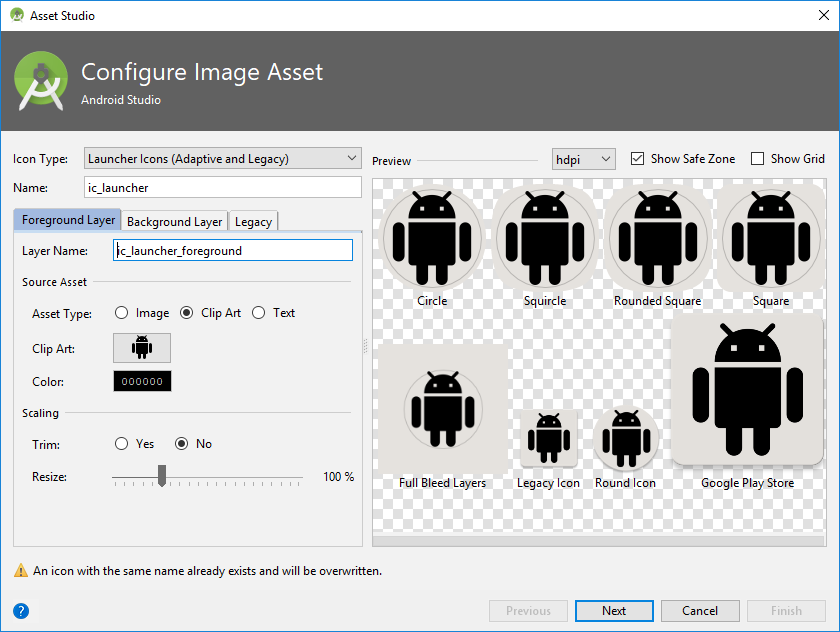
To use Asset Studio open it from within Android Studio using the New menu then select Image Asset. This allows you to configure the launcher icon based on different clip arts, images and colors. The various size icons are created and placed into various mipmap folders in the projects res directory. The folders are mipmap-mdpi, mipmap-hdpi, mipmap-xhdpi, mipmap-xxhdpi and mipmap-xxxhdpi. It you need a low density, LDPI, icon create and put a 36×36 PNG or JPG in a mipmap-ldpi folder.
(In older versions of Android the folders used to be named drawable, i.e. drawable-ldpi, drawable-mdpi, drawable-hdpi, drawable-xhdpi, drawable-xxhdpi and drawable-xxxhdpi. For the very first version of Android, to support Cupcake devices, i.e. API level 3, a single drawable folder was used and contained the 48×48 MDPI PNG or JPG file.)
Notice how the reference to the icon only needs the mipmap part of the folder name. Android works out the correct density icon to use. Android will also scale one of the other density icons if an icon at a certain density is missing (though that may result in a fuzzy icon being displayed on the screen).
Android Icon Margins
The Android Operating System (OS) has evolved since it was released. This means that the icon requirements have changed over the years. The main changes for icons are to support the increase in screen sizes and screen densities. Low density and medium density devices were common. Now high density and extra high density devices are the most common.
Previously it was recommend that the icon included a margin around one twelfth of the total size between the edge of the icon and the image it contained. For example the medium density icon is 48×48 pixels, one twelfth of this is 4, giving a margin of 4 pixels around the icon’s image. This meant the area available for the image was 40×40 (48 minus the margin of 4 pixels on each side).
However, the bigger screens on today’s devices gives more room for the icons so a smaller margin can be used, for example one eighteenth of the icon size. The use of a margin allows image spacing between the icons on a screen, and to allow for any drop shadows, or parts of an image that sticks out from main image content.
The High Resolution Application Icon needed for the Google Play store must be 512×512 in size. This image can have a margin to allow for padding or drop shadows, for example it could be 464×464 on the 512×512 canvas giving 48 pixels for padding and drop shadows. Again the size of the margin may depend upon the type of image being used, but the final file will be a 512×512 in size.
Android Bitmap Assets Ratios
With the 48×48 icon as baseline the 6 launcher icons have the ratios 0.75, 1, 1.5, 2, 3 and 4. These ratios apply to the screen densities. So a high density screen (HDPI) is 1.5 times a medium density screen (MDPI). I.e. 1.5 * 160 = 240. Likewise for the other densities. These ratios generally apply to all images used in an app that target different screen densities. If a bitmap is 100×100 on a medium density screen use the ratios to calculate the bitmap sizes required for other densities (75, 150, 200, 300 and 400 in this case). When generating icons and bitmap assets work at a high resolution and scale down, this prevents pixelation of the images. E.g. a canvas of 576×576 or 864×864 is good for design work. An art-board of those sizes is bigger than the biggest icon required (512×512 for the Google Play store). Even better use a vector drawing package such as Inkscape which effectively allows working at any resolution.
Android Icon Size Table
The following table summarizes the above information, remember to have one square and one round icon for the six screen sizes (or just five if not supporting the out-of-date low density screens).
List of Android Icon Sizes and Locations in the Apps Project
| Density | size | Location (under res) | Ratio | Screen | Margin |
|---|---|---|---|---|---|
| XXXHDPI | 192×192 | mipmap-xxxhdpi | 4 | 640 DPI | 12 to 16 pixels |
| XXHDPI | 144×144 | mipmap-xxhdpi | 3 | 480 DPI | 8 to 12 pixels |
| XHDPI | 96×96 | mipmap-xhdpi | 2 | 320 DPI | 6 to 8 pixels |
| HDPI | 72×72 | mipmap-hdpi | 1.5 | 240 DPI | 4 to 6 pixels |
| MDPI | 48×48 | mipmap-mdpi | 1 | 160 DPI | 3 to 4 pixels |
| LDPI (optional) | 36×36 | mipmap-ldpi | 0.75 | 120 DPI | 2 to 3 pixels |
| NA | 512×512 | Google Play | NA | NA | As required |
You will find a handful of Android icons used in Tek Eye projects on the Free Launcher Icons, Menu Icons and Android Graphics page, and of course many thousands more on the web.
For information on designing Android icons see the Android Icons Style web page on the Material Design web site.
See Also
- See the Tek Eye Android Studio example projects to learn Android app programming.
- For a full list of the articles on Tek Eye see the full site Index
Author: Daniel S. Fowler Published: 2018-05-06


Do you have a question or comment about this article?
(Alternatively, use the email address at the bottom of the web page.)
↓markdown↓ CMS is fast and simple. Build websites quickly and publish easily. For beginner to expert.
Free Android Projects and Samples:
Источник
How to Get App Package Name on Android [3 Methods]
In this guide, we will share three different methods to get the package name of all the installed apps on your Android device. The apps installed on your device are labeled via two different methods. The first one is the general name that you usually come across such as Facebook, WhatsApp, etc. These are the name that the everyday users deals with and searches for on Play Store.
On the other hand, there’s an associated application ID or app package name, which acts as a unique identifier for each app. For example, Facebook has the package name com.facebook.katana and WhatsApp has com.whatsapp. These are the names used by backend people and developers alike. Furthermore, while you may come across many apps on the Play Store by the name of Facebook, but none could have the com.facebook.katana as their package.
So if you have ever any doubt regarding the app’s authenticity, then you may count on this factor. With that said, how could you get hold of the package name of all the installed apps on your Android device? Well, there are three different methods for the same, and in this guide, we will make you aware of all these three approaches. So without further ado, let’s get started.
Table of Contents
Method 1: Get Android App Package Name via Play Store URL
This method is extremely easy to execute. However, if you are looking to get the name of various installed apps in one go, then it would require quite a lot of manual effort. But for a few apps, this should be your go-to method. Here’s how to use it:
On PC

- First off, head over to the Play Store website on your PC.
- Now search for the desired app (as an example, let’s go with Facebook)
- Then head over to its search bar and check out its URL, it will be something along this line:
- As an example, in the case of Facebook, the URL will be
- Now the portion after be the app’s package name. So for Facebook, it turns out to be com.facebook.katana.
So this was the first method to get the app package name via Play Store and PC. Let’s see how to try out this Play Store trick on your phone.
On Mobile
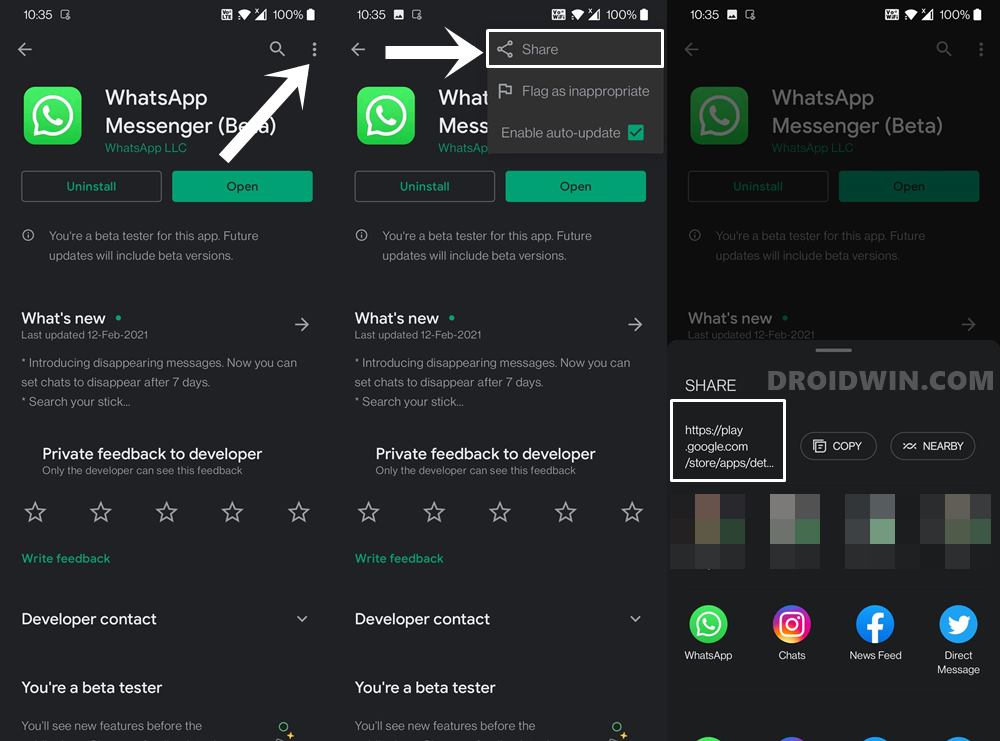
- Open the Play Store app on your device and search for the desired app (let’s say WhatsApp).
- Under the app listing’s page, tap on the overflow icon situated at the top right and select Share.
- Now just share/save this URL anywhere you wish. The URL will be of the same format as mentioned above, i.e.
- As an example, in the case of WhatsApp, the URL turns out to be
- As before the app package name will be the portion after So for WhatsApp, it turns out to be com.whatsapp.
The other method involves opening the Play Store website on your smartphone browser, changing its view to Desktop Mode, and then getting hold of the URL. With that, we round off this first method to get the package name of all the installed apps on your Android device. Let’s now turn our attention towards the other two methods.
Method 2: Get Android App Package Name via a Third-Party App
The benefit of this method is the fact that you require minimal effort. Furthermore, it is able to display both the user installed as well as system apps. The UI is also user-friendly. However, I have never been in favor of using third-party apps and giving them access to my device, unless it is of paramount importance. With that said, if you wish to try it out, then follow the below instructions:

- To begin with, download the App Package Viewer 2.0 from Play Store.
- Then launch it and select the desired app from the list.
- Now tap on that app’s name and you should get its associated package name.
That’s it. This is perhaps the easiest method to get the package name of all the installed apps on your Android device. Now let’s check out the third and final method to carry out this task.
Method 3: Get Android App Package Name via ADB Commands
The benefit of this method is the fact that apart from getting the app’s package name, you could even remove the user-installed and system-installed apps on your device via these ADB Commands. Without Root! On the flip side, this method requires a few prerequisites and some level of technicalities as well. But if you are ready to challenge your inner-geek, then this method is tailored made for you. Follow along.
- To begin with, download and install the Android SDK Platform Tools on your PC. These are the official ABD binary files provided by Google.
- Extract its content to any convenient location on your PC and you should get the platform-tools folder.
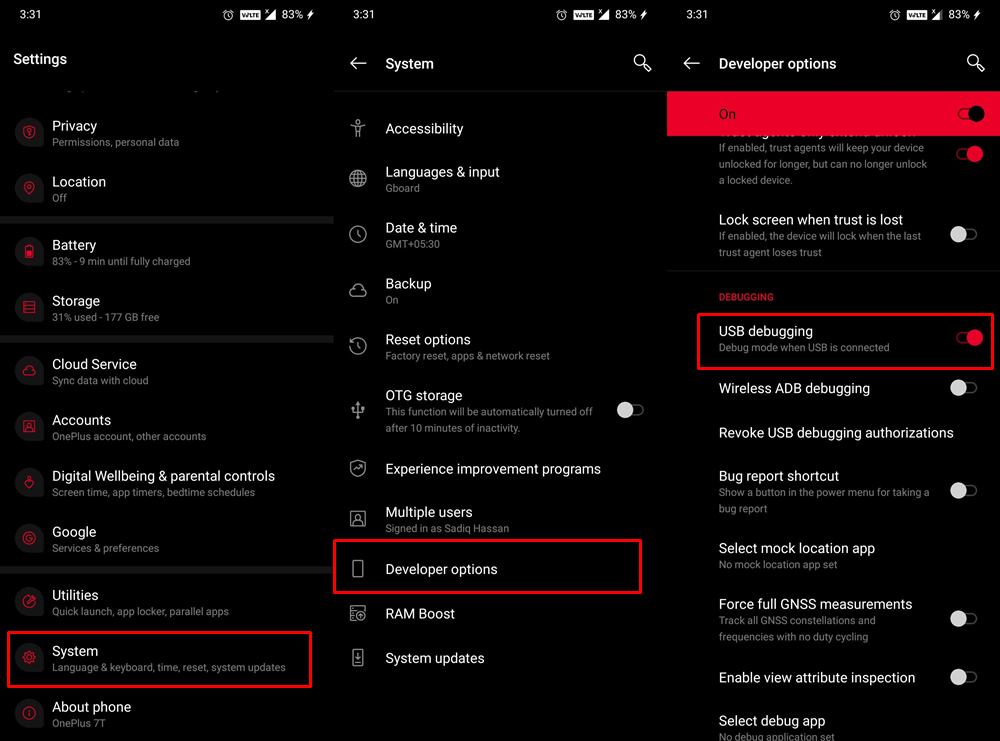
- Now head over to your Android device and enable USB Debugging. This will make your device recognizable by your PC in ADB mode. So head over to Settings > About Phone > Tap on Build Number 7 times > Go back to Settings > System > Developer Options > Enable USB Debugging.

- When that is done, connect your device to the PC via USB cable. Make sure USB Debugging is enabled.
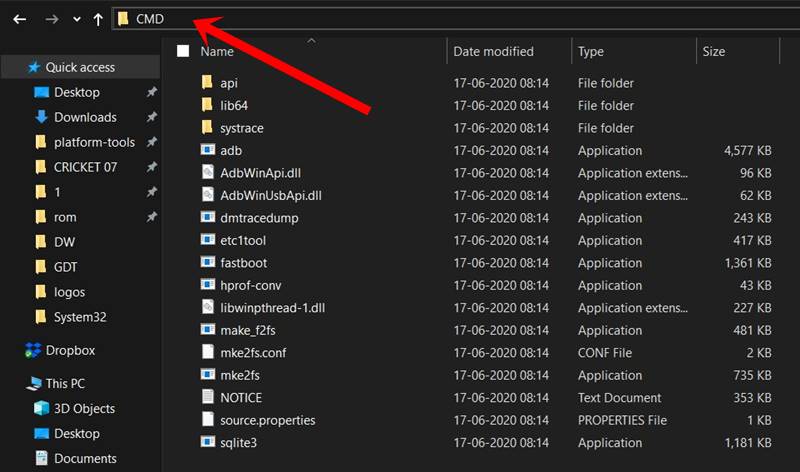
- Then head over to the platform-tools folder, type in CMD in the address bar, and hit Enter. This will launch the Command Prompt.
- Now type in the below command in the CMD window and hit Enter:
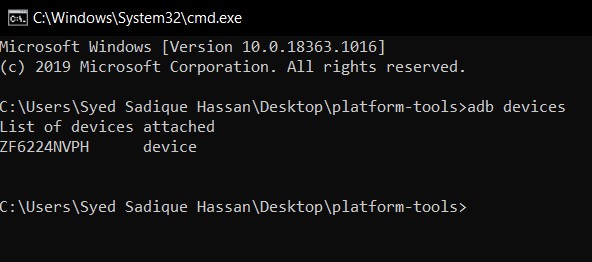


Then type in the below command and you should get a list of all the installed apps:
 List of Apps on my OnePlus 7T. View Full-Size Image
That’s it. With this, we conclude the guide on how to get the package name of all the installed apps on your Android device. We have shared three different methods for the same, do let us know in the comments which one you ultimately settled for.
About Chief Editor
Sadique Hassan
A technical geek by birth, he always has a keen interest in the Android platform right since the birth of the HTC Dream. The open-source environment always seems to intrigue him with the plethora of options available at his fingertips. “MBA by profession, blogger by choice!”
Источник


