- Настройка подключения VPN на Mac
- Импорт файла настроек VPN
- Введите настройки VPN автоматически
- VPN для iPhone
- Организация VPN сервера для использования с iOS устройствами
- Как вернуть PPTP соединение (VPN) в macOS?
- PPTP соединение в macOS
- Как в Shimo настроить PPTP соединение?
- Get Better VPN
- FlowVPN provides an unlimited VPN service for all your devices.
- Flow VPN PPTP Mac Client
- Download Flow VPN Connect (2.13)
- How to: Setup VPN on an Apple Airport Extreme
- Wait what? Setup a VPN on my router, but why?
- How to Use a VPN Router with Apple Airport Extreme
- Dual-Router Setup
- Two Simultaneous Network Connections
- Extend Wireless Coverage
- Router Requirements for VPN
- Manually Flash Firmware
- Purchase a Pre-Configured Router
- Do Apple routers support VPN?
Настройка подключения VPN на Mac
Чтобы подключиться к сети VPN, необходимо ввести настройки конфигурации на панели «Сеть». Эти настройки включают адрес сервера VPN, имя учетной записи и другие параметры идентификации, такие как пароль или сертификат. Обратитесь к сетевому администратору организации или поставщику услуг VPN за информацией о настройках, которые Вам необходимо ввести для подключения к VPN.
Если Вы получили файл настроек VPN от администратора сети или поставщика услуг VPN, можно импортировать его для настройки подключения. Если нет, то настройки можно ввести вручную.
Импорт файла настроек VPN
На Mac выполните одно из следующих действий.
Дважды нажмите на файл, чтобы открыть настройки сети и автоматически импортировать настройки.
Выберите меню Apple

> «Системные настройки», нажмите «Сеть»  , нажмите всплывающее меню «Действия»
  , затем выберите «Импортировать конфигурации». Выберите файл, затем нажмите «Импортировать».
Введите настройки VPN автоматически
На Mac выберите меню Apple
> «Системные настройки», затем нажмите «Сеть» .
Нажмите кнопку «Добавить»  в списке слева, нажмите всплывающее меню «Интерфейс», затем выберите «VPN».
Нажмите всплывающее меню «Тип VPN», затем выберите тип VPN-подключения, который Вы хотите настроить, в зависимости от сети, к которой Вы подключаете компьютер. Присвойте имя службе VPN, затем нажмите «Создать».
Протокол L2TP — это расширенная версия протокола PPTP, который используется интернет-провайдерами для поддержки VPN через интернет.
Протокол IPSec (Internet Protocol Security) является набором протоколов безопасности.
IKEv2 — это протокол, который настраивает сопоставление безопасности в IPSec.
Введите адрес сервера и имя учетной записи для VPN-подключения.
Нажмите «Настройки аутентификации», затем введите информацию, полученную от администратора сети.
Если Вы получили соответствующие указания от администратора сети, нажмите «Дополнительно» и введите дополнительную информацию, такую как параметры сеанса, настройки TCP/IP, DNS-серверы и прокси.
Дополнительная информация, которую Вы можете ввести, зависит от типа настраиваемого VPN-подключения.
Нажмите «Применить», затем нажмите «ОК».
Выберите «Показывать статус VPN в строке меню», чтобы использовать значок статуса VPN для подключения к сети и переключения между службами VPN.
Для удаления конфигурации VPN выберите службу VPN в списке сетевых служб и нажмите кнопку «Удалить»  .
.
Источник
VPN для iPhone
Организация VPN сервера для использования с iOS устройствами
Прочитав статью Теплый и ламповый интернет озаботился проблемой поднятия VPN сервера, которым можно пользоваться с iOS устройств.
Для использования OpenVPN нужен Jailbreak. Этот вариант мной не рассматривался.
iOS поддерживает L2TP, PPTP, Cisco IPSec.
Cisco IPSec работает с соответствующим оборудованием. PPTP иногда режется сотовыми операторами. Исходя из этого был выбран L2TP.
У меня уже был VQ7 сервер от Hetzner с установленной Ubuntu 12.04 32 bit, поэтому все эксперименты проводились на данном сервере.
Установка IPSec
При установке будет предложено создать сертификат x509. Это не обязательно, так как доступ будет использоваться по ключевой фразе.
Настройка IPSec:
Конфигурация выглядит следующим образом:
Конфигурируем доступ к серверу по IPSec:
Файл должен содержать одну строчку:
Ссылка на pre-shared ключ должна быть удалена, иначе IPSec не сможет инициализироваться.
YOUR.SERVER.IP.ADDRESS в обоих файлах — IP адрес вашего сервера.
%any в /etc/ipsec.secrets определяет с каких адресов может быть доступ. В данном случае разрешается доступ со всех адресов.
YourSharedSecret — ключ, который будет использоваться для доступа по IPSec.
Для того, чтобы IPSec нормально работал, делаются дополнительные настройки:
Первые две строчки на самом деле используются для L2TP
Делаем скрипт исполняемым:
Добавляем его в rc.local
Установка L2TP:
Настройка L2TP:
test — имя пользователя
l2tpd — имя сервиса из /etc/ppp/options.xl2tpd
testpassword — пароль для пользователя
* — диапазон разрешенных адресов для логина данного пользователя (формат 10.254.253.128/25)
После этого рестарт IPSec и L2TPD должны активировать всю систему:
Настройка iPhone:
Настройки > Основные > VPN > Добавить конфигурацию VPN. 
Описание — Имя подключения
Сервер — IP адрес вашего сервера
Учетная запись — это user из файла /etc/ppp/chap-secrets
Пароль — password из /etc/ppp/chap-secrets
Общий ключ — YourSharedSecret из /etc/ipsec.secrets
После этого в меню Настройки и в меню Настройки > Основные > VPN появляется возможность включить VPN. Если все пройдет успешно, то появится соответствующий значок.
VPN надо будет включать вручную, при каждом использовании.
Настройка подключения в Windows 7
В центре управления сетями и общим доступом, установка нового подключения к сети создание нового подключения:
Создаете новое VPN подключение:

В поле “интернет адрес” вводите IP вашего сервера. Не подключаетесь сразу.
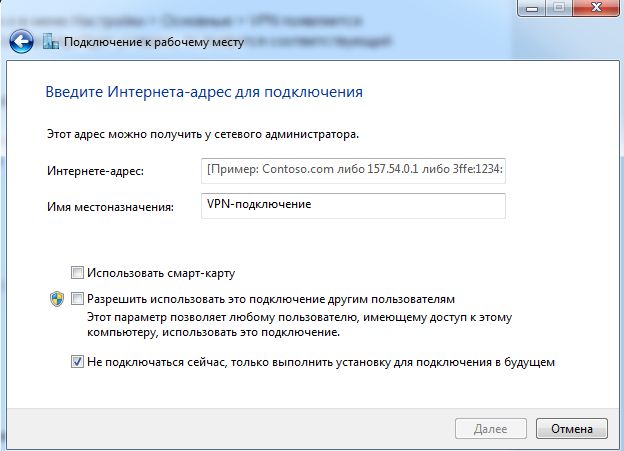
После этого заходите в свойства нового подключения и в настройках указываете использование L2TP, вводите ключ YourSharedSecret из /etc/ipsec.secrets
При подключении указываете логин и пароль из /etc/ppp/chap-secrets.
При написании статьи были использованы материалы ссылка1, ссылка2
Источник
Как вернуть PPTP соединение (VPN) в macOS?
Не смотря на безупречную работу macOS, иногда ее разработчики действуют кардинально и убирают очень полезные функции и возможности, например — PPTP соединение. О том как вернуть его обратно мы подробно расскажем в этой статье!
На данный момент существует масса возможностей создания собственного VPN сервера для безопасного пребывания в сети интернет, одним из самых популярных видов соединений является PPTP подключение. Основным плюсом данного подключения является его стабильность, настраиваемость, высокая совместимость. PPTP подключение поддерживают все смартфоны Android, Linux, Windows и до не давних времен macOS и iOS…
В последних версиях операционных систем от Apple было удалено PPTP соединение, в связи с его недостаточной безопасностью. Обновив ОС на своих mac компьютерах, iPhone и iPad, многие были сильно огорчены отсутствием данного подключения и не могли найти решения. Так как вернуть PPTP подключение обратно в систему? Вот решение этой проблемы:
PPTP соединение в macOS
Для того, чтобы вернуть соединение PPTP обратно в Mac, вам понадобится специальный клиент VPN под названием Shimo. К сожалению, программа не бесплатная и ее стоимость составляет €49, но есть возможность использования полнофункциональной версии (trial), без каких либо ограничений, на протяжении 30 дней. Скачать программу можно на данной официальной странице.
Как в Shimo настроить PPTP соединение?
- После установки Shimo, запустите программу и перейдите в ее настройки (Preferences)
- Далее перейдите во вкладку Accounts и добавьте новое подключение

- Выберите PPTP/L2TP подключение
- Внесите настройки подключения
- После добавления, данные сохранятся и PPTP подключение можно выбрать для использования
- Для быстрого подключения к VPN, на панели выберите иконку Shimo и выбрать созданное соединение


Способ достаточно легкий, ваша проблема решена и теперь на вашем любимом Mac есть доступ к PPTP соединению.
У вас остались еще дополнительные вопросы? Пишите их в комментариях, о том что у вас получилось или наоборот!
Вот и все! Оставайтесь вместе с сайтом Android +1, дальше будет еще интересней! Больше статей и инструкций читайте в разделе Статьи и Хаки Android.
Источник
Get Better VPN

FlowVPN provides an unlimited VPN service for all your devices.
We manage a network of hundreds of servers across 88 locations in 50 countries to secure and speedup your Internet connection. Get a free trial now to secure yourself with a provider that is constantly investing in new services and technology. FlowVPN provides VPN clients for macOS, iOS, Windows and Android – just download and click connect.
We support IPSec, L2TP, PPTP, IKEv2, OpenVPN and our own SSH VPN service. Get our apps from the App Store or www.flowvpn.com/sign-up
Flow VPN PPTP Mac Client
FlowVPN Connect provides an alternative method of connecting to our services using the PPTP protocol. Connect to PPTP VPN services on macOS Sierra using this client.
This client can help you connect on networks where normal IPSec connections don’t work. If you would like our normal macOS VPN app supporting IPSec, OpenVPN and SSH VPN download it here
By creating a secure tunnel using the SSH protocol this client encapsulates all VPN connections in SSH hiding your traffic and keeping your personal information private.
This client also supports PPTP VPN connections on macOS Sierra.
Download Flow VPN Connect (2.13)
 Download Flow VPN Connect (2.13)
 Enter the VPN Username and Password from your client area – this is not your account password
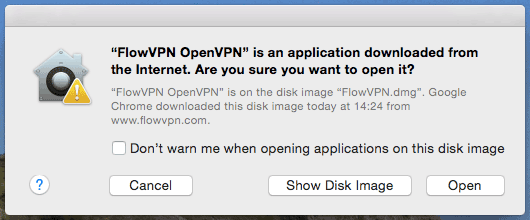
1. Open the downloaded .dmg file and double-click the Go OpenVPN icon to install the application

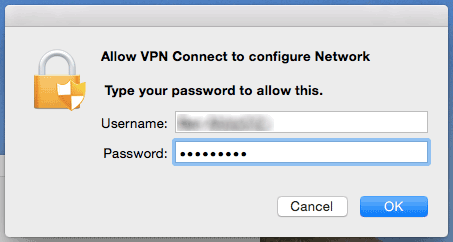
2. Open Go OpenVPN. You’ll be asked to enter your Mac user password.
3. Accept the warning:
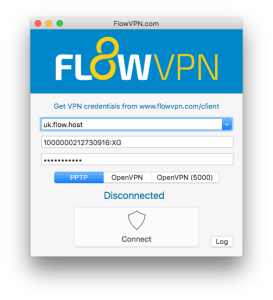
4. Choose a server from the drop-down menu and enter your FlowVPN account name (probably your email address) and your VPN password. Please note that this isn’t the password you use to log into the FlowVPN website – you can find your VPN password in your FlowVPN client area .
5. Select PPTP or OpenVPN.
6. Click ‘Connect’!
7. To change servers at any time, simply select a different one from the drop-down menu in Go OpenVPN before you connect.
Источник
How to: Setup VPN on an Apple Airport Extreme

If you’re a mac user or just fancy Apple hardware, than you may be currently using an Apple Airport Extreme, or Time Capsule as your router of choice. The Airport Extreme is a powerful all in one box that makes setting up a network, especially with Mac and iOS devices, a breezy, enjoyable process.
But what if you wanted to add a VPN service to your Airport? Maybe you want to secure your browsing, access geo-restricted services like Netflix, or any other reason. This is where the simplicity of the Airport’s design and software falls short. It does not provide the required platform to configure popular VPN services in order to encrypt all data flowing across the router. Although there is a VPN tab under the GUI, it only allows you to connect to a single private network point, such as connecting to a business network for work, as opposed to popular VPN encryption services. Additionally, you’re limited to unsecure PPTP/L2TP protocols, with no option to add OpenVPN.
Luckily, there’s still a way to do it, with a dual-router setup configuration. Simply put, you need to run a second third-party router dedicated for VPN, side-by-side the Airport Extreme, since it’s impossible to easily set it up on Apple’s firmware.
Wait what? Setup a VPN on my router, but why?
When it comes to new VPN users, Airport Extreme users or not often get confused with all the options and configurations possible. Since VPN services are most often suggested to be used over OpenVPN, or the provided software when available, setting up a VPN connection directly on the network router can be something new. If this is not new to you, quickly skip to the next section.
There’s mostly big advantages, and some disadvantages to watch out for;
The good thing is that you can encrypt ALL your devices at once, with one single VPN connection and account, by configuring it on your router. It will encrypt both wired LAN and Wi-Fi connection data, giving them all a single IP and country of your choice. This is a cost effective way for users that have a large number of devices. Many networks can end up having multiple management benefits from this type of setup, and it’s easy to ensure everything is encrypted at all times.
The main drawback is that you can no longer select different IP and countries for each device. Since all the traffic passes through that VPN encryption, there’s no way around it for all devices connected to the network. But there is a simple solution, that just so happens to be perfect for Airport Extreme and Time Capsule users, which is to setup a secondary router to handle all VPN connections, and the Airport can remain the open access point. This dual-router setup negates pretty much every con, and in turn makes your home or office network a powerhouse with possibilities you didn’t know existed.
The last negative that should be mentioned, is the possible loss of speed across the whole network. Many VPN connections can take some bandwidth away from your total speed, but luckily, many top providers offer blazing fast servers and shorter routes than conventional ones used by internet service providers, helping speed up the connection in some areas and applications, or at least keeping it on par with minimum speed loss. But, once again, a dual router configuration allows the best of both worlds.
How to Use a VPN Router with Apple Airport Extreme
First, let me explain that even regular home grade branded Wi-Fi routers are mostly incapable of setting up popular VPN services on them out of the box, however, users often get around this limitation by replacing the firmware to a much better option of available open-source GUIs available. However, before I delve any further into that topic, let’s just be clear that it is not possible to do this on an Apple device. They operate strictly on apple software and firmware, so this is once again where the dual-router bridging comes in;
Dual-Router Setup
 Dual-Router Setup
As mentioned above, it’s not possible to flash an Airport or Time Capsule, and would not only void your expensive Apple warranty, but also remove all the apple compatible quirks offered with their software. Instead, using a second VPN capable network router behind or parallel with the Apple Airport is the way to go.
The Airport has native support for “bridging”, which allows you to turn the router portion off from the the Network tab, turning the device into a switch. This is one way of connection the Airport to a second router, while bypassing Apple’s firewall, but negates all the networking capabilities of your router.
Instead, I highly suggest you place a switch between your broadband ISP modem and your two routers. The topology goes like this;
Internet Modem –> Ethernet Switch –> Switch Port 1 –> Airport Extreme
–> Switch Port 2 –> VPN Router
With a little bit of luck, your internet provider might have updated modems with multiple LAN ports, negating the need to add a switch hub to the mix.
Connecting a second router creates a two separate networks. This adds a multitude of benefits, and creates two separate networks for you to utilize effectively.
Two Simultaneous Network Connections
Having two network routers virtually providers you two separate connections. Leaving your Airport running directly on your home ISP service, and utilizing the second router as a dedicated secure VPN gateway. This is great for both home and business use. You can have the encrypted side unlocking various online services while securing your data, and have the Apple Airport or Time Capsule on an open connection for everyday tasks. Or, using the VPN router as a secure home/small office business network. The applications are endless, but the value is that you’re not stuck having to constantly reconnect to VPN servers, instead quickly switching from one connection to another.
Extend Wireless Coverage
When Wi-Fi is a need, poor performance quickly becomes a problem. Instead of adding Wireless repeaters and extenders, this secondary router can be placed in a different location, to immediately add coverage to needed areas and rooms of the house or office. You’re also taking advantage of two different access points, reducing the load on each individual router, and facilitating setups for guest Wi-Fi connections.
Router Requirements for VPN
In order to run a VPN connection through any consumer grade router, you’re most likely going to need to “flash” the firmware to one of the follow options: DD-WRT and variant builds, or Tomato. Both are very popular options to not only open up VPN capabilities for client/server connections, but revamping and supercharging your router’s capabilities and performance. Flashing firmware is not very hard, but it’s not exactly easy either. It does come with a learning curve, and a fair share of research to ensure your selected device is compatible with a given firmware. First – let’s list the most popular VPN capable firmwares available, to better assess our options;
DD-WRT: Most popular and feature rich third-party firmware.
- Can be flashed manually on a long list of compatible devices.
- Can be purchased pre-configured from Buffalo routers.
- Can be purchased pre-configured from specialized shops: Flashrouters or Routersource.
ASUSWRT: Latest native Asus GUI firmware based off DD-WRT – stripped down for performance.
- Includes VPN service capabilities – no changes needed.
- Can be purchased on any of the latest best Asus Routers.
- Can still be flashed to improved Asuswrt-merlin or DD-WRT.
TOMATO: Second most used after DD-WRT. Just as good if not better – balanced features and performance.
- Can be flashed manually on a sizable list of compatible devices
- Can be purchased pre-configured from specialized shops: Flashrouters or Routersource.
Manually Flash Firmware
Flashing the “firmware” is the term used when talking about replacing the native GUI firmware with another one of your choice, and it sounds more complicated than it really is, but still remains a bit more advanced than just downloading software and installing it, and if done wrong, it can cause irreparable damage to the device. It should also be known that flashing a brand new router will usually be against warranty agreements and void claims. But overall, I don’t want to stress over that stuff, this isn’t an expensive iPhone and your router can do so much more with the right software running it!
For anyone that is totally new to this, I would first suggest to read more on the different third-party open-source firmware options available, such as; DD-WRT & Tomato. Either make a great choice for any home grade router, instantly turning into a secure, high-grade customizable router, comparable to commercial grade firewalls that cost hundreds to thousands of dollars. Manually flashing your device brings many benefits regarding advanced controls, easily improving Wi-Fi quality and extending the reach, better bandwidth control and of course, adding a VPN service directly on the router. This router can now be used in conjunction with your Aiport Extreme or Time Capsule, in order to provide an open and secure network simultaneously.
In the end, this may prove to be too technical for some users, but where there is a need, there’s always help and solutions around the corner. So, if technology, routers, networks and setting up advanced computer parameters are not your thing, what do you do?
Purchase a Pre-Configured Router

Flashrouters.com offer the convenient option of a professionally pre-configured device of your choice, on either DD-WRT or Tomato, and even go as far as offering you to purchase VPN integration from a few different providers along with the router itself, that way even the VPN part comes pre-configured. Now you can have the best of both worlds, routers with enhanced software can act in a dual router setup. So you can use your Airport for traditional use & the flashrouter for more advanced things such as VPN. While this option does involve the extra step of buying certain hardware it assures you that you’ll have hardware that is already configured with the custom software you need.
It may seem like a big step in price, but you’re paying for peace of mind that you’re getting the best pre-configured wireless router on the market, specifically programmed to work in conjunction with your Airport or Time Capsule, with seamless integration that allows you to switch between networks at the touch of a button. They even go thoroughly into the dual-router Aiport setup here. the The team at Flashrouters also goes above and beyond at providing stellar support over the phone, to help you with every difficulty you may face when connecting everything up at home. So if you’re not very techy, and don’t know any network technicians willing to help you out, this is by far your cheapest, yet most valuable option. If you’re feeling adventurous, I highly suggest checking our more on DD-WRT or Tomato, finding a compatible model, and going at it yourself. Either way, it’s time to get more out of your home network setup, and this is a great first step.
 An alternative choice is Routersource.com. Just like Flashrouters, they offer pre-configured flashed models and specialized networking services, but instead of having DD-WRT and Tomato options, they have DD-WRT and Sabai OS. What is Sabai? Well, it’s a firmware developed specifically for VPN setups, and performs well under heavy loads. The whole firmware is designed to make OpenVPN protocol connections easy, as either client or server, and providing the best possible speeds and stability on encrypted data.
 If those options are not the right ones for you, you can always opt for one of Buffalo’s 3 latest DD-WRT routers. That’s right, Buffalo now providers DD-WRT Firmware right out of the box on 3 of their most popular models. With 3 different entry level units, there should be a model to please just about every need and budget. Since the past year, Buffalo has revised these models and the second-gen routers perform better than ever.
Lastly, you can opt for an ASUS powered network using Asuswrt, or flash to DD-WRT firmware on your own – find the best models for either of these options on our best network routers for DD-WRT page.
Do Apple routers support VPN?
No AirPort routers support VPN. AirPort base stations can be used as VPN-passthrough devices but you would need a dedicated VPN server/router on your local network that can be accessed from a VPN client app on the remote device.
Источник


