- Spiced apple muffins with honey butter
- What apples to use for muffins?
- How long to bake muffins?
- Can you freeze muffins?
- How to Make Honey Apple Butter
- Make Apple Butter in the Crockpot Using Honey
- Does Apple Butter Contain Butter?
- Ingredients:
- Honey Apple Butter in the Crockpot Step by Step
- Honey Apple Butter In the Crockpot
- Equipment
- Ingredients
- Instructions
- Video
- Notes
- Nutrition
- Special Tips for Making Homemade Apple Butter
- What Can You Do With Apple Butter?
- Storing Your Honey Apple Butter
- Girl Meets Farm
- Ingredients
- Directions
- Apples and Honey Babka
- Apples and honey babka ingredient notes
- how to make apples and honey babka
- Passing the windowpane test
- The first babka dough rise
- Easy apple butter filling
- Assembling and shaping your apples and honey babka
- twisting your apples and honey babka
- How to make a round spiral babka
- The final round babka rise
- Baking your apples and honey babka
- The honey icing drizzle
- Apples and honey babka FAQ
Spiced apple muffins with honey butter
These easy, healthy-ish apple muffins spiced with cinnamon, ginger and all spice served with honey butter are a delicious fall breakfast or snack.
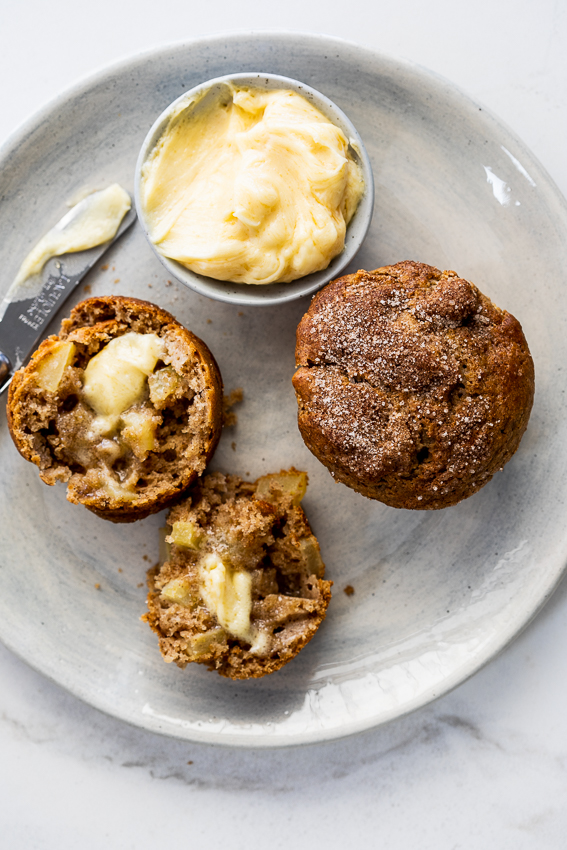
I’m not going to beat around the bush. These muffins are BOMB! They are stuffed to the brim with juicy, sweet chunks of apple and spiced with all the warming spices you want during fall. Cinnamon, ginger, vanilla and all spice all make an appearance. Yes please!
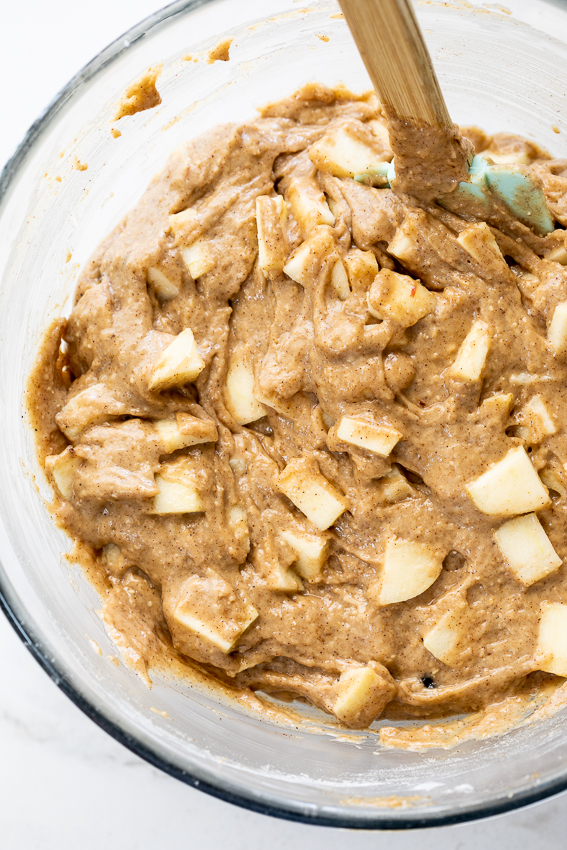
I love having muffins in the house for grab-and-go breakfasts and easy, healthy snacks. These apple muffins are healthy-ish. They are made with a combination of white flour and oat flour. I like the combo of these two as the white flour gives the muffins structure and the oatmeal flour adds fiber and a little texture. You could totally sub in whole wheat flour if you prefer. Instead of butter, I like using canola oil and plain yogurt to add moisture to the muffins.
And to finish? Only the most delicious honey butter that is so delicious, I could eat it on its own. Slathered onto a warm apple muffin though? Get ready to fall in love friends.
What apples to use for muffins?
I prefer using crisp, juicy and slightly tart apples for any baking. Granny Smith, Honeycrisp and Pink Lady (Cripps Pink) apples are some of my favorites. Peel the apples and then cube them before folding into the muffin batter. You could also grate them if you prefer a finer texture.
How long to bake muffins?
Muffins should take approximately 15-20 minutes to bake in an oven that has been preheated to 180°C/350°F. You can test if muffins are done by inserting a toothpick. If it comes out clean, the muffins are done.
Can you freeze muffins?
Muffins freeze very well. Allow baked muffins to cool completely then transfer to an airtight, freezer safe container or freezer bag. Freeze for up to 3 months. Allow to thaw completely before serving. These muffins can be stored at room temperature in an airtight container for up to 3 days.
Источник
How to Make Honey Apple Butter

The aroma is as enticing as the flavor when you are making honey apple butter. How much natural goodness can you fit on a spoon? This recipe is easy to make and uses a crockpot instead of you having to stand over the stove for hours. A great way to incorporate honey into your diet.

Make Apple Butter in the Crockpot Using Honey
As a child, I always loved the time of year when my Granny made apple butter. Living near the South Carolina mountains, several trips to the apple orchards near Hendersonville, NC were annual events.
May contain affiliate links. Read my privacy and affiliate disclosure policy for more info.
The scent of cinnamon, nutmeg and apples permeated the whole house. And Granny would spend hours stirring that large pot of cooking apples.
She didn’t have a crockpot to help make the job much easier. But thankfully, today we have that option.
Does Apple Butter Contain Butter?
No, apple butter does not contain any butter. Instead this term is used to refer to the buttery consistency of the spread. In fact, there are many different fruits you can use to make butter spreads.
Ingredients:
- apples
- honey
- brown sugar
- cinnamon
- nutmeg
- cloves
- vanilla flavoring
- water
Apples: In making apple butter, you have several choices when it come to apple selection. Of course avoid any rotten fruit or any that are not ripe. Otherwise, a mix of sweet and tart create a nice flavor.
Honey: Choose any raw honey – you knew I was going to recommend raw right? Raw honey is straight from the hive – just like the bees made it.
Any good quality brown sugar and spices will perform well. Make sure they are fresh and haven’t been in storage for years.
Honey Apple Butter in the Crockpot Step by Step
Take the drudgery out of cooking homemade apple butter and let your crockpot do the tedious work. Some apples, a little honey and a few spices and you are ready to go.
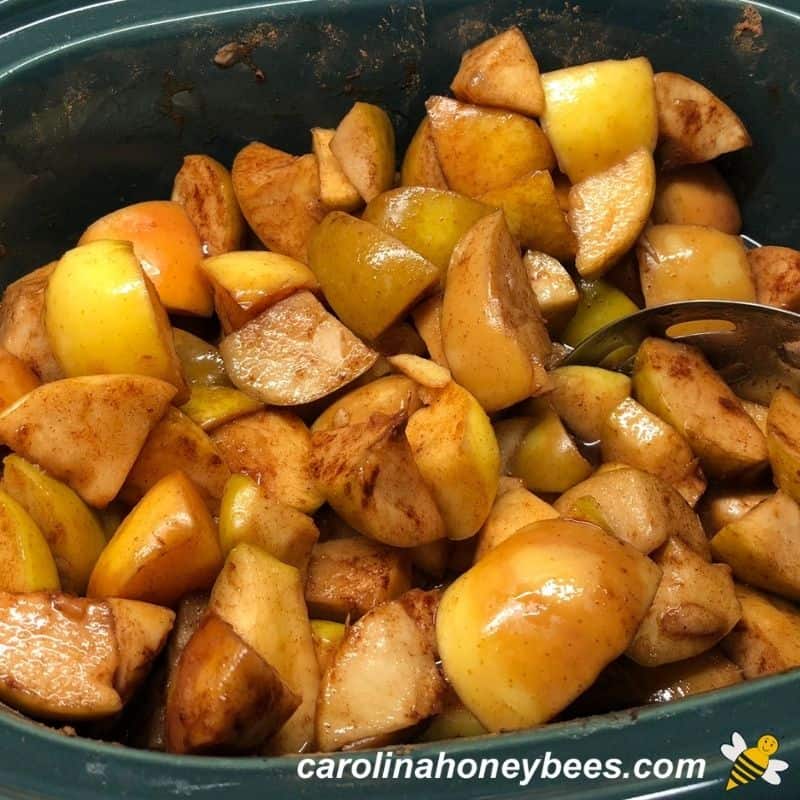
First, prepare your apples. Always wash apples, who knows where they have been and what germs may lurk on the surface. To peel or not to peel? That’s your choice. But do cut them into large chunks and discard any seed.

Place apple chunks, honey and all other ingredients into your crockpot but only 1/2 cup of water. Use a large spoon to stir the apples so that all are coated with the liquid.
You can add small additional amounts of water during cooking if the mixture seems too thick. I usually do not have to use more than the 1/2 cup. Let cook on low for 8-9 hours.
After the crockpot has completed the tedious work of tenderizing your apples, it’s time to blend things up. There are many ways to do this including the old fashioned food mills or a blender.
If you have an immersion blender, they make quick work of the job and you can blend right in the crockpot. A food processor works well – it is just a little bit messier-but gets the job done.

Spoon honey apple butter into small containers with tight fitting lids. It will keep for up to 3 weeks in the refrigerator.

Honey Apple Butter In the Crockpot
Use your crockpot to create this easy recipe for honey apple butter and you wont spend the whole day standing over the stove.
The wonderful aroma will make you want to hurry the process but don’t. The sweet spicy apple butter will be worth the wait.
Equipment
Ingredients
- 5 pounds apples any type but mix of sweet and tart is good
- 2/3 cup honey
- 2/3 cup brown sugar
- 2 tablespoons cinnamon
- 3/4 teaspoons nutmeg
- 3/4 teaspoons cloves
- 1 1/2 teaspoons vanilla flavoring
- 1/2 – 1 cup water
Instructions
Video
Notes
Nutrition
Want to Learn More About Bees and Everything Honey? Join me on Instagram
Special Tips for Making Homemade Apple Butter
The moisture content of the apples used can vary. That’s why I suggest that you add only a small amount in the beginning. Your recipe will thicken after cooking when it cools.
However, even at 1/2 cup of water, I wanted my honey apple butter to be a bit thicker. I transferred it to a saucepan and heated it on the stove for just a bit.
What Can You Do With Apple Butter?
Honey Apple Butter can be used in many ways. This delicious spread can be used on toast, bagels or even in a sandwich to add a bit of special flavor.
It can also be used as a side dish on its own or as part of a marinade in some styles of cooking. My family enjoys eating it with scrambled eggs!
If you have a little extra time, you might try my Honey Blueberry Scones with a bit of your homemade apple butter.
Storing Your Honey Apple Butter
Your fresh apple butter will keep in the refrigerator for several weeks in a tight sealing container – if you don’t eat it up sooner.
However, maybe you would like to have some on hand for another time – when you may not have time to cook.
One way to store your special apple spread is to freeze it in small containers. Then you can remove small portions at a time.
The other option is to preserve the apple butter using the boiling water canning method. This is a great option if you would like to give small jars of homemade honey apple butter for gifts!
This is what I do when I make this recipe. Those canned jar come in really handy and it is not hard to do.
Using honey in your recipes is a great way to add it in your diet – especially for those of you who may not enjoy the taste of honey alone.
The sweetness of the final product will depend somewhat on the apples you use. I find this recipe not too sweet but my husband loves it just like this as he says the flavor of the apples is not overwhelmed.
Making honey apple butter is a great way to use up apples that you may have on hand-before they spoil. And, what a tasty way to be frugal. Anyone wanting a homemade gift? Yes, please.
Master Beekeeper, Charlotte Anderson shares her love of all things honeybee. She helps others become better beekeepers and teaches new beekeepers how to get started. Her mission is spreading awareness of the importance of honey bees. She is a former Beekeeper of the Year in South Carolina.
Источник
Girl Meets Farm

Ingredients
1 cup (236 mL) almond milk or dairy milk, warm (105 to 110°F)
2 ¼ tsp active dry yeast
¼ cup (50 g) plus 1 tsp sugar
1 tsp ground cinnamon
1 tsp kosher salt
Pinch ground cardamom
4 ½ cups (585 g) all-purpose flour, plus additional for dusting
½ cup (100 g) flavourless oil, plus additional for oiling the bowl
1 tsp vanilla extract
Nonstick cooking spray, for the baking dish
¾ cup apple butter (store-bought or homemade)
1 tsp ground cinnamon
6 oz almond paste, grated on the big holes of a box grater or finely chopped
1 ½ cups blanched almonds
1 tsp almond extract
¼ tsp kosher salt
Zest from 1/2 lemon
6 Tbsp almond milk
Toasted sliced almonds, for topping
Directions
1. Combine the milk, yeast and 1 teaspoon sugar in a bowl and swirl together. Let sit until foamy on top, about 5 minutes.
2. Combine the cinnamon, salt, cardamom and 3 1/2 cups flour in a large bowl or the bowl of a stand mixer fitted with the dough hook. Whisk together the eggs, oil, honey and vanilla in a medium bowl. Stir the yeast mixture and oil mixture into the dry mixture and then knead, either on a work surface or with the dough hook, adding up to 1 cup more flour as needed, until the dough is smooth and slightly sticky, 15 minutes by hand and 7 to 10 minutes by mixer. Place in an oiled bowl, cover with plastic wrap and let rise until doubled in size, 1 1/2 to 2 hours.
1. Spray a 9-by-13-inch baking dish with cooking spray and set aside.
2. Turn the dough out onto a clean surface and roll it out, dusting with flour as needed to prevent sticking, into an 18-by-12-inch rectangle. Spread it with the apple butter and sprinkle with the cinnamon and almond paste. Roll up tightly starting from a long end (so that it results in an 18-inch-long roll), and pinch the edges to seal. Cut into 12 rolls and place in the prepared baking dish. Cover with plastic wrap and refrigerate overnight. (Or cover loosely with plastic wrap and let rise at room temperature for 1 hour, then go right to preheating the oven.)
3. When ready to bake, remove the rolls from the refrigerator and loosen the plastic wrap. Let sit at room temperature until puffy, 1 to 2 hours.
4. Preheat the oven to 350°F.
5. Beat the egg with a splash of water in a cup. Remove the plastic wrap from the baking dish and brush the rolls with the egg wash. Bake until the rolls are lightly browned and have an internal temperature of 190°F, 35 to 40 minutes.
1. Meanwhile, blend the blanched almonds in a food processor, scraping the sides occasionally, until creamy and spreadable, 5 to 10 minutes. Add the honey, almond extract, salt and lemon zest and continue to blend (it may clump together at this point, and that’s okay) as you drizzle in the milk. Blend until creamy. (This can be made the day before and stored in an airtight container in the fridge.)
2. When the rolls come out of the oven, spread them with the frosting, sprinkle with the sliced almonds and serve.
Источник
Apples and Honey Babka
Published: Aug 31, 2021 by Rebecca · This post may contain affiliate links

Just in time for Rosh Hashanah, this round, braided apples and honey babka is packed full of apple butter and drizzled with a honey icing.
Traditionally, on Rosh Hashanah (the Jewish new year) you dip apples in honey, and eat a round challah to symbolize the start of a new calendar cycle. This round coiled apples and honey babka combines all three of those things in one sticky, ooey-gooey, sweet dessert bread.
Whether you’re kicking off the High Holy Days or just want to really wow your friends at brunch, your search for the perfect recipe ends here. This apples and honey round babka is it.
UPDATED 8/2021 — I’ve given this recipe a fairly massive post-pastry school update. I retested the recipe and reworked the dough to make it MUCH simpler, easier, and less messy to handle, shot all new photos, simplified the filling, and added a lot more info and a more robust FAQ section. How’s that for a shanah tovah?
![]()
The filling for this apples and honey babka is super simple — a store-bought apple butter slightly dressed up with a bit of honey and cinnamon. Finely minced apples add a nice bit of sweetness and crunch.
Honestly, the trickiest part of the whole babka-making process is the twisting and coiling when it comes time to shape. Fair warning: Things will get messy. (But less messy than the original version of this recipe did!).
I do recommend knowing what plate or serving platter you want to use before you start baking, because once you take this apples and honey babka out of the oven you really don’t want to have to move it too much. If you’re particularly mess-averse, I did include instructions for how to bake this in a loaf pan instead of as a spiral.
This dough has two long rising periods and needs to cool completely before you add the honey drizzle, so I recommend making this over a two or three day period. Make the dough one day, shape and bake it the next, then add the icing drizzle shortly before serving. You can rush it a bit, but if you have the time to space it out, you should.

Apples and honey babka ingredient notes
Here’s what you’ll need to make this apples and honey babka!
- All-purpose flour — Bread flour will also work here.
- Salt — I use diamond crystal kosher salt. If you use a different brand and measure your salt with measuring spoons, use half as much.
- Honey — I used Local Hive Honey’s New England honey for this. Any honey you like best is fine. The honey is used in the icing drizzle but also functions as sugar in the dough!
- Instant yeast — Also called «rapid rise» or «quick rise» yeast. If you only have active dry yeast, use 7 grams (2¼ teaspoons aka one packet) instead. I use SAF instant yeast.
- Cinnamon — I really like Vietnamese Cinnamon (aka Saigon Cinnamon) for its stronger flavor, but any ground cinnamon is fine.
- Nutmeg — Freshly grated on a microplane is always best. I get my whole nutmeg Spicewalla where a small tin will last you literally for years.
- Eggs — Large eggs.
- Whole milk — Lukewarm or slightly warm, but not hot.
- Unsalted butter — You’ll need one stick for the dough, and 1 tablespoon for the icing. Make sure the butter is at a true room temperature for both. Room temperature butter should be soft and spreadable, but not melted. You should be able to easily press a finger into it and make an indent.
- Apple butter — Look for unsweetened apple butter, but whatever you can find at your local grocery store is fine.
- Apple — A crisp, firm apple like a pink lady, Cosmic Crisp, honey crisp, green apple works best. Avoid anything soft or mealy in texture like macintosh or red delicious.
- Powdered sugar — For the honey glaze.

how to make apples and honey babka
Babka dough is a brioche dough, which means it’s enriched with butter, milk, and eggs. The butter is added last because it’s a fat, and if you include it from the start, it will coat the flour and other ingredients and make it harder for them to absorb the milk.
- Mix the dough [2 to 3 minutes] — Mix all of the ingredients except butter with a dough hook until they combine into a shaggy, messy ball in the bowl and there aren’t any dry bits of flour left in the bottom.
- Knead the dough [3 to 4 minutes ] — Once the dough comes together, increase the speed and mix on medium until the dough passes the «windowpane test.»
- Add the butter [7-10 minutes] — Add the soft, room temperature butter 1 tablespoon at a time, letting it fully incorporate between each addition.
- Knead the dough [3 to 4 minutes] — Once the butter has been added, knead the dough again on medium speed until it passes the «windowpane test» a second time.
- Proof the dough [3+ hours] — Shape the dough into a ball and let it rise for one hour at room temperature, then at least two hours in the fridge.
What to expect when adding butter: Each time you add a new piece of butter, your dough will fall apart a little bit, it might slide around in the bowl or fall off the dough hook, but just let the mixer keep running and it will come back together. You’re asking the gluten network to incorporate quite a lot of fat at this stage — be patient!
At the end of each mixing stage, the dough will be slightly sticky, but should clear the sides of the bowl. After all the butter has been added, if the dough is clinging to the walls of the bowl, you can, dust in more flour 1 tablespoon at a time.
Passing the windowpane test
The «windowpane test» is a way of checking how well developed the gluten network in your dough is. Tear off a tiny piece of dough, about the size of a grape. Coat it with flour and use your thumbs and fingers to gently press it into a flat shape from the center out. When you can stretch it quite thin in the center without it tearing, you’ve passed the windowpane test.
 FAIL
FAIL- PASS
 FAIL
FAIL PASS
PASSEven dough that passes the windowpane test will tear eventually if you keep stretching it. As long as you get the center thin enough to almost see through before it tears, you’re fine.
The first babka dough rise
Place the dough in a lightly greased bowl, cover it, let it rise at room temperature for one hour. It should just about double in size at this stage. Depending on how cold or warm your kitchen is, and the temperature of the milk you used, this may happen quickly or may take a bit longer.
Pro-tip: If your kitchen is quite cool, you may want to move the bowl into your oven (turned off) but with the oven light on. This will give the yeast a nice, warm environment to get to work.
Once it has doubled in size, place it in the fridge for another 2 hours or even overnight. Don’t take it out of the fridge until you’re ready to start rolling and shaping your apples and honey babka. You want all that soft butter you added to the dough to be firm (and not sticky!) when you roll the dough out.
Easy apple butter filling
Rolling, cutting, twisting, and shaping your babka dough is challenging enough — there’s no point in overcomplicating it by also trying to make apple butter from scratch. Store bought apple butter with a bit of cinnamon and honey is all you need for a great babka filling.
You can even make the apple butter filling a few days in advance and store it in the fridge until you’re ready to use it..
Important: Make sure you have the apples, walnuts, and apple butter filling for your apples and honey babka ready before you start rolling out your dough. You don’t want the dough to warm up and start rising again while you prep the filling!

Assembling and shaping your apples and honey babka
Clear off a nice big stretch of counter or table space for this step. It’s going to get messy, so don’t do this on grandma’s nice vintage dining table or whatever. Lightly dust your work surface with flour, then transfer the dough from the bowl to the countertop. Dust the top of the dough lightly with flour as well.
Deflate the chilled dough to knock any air out of it. Then gently stretch it dough into a rough rectangle shape, and use a rolling pin to roll it out into a 20″ long rectangle about ¼» thick.
Tips for rolling dough:
- If the dough fights back or starts to tear, let it relax for 30 seconds and then keep going.
- Start with your rolling pin in the center of the dough and roll outwards, rather than trying to roll the pin across the entire length of dough with each pass.
- Use a bench scraper to square off the dough as you roll to help keep the rectangle shape.
- Dust on more flour or rotate and flip the dough as needed to prevent it from sticking and keep an even thickness.


It’s okay if you don’t have a perfect rectangle or if you end up with something a little bigger or are slightly off in your dimensions. The important measurement to achieve is that ¼» thickness. Once you shape the babka, it still has to rise one more time, and the dough will almost double in size. So if you start with dough that’s ½» thick. well, you get the idea.
Spread your apple-butter filling across the surface of the dough leaving one long edge bare. Once you’ve got a thin, even layer of apple butter, sprinkle on your minced apples (and optional walnuts) trying to distribute them as evenly as possible.
To roll the babka: Start with one of the bottom corners and begin rolling it up, moving across the long side of the dough from one side to the other. Roll tightly, trying not to trap any air bubbles inside. Repeat until your dough rectangle is rolled into a log. This will get easier as you go.
- started from the bottom
- now we’re here
 started from the bottom
 now we’re here
PRO-TIP: Once you roll the dough into a log, place it on a sheet pan and chill it in the fridge for an hour or two before shaping. The dough warms up quite a bit while you’re rolling it and the next step is MUCH easier and less messy if the dough is chilled. (The recipe will still work if you skip this step, but do so at your peril!)
twisting your apples and honey babka
Okay. This is the hard part. This is the part where you will definitely curse at least once and wonder if you’ve made a huge mistake (you haven’t). Bear with me, because I promise it will all work out in the end.
Take a knife or a metal bench scraper with a sharp edge and cut lengthwise down the middle of the rolled dough log. You’re creating two long thin strips, revealing all the layers inside. Yes, you’re right, it will get messy. How’d you guess?
Turn the two strips so that the inside layers are facing up. Starting in the middle, cross one strip over the other to form an X shape. Continue crossing the two strips of dough over each other until one half of the dough is twisted. Repeat this process with the other half of the dough strips so you have a fully twisted rope of babka.


Why start twisting from the middle? It’s a lot easier to pick up and cross shorter pieces of dough over each other. If you started at one end of the dough, you’d be trying to handle almost 20″ of gooey, apple-butter filled dough at once. This way you can work in smaller sections which is easier, less stressful, and gives you a more uniform twist.
How to make a round spiral babka
Bend one end of the babka in toward itself, tucking the end under. Then wrap the other end of the twisted babka rope around the folded bit to create the spiral. Again, tuck the end under. The babka will seem lopsided at this point, but that’s okay — it’ll settle down during the final rise.


The final round babka rise
Cover the coiled babka loosely with plastic wrap and let it rest while you scrub all the ooey-gooey apple butter filling off your hands and wipe down your counters. Let the babka rest at room temperature for 1-1½ hours.
During this time, the babka should nearly double in size — it will grow outwards as well as upwards as it rests. If you’ve gone the loaf-pan route, the dough should crown slightly over the top of the pan.
During the last 15 minutes of this resting period, begin preheating your oven to 375F. If your oven takes longer than 15 minutes to preheat, don’t sweat it — the babka can continue rising until the oven is ready.
Baking your apples and honey babka
Your apple and honey babka will bake for about 30-40 minutes total. Let it bake uncovered for the first 25-30 minutes, then loosely cover it with a sheet of aluminum foil for the rest of the bake to prevent the sides and edges from getting too dark.
When your babka is done, take it out of the oven and let it cool slightly on the sheet pan. Then, carefully use your hands or the largest spatula you have to lift the babka onto a wire cooling rack.

The honey icing drizzle
This is a simple mixture of soft butter, honey, and powdered sugar. Make sure the butter is super soft here or your icing will be lumpy.
Let your babka cool completely before you do the drizzle. If the dough is hot or warm, the icing will melt and slide off the dough. To drizzle it, use a fork or even the whisk you used to mix the icing to drag long ropes of it across the babka in a zig-zag shape.
To move the babka off the cooling rack and onto your serving platter be confident, move quickly, and don’t let it see the fear in your eyes. Another option is to cut it in half, in quarters, or wedges/slices, and then move it onto the serving tray.

Apples and honey babka FAQ
I haven’t tested this recipe with other sizes of eggs. If you use a b igger egg (XL, Jumbo), hold back a few tablespoons of milk and add the rest only if the dough seems like it’s not coming together in the mixing stage.
Once you’ve twisted the babka into a long rope, place it in greased 9×5″ loaf pans, with the ends tucked underneath. Bake at 350F for 40-45 minutes.
Microwave in the paper wrapper 4 seconds per side. Or, fill a bowl with very very very hot water, empty the bowl, and invert it over the stick of butter for 10 minutes.
Up to two days! Wait to do the honey icing drizzle until right before you serve it. Keep it wrapped in plastic until you’re ready to serve.
Butter is slippery and when you’re trying to add a lot of it into a well-kneaded dough with a strong gluten network, the first thing it does is coat the entire outside of the dough. This makes it quite slippery and the dough hook might have trouble picking it up. Usually if you just let it go it will snag the dough again on its own, but if it’s really having trouble you can pause the mixer and use a spatula or your hands to fold the dough around the hook again.
I’d estimate 8-10, but you could probably serve up to 12 if needed.
I am…unqualified to answer that because there are so many different levels of kashrut and I don’t personally keep kosher. It does have dairy in it, so just be aware of that if you’re also serving meat.
Yep, that’s fine! If your fridge runs particularly cold you can do the room temperature rise for 2 hours and then 1+ hours in the fridge for the remaining rise. Yeast moves slower at colder temperatures so you likely won’t see a dramatic rise in the fridge unless you let it sit overnight.
Up to 24 hours, but no more than 48 hours. This is a very resilient dough. If you need to leave it for 48 hours, I recommend taking it out at least once and kneading it gently to redistribute the yeast and starches, and then placing it back in the fridge.
Источник


