- About your Apple ID email addresses
- Email addresses you use with your Apple ID
- Apple ID email address
- Change your Apple ID email address
- Reset your Apple ID password
- Get a verification code
- Additional email addresses
- Add an additional email address
- Delete an additional email address
- Rescue email address
- Add or edit a rescue email address
- Delete a rescue email address
- Reset your security questions
- Learn more
- Change your Apple ID
- How to change your Apple ID to a different email address
- If you can’t change your Apple ID
- Change your Apple ID password
- On your iPhone, iPad, iPod touch, or Apple Watch
- On your Mac
- On the web
- Learn more about passwords and your Apple ID
- What to do after you change your Apple ID or password
- Apple Developer Programs
- Apple Online Store
- iPhone, iPad, and iPod touch
- Mac with OS X Mountain Lion or later, or Windows PC
- Apple Retail Store services
- Apple Support website and Apple Support Communities
- FaceTime
- iPhone, iPad, and iPod touch
- Mac with OS X Mountain Lion or later
- iCloud
- iPhone, iPad, and iPod touch
- Windows PC
- Apple TV
- App Store, Books Store, and iTunes Store
- iPhone, iPad, and iPod touch
- Apple TV
- Smart TV or streaming media device
- Windows PC
- Jobs at Apple
- Messages
- iPhone, iPad, and iPod touch
- Mac with OS X Mountain Lion or later
- Volume Purchase Program
About your Apple ID email addresses
Learn how to add, change, or delete the different types of email addresses that you can use with your Apple ID account.
Email addresses you use with your Apple ID
Your Apple ID uses email addresses to sign you in to your account with Apple. With your Apple ID, you can access services like the App Store, Apple Music, iCloud, iMessage, FaceTime, and more. We use your email addresses to send you information about your account, and to help friends and family communicate and share with you.
Apple ID email address
In most cases, your Apple ID is also the primary email address of your Apple ID account.
Additional email addresses
Add extra email addresses to your account to help people find you on Apple services like FaceTime, iMessage, and Find My.
Rescue email address
Most people have a notification email address instead of a rescue email address. Apple uses this to send you important account and security related information. If you don’t use two-factor authentication or two-step verification (learn how to check what security method you use), you have the option to add a rescue email address to your account for more security. You can see it when you sign in to your Apple ID account page.
Before you can use a new or updated Apple ID, we’ll send you a verification email to make sure that the email address belongs to you.

Apple ID email address
When you create an Apple ID, you enter an email address. This email address is your Apple ID and the username that you use to sign in to Apple services like Apple Music and iCloud. It’s also the contact email address for your account. Be sure to check your email address regularly. We’ll send you email notifications to help you manage your account and make the most of your Apple ID.
Change your Apple ID email address
Reset your Apple ID password
If you know your current Apple ID password and want to change it, follow these steps on your iPhone, iPad, iPod touch, or Mac. If you’ve forgotten your Apple ID password and need to reset it, follow these steps.*
Get a verification code
With two-factor authentication, you’ll need a verification code to sign in with your Apple ID on a new device or browser. Learn how to get and use the code on a trusted device, or get a text or phone call.
* If you use two-factor authentication, in some cases you might be able to speed up the account recovery process or reset your password immediately by verifying a six-digit code sent to your primary email address.
Additional email addresses
Many of us have more than one email address that friends and family use to reach us. Add an email address that you commonly use to your Apple ID account, so people can easily find and communicate with you on Apple services like FaceTime, iMessage, Shared Albums, iWork collaboration, and Find My.
Add an additional email address
- Sign in to your Apple ID account page.
- Click Edit in the Account section.
- Under Reachable at, select Add More.
- Enter your additional email address. Make sure you’re not already using it as an Apple ID.
- We’ll send a verification to that address. Didn’t get the email?
- Enter the verification code and click Verify.
Delete an additional email address
- Sign in to your Apple ID account page.
- Click Edit in the Account section.
- To delete one of your additional email addresses, click next to the address.
Rescue email address
Having a rescue email address is optional but recommended if you do not have two-factor authentication or two-step verification. If you ever forget your security questions, you can use your rescue email address to reset them. We also send any account security-related notifications to your rescue email address. If you have two-factor authentication or two-step verification, you have a notification email address instead of a rescue email address and won’t need to remember security questions.
Add or edit a rescue email address
- Sign in to your Apple ID account page.
- Click Edit in the Security section. You might be asked to answer one or more security questions before you continue.
- To add a rescue email address:
- Under Rescue Email, click Add an Email Address, then enter your rescue email address. We send a verification to that address. Didn’t get the email?
- Enter the verification code and click Verify.
- To edit a rescue email address:
- Select Change Email Address under the address you want to edit, then enter the new address. We send a verification to that address. Didn’t get the email?
- Enter the verification code and click Verify.
If you had a rescue email address on file when you upgraded to two-factor authentication or two-step verification, you can also use these steps to edit your notification email address. If you remove the notification email, you won’t be able to add a new one.
Delete a rescue email address
- Sign in to your Apple ID account page.
- Click Edit in the Security section. You might be asked to answer one or more security questions before you continue.
- To delete a rescue email address, click next to the address.
Reset your security questions
If you’ve forgotten the answers to your security questions, follow these steps to verify your identity and reset your security questions. If you set up two-factor authentication or two-step verification, you won’t need to remember any security questions.
Learn more
If you receive suspicious email, learn how to identify fraudulent email.
FaceTime is not available in all countries or regions.
Источник
Change your Apple ID
If you no longer use the email address that’s associated with your Apple ID, you can change it. You won’t lose access to your contacts, purchases, or other account information.
How to change your Apple ID to a different email address
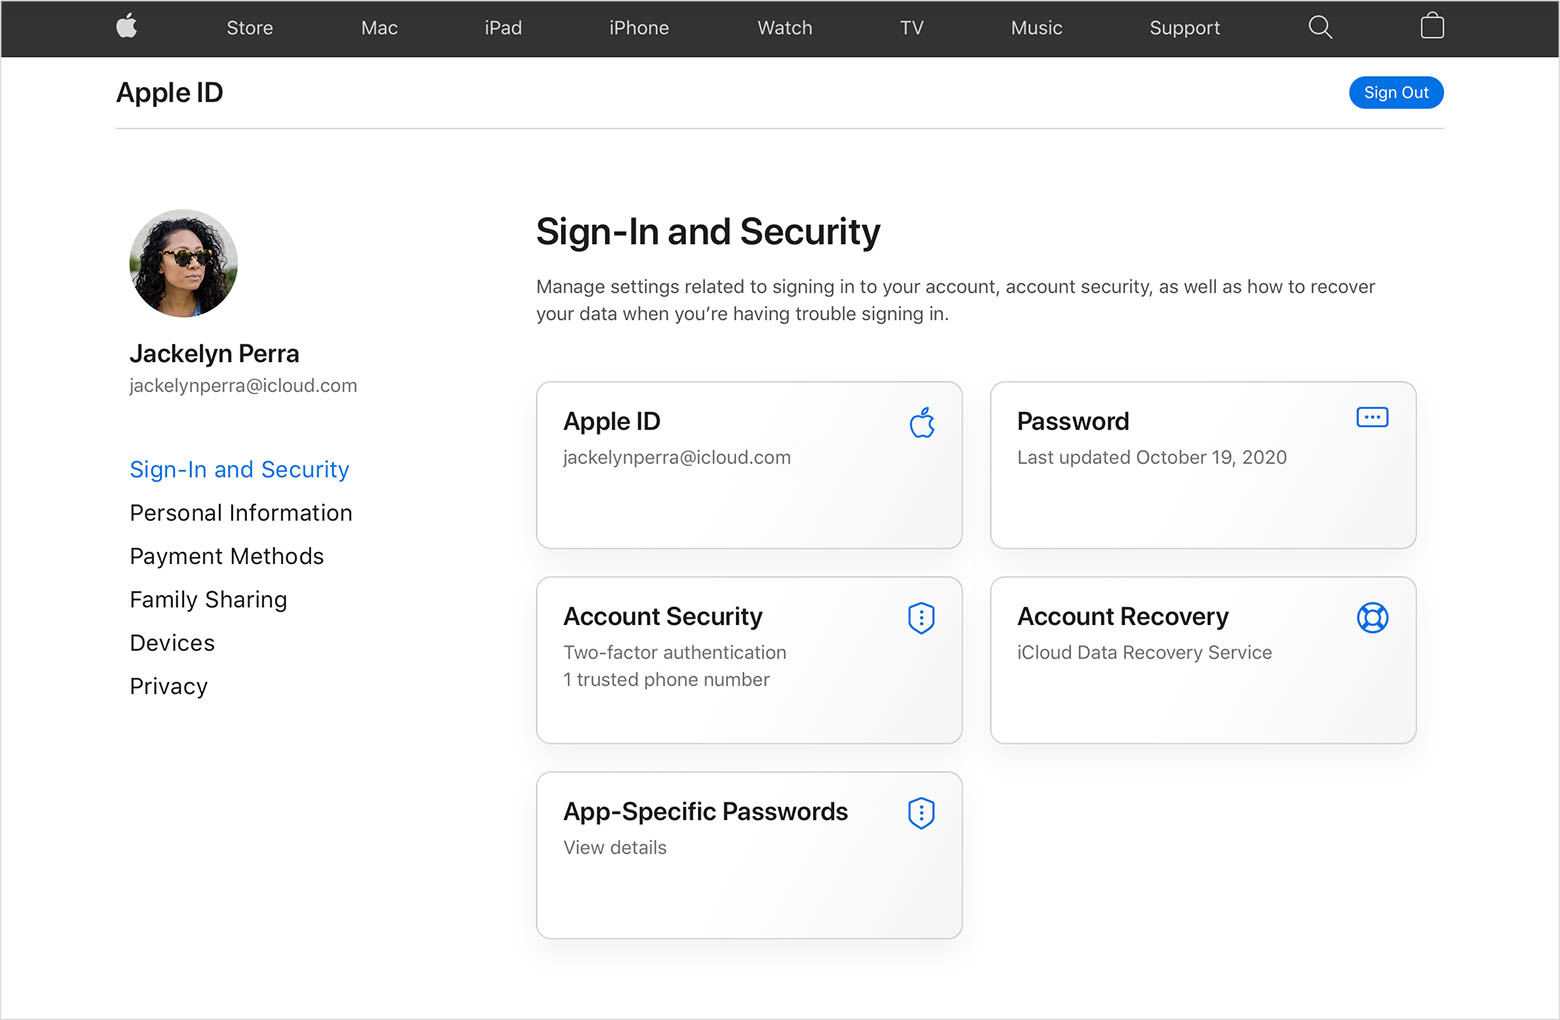
- Go to appleid.apple.com and sign in.
- In the Sign-In and Security section, choose Apple ID.

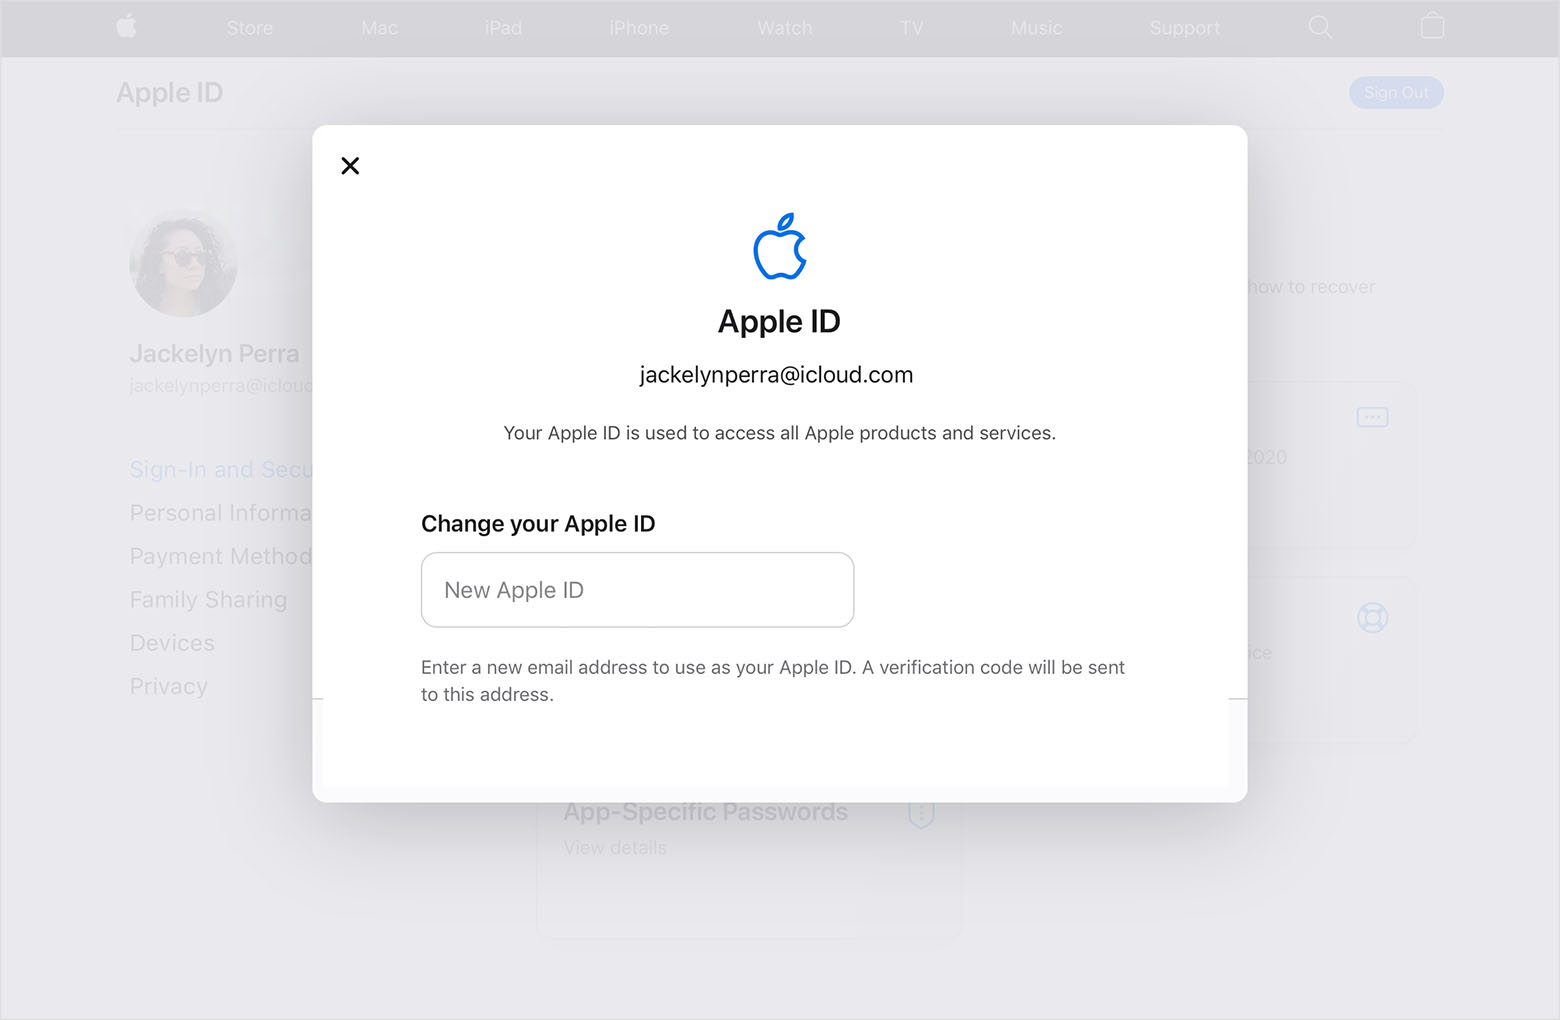
- Enter the email address that you want to use as your Apple ID.
- Choose Change Apple ID.
- If you changed your Apple ID to a third-party email address, check your email for a verification code, then enter the code. Learn what to do if you didn’t get the email.
- If you use services like iCloud or Messages to share with friends and colleagues, sign in to those services with your updated Apple ID.
If you can’t change your Apple ID
If you try to change your Apple ID to an @icloud.com email address that was created within the last 30 days, you will be asked to try again later.
If you see a message that the email address you want to use isn’t available or is already in use, check that you or a family member aren’t already using that email address with a different Apple ID. If a family member is using that email address, remove it from their account then try to use it.
In some countries or regions, you can use your phone number as your Apple ID. But if your Apple ID is an email address, you can’t change it to a phone number.
Источник
Change your Apple ID password
Follow these steps to change your Apple ID password.
On your iPhone, iPad, iPod touch, or Apple Watch
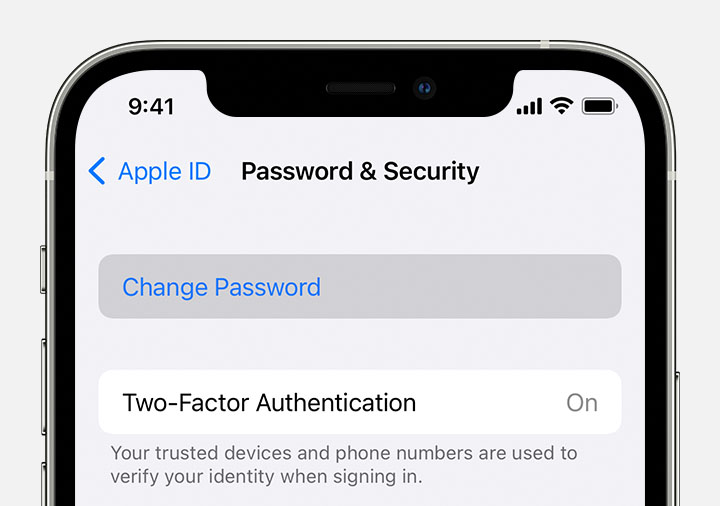
- Tap Settings > [your name] > Password & Security.
- Tap Change Password.
- Enter your current password or device passcode, then enter a new password and confirm the new password. Forgot your password?
- Tap Change or Change Password.
- Sign in with your new Apple ID password to access Apple features and services.
On your Mac
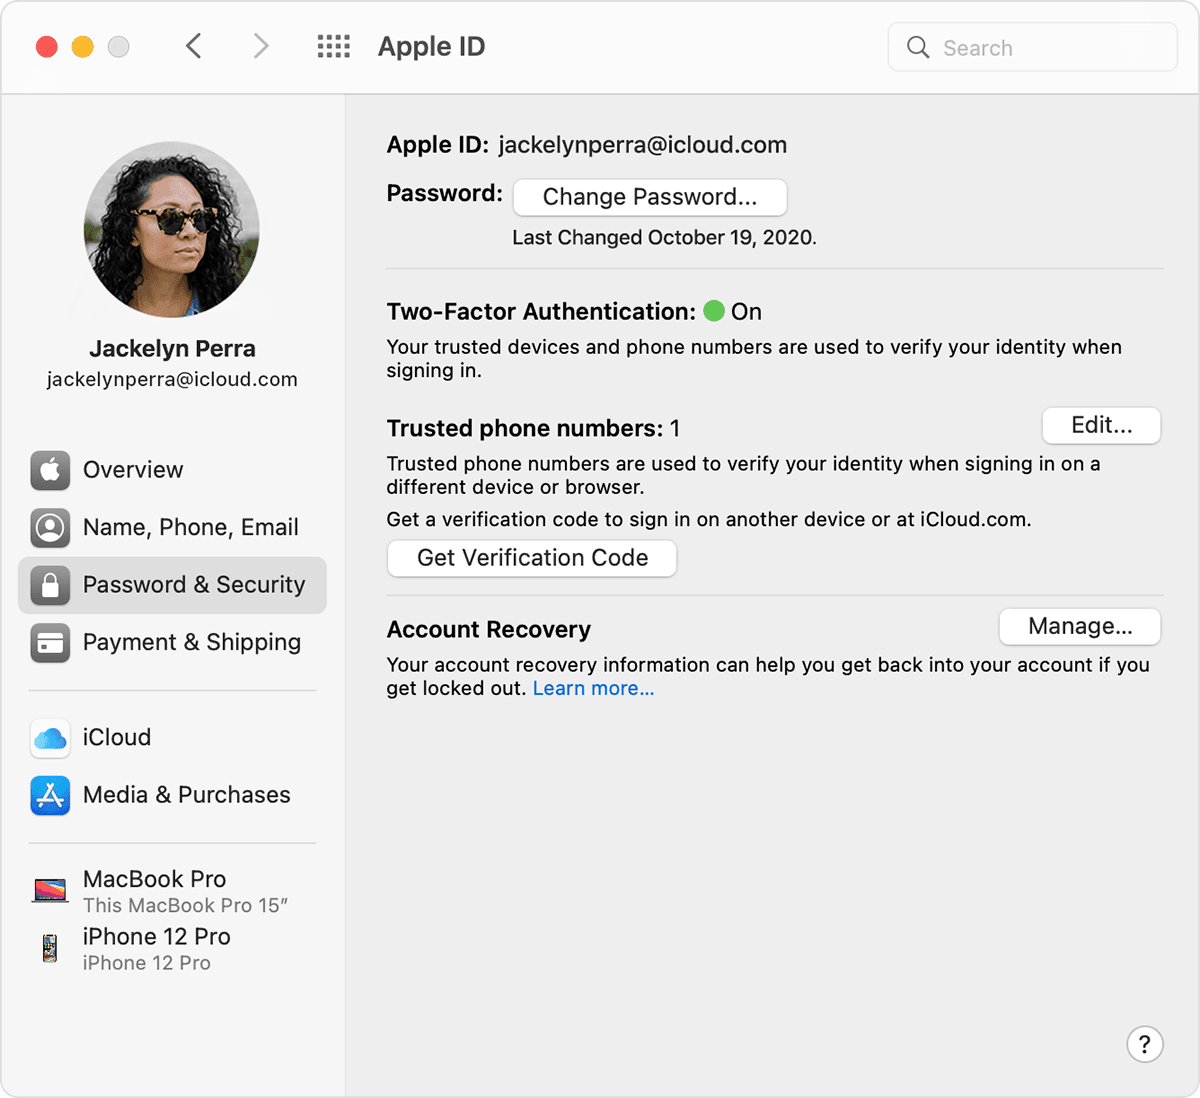
- Choose Apple menu > System Preferences, then click Apple ID.
- Click Password & Security.
- Click Change Password. Before you can reset your Apple ID password, you’ll be required to enter the password used to unlock your Mac.
On the web
- Sign in to appleid.apple.com.
- In the Sign-In and Security section, click Password.
- Enter your current password, then enter a new password and confirm the new password. Forgot your password?
- Click Change Password.
- Sign in with your new Apple ID password to access Apple features and services.
Learn more about passwords and your Apple ID
Your Apple ID is the account you use to access Apple services like the App Store, Apple Music, iCloud, iMessage, FaceTime and more.
When you create a new password, keep the following in mind:
- Your new Apple ID password must contain at least eight characters, a number, an uppercase letter, and a lowercase letter.
- You can’t use spaces, the same character three times in a row, your Apple ID, or a password you’ve used in the last year.
FaceTime is not available in all countries or regions.
Источник
What to do after you change your Apple ID or password
After you change your Apple ID or password, you might need to update your sign-in information with any Apple services that you’re using.
Use the list below to make sure that each store or service is using your updated sign-in information. You can use these steps to sign in on your iPhone, iPad, iPod touch, Mac, PC, and Apple TV.
In some cases, you don’t need to update your Apple ID or password on your device until the next time you’re asked to sign in to the store or service. But if you’re using services to share information or communicate with others, you should update your Apple ID or password immediately.
Apple Developer Programs
Nothing needs to be done. Within 24 hours of changing your Apple ID or password, the change automatically updates for Apple’s developer programs.
Apple Online Store
Update your Apple ID and password on your iPhone, iPad, iPod touch, Mac, and PC.
iPhone, iPad, and iPod touch
If you’re using iOS 10.3 or later, go to Settings > [your name] > iTunes & App Store. If you’re using iOS 10.2 or earlier, go to Settings > iTunes & App Store.
- If you’re signed out, enter your updated Apple ID and password.
- If you’re signed in with your previous Apple ID, tap your Apple ID, then tap Sign Out. Then enter your updated Apple ID and password.
Mac with OS X Mountain Lion or later, or Windows PC
- Go to the Apple website.
- Click , then click Account.
- In the Account Settings section, click Apple ID and password.
- Enter your updated Apple ID and password.
Apple Retail Store services
When you make a Genius Bar, Workshop, Business, or Joint Venture reservation, you’ll be asked to sign in with your Apple ID and password.
Apple Support website and Apple Support Communities
- If you’re signed out, enter your updated Apple ID and password the next time you use a feature of the site that requires you to sign in. For example, you’ll be asked to sign in to view an open case.
- If you’re signed in with your previous Apple ID, click Sign Out, then click Sign Out again to confirm. The next time you use a feature of the site that requires you to sign in, enter your updated Apple ID and password.
- If you’re signed out, click Sign in and enter your updated Apple ID and password.
- If you’re signed in with your previous Apple ID, click Sign out, then click Sign in and enter your updated Apple ID and password.
FaceTime
Update your Apple ID and password on your iPhone, iPad, iPod touch, and Mac.
iPhone, iPad, and iPod touch
Go to Settings > FaceTime.
- If you’re signed out on your iPhone or iPod touch, tap «Use your Apple ID for FaceTime» and enter your updated Apple ID and password. On your iPad, just enter your updated Apple ID and password.
- If you’re signed in with your previous Apple ID, tap your Apple ID, then tap Sign Out. On your iPhone or iPod touch, tap «Use your Apple ID for FaceTime» and enter your updated Apple ID and password to sign in. On your iPad, just enter your updated Apple ID and password.
Mac with OS X Mountain Lion or later
- Open the FaceTime app.
- Select FaceTime > Preferences.
- If you’re signed out, enter your updated Apple ID and password.
- If you’re signed in with your previous Apple ID, select your Apple ID, click Sign Out. Then click Sign Out again when asked to confirm, and enter your updated Apple ID and password.
iCloud
Update your Apple ID and password on your iPhone, iPad, iPod touch, Mac, PC, and Apple TV.
iPhone, iPad, and iPod touch
If you’re using iOS 10.3 or later, go to Settings > [your name]. If you’re using iOS 10.2 or earlier, go to Settings > iCloud.
- If you’re signed out, enter your updated Apple ID and password. The data in iCloud will automatically appear on your device after you sign in.
- If you’re still signed in with your previous Apple ID:
- Scroll down and tap Sign Out, then follow the onscreen steps. You might need to enter your password. Your data will remain in iCloud and will be updated on your device when you sign in to iCloud again.
- Enter your updated Apple ID and password.
If you updated your Apple ID email address* before signing out of iCloud, and your device repeatedly asks for the password to your previous Apple ID, you can temporarily change your Apple ID to sign in.
If you’re using macOS Catalina, choose Apple menu > System Preferences, click Apple ID, then click iCloud. If you’re using macOS Mojave or earlier, choose Apple menu > System Preferences, then click iCloud.
- If you’re signed out, enter your updated Apple ID and password to sign in. The data in iCloud will automatically appear on your device after you sign in.
- If you’re signed in with your previous Apple ID:
- Click Sign Out. Depending on what iCloud options are turned on, you’ll be asked if you want to make copies or delete iCloud data (Contacts, Calendar, Reminders, Bookmarks, Photo Stream) from your Mac. Your data will remain in iCloud and will be updated on your device when you sign in to iCloud again.
- Enter your updated Apple ID and password to sign in.
Windows PC
Open iCloud for Windows and click Sign Out.
- If you’re signed out, sign in with your updated Apple ID and password. The data in iCloud will automatically appear on your device after you sign in.
- If you’re signed in with your previous Apple ID:
- Click Sign Out. Depending on what iCloud options are turned on, you’ll be asked if you want to make copies or delete iCloud data (Contacts, Calendar, Reminders, Bookmarks, Photo Stream) from your PC. Click Delete. Your data will remain in iCloud and will be updated on your device when you sign in to iCloud again.
- Sign in with your updated Apple ID and password.
Apple TV
To play content from your Mac or PC on an Apple TV HD, go to Settings > Accounts > iCloud. On Apple TV (3rd generation or earlier) go to Settings > iCloud.
- If you’re signed out, choose Sign In. You’ll be asked to sign in with the Apple ID that you entered for the iTunes Store. If you use the same Apple ID for iCloud and the iTunes Store, choose Yes.
- If you’re signed in with your previous Apple ID, choose Sign Out, then choose Sign In. You’ll be asked to sign in with the Apple ID that you entered for the iTunes Store. If you use the same Apple ID for iCloud and the iTunes Store, choose Yes.
App Store, Books Store, and iTunes Store
Update your Apple ID and password on your iPhone, iPad, iPod touch, Mac, Apple TV, or Windows PC. On a Mac with macOS Mojave or earlier, iTunes includes iTunes Genius, iTunes Home Sharing, iTunes Match, iTunes Store, and iTunes U. On a Mac with macOS Catalina, open Apple Music, Apple TV, or Apple Podcasts instead of iTunes.
iPhone, iPad, and iPod touch
If you’re using iOS 10.3 or later, go to Settings > [your name] > iTunes & App Store. If you’re using iOS 10.2 or earlier, go to Settings > iTunes & App Store.
- If you’re signed out, enter your updated Apple ID and password.
- If you’re signed in with your previous Apple ID, tap your Apple ID, then tap Sign Out. Then enter your updated Apple ID and password.
On a Mac with macOS Catalina, open Apple Music, Apple TV, or Apple Podcasts.
- If you’re signed out, select Account > Sign In and enter your updated Apple ID and password.
- If you’re signed in with your previous Apple ID, select Account > Sign Out, then select Account > Sign In and enter your updated Apple ID and password.
On a Mac with macOS Mojave or earlier, open iTunes.
- If you’re signed out, select Account > Sign In and enter your updated Apple ID and password.
- If you’re signed in with your previous Apple ID, select Account > Sign Out, then select Account > Sign In and enter your updated Apple ID and password.
Open Apple Books.
- If you’re signed out, choose Store > Sign In and enter your updated Apple ID and password.
- If you’re signed in with your previous Apple ID, choose Store > Sign Out, then choose Store > Sign In and enter your updated Apple ID and password.
Open the App Store.
- If you’re signed out, click Sign In and enter your updated Apple ID and password.
- If you’re signed in with your previous Apple ID, choose Store > Sign Out, then click Sign In and enter your updated Apple ID and password.
Apple TV
On Apple TV HD, go to Settings > Accounts > iTunes and App Store. On Apple TV (3rd generation or earlier), go to Settings > iTunes Store.
- If you’re signed out, choose Sign In and enter your updated Apple ID and password.
- If you’re signed in with your previous Apple ID, choose Sign Out, then choose Sign In and enter your updated Apple ID and password.
For Home Sharing on Apple TV HD, go to Settings > Accounts > Home Sharing. On Apple TV (3rd generation or earlier), go to Settings > Computers. Then choose Turn Off Home Sharing. When you’re asked to confirm, choose Turn Off. Then choose Turn On Home Sharing, and enter your updated Apple ID and password.
Smart TV or streaming media device
Open Apple Music, Apple TV, or Apple Podcasts.
- If you’re signed out, choose Settings, then select Account > Sign In.
- If you’re signed in with your previous Apple ID, choose Settings, select Account > Sign Out, then choose Settings, select Account > Sign In and enter your updated Apple ID and password.
Windows PC
- If you’re signed out, select Account > Sign In and enter your updated Apple ID and password.
- If you’re signed in with your previous Apple ID, select Account > Sign Out, then select Account > Sign In and enter your updated Apple ID and password.
Jobs at Apple
Go to Jobs at Apple and click My Profile.
- If you’re signed out, click Sign In and enter your updated Apple ID and password.
- If you’re signed in with your previous Apple ID, click Sign Out, then click Sign In and enter your updated Apple ID and password.
Messages
After you update your Apple ID, your friends will receive new messages from your updated Apple ID. Old messages aren’t removed.
iPhone, iPad, and iPod touch
Go to Settings > Messages, then tap Send & Receive.
- If you’re signed out on your iPhone or iPod touch, tap «Use your Apple ID for iMessage» then enter your updated Apple ID and password. On your iPad, just enter your updated Apple ID or password.
- If you’re signed in with your previous Apple ID, tap your Apple ID, then tap Sign Out. On your iPhone or iPod touch, tap «Use your Apple ID for iMessage» and enter your updated Apple ID or password. On your iPad, just enter your updated Apple ID and password.
Mac with OS X Mountain Lion or later
Open the Messages app, select Messages > Preferences, click the Accounts tab, then select your Apple ID from the list of accounts.
- If you’re signed out, sign in with your updated Apple ID and password.
- If you’re signed in with your previous Apple ID, click Sign Out, then click Sign Out again when asked to confirm. Sign in with your updated Apple ID and password.
Volume Purchase Program
If you changed your Apple ID or password and you’re in the Volume Purchase Program, contact Apple Support for help. Changing your Apple ID or password will prevent you from signing in to your purchasing account, making purchases, and accessing previous purchases.
FaceTime isn’t available in all countries or regions.
* In China mainland and India, you can use your phone number as your Apple ID.
Information about products not manufactured by Apple, or independent websites not controlled or tested by Apple, is provided without recommendation or endorsement. Apple assumes no responsibility with regard to the selection, performance, or use of third-party websites or products. Apple makes no representations regarding third-party website accuracy or reliability. Contact the vendor for additional information.
Источник


