- Dutch Oven Apple Cobbler
- Recipe
- What Else You’ll Need
- Before You Leave Home
- Step 1
- Step 2
- Step 3
- At the Campsite
- Step 1
- Step 2
- Step 3
- Step 4
- Step 5
- Step 6
- Dutch Oven Apple Cobbler
- How to Make Dutch oven Apple Cobbler
- At home
- At camp
- Essential Equipment
- Dutch Oven Cobbler
- Introduction: Dutch Oven Cobbler
- Step 1: Ingredients and Utensils
- Step 2: Ingredients
- Step 3: Choose a Spot for Cooking
- Step 4: Light the Coals
- Step 5: Prepare the Cobbler
- Step 6: Cooking the Cobler
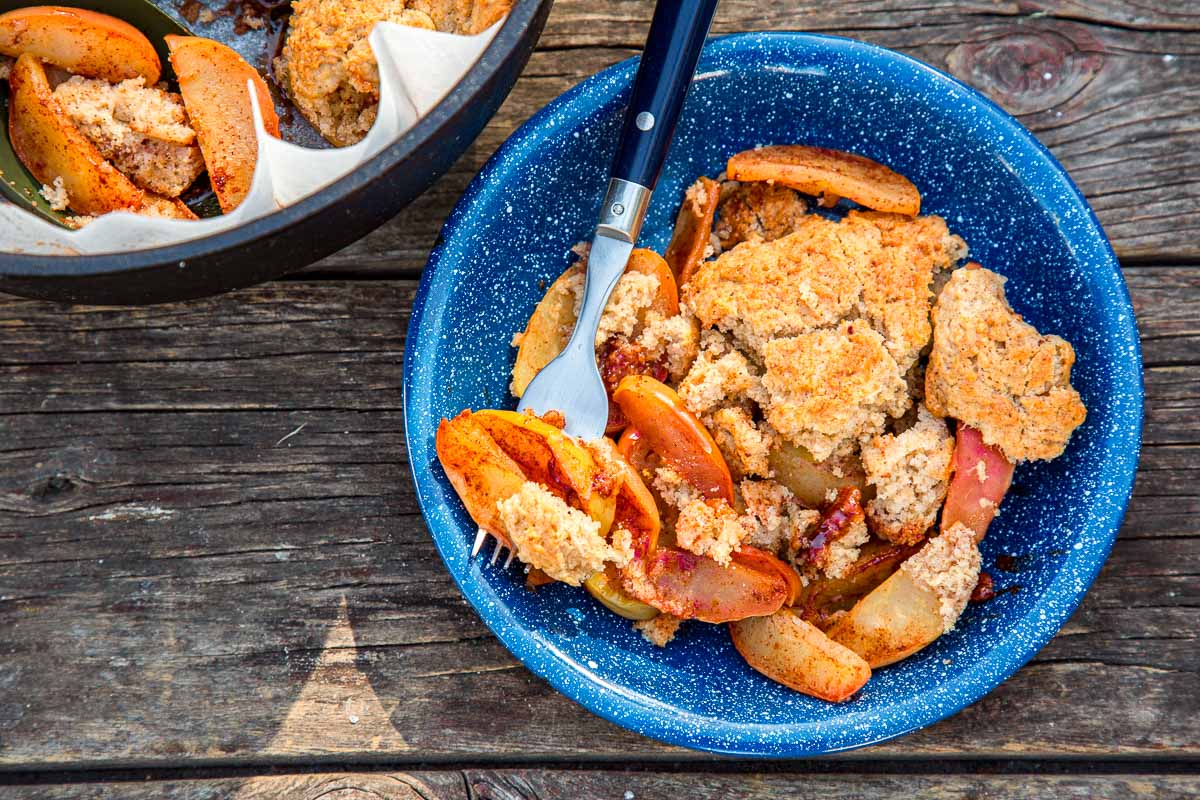
- Step 7: Serving the Cobbler
- Step 8: Cleaning the Dutch Oven
- Step 9: Reseason the Dutch Oven
- Step 10: Conclusion
- Be the First to Share
Dutch Oven Apple Cobbler
In my quest for the ultimate campfire dessert – I stumbled onto a number of recipes that called themselves a dutch oven apple cobbler. After reading the ingredient list I realized it’s more like a dump cake mixed with a cobbler. The good news is that it takes the best of both things – the ease of the dump cake and the fresh seasonal fruit of the cobbler and combines them. And much like everything made in a dutch oven – it’s crazy delicious!

Recipe
This recipe makes a pretty large amount – enough for good-sized portions for at least 8 people (or 2nd helpings for 4!)
I highly recommend Granny Smith apples or some other tart apple variety. The sweetness of the cake mix really needs the complementary bite of a tart apple.
- 1 12 oz. bottle of lemon-lime soda
- 1 boxed vanilla cake mix
- 4-5 large Granny Smith apples
- 4 Tbsp unsalted butter (about half a stick)
- 3 Tbsp sugar
- 3 tsp cinnamon (more if you really like cinnamon)
- 3 Tbsp lemon juice

What Else You’ll Need
- 30 pieces of charcoal (and some way to light it)
- 4 quart 10 inch camping dutch oven
- lid lifter (not required, but helpful)
- hot pads
- tongs (or some other means of moving very hot charcoal briquettes)
- parchment paper (makes for easier clean up)
- zip-top plastic bag
- peeler
- sharp knife
- apple corer (optional, but very handy)
While I love cast iron – I hate cleaning it. I can’t say enough about using parchment paper to line your dutch oven. It virtually eliminates scrubbing and doesn’t add any strange flavors to your food.
Before You Leave Home
In order to save yourself the mess of a campsite cleanup – I highly recommend prepping your apples at home with access to your full kitchen.
Step 1
Peel your apples. Then core and slice them. The thinner the slices the better because it’ll ensure that your apples are nice and soft without a very long cook time.
Step 2
Place your apples in a large zip top plastic bag. Sprinkle the lemon juice on top of them. Seal the bag and try to coat the apples with the lemon juice as much as possible. The lemon juice helps prevent the apples browning. However, if they do get a little brown – don’t worry. They’ll still taste just as good – they just won’t look as pretty.
Step 3
Open the bag up and sprinkle the cinnamon and sugar on the apples. Re-close the bag and move that cinnamon and sugar all over your apples. Try and coat them as evenly as possible.
Make sure that bag has as little air as possible in it and place them in the refrigerator. Keep them refrigerated until it’s time to add them to the cooler before you leave.
At the Campsite
Now comes the fun part! This cobbler is seriously easy to assemble, but looks fantastic.
Step 1
Prepare your cooking area. I’m a huge fan of charcoal with dutch ovens because it’s fairly easy to regulate the temperature. Wood is definitely doable, but takes a little more know-how.

You’ll want your briquettes white hot or your wood coals bright red. I wasn’t sure quite how many briquettes to use so I experimented. I heated up 30+ and used them all so my cobbler cooked pretty quickly.
I’ve made do without a charcoal chimney starter, but I’m just getting ready to invest in one (one too many windy cooking sessions.) Without one, I’m spending time making sure my briquettes are staying lit, but with one I could walk away without any worries.
Step 2
If you plan to line your dutch oven with parchment paper – do it now. (For an easy trick on how to create a circular shape – see my post on Dutch Oven Vegetarian Lasagna for a quick how-to.) Once your dutch oven is ready – empty your zip top bag of apples carefully into the bottom of the dutch oven.

Step 3
Open your box of cake mix and shake the cake mix as evenly as possible over the apples. Do not stir!

Step 4
Now crack open that bottle of lemon-lime soda and pour it over the top of the cake mix. Try to get as much of it as wet as possible. Still no stirring! It’ll bubble up in a very satisfying way.

Step 5
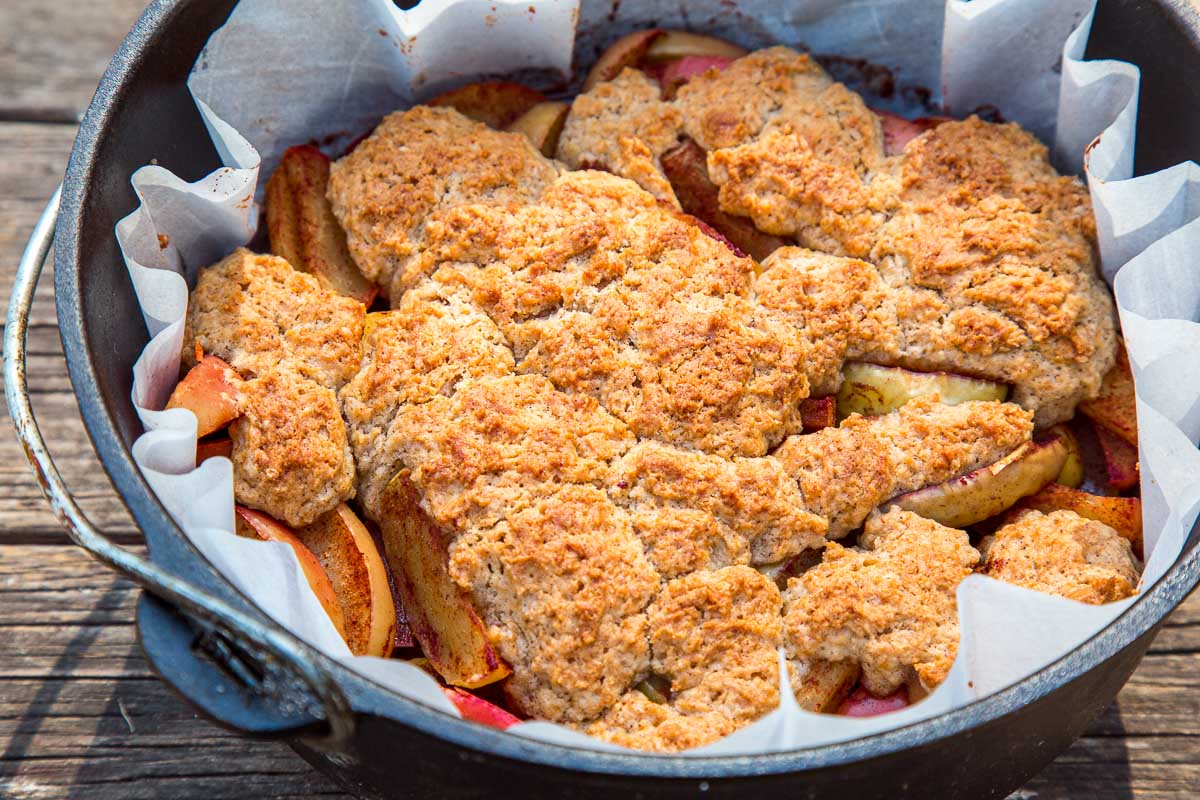
Cut your butter into small pieces and add it to the top of the cobbler before covering it with the lid.

Step 6
Place your dutch oven over the top of about 10 briquettes and carefully place 20 more on the top of the lid. Cook the cobbler for about 20 minutes, then using your lid lifter or a hot pad check for doneness. The top will brown nicely and the apples will be soft (test using a fork.)

Despite being made with a boxed cake mix – the texture of this cobbler was very similar to more traditional cobblers. However, if you’re looking for a very traditional cobbler top – I do think it could be made with oats and/or nuts in addition to the cake mix and still be pretty amazing.


This recipe would be easy to modify if you’re not that into apples. It’d work great with pears, peaches, raspberries, blueberries, or any combination of those fruits. Enjoy!
Источник
Dutch Oven Apple Cobbler
This post may contain affiliate links.

Baking an apple cobbler on a camping trip definitely sounds impressive, right? But despite the high production value, this Dutch Oven Apple Cobbler recipe is actually really simple to pull off.
We’ve stripped down the ingredient list, consolidated steps, and developed a few tricks to speed the process along.
So now you can wow your friends and family with this incredible dessert, without breaking a sweat.
Why We Love It:
↠ Big production value for not a whole lot of work.
↠ Can mix the dry ingredients at home. Add the milk and butter on-site.
↠ Using a parchment paper liner makes clean up a breeze.
If you’re just getting into using a Dutch oven to bake at a campsite, this is a perfect recipe to try out. It’s “baking” in the loosest sense of the word and very forgiving at that.
How to Make Dutch oven Apple Cobbler
This recipe was developed using a 10” Dutch oven.
At home
Unless you need the flour and baking powder for other recipes, it’s easiest to mix the dry ingredients at home. Mix the flour, sugar, cinnamon, baking powder, and salt in a resealable container. Shake to thoroughly combine. Now you can leave the bag of flour and baking powder at home.
We recommend freezing a stick of butter before putting it in your cooler. You want the butter to be really cold for this recipe and pre-freezing beforehand goes a long way.
At camp
If you’re using charcoal, we suggest you get them started before you begin. For a 10” Dutch oven, you’ll need at least 21 coals – but it’s nice to have some extras on hand.
Line the bottom of your Dutch oven with parchment paper.
Slice your apples into wedges (1). We did this using a knife, but one of those circular apple corer / slicers things would be WAY faster! Place the apple slices on top of the parchment paper inside the Dutch oven. Add in the sugar and cinnamon and mix until the apple slices are evenly dusted. Try to flatten out the apple slices so they are more or less level (2).
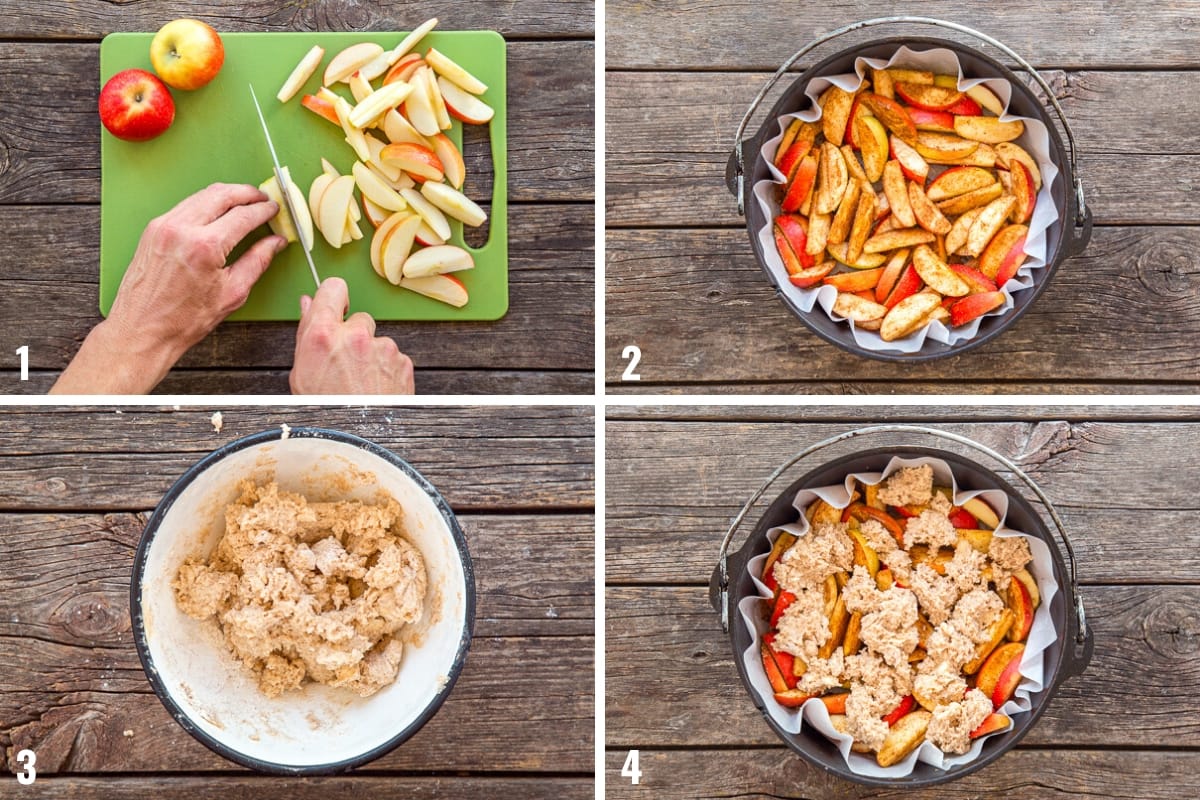
Retrieve your cold butter from the cooler, slice into cubes, and then work into the dry ingredients with your finger. Crumbling and smearing the dry ingredients into the flour, to create a coarse, crumbly meal.
Add in the milk a little bit at a time and work with your fingers until a dough forms (3). Tear off bits of dough and place on top of apples. You want little pockets of dough spread evenly around, not one large blob of dough in the middle (4).
Once the dough has been distributed, wash your hands, cover the oven, and start arranging your top and bottom charcoals: 7 on the bottom and 14 on the top, for about 350F.
Our apple cobbler usually takes 30-40 minutes to fully cook. Once it starts to get close to being done, it will become really fragrant. So once you smell it, give it a quick visual check to see how it’s doing.

Essential Equipment
↠ Dutch oven: This recipe was developed for a 10″ Dutch oven. You could use a larger, 12″ dutch oven but we would suggest increasing the recipe by 1.5X or 2X.
↠ Chimney starter: A chimney starter will make preparing your charcoals easier. We like this collapsible version which is easy to store in our camp box.
↠ Lid lifter: This lid lifter makes checking on the cobbler safe and easy, and it doubles as a pot stand when you’re ready to serve.
↠ Apple Slicer: This isn’t totally essential, but using a apple corer/slicer tool would definitely make preparing the apples go way faster.
Источник
Dutch Oven Cobbler

Introduction: Dutch Oven Cobbler
Making dutch oven cobbler is a fast and easy desert to make. This is one of the first deserts I was taught In the Boy Scouts to make in a dutch oven. All you need is box cake mix, pie filling, butter, a dutch oven, and charcoal briquettes. From start to finish it should take abut 30 minutes. I will give you steps to cook and a easy way to clean the dutch oven when the cobbler is done.
Step 1: Ingredients and Utensils
- Tools
- Dutch Oven( This is for a 12 inch oven)
- Dutch Oven Lid Lifter (You can use pliers if don’t have one.)
- Dutch Oven Lid Holder (You don’t need one but nice to have)
- Charcoal Briquettes ( I use Kings-Ford but you can use the brand you like.)
- Charcoal Fluid
- Matches or Lighter
- Charcoal Briquette Chimney (This is optional. You can just put them in a pile.)
- Dutch Oven Liners (Used to make the clean up easy. You don’t need this. )
- Paper Towels
- Can Opener
- Spatula
- Tongs
- Also Stuff to Serve with
Step 2: Ingredients
- Box Cake Mix (Any flavor is fine.)
- 1(One) Stick Of Butter
- 2(Two) Cans of Pie Filling(examples:peach, apple, cherry, pear, blueberry)
- Vegetable Oil
Step 3: Choose a Spot for Cooking
- You will need a flat surface to place your dutch oven. There should not be any combustible materials around.
- You also can use a grill if you don’t have a place to set the dutch oven. Take out the top grate and use the bottom for the spot where the coals will sit.
Step 4: Light the Coals
- You will need about 30 Briquettes to cook the cobbler.
- You can use your chimney or lust pile them up to start.
- Spray with lighter fluid and light.
- When the coals are starting to look like ash they are ready.
Step 5: Prepare the Cobbler
- Get your dutch oven and use a paper towel and lightly cover the inside with oil.
Now ether you can skip this or add the dutch oven liner( have the right size for your oven).
- Open the 2 pie fillings and use the spatula to pore and level in the dutch oven.
- Open the cake mix and dump over the pie filling.
- Break the butter in small chunks and drop around the top of the cake mix.
- After you are done put the lid on and wait for the charcoal to be ready.
Step 6: Cooking the Cobler
- When the Charcoal is ready, bring over the dutch oven with the lid on.
- Arrange about half the coals (15) in a circle and place the dutch oven over that circle.
- Place the rest of the coals in a circle on the lid of the dutch oven.
- Wait till it is done.
Step 7: Serving the Cobbler
- When the cobbler is done (about 15 to 25 minuets), the butter should be melted and you can smell the cobbler.Use the dutch oven lid lifter to lift the lid to check.(or pliers)
- Remove the coals from the to of the lid and lift away from the coals that are underneath.
- Remove the lid and enjoy.
Step 8: Cleaning the Dutch Oven
- If you used a dutch oven liner, lift and throw away the liner.
- Or scrap out the left over food.
- Now boil water and pore in the dutch oven.
- Clean out the dutch oven.
- Clean the lid.
- Rinse out with clean water and dry.
Step 9: Reseason the Dutch Oven
Now grab the oil and paper towels.
- Pore a small amount in the dutch oven.
- Use the paper towels and coat the inside of the dutch oven.
- Also oil the under side of the lid.
Step 10: Conclusion
This is an easy desert to make using a dutch oven. You can now try any different pie fillings and cake mix.
Be the First to Share
Did you make this project? Share it with us!
Источник
- Remove the coals from the to of the lid and lift away from the coals that are underneath.


