- Prepare an iPhone, iPad, or Apple TV manually in Apple Configurator 2
- Manually add devices to Apple School Manager or Apple Business Manager
- Prepare devices or add prepare steps to Blueprints
- Intro to Apple Configurator 2
- Configure large numbers of devices
- Activate devices without an internet connection
- Customize or automate your device configuration
- Prepare Apple TV in Apple Configurator 2
- Prepare Apple TV HD or Apple TV 4K using Wi-Fi or Ethernet
- Revive or restore an Intel-based Mac using Apple Configurator 2
- What does a revive do to your Mac?
- What does a restore do to your Mac?
- Before you begin
- How the revive and restore processes work
- Step 3: Revive the firmware
- Step 4: Restore the firmware and erase all data
Prepare an iPhone, iPad, or Apple TV manually in Apple Configurator 2
You can quickly manage every aspect of device configuration and prepare devices manually using the Prepare Assistant. For example:
Add devices to Apple School Manager or Apple Business Manager. Adding iPhone and iPad devices requires iOS 11 or later, and adding Apple TV devices requires tvOS 11 or later.
Supervise devices and assign them to an organization.
Enroll devices with a mobile device management (MDM) solution.
Control which Setup Assistant panes the users see and interact with.
WARNING: Preparing devices may take a few minutes. If you try to cancel or stop the process, Apple Configurator 2 takes the time necessary to safely terminate all operations. Don’t shut down the Mac running Apple Configurator 2 while it’s preparing devices—doing so could damage the devices.
Manually add devices to Apple School Manager or Apple Business Manager
You can choose to add iPhone, iPad, and Apple TV devices to Apple School Manager or Apple Business Manager using Apple Configurator 2 , even if the devices weren’t purchased directly from Apple, an Apple Authorized Reseller, or an authorized cellular carrier. When you assign a device that has been manually added, it behaves like any other assigned device, with mandatory supervision and mobile device management (MDM) enrollment. For these devices that weren’t purchased directly, the user has a 30-day provisional period to release the device from Apple School Manager or Apple Business Manager, supervision, and MDM. This 30-day provisional period begins after the device:
Is disconnected from the Mac running Apple Configurator 2
Is successfully enrolled in an MDM server configured in Apple School Manager or Apple Business Manager
There are two ways to add devices to Apple School Manager or Apple Business Manager:
You don’t enable “Activate and complete enrollment”: You have a new or existing device that requires unique user authentication to enroll in MDM. The device is left at the Setup Assistant, and the user completes the enrollment.
You enable “Activate and complete enrollment”: You have an existing device that already has a record in, and is managed by, your MDM solution. This can include managing all the Setup Assistant panes so the user gets a device that’s ready to use.
Prepare devices or add prepare steps to Blueprints
In Apple Configurator 2  , select one or more devices you want to prepare or Blueprints, then do one of the following:
Click Prepare  in the toolbar.
Choose Actions > Prepare.
Control-click the selected devices or Blueprints, and choose Prepare.
The Prepare Assistant appears.
Select Manual Configuration, then choose any of the following options:
Add the devices to Apple School Manager or Apple Business Manager, and choose whether to activate the device and complete the enrollment.
Designate an iPhone, iPad, or Apple TV device as a supervised device.
When a device is supervised, you’re granted ongoing control over its configuration, and you can reapply that configuration at any time just by reconnecting the device to the Mac with Apple Configurator 2 installed.
Some payloads and restrictions are available only for supervised devices. For information about supervised-only restrictions, see MDM restrictions for supervised Apple devices in Apple Platform Deployment.
Allow devices to pair with other computers: Select this option if you want users to use a USB cable to sync with a Mac or PC.
Note: Changing this restriction later requires you to erase, prepare, and supervise the devices again.
Enable Shared iPad : Select this option if you want users to use Shared iPad .
See Shared iPad overview in Apple Platform Deployment.
When you have made your selections, click Next. Follow the Help buttons if you need further clarification.
If you don’t want to enroll with an MDM solution, select Do not enroll in MDM, then click Next and skip to step 5.
Select an existing MDM solution that was set up in Apple Configurator 2 preferences, or select New Server, then click Next, and create a new connection with the following:
Name: A description for the server, which may be based on location, grade level, or something easy for you to remember.
Enrollment URL: The fully qualified domain name (FQDN) or IP address of your MDM solution. Apple Configurator 2 then attempts to ask the MDM solution for the full enrollment URL.
If the default FQDN or IP address doesn’t return the correct information, consult your MDM vendor.
When you’re done, click Next.
If necessary, enter a Managed Apple ID and password from Apple School Manager or Apple Business Manager and click Next to authenticate, or click Skip.
Choose your organization information.
If you selected Supervision, you must select an existing organization or enter new information about your organization (only the name field is required). See:
Important: After you prepare supervised devices with a supervision identity, changing that identity later requires that you erase, prepare, and supervise the devices again. The actual name of the supervision identity often isn’t critical, but you need to standardize on the use of that identity for all instances of mobile device management (MDM) and Apple Configurator 2 .
When you’re done, click Next.
Select which panes of Setup Assistant to skip. For information on each Setup Assistant pane, see Manage Setup Assistant for Apple devices in Apple Platform Deployment.
Choose Window > View Activity to follow the progress as Apple Configurator 2 prepares the devices.
Источник
Intro to Apple Configurator 2
Apple Configurator 2 is a macOS app that makes it easy to deploy iPad, iPhone, iPod touch , and Apple TV devices in your school or business.
Note: In the rest of this document, the term iPhone refers to both iPhone and iPod touch .
Configure large numbers of devices
Apple Configurator 2 features a flexible, device-centric design that enables you to quickly and easily configure one or dozens of iPhone, iPad, and Apple TV devices connected to your Mac through USB or—in the case of Apple TV —wirelessly. After you connect a device, it can be seen in Apple Configurator 2 . Simply select a single device—or many at once—and perform an action. With Apple Configurator 2 , you’re able to update software, install apps and configuration profiles, rename and change wallpaper on devices, export device information and documents, and much more.
Apple Configurator 2 also includes a window that displays information for devices—such as operating system version, serial number, hardware IDs and addresses, available capacity, and log messages collected by your computer.
Activate devices without an internet connection
If iOS, iPadOS, and tvOS devices have absolutely no internet connection and they’re connected to a host Mac with an internet connection while the devices are being set up, you can use Apple Configurator 2 to activate them. Administrators can restore, activate, and prepare devices with their necessary configuration including Apps, Profiles, and Documents without ever needing to connect to either Wi-Fi or cellular networks. This feature doesn’t allow an administrator to bypass any existing Activation Lock requirements that are normally required during nontethered activation.
Customize or automate your device configuration
Apple Configurator 2 automates MDM enrollment to distribute apps seamlessly from the App Store. It does this by integrating with Apple School Manager and Apple Business Manager. The Prepare Assistant makes it easy to supervise and configure a cart of iPad devices for the classroom or to quickly enroll a large number of devices in your MDM solution for ongoing management. The built-in configuration profile editor supports creating and editing profiles with the latest iOS, iPadOS, and tvOS settings.
If you’re configuring devices in an environment where consistency is critical, use Blueprints in Apple Configurator 2 to create a custom configuration for your devices, one that can be applied with one click. A Blueprint is a template device to which you add configuration profiles and apps and perform actions, just as you would do for a connected physical device.
You can also fully automate Apple Configurator 2 and integrate its capabilities into your existing device management workflows using the included command-line tool, the AppleScript scripting library, or Automator Actions.
Support for iCloud Drive enables you to keep your configuration profiles and other settings consistent across multiple Apple Configurator 2 computers.
Here’s how you use Apple Configurator 2 to configure and deploy devices:
Create Blueprints: Blueprints let you record actions that can be applied to actual devices. You add configuration profiles and apps to Blueprints, just as you would add them to a physical device. You can prepare a Blueprint so that it has the mobile device management (MDM) information and supervision identity attached. You can also add specific actions to a Blueprint, such as putting the device into Single App Mode. After you have the Blueprint the way you want, you can apply it to devices. See Use Blueprints.
Create configuration profiles: You can change device settings, letting users automatically connect to Wi-Fi networks, preconfigure mail and Microsoft Exchange settings, and more. See Create and edit configuration profiles.
Prepare devices: You first configure one device and then deploy that configuration to many devices at once. Preparing devices is a great deployment option for enterprise organizations and schools that provide devices to employees or students for their day-to-day use. You can reuse devices the organization already owns, or you can begin with new ones. See Intro to preparing devices.
Источник
Prepare Apple TV in Apple Configurator 2
You prepare Apple TV just as you would an iPhone or iPad. When you prepare an Apple TV , you can enroll it in a mobile device management (MDM) solution, update software, or add configuration profiles to it. When you update tvOS, you can rename the device and choose the language and region.
Apple TV supports specific payload settings. Other payloads apply only to iPhone and iPad devices but not to Apple TV .
WARNING: Preparing devices may take a few minutes, and you shouldn’t stop the installation after it starts. If you try to cancel or stop the process, Apple Configurator 2 takes the time necessary to safely terminate all operations. Don’t shut down the Mac running Apple Configurator 2 while it’s preparing devices—doing so could damage the devices.
Before you begin, make sure you have the following:
Apple TV (HD or 4K) connected to a monitor
Apple TV and the Mac on the same Wi-Fi or Ethernet network (with Bonjour enabled across subnets if necessary)
Prepare Apple TV HD or Apple TV 4K using Wi-Fi or Ethernet
Make sure your Apple TV is connected to the same network your Mac is connected to.
Make sure the Apple TV is at the first screen of the Setup Assistant that says Pair Your Remote.
Launch Apple Configurator 2 .
From the Apple Configurator 2 menu, choose Paired Devices.
Select your Apple TV in the Paired Devices list, then click Pair.
Enter the six-digit personal identification number (PIN) that appears on the screen of your Apple TV .
Select your Apple TV in the device window of the Apple Configurator 2 .
Click Prepare and follow the onscreen instructions to set up your Apple TV .
Источник
Revive or restore an Intel-based Mac using Apple Configurator 2
In very rare circumstances, such as a power failure during a macOS update or upgrade, a Mac may become unresponsive and so the firmware must be revived or restored.
Important: First try reviving the computer. If that fails or if you can’t start the Mac from the startup volume, recoveryOS, or Internet Recovery, you must restore the firmware and erase the internal flash storage.
What does a revive do to your Mac?
A revive updates the firmware on the Apple T2 Security Chip. A revive is designed to not make any changes to the startup volume, the user’s data volume, or any other volumes. User data may be retained if recoverable.
What does a restore do to your Mac?
A restore updates the firmware and erases recoveryOS and macOS on your internal storage. When this process is complete, any data on any internal volumes is unrecoverable.
You must restore the firmware and erase the internal flash storage if:
Reviving the firmware was unsuccessful
You can’t start the Mac from the startup volume, recoveryOS, or Internet Recovery
Before you begin
These revive and restore instructions cover the following Intel-based Mac computers with an Apple T2 Security Chip:
MacBook Pro (13-inch, 2020, Four Thunderbolt 3 Ports)
MacBook Pro (13-inch, 2020, Two Thunderbolt 3 Ports)
MacBook Pro (13-inch, 2019, Four Thunderbolt 3 Ports)
MacBook Pro (13-inch, 2019, Two Thunderbolt 3 Ports)
MacBook Pro (13-inch, 2018, Four Thunderbolt 3 Ports)
MacBook Pro (16-inch, 2019)
MacBook Pro (15-inch, 2019)
MacBook Pro (15-inch, 2018)
MacBook Air (Retina, 13-inch, 2020)
MacBook Air (Retina, 13-inch, 2019)
MacBook Air (Retina, 13-inch, 2018)
Make sure you have:
The latest version of Apple Configurator 2 installed on a Mac running macOS 10.15.6 or later
You may need to configure your web proxy or firewall ports to allow all network traffic from Apple devices to Apple’s network 17.0.0.0/8. For more information on the ports used by Apple products, see the Apple Support article Use Apple products on enterprise networks. For more information on whether your network uses a web proxy or firewall, consult your router manual or your internet provider.
A supported USB-C to USB-C charge cable, such as the one sold by Apple (may not be available in all countries or regions) or a supported USB-A to USB-C cable
The USB-C cable must support both power and data. Thunderbolt 3 cables aren’t supported.
How the revive and restore processes work
The revive and restore processes involve the following steps:
Step 1. Plug the Mac computers together with a supported USB-C cable, locate Apple Configurator 2 in the Applications folder or in Launchpad, then launch Apple Configurator 2 on the first Mac.
Step 2. Restart the second Mac using a special key sequence. The key varies according to the type of Mac you want to revive or restore.
Step 3. Use Apple Configurator 2 to revive the Mac.
Step 4. If a revive is unsuccessful, you can use Apple Configurator 2 to restore the Mac.
Step 1: Connect the Mac computers
1. Make sure your first Mac is plugged into a power source and started.
Important: Don’t launch Apple Configurator 2 until after you have connected both Mac computers with the USB-C cable.
2. Plug in the USB-C cable (along with any adapters needed) and connect the two Mac computers.
Step 2: Prepare the Mac you want to revive or restore
Select the Mac you want to revive or restore.
If reviving or restoring an iMac (2020) or iMac Pro (2017):
1. Disconnect the iMac Pro or iMac from power.
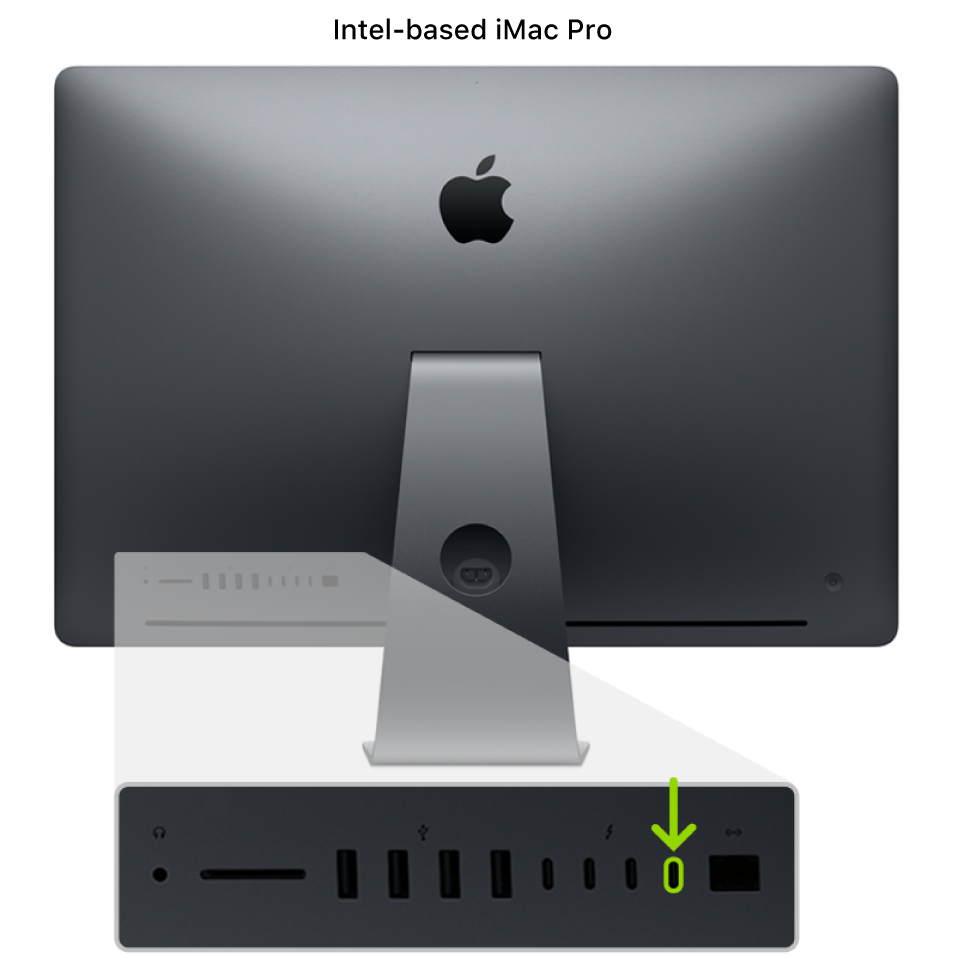
2. Plug the USB-C cable into the Thunderbolt port closest to the Ethernet port.

3. While holding down the power button, connect the iMac Pro or iMac to power and continue to hold the power button for about 3 seconds.
Note: You won’t see any screen activity from the iMac Pro or iMac you are trying to revive or restore.
If reviving or restoring a Mac mini (2018):
1. Connect a monitor to your Mac mini (so you can see when the process is complete).
2. Disconnect the Mac mini from power for at least 10 seconds.
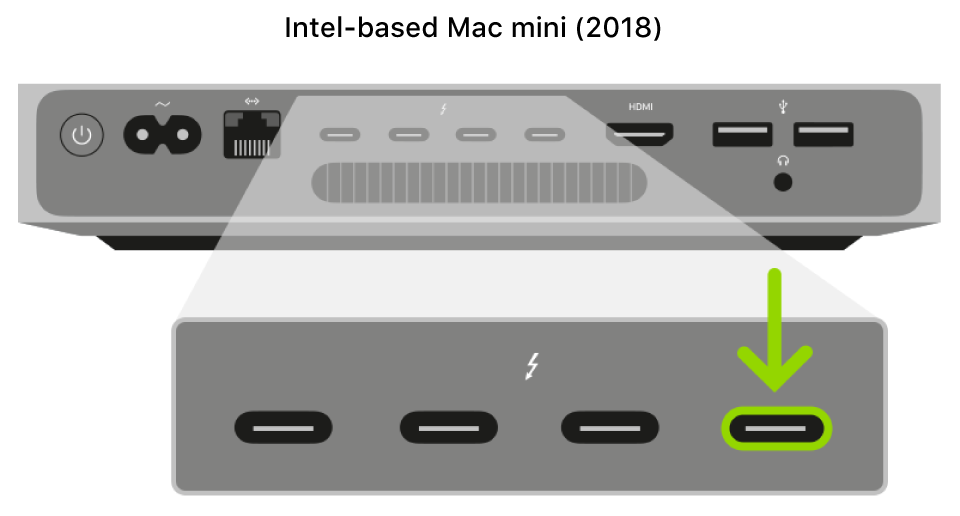
3. Plug the USB-C cable into the Thunderbolt port closest to the HDMI port.
4. While holding down the power button, connect the Mac mini to power and continue to hold the power button for about 3 seconds.
Note: You won’t see any screen activity from the Mac mini you are trying to revive or restore.
If reviving or restoring an Intel-based Apple notebook computer:
1. Press the Sleep/Wake button for about 5 seconds to shut down the Apple notebook computer.
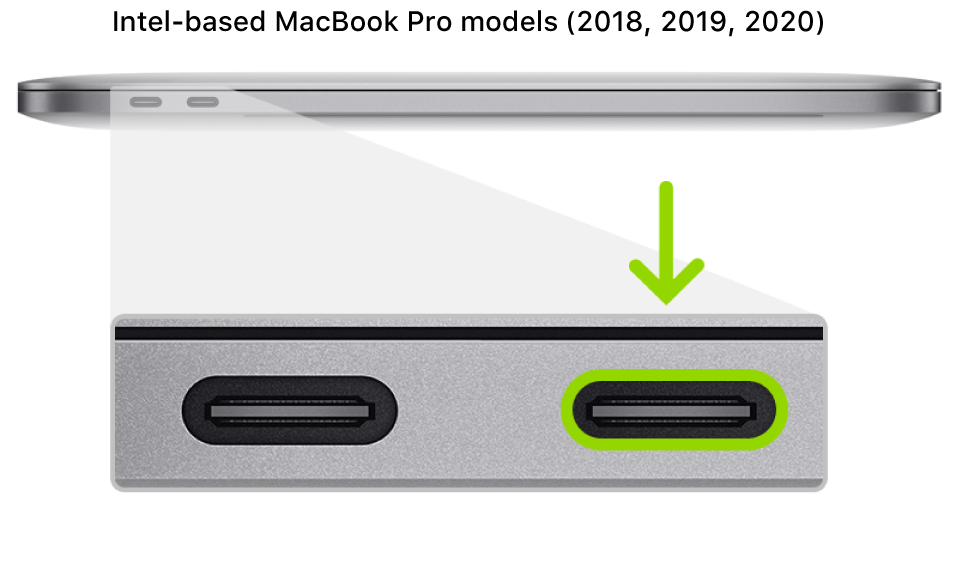
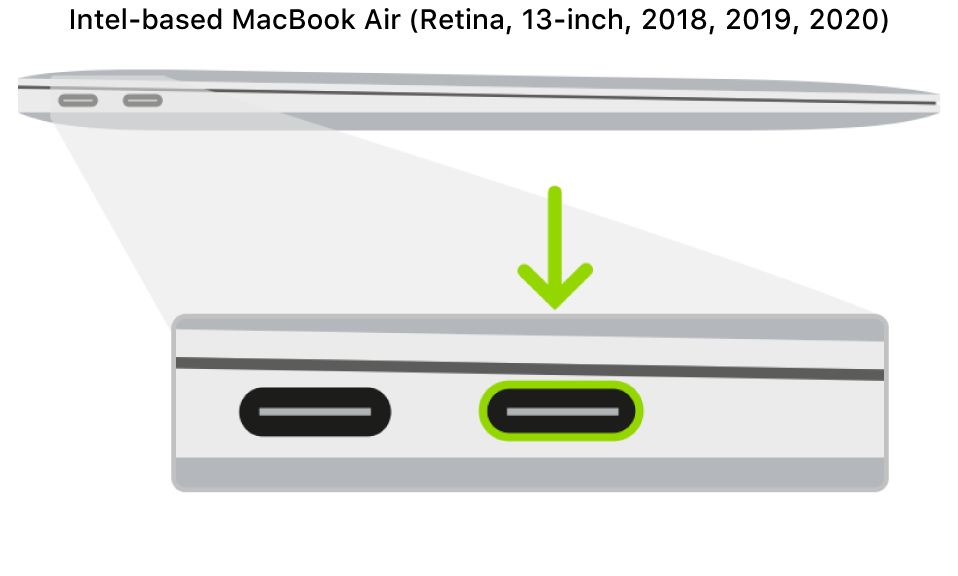
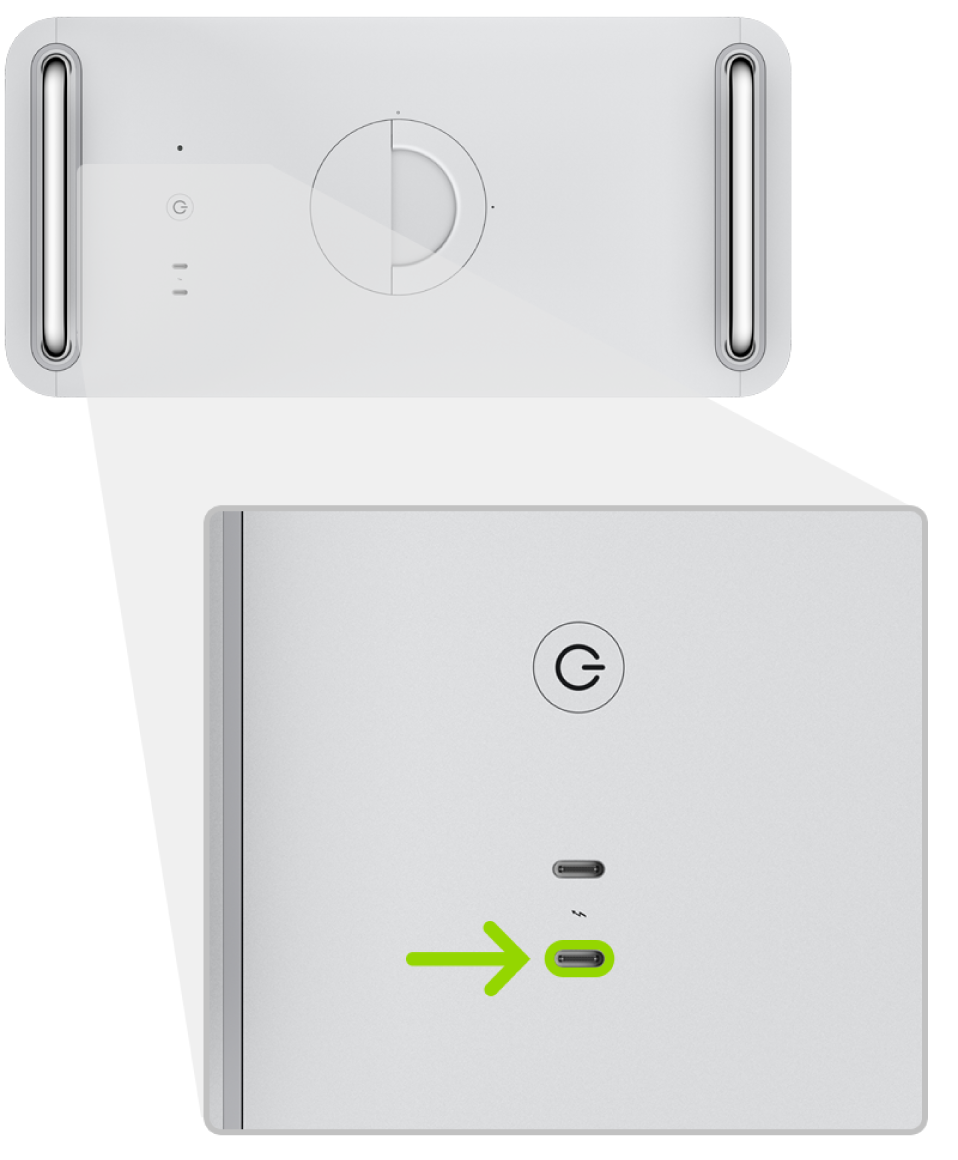
2. Plug the USB-C cable into the front Thunderbolt port on the left side of the Apple notebook computer.
3. While holding down the power button, at the same time press all three of the following keys for about 3 seconds:
The right Shift key
The left Option key
The left Control key
Note: You won’t see any screen activity from the Apple notebook computer you are trying to revive or restore.
If reviving or restoring a Mac Pro (2019):
You need to revive the firmware in a Mac Pro if the light turns amber and flashes the following sequence in under 4 seconds: three short flashes, three long flashes, and three short flashes again. For more information, see the Apple Support article Mac Pro (2019) status indicator light behavior.
1. Connect a monitor to your Mac Pro (so you can see when the process is complete).
2. Disconnect the Mac Pro from power, then do one of the following:
For the desktop Mac Pro , plug the USB-C cable into the Thunderbolt port farthest away from the power button.
For the rack mount Mac Pro , plug the USB-C cable into the Thunderbolt port closest to the power button.
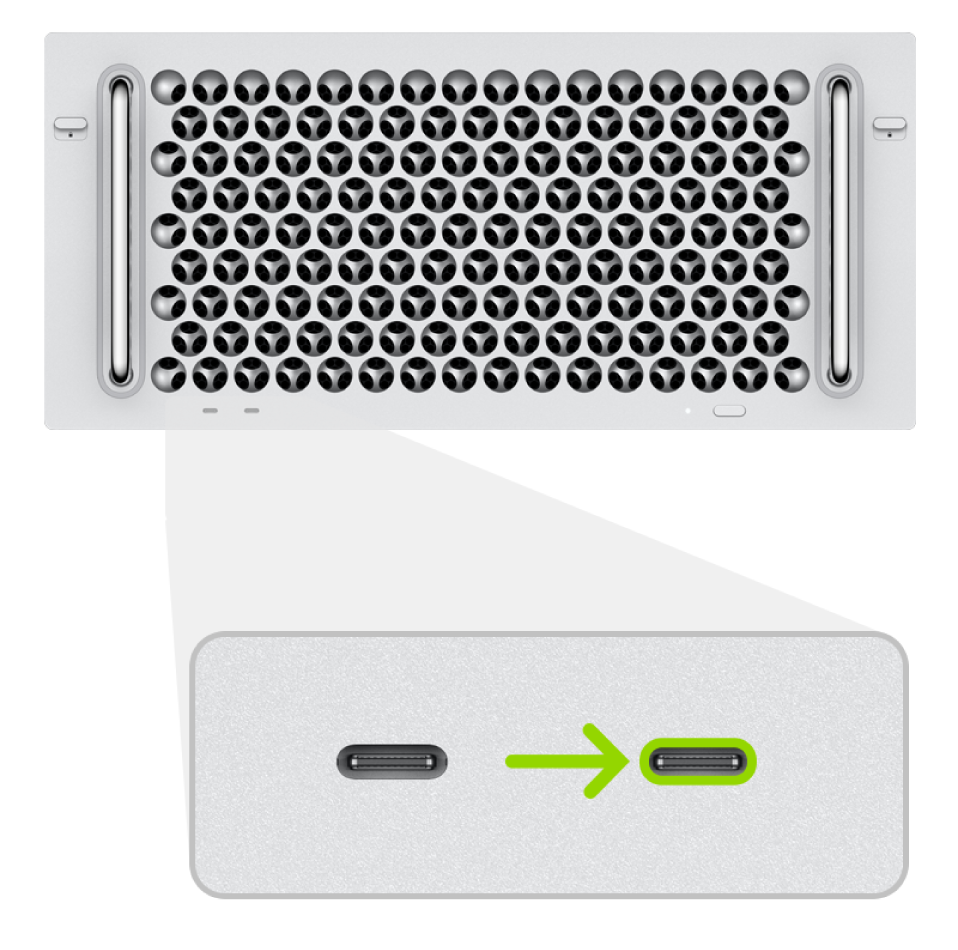
3. While holding down the power button, connect the Mac Pro to power and continue to hold the power button for about 3 seconds.
Note: You won’t see any screen activity from the Mac Pro you are trying to revive or restore.
Step 3: Revive the firmware
In the Apple Configurator 2 window on the first Mac, select the DFU icon of the Mac whose chip firmware you want to revive.
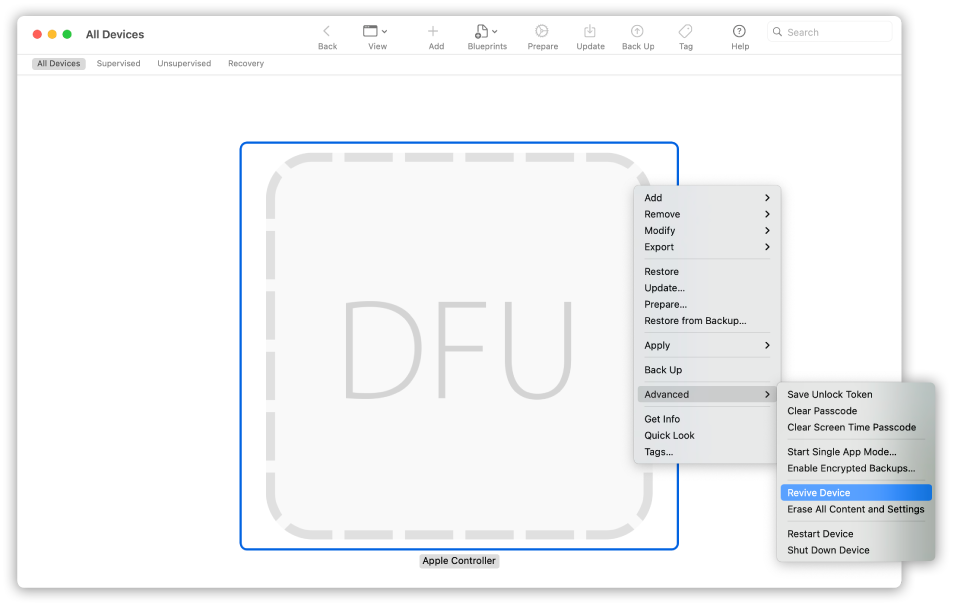
Do one of the following:
Choose Actions > Advanced > Revive Device, then click Revive.
Control-click the selected DFU icon, then choose Advanced > Revive Device, then click Revive.
Note: If you lose power to either Mac during this process, begin the revive process again.
Wait for the process to complete. During this process, an Apple logo will appear and disappear on the second Mac.
After the process successfully completes, your Mac will reboot.
Note: If the revive was unsuccessful, proceed to step 4.
If necessary, use recoveryOS to reinstall macOS.
Quit Apple Configurator 2 on the first Mac, then unplug any cables and adapters.
Step 4: Restore the firmware and erase all data
In the Apple Configurator 2 window on the first Mac, select the DFU icon of the Mac to be restored.
Do one of the following:
Choose Actions > Restore, then click Restore.
Control-click the selected DFU icon, then choose Actions > Restore, then click Restore.
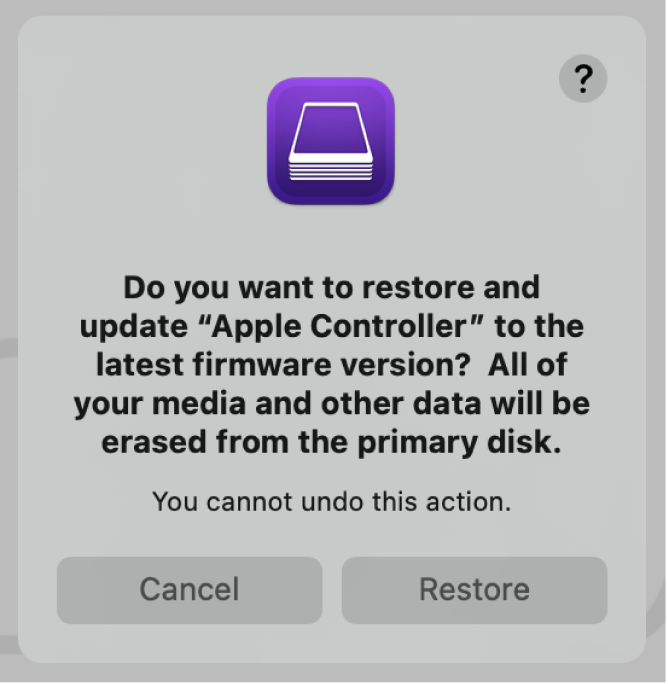 The restore confirmation dialog.
Note: If you lose power to either Mac during this process, begin the restore process again.
Wait for the process to complete. During this process, an Apple logo will appear and disappear on the second Mac.
After the process completes, your Mac will restart.
After the Mac restarts, press Shift-Option-Command-R at startup (Internet Recovery) to install the macOS that came with your Mac, or the closest version still available.
See the Apple Support article How to reinstall macOS.
Quit Apple Configurator 2 and unplug any adapters and cables.
Источник


