- Sign in with your Apple ID
- Sign in on your iPhone, iPad, or iPod touch
- Sign in on your Mac
- Sign in on Apple TV
- Sign in on apps and other devices
- Sign in to use Apple Music, the Apple TV app, and more on your other devices
- Sign in to use iCloud on your other devices
- Use Sign in with Apple on third-party apps and websites
- Learn more
- Manage and use your Apple ID
- Sign in with your Apple ID
- Manage your Apple ID
- Help us protect your account
- Manage the apps that you use with Sign in with Apple
- View the apps using your Apple ID
- On your iPhone, iPad, or iPod touch
- On your Mac
- On the web
- Manage your apps
- Turn off email forwarding
- Change your forwarding address
- Stop using your Apple ID with an app
- See and remove your devices that are associated with Apple ID purchases
- Use a Mac or PC to see or remove your associated devices
- Remove your associated iPhone, iPad, or iPod touch
- More about associated devices
- Check your Apple ID device list to see where you’re signed in
- See where you’re signed in
- Use your iPhone, iPad, iPod touch, or Apple Watch to see where you’re signed in
- Use your Mac to see where you’re signed in
- Use your PC to see where you’re signed in
- Use the web to see where you’re signed in
- Add a device to the list
- Remove a device from the list
- Use your iPhone, iPad, or iPod touch to remove a device
- Use your Mac to remove a device
- Use your PC to remove a device
- Use the web to remove a device
- Permanently remove a device from your account page
Sign in with your Apple ID
Your Apple ID is the account that you use to access all Apple services and make all of your devices work together seamlessly. After you log in, you can use the App Store, iCloud, iMessage, Apple Music, Apple TV+, and more.
Want to use Sign in with Apple on third-party apps or websites? Learn how to use Sign in with Apple.
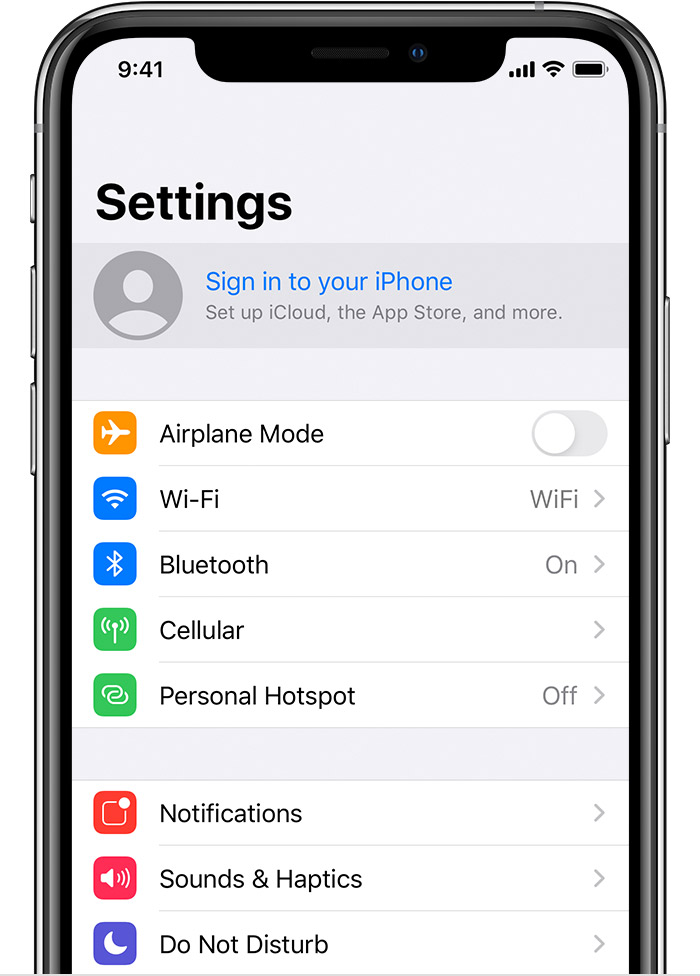
Sign in on your iPhone, iPad, or iPod touch
Sign in on your Mac
Sign in on your Apple TV
Sign in on apps and other devices
Sign in on your iPhone, iPad, or iPod touch
- Open the Settings app.
- Tap Sign in to your [device].

- Enter your Apple ID and password.
- If prompted, enter the six-digit verification code sent to your trusted device or phone number and complete sign in.
If you’re already signed in to iCloud on the iPhone paired with your Apple Watch, you will automatically be signed in to that Apple ID. Learn more about how to set up and sign in to your Apple Watch.
Sign in on your Mac
- Choose Apple menu > System Preferences.
- Click Sign In.
- Enter your Apple ID and password.
- If prompted, enter the six-digit verification code sent to your trusted device or phone number and complete sign in.
Sign in on Apple TV
- From the Home screen, choose Settings.
- Then choose Users and Accounts and select Add New User…
- Select Enter New…, then follow the on screen instructions.
If you use two-factor authentication on an Apple TV (2nd or 3rd generation), you might need to enter a verification code with your password. Learn how to get a verification code on your trusted device or sent to your trusted phone number.
Sign in on apps and other devices
You can use your Apple ID on some third-party devices to sign in to Apple services like Apple Music, the Apple TV app, and more.
Depending on your device, you might need to use an app-specific password.
Sign in to use Apple Music, the Apple TV app, and more on your other devices
You can sign in to Apple Music on Android, or sign in to the Apple TV app on your smart TV or streaming device.
On your Windows PC, you can sign in to iTunes for Windows to buy movies and TV shows, or listen to songs on Apple Music.
Sign in to use iCloud on your other devices
On your Windows PC, you can set up and sign in to iCloud for Windows to access photos, documents, and more.
You can also sign in to iCloud.com from your browser. Learn which iCloud.com features are available on your device.
Use Sign in with Apple on third-party apps and websites
If you see a Sign in with Apple button on a participating third-party app or website, you can use your existing Apple ID to quickly set up an account and sign in. Learn how to use Sign in with Apple.
When you sign in to the App Store and other media services for the first time, you might need to add a credit card or other payment information. You can’t sign in to the App Store and other media services with more than one Apple ID at the same time, or update the content you buy with a different Apple ID. Depending on how you created your Apple ID, you might be prompted to upgrade to two-factor authentication on an eligible device.
Learn more
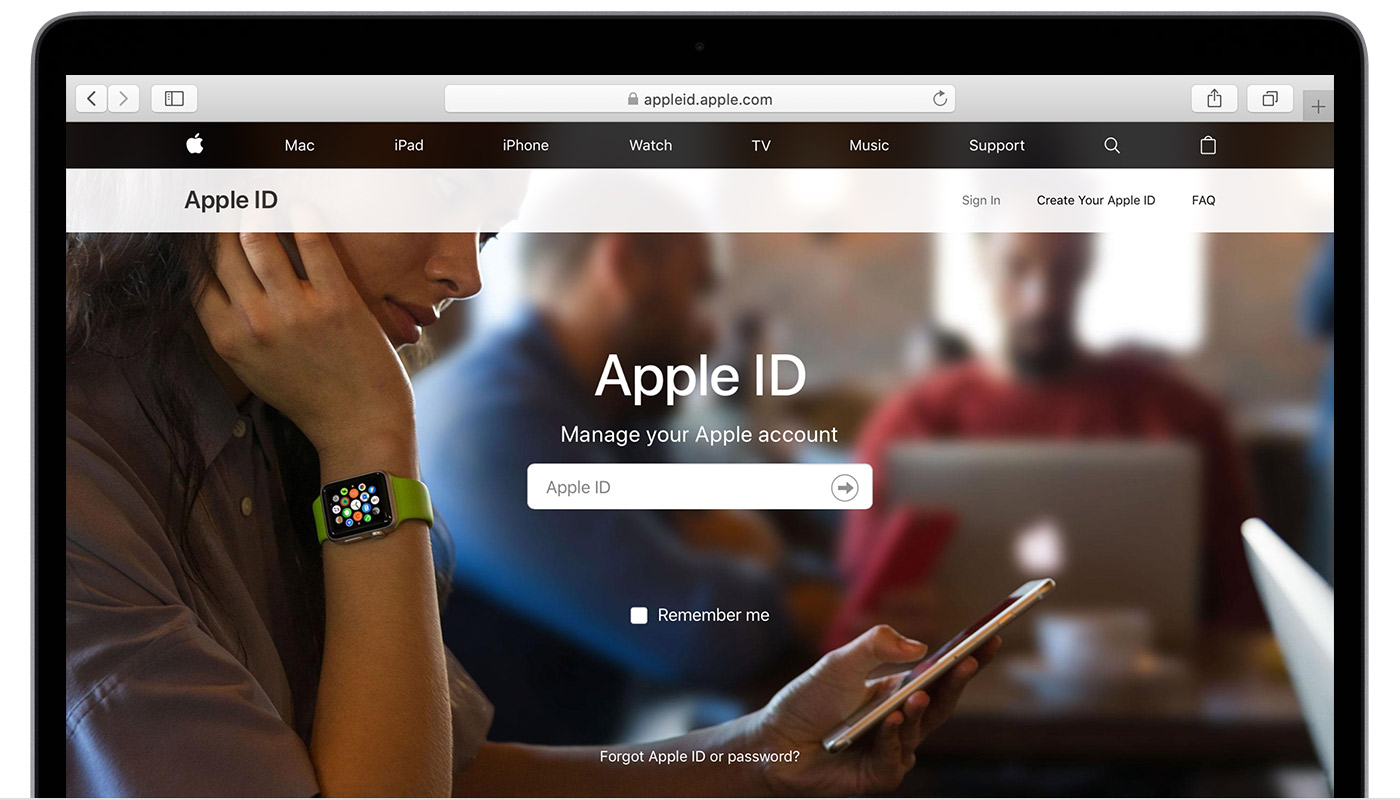
- To view and manage your Apple ID account details on the web, sign in to appleid.apple.com.
- Learn more about where you can use your Apple ID.
- Learn how to manage your subscriptions to services like Apple Music or Apple TV+.
- If you have multiple Apple IDs, you can’t merge them.
Information about products not manufactured by Apple, or independent websites not controlled or tested by Apple, is provided without recommendation or endorsement. Apple assumes no responsibility with regard to the selection, performance, or use of third-party websites or products. Apple makes no representations regarding third-party website accuracy or reliability. Contact the vendor for additional information.
Источник
Manage and use your Apple ID
Your Apple ID is the account you use to access Apple services like the App Store, Apple Music, iCloud, iMessage, FaceTime, and more. You can sign in to all Apple services with a single Apple ID and password.
Sign in with your Apple ID
Use the same Apple ID and password every time you’re asked to sign in to an Apple device or service. If you don’t have an Apple ID, learn how to create a new Apple ID. You can use your Apple ID to:
- Automatically set up all of your Apple services when you set up a new device and sign in with your Apple ID.
- Keep your personal content up to date on all of your devices when you sign in to iCloud.
- Sign in to the iTunes, Books, and App Store to make purchases and access previous purchases.
- Sign in to iMessage and FaceTime 1 to talk and text with friends and family.
- Sign in to third-party apps and websites with Sign in with Apple.

Manage your Apple ID
Because your Apple ID is used across all your devices and services, it’s important to keep your account information up to date. Simply sign in to your Apple ID account page 2 at any time to manage your account:
- Update trusted phone numbers and devices that you’re currently signed in to with your Apple ID.
- Change your password to help maintain the security of your account.
- Update your Apple ID email address 3 to make sure it’s an address that you use frequently.
- Add additional email addresses to help people find and communicate with you on Apple services like FaceTime 1 , iMessage, and Find My.
- Update the birth date associated with your Apple ID.
- Change your Apple ID country or region.
Help us protect your account
The security and privacy of your Apple ID is very important to us. Here are some things you can do to make sure your account remains private and secure:
- If you haven’t already, set up two-factor authentication to add an extra layer of security to your account. Depending on when you created your Apple ID, it might already be protected by two-factor authentication.
- If you can’t set up two-factor authentication, reset your security questions and add a rescue email address. If you forget your password or the answers to your security questions, your rescue email address will help you regain access to your account.
- Learn about best security practices for your Apple ID.
1 FaceTime isn’t available in all countries or regions.
2 Depending on how you created your Apple ID, you might be required to provide additional information or change your Apple ID username from a mobile phone number to an email address.
3 In China mainland and India, you can use your phone number as your Apple ID. In China mainland, you might be required to provide a +86 phone number for your Apple ID. You can change the number later, or change your country or region to a location that doesn’t require it. This number is only used for verification purposes.
Источник
Manage the apps that you use with Sign in with Apple
When you use Sign in with Apple, you can sign in to participating third-party apps and websites with your Apple ID. Learn how to view and manage the apps that you use with Sign in with Apple.
View the apps using your Apple ID
To see a list of the apps that you’re currently using with Sign in with Apple and manage your preferences for each one, go to Apple ID settings on your device or sign in to your Apple ID account page. Learn more about Sign in with Apple.
On your iPhone, iPad, or iPod touch
- Open the Settings app, then tap your name.
- Tap Password & Security.
- Tap Apps Using Your Apple ID.
On your Mac
- Choose Apple menu, then click System Preferences.
- Click Apple ID, then choose Password & Security.
- Click Edit.
On the web
- Sign in to appleid.apple.com.
- Go to the Security section. Under Sign in with Apple, select «Manage apps & websites.»
- Select Manage.
Manage your apps
In your Apple ID account settings, you see a list of apps that you use with Sign in with Apple. To view the information you originally shared with an app, select any app in the list. You can also view a link to the app’s Privacy Policy or Terms & Conditions.
If you chose to hide your email address from an app and use our private email relay service, you can turn off email forwarding to your personal email address. You can also choose to stop using your Apple ID with an app or website.
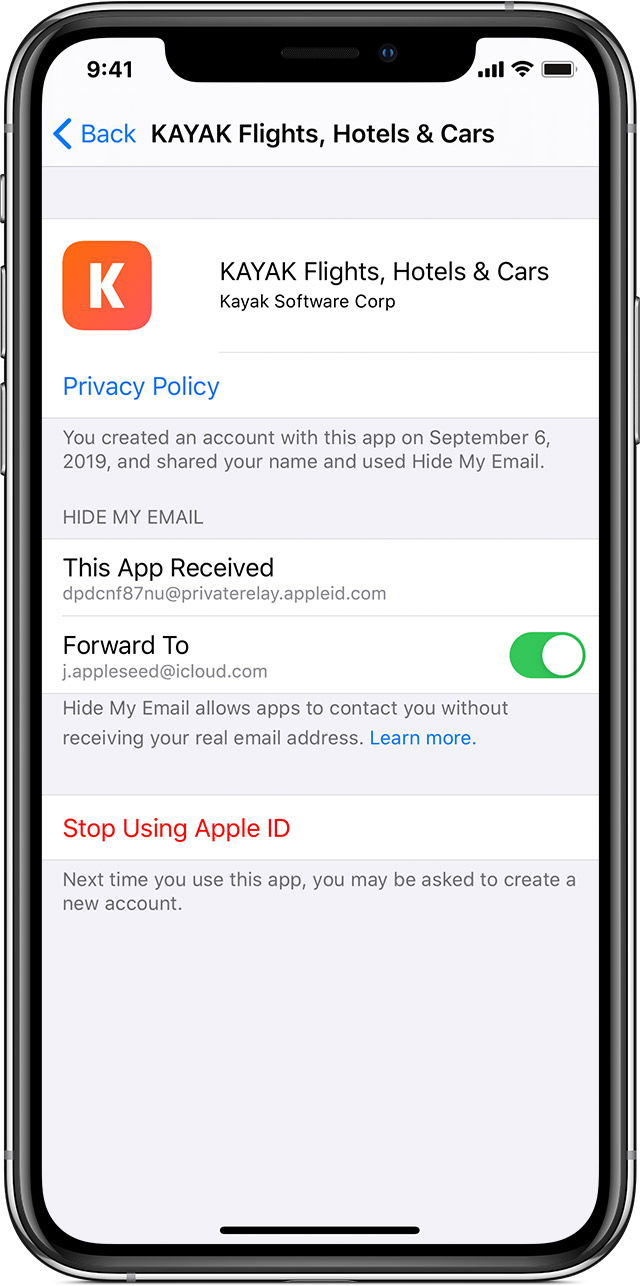
Turn off email forwarding
To stop emails sent by a particular developer from reaching your personal inbox, turn off Forward To, then select Stop. Emails aren’t forwarded to your personal inbox unless you turn email forwarding back on.
Change your forwarding address
If you use Hide My Email with a developer, you can change the email address that receives forwarded messages from that developer. You can select any email address you have on file in your Apple ID account:
- On your iPhone, go to Settings, then tap [your name].
- Tap Name, Phone Numbers, Email, then tap Forward to under Hide My Email.
- Choose the address you want emails to be forwarded to.
When you choose the email address, this applies to email from all apps and developers using Hide My Email.
Stop using your Apple ID with an app
To stop using your Apple ID with an app, select Stop Using Apple ID, then choose Stop Using.
When you stop using your Apple ID with an app, you’re signed out of the app on your device. The next time you visit the app or its associated website, you can either select Sign in with Apple to sign in again, or create a new account.
If you choose to use Sign in with Apple again, you’re signed in to the same account you previously used. Some apps might let you create a new password for your existing account so you can sign in again without using your Apple ID.
Some developers might use Sign in with Apple to give you an account for more than one app. If that’s the case and you turn off email forwarding or stop using your Apple ID for one app, it applies to all apps from that developer.
Источник
See and remove your devices that are associated with Apple ID purchases
Manage the list of devices that can download and play items that you bought with your Apple ID.
When you subscribe to Apple services or buy content from Apple, the device that you’re using becomes associated with your Apple ID. You might want to remove an associated device in these situations:
- If you reach your limit of associations and want to add a new one.
- If you can’t redownload purchases from the App Store, Apple TV app, the iTunes Store, and other Apple services.
- If you want to sell or give away an associated device.
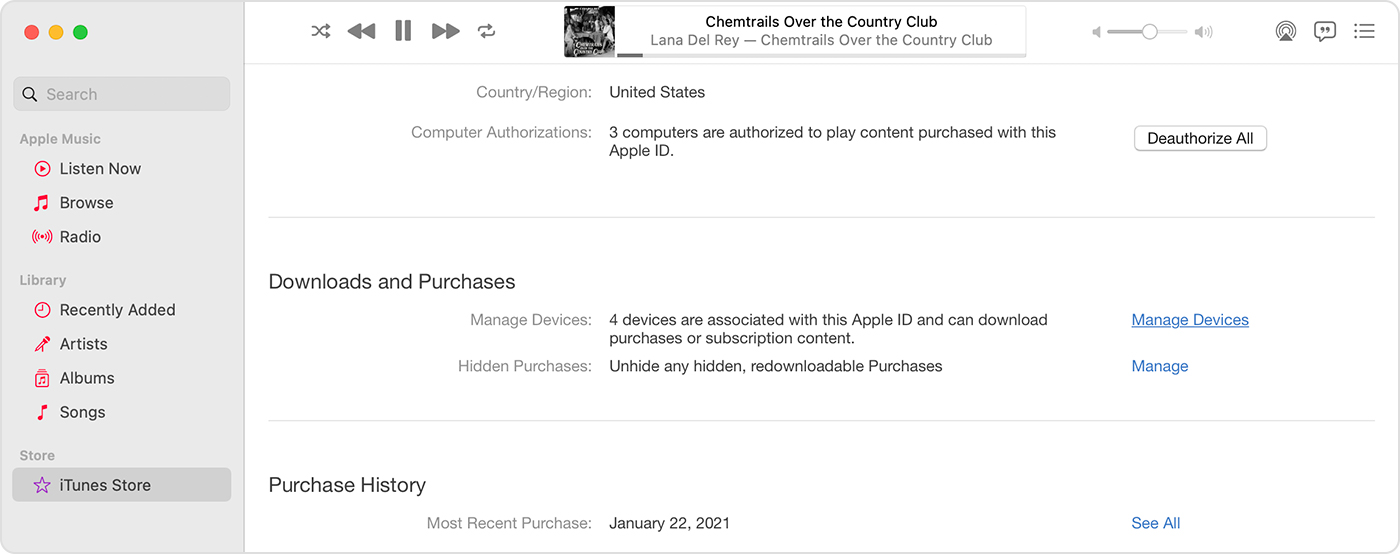
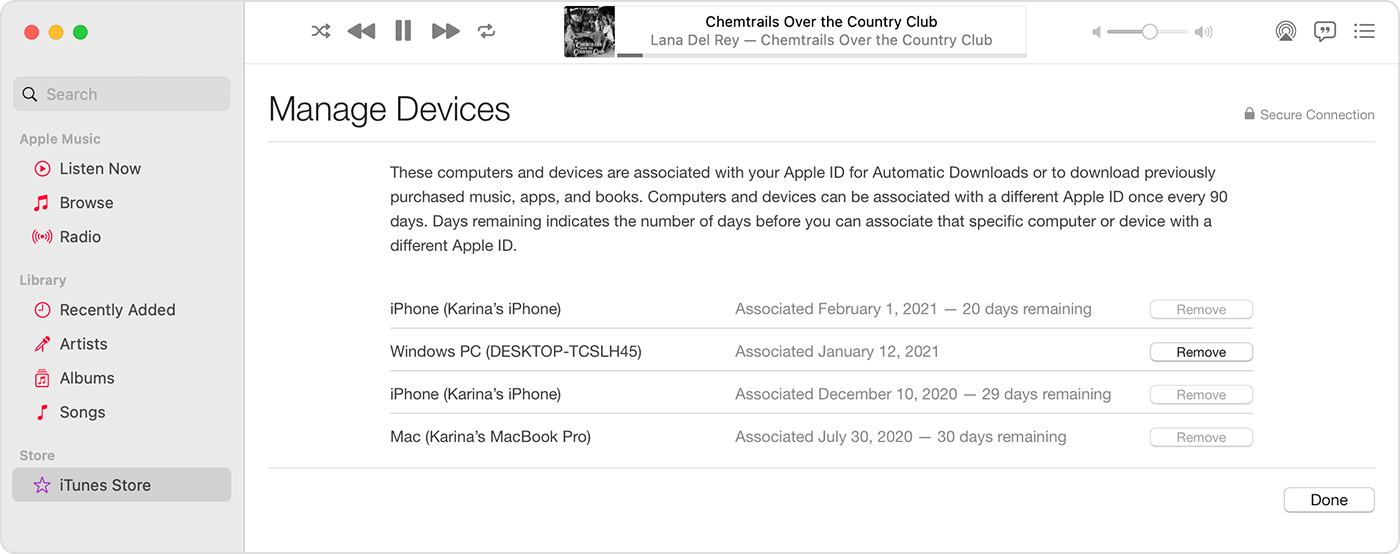
Use a Mac or PC to see or remove your associated devices
- On your Mac, open the Apple Music app. Or on your PC, open iTunes for Windows.
- From the menu bar, choose Account > View My Account. You might need to sign in with your Apple ID.
- Click Manage Devices. If no devices are associated with your Apple ID, you won’t see this section.
- If you want to remove a device, click Remove. If you can’t remove a device, sign out of your Apple ID on that device and try again. If you still can’t remove it, you might need to wait up to 90 days to associate the device with a different Apple ID.
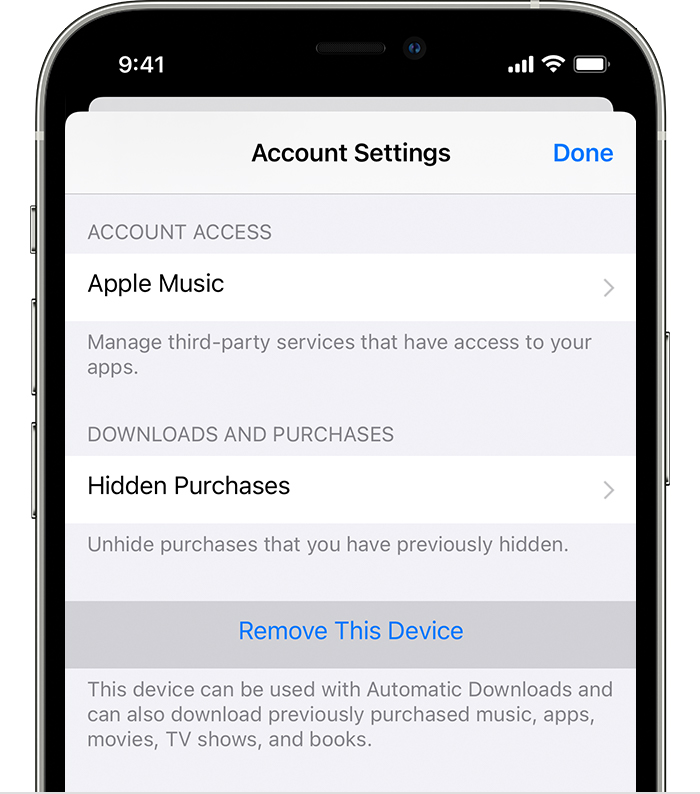
Remove your associated iPhone, iPad, or iPod touch
- Tap Settings, tap your name, then tap Media & Purchases.
- Tap View Account.
- Scroll down, then tap Remove This Device.
More about associated devices
You can have ten devices (no more than five computers) associated with your Apple ID for purchases at one time.
When you try to associate a device that was previously associated, you might see a message that says, «This device is associated with another Apple ID. You cannot associate this device with another Apple ID for [number] days.» You might need to wait up to 90 days to associate the device with a different Apple ID.
This list of associated devices is not the same as the list of devices that you’re currently signed in to with your Apple ID. You can see where you’re signed in on your Apple ID account page.
Information about products not manufactured by Apple, or independent websites not controlled or tested by Apple, is provided without recommendation or endorsement. Apple assumes no responsibility with regard to the selection, performance, or use of third-party websites or products. Apple makes no representations regarding third-party website accuracy or reliability. Contact the vendor for additional information.
Источник
Check your Apple ID device list to see where you’re signed in
Learn which devices appear in your Apple ID device list, how to see your device’s details, and how to remove a device, if necessary.
See where you’re signed in
Use the steps below to see the devices that you’re currently signed in to with your Apple ID.
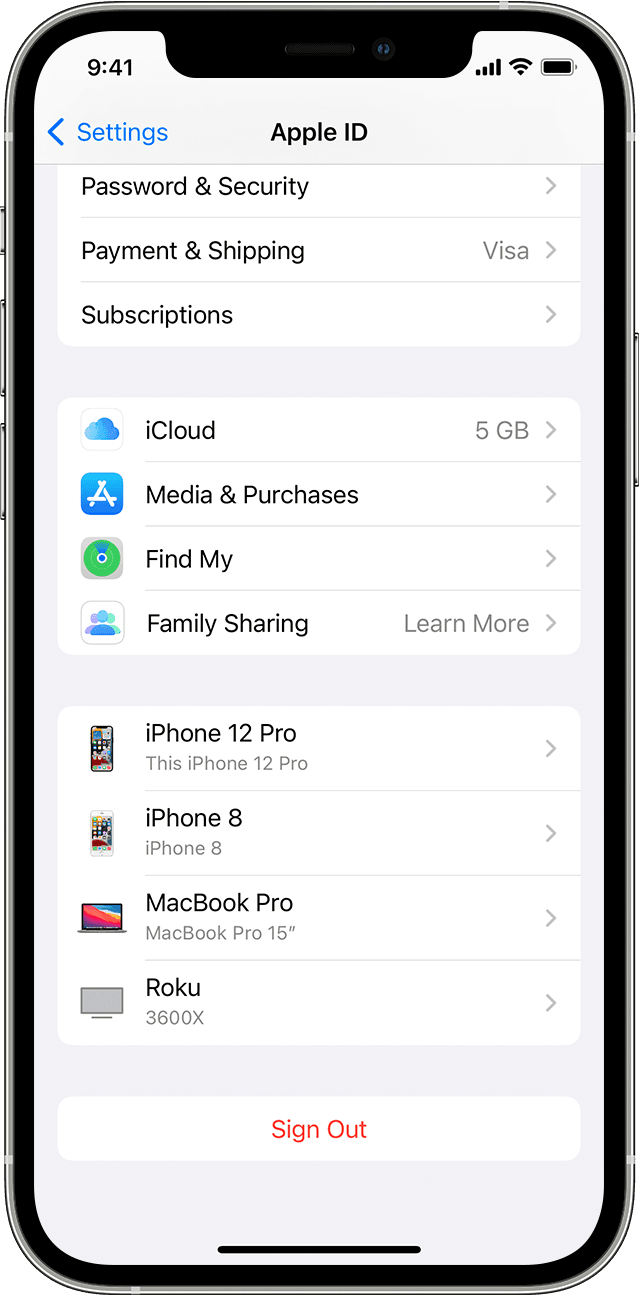
Use your iPhone, iPad, iPod touch, or Apple Watch to see where you’re signed in
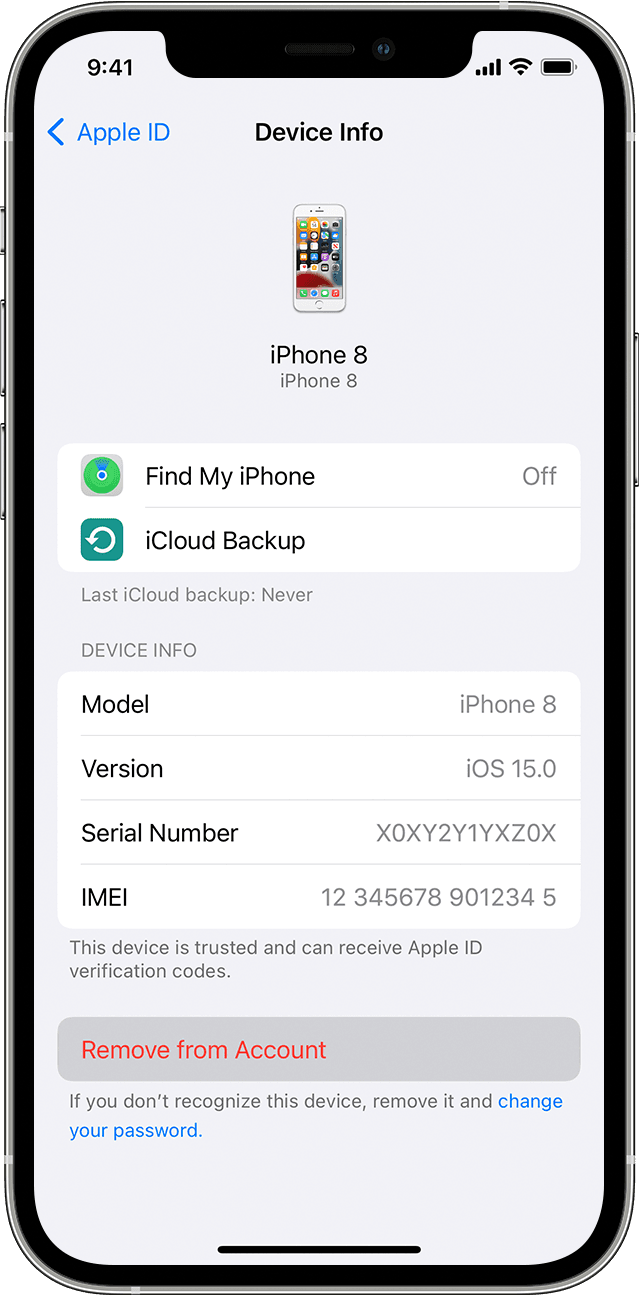
- Tap Settings > [your name], then scroll down.
- Tap any device name to view that device’s information, such as the device model, serial number, OS version, and whether the device is trusted and can be used to receive Apple ID verification codes. The information might vary depending on the device type. You might need to answer your security questions to see device details.
![]()
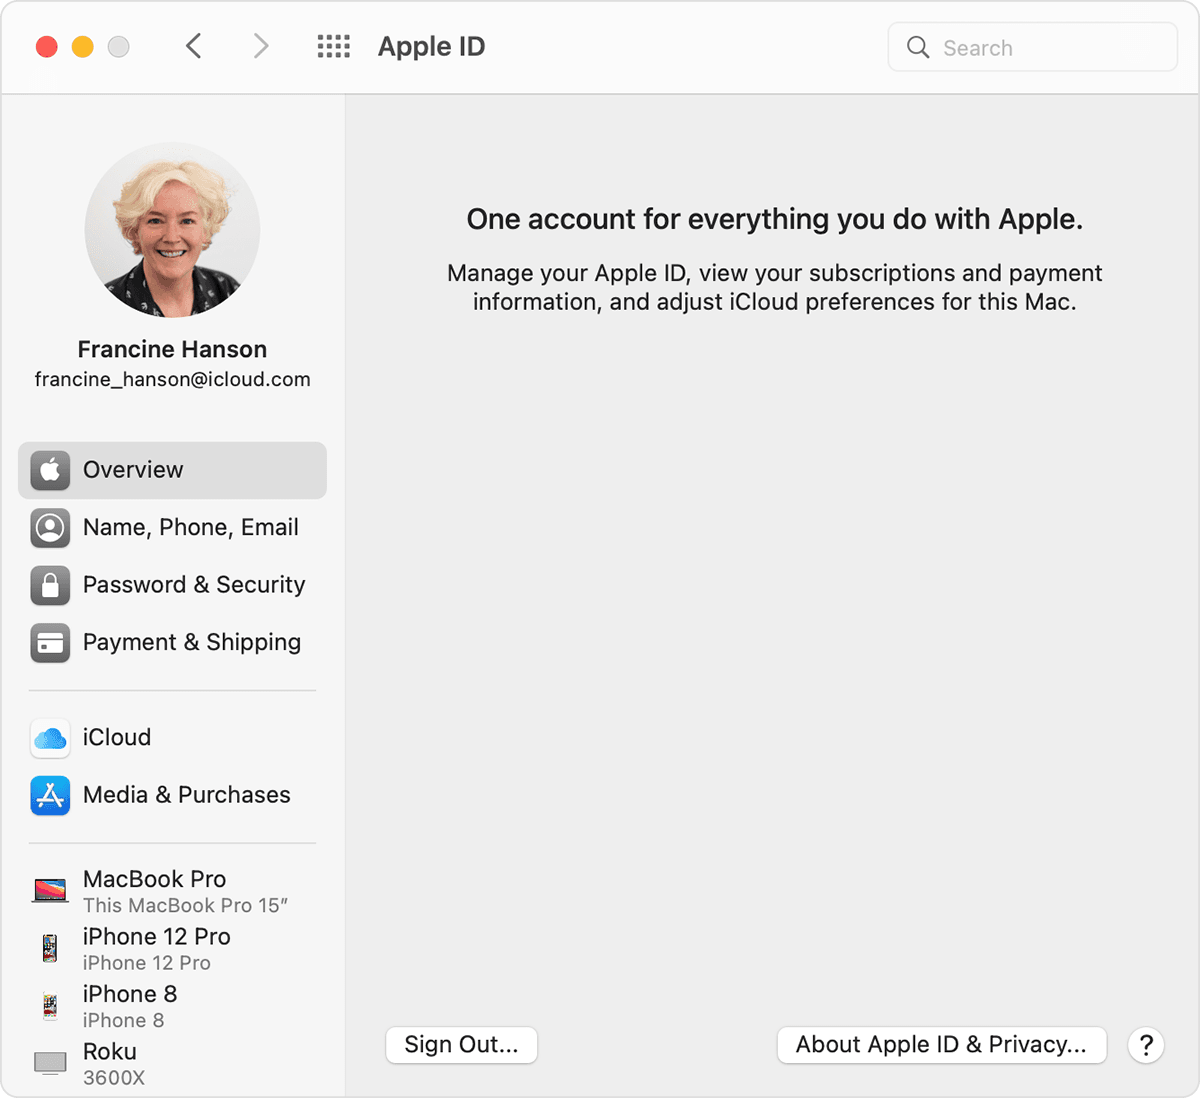
Use your Mac to see where you’re signed in
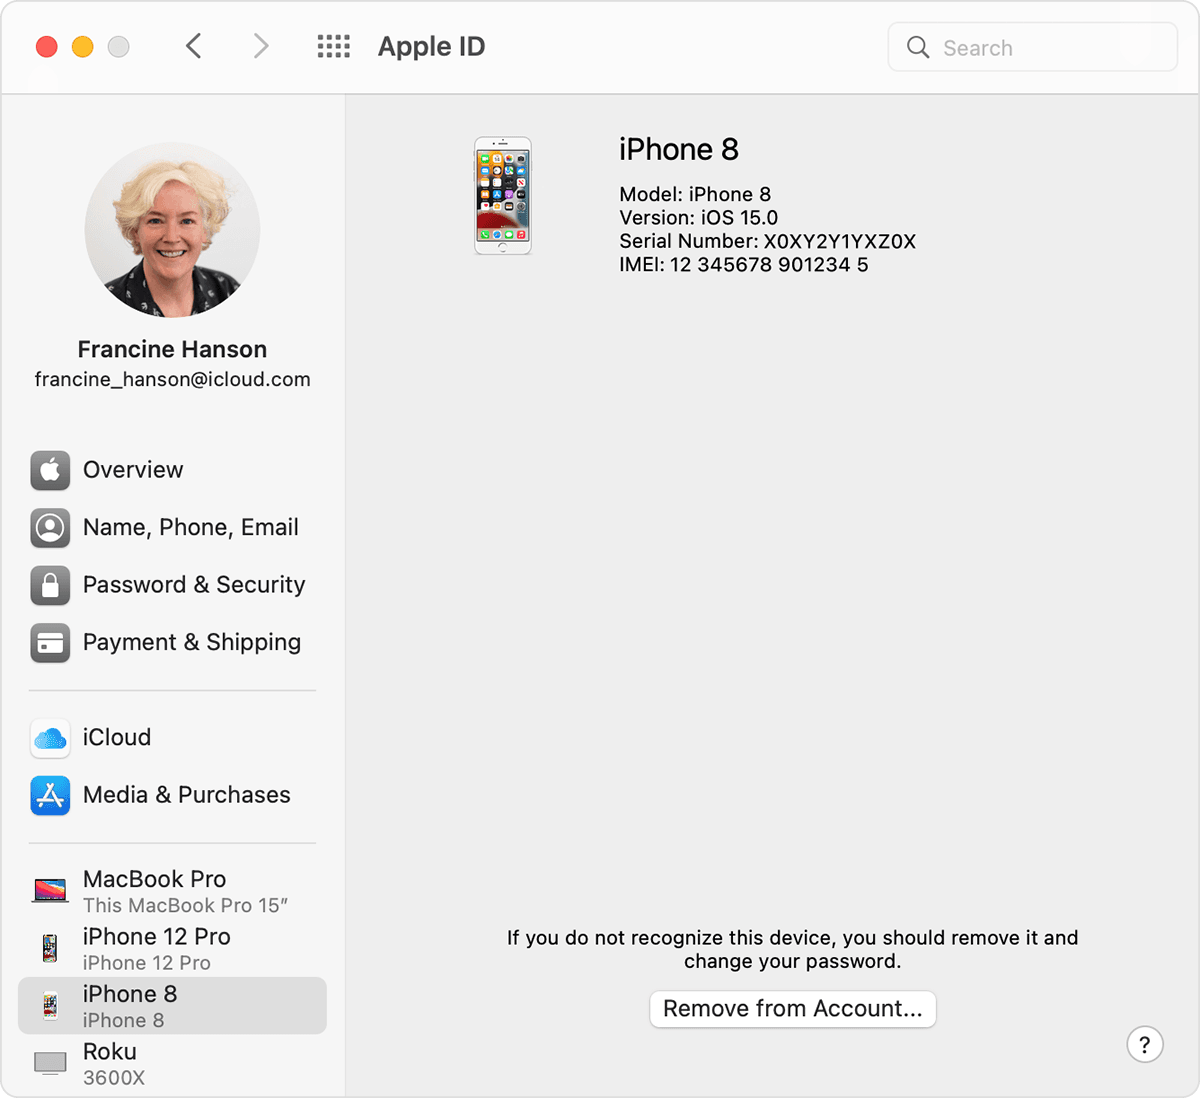
- Choose Apple menu > System Preferences.
- Click Apple ID.
- Click any device name to view that device’s information, such as the device model, serial number, and OS version. The information might vary depending on the device type. You might need to answer your security questions to see device details.
Use your PC to see where you’re signed in
- Open iCloud for Windows.
- Click Account Details, then click Manage Apple ID.
- Click any device name to view that device’s information, such as the device model, serial number, and OS version. The information might vary depending on the device type.
Use the web to see where you’re signed in
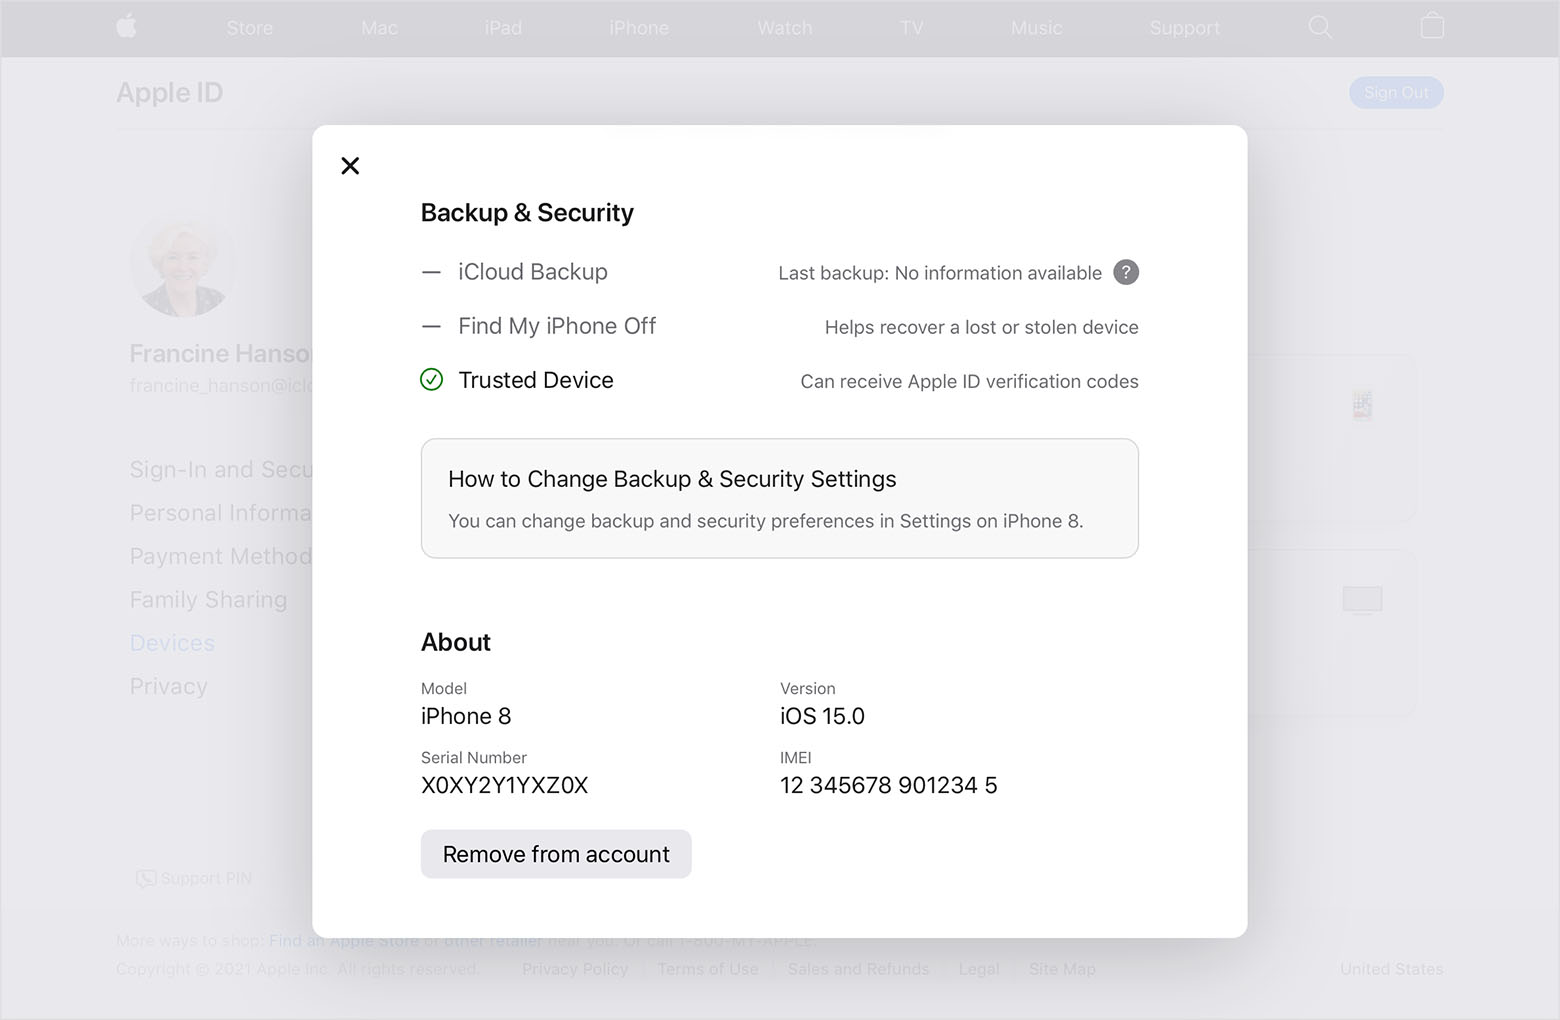
From the Devices section of your Apple ID account page, you can see all of the devices that you’re currently signed in to with your Apple ID, including Android devices, consoles, and smart TVs:
- Sign in to appleid.apple.com,* then select Devices.
- If you don’t see your devices right away, click View Details and answer your security questions.
- Click any device name to view that device’s information, such as the device model, serial number, and OS version. The information might vary depending on the device type.

* Depending on how you created your Apple ID, you might be required to provide additional information.
Add a device to the list
To add a device to the list, you need to sign in with your Apple ID. After you sign in on a device with your Apple ID, that device appears in the list. Here’s where you need to sign in:
- For iOS or iPadOS, sign in to iCloud, iMessage, FaceTime, iTunes & App Stores, or Game Center on the device. You can also see your paired Apple Watch.
- For macOS or Windows 10 and later, sign in to iCloud on the device.
- For Apple TV HD and later, sign in to the iTunes and App Store on the device.
- For Apple TV (3rd generation) and earlier, sign in to the iTunes Store on the device.
Your AirPods will appear in the Find My app, but they won’t appear in your Apple ID device list. You can remove your AirPods from your account using Find My. Devices running iOS 7 or earlier or OS X Mavericks or earlier won’t appear in your device list.
Remove a device from the list
If your device is missing, you can use Find My to find your device and take additional actions that can help you recover it and keep your data safe. If you aren’t using your device anymore, or if you don’t recognize it, you might want to remove it from the list.
If you set up two-factor authentication for your Apple ID, removing a device will ensure that it can no longer display verification codes. It also won’t have access to iCloud and other Apple services, including Find My, until you sign in again with two-factor authentication. The device won’t reappear in the list unless you sign in again.
Use your iPhone, iPad, or iPod touch to remove a device
- Tap the device to see its details, then tap Remove from Account.
- Review the message that appears, then tap again to confirm that you want to remove the device.
- Want to permanently remove the device from your account page?
![]()
Use your Mac to remove a device
- Choose Apple menu > System Preferences.
- Click Apple ID.
- Click the device to see its details, then click Remove from Account.
- Review the message that appears, then click again to confirm that you want to remove the device.
- Want to permanently remove the device from your account page?
Use your PC to remove a device
- Open iCloud for Windows.
- Click Account Details, then click Manage Apple ID.
- Click the device to see its details, then click Remove from Account.
- Review the message that appears, then click again to confirm that you want to remove the device.
- Want to permanently remove the device from your account page?
Use the web to remove a device
- Sign in to appleid.apple.com, then select Devices.
- Click the device to see its details, then click «Remove from account.»
- Review the message that appears.
- Click again to confirm that you want to remove the device.
- Want to permanently remove the device from your account page?
Permanently remove a device from your account page
If you’re still signed in with your Apple ID on the device, it might reappear on your account page the next time your device connects to the Internet. To permanently remove the device from your account page, sign out of iCloud, iTunes & App Stores, iMessage, FaceTime, and Game Center on that device, or erase that device.
Источник


