- Electric Arc Furnace for Electrode Handling
- Discover our Products
- What is an Electric Arc Furnace?
- How does an Electric Arc Furnace Make Steel?
- How does an Electric Arc Furnace for Electrode Handling work in the Steel Process?
- Structure of the Arc Furnace
- Operation
- Advantages of the Electric Arc Furnace in the Steel Production
- Energy Efficiency
- Flexibility
- Productivity and Safety in Steel Smelting
- Safety Enhancements
- Increased Productivity
- Newsletter
- The Safest Solution for Steel Making. Automatic Crane Hooks
- Arc Furnace
- arc furnace
- Arc Furnace
- Electrical Arc Furnace
- Introduction: Electrical Arc Furnace
- Step 1: Gather the Necessary Materials
- Step 2: Transformer Cannibalization and Jig
- Step 3: Winding a New Secondary Coil
- Step 4: Building the Leads
- Step 5: Building the Furnace
- Step 6: Time & Effort Analysis
- Step 7: Improvements
- Be the First to Share
Electric Arc Furnace for Electrode Handling
Elebia » Electric Arc Furnace for Electrode Handling
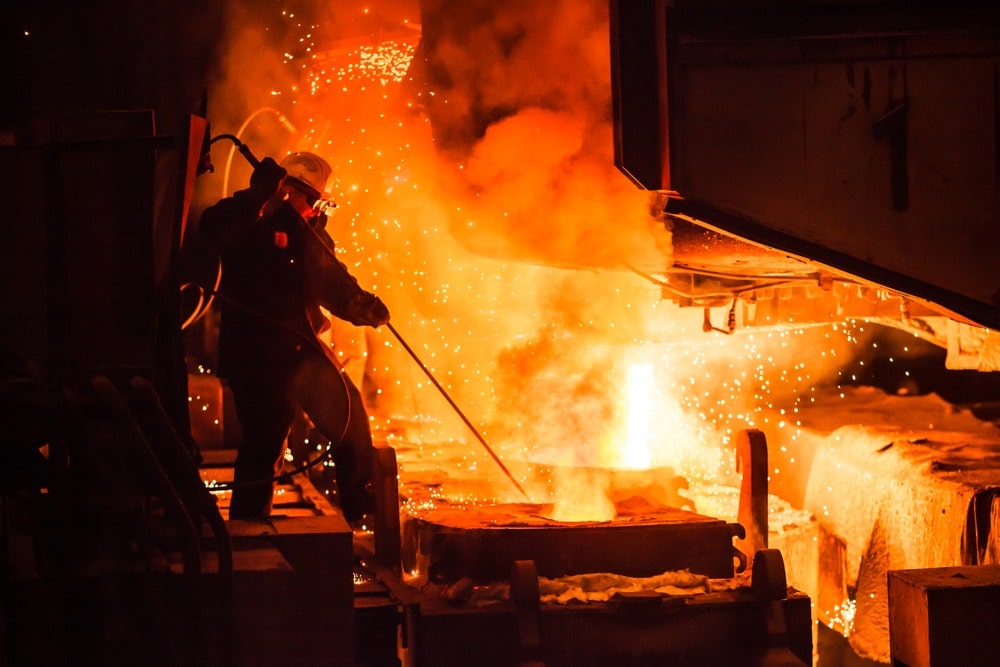
Approximately one-quarter of global steel production utilises an electric arc furnace for electrode handling, which primarily uses high-voltage electrified arcs to melt scrap steel for conversion into liquid steel without altering the electrochemical properties of the specific metal.
For three to four decades now, industrial electric arc furnaces have been running for more extended hours, faster and harder as steel-making facilities have made it a priority to increase production. Besides ramped up production and intensive operating schedules, more electric arc furnaces have been outfitted with larger electrodes, more oxygen lances and in some cases, secondary chemical sources to generate more power and boosting furnace rating.
Discover our Products
While electric arc furnaces are increasingly stretched and pushed to the limits, the aim of ensuring safe and dependable processes has never been more critical. With rising production demands, electric arc furnace accidents are escalating. But at elebia we know that, with the correct prevention and safety measures and by using automated lifting solutions, industries can avoid work-related accidents, enhancing safety whilst increasing productivity. Finally,the best hook for an EAF is a patented automatic lifting hook.
Find out more with the below video.
What is an Electric Arc Furnace?
An electric arc furnace (EAF) is a type of metallurgical furnace which makes use of an electrical arc to heat the material, mostly metal ore or scrap metal in the production of steel. Metallurgical Furnaces can be heated with different heat sources but in the EAF unlike than the induction steel furnace, the charged metal is directly heated by the electrical arc and with the electric current running from the furnace’s terminals through the charged material. The furnace consists of the following basic parts:
Shell
Hearth
Retractable roof
The electrode support, electric system, furnace transformer and tilting table is separate from the furnace.
How does an Electric Arc Furnace Make Steel?
The process of steelmaking in an EAF is very straightforward and consists of a few basic steps:
1. The furnace is charged with the material
2. The roof is lowered and closed
3. Electrodes are lowered onto the material to form the arc between the material and the electrodes
4. Arc is struck at a lower voltage which is thereafter increased to speed up the melting process. The arc heats the material to a molten state
5. While melting takes place the refining process starts with the oxidising of certain elements
How does an Electric Arc Furnace for Electrode Handling work in the Steel Process?
The process how to make steel will be discussed in more detail further down. Let’s start with the components of the EAF.
Structure of the Arc Furnace
The Electric Arc Furnace is a thick, cylindrical boiler made of reinforced steel plates. It consists of a refractory-lined vessel covered with a retractable roof, and through which one or more graphite electrodes enter the furnace. The furnace is normally divided into three sections:
Shell, which consists of the sidewalls and lower steel “bowl”;
Hearth, which consists of the refractory that lines the lower bowl;
Roof, which may be refractory-lined or water-cooled, and can be shaped as a section of a sphere, or as a frustum (conical section).
Separate from the furnace structure is the electrode support and electrical system, and the tilting platform on which the furnace rests.
A typical EAF is powered by a three-phase electrical supply and therefore has three electrodes. Electrodes are round in section, and typically in segments with threaded couplings, so that as the electrodes wear, new segments can be added. The arc forms between the charged material and the electrode, the charge is heated both by current passing through the charge and by the radiant energy evolved by the arc. The furnace is built on a tilting platform so that the liquid steel can be poured into another vessel for transport.
Operation
The scrap is loaded into baskets. Heavy melt is placed on top of a light layer of protective shred, on top of which is placed more shred. The scrap basket is then taken to the melt shop, the roof is swung off the furnace, and the furnace is charged with scrap from the basket. After charging, the roof is swung back over the furnace and meltdown commences. The electrodes are lowered onto the scrap, an arc is struck and the electrodes are then set to bore into the layer of shred at the top of the furnace. To speed up the process, metal charging, burnt lime, slag formation and spar are added to the basket.
Once heated, the meltdown processes begin. Electrodes are lowered down into the scrap to produce the arc in a low voltage condition. Once the arc is formed, the voltage is increased to speed up the melting process while simultaneously oxidising manganese, silicon and carbon. As melting continues, the refining process begins.
Advantages of the Electric Arc Furnace in the Steel Production
The Electric Arc Furnace has many advantages. Here we will explain why it’s the best choice in in the steel production.
Energy Efficiency
The method is mostly adopted by steelmaking companies all over the world, which means there is massive consumption of graphite electrodes which significantly reduces the amount of energy needed to make steel. Unlike traditional steelmaking from ores, electric arc furnace makes steel from 100% metal scrap feedstock; therefore, it’s more energy efficient.
Flexibility
An EAFs process can be rapidly scaled up or down as needed, unlike blast furnaces which cannot easily be adjusted according to production demand. While the primary feedstock for electric arc furnaces is scrap steel, direct-reduced iron or hot metal from blast furnaces can also be used to feed the electric arc furnace.
Productivity and Safety in Steel Smelting
The unfavourable and highly dangerous working conditions in a steel mill means that companies must take preventive measures to prevent both minor and severe incidents. Minor incidents like small explosions may not cause injuries but often cause property damage. To mitigate such events in a production facility, automating processes results in minimising human risks, reducing errors and improving safety in the work environment.
The use of cranes with automatic lifting hooks with a fail-safe design ensure that safety is enhanced during the complete fabrication process along with the corresponding increase in productivity.
Safety Enhancements
- – The ability to control the lifting hook with the use of a remote control eliminates the risk of having operators or personnel get too close to the furnace and operate the manoeuvring process from a safe distance.
- – Better health and wellness due to automated processes, non-exposure to toxic radiation materials, etc.
Increased Productivity
- – The use of the remote control simplifies engaging and releasing the electrodes’ lifting point to the automatic lifting hook.
- – Minimal risks of injury or fatality thanks to the automatic engage and release features. Accidents are avoided, the fabrication process isn’t affected and production times are decreased.
Newsletter
Sign up for our newsletter and get the latest news from elebia
The Safest Solution for Steel Making. Automatic Crane Hooks
The evo range of lifting hooks by elebia is the ideal solution to boost the productivity and safety of your cranes. The evo range with its patented automatic hooks with a capacity range from 2.5 tons up to 25 tons allows operators to hook on any load and release it remotely.
32 neodymium permanent magnets, located in the lower section of the hook, ensure the safety of workers with its ability to attract and correctly position the sling. The crane operator can remotely close the automatic hook which will catch the ring and lift the load by pushing a control button. There is no need for any additional handling by workers.
For special environments like the steel industry and foundries, elebia has a dedicated heat shield for automated hooks available that will protect the hook and its electronic components against the radiated heat from the EAF and the elevated working temperatures.
The heat shield ensures that the already tough and rugged elebia hook can withstand the tough conditions posed by the steel industry even better. The elebia automatic hook with heatshield allows operations to be done remotely without having to expose workers unnecessarily to the dangers of the modern steel industry. Loads can be picked up and released remotely with minimal risk to the safety of workers.
Источник
Arc Furnace
arc furnace
Arc Furnace
an electrical furnace in which the thermal effect of an electric arc is used to smelt metals and other materials. The first industrial arc furnaces were built between 1898 and 1901 by P. Héroult in France and E. Stassano in Italy. The first arc furnace in Russia was built at the Obukhov Plant in St. Petersburg in 1910.
Arc furnaces are classified according to their method of heating as direct and indirect furnaces and furnaces with a submerged arc. In direct arc furnaces, electric arcs burn between electrodes and the body being heated (Figure l,a). In indirect arc furnaces the arc burns between electrodes at a certain distance from the materials being heated, and the heat from the arc is transmitted to them by radiation (Figure 1,b). In furnaces with a submerged arc, the arcs burn under a layer of solid charge that surrounds the electrodes (Figure 1,c). The charge is heated by the heat emitted in the arc and also by the Joule heat developed as the current passes through the charge.

Arc furnaces have come to be used extensively in metallurgy, mainly to smelt steel and, in somewhat different form, to smelt ferrous alloys and pig iron from ores, as well as in the chemical industry to produce calcium carbide, phosphorus, and other products. The electric power in an arc furnace is supplied from a transformer through copper bars and carbon or, more frequently, graphited electrodes, mostly of round cross section. Three-phase arc furnaces, in which the arcs burn between three electrodes and the material being processed, are the most widespread.
A modern electric steel-smelting arc furnace is a large, highly mechanized and automated unit (Figure 2), in which the time required for production operations between smeltings—the discharging of one smelting and loading for the next one—is reduced to a minimum, making possible the most efficient use of the furnace’s operation time.
The main element in the design of an arc furnace is the metal body in the form of a shell, usually of circular cross section. The shell is lined inside with highly refractory materials. The refractory lining of the removable roof of the furnace is ring-shaped. The roof is usually raised and moved aside in order to load the charge into the furnace. The walls
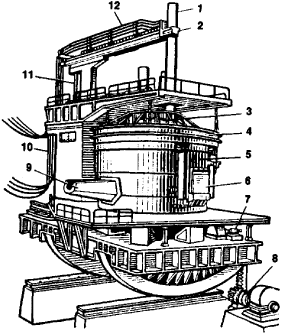
of an arc furnace have one or two viewing ports and a taphole with a spout to pour the metal and slag into a ladle. The roof has openings for inserting electrodes equipped with water-cooled jackets (economizers). The arc furnace is mounted on a cradle so that it can be tilted toward a viewing port or taphole by an electrical or hydraulic drive mechanism. Modern arc furnaces have inductors for electromagnetic mixing of the molten batch.
Arc furnaces are built with various capacities (up to 250 tons) and with transformer capacities as high as 85,000 kilovolt-amperes.
Источник
Electrical Arc Furnace

Introduction: Electrical Arc Furnace


An electric arc furnace is a type of furnace that heats up materials using a very high current. The rods (which are made of graphite for its semi-conductive properties) heat up and create a plasma that can be directed to melt metals. Although electrical arc furnaces (EAFs) are reliant on large amounts of electricity, it is fairly cheap and in certain circumstances, cheaper than using carbon fuels. In this instructable, I’ll be showing you how to make a DIY EAF (acronyms galore) with materials you can find at home or at the very least, a local hardware store. Be aware that this is very dangerous and should be dealt with extreme caution and awareness of said dangers, which are very likely to be life-threatening.
This idea was based off a multitude of things and sources:
1) My innate (but unfortunate) tendency to end up electrocuting myself
2) Having knowledge about resistivity and all that is included
3) This video:
4) And most importantly, these videos
Quite a few pictures were taken directly from Mr. Thompson’s videos, as his videos are very clear and concise, and we opted to use them over our own pictures. However, the procedure is practically the same and any differences are noted.
Step 1: Gather the Necessary Materials
As always, you’ll want to gather up the materials and tools for the job. You will need everything listed below. Some of the materials can be subject to change depending on how you want to build your furnace, but I specifically used the following. This project deals with high voltage and current, as well as extremely bright electrical arcs, please take caution when building and using this. Basic tools like a handsaw and power tools will be used, which will require safety precautions. So first and foremost, grab a pair of safety glasses, some insulated gloves, a weldingmask and get to the workshop.
What You Need:
The Arc Welder
— 10-14 ft of 8 gauge stranded copper wiring (coated)
— 1x Microwave transformer (scrapped from a microwave that was thrown out)
— At least 2x 6V heavy duty lantern batteries
— 2x Vice grips
— A foot of copper tubing (half-inch diameter )
— 2x Half inch hose clamps
— A roll of electrical tape
— Miscellaneous pieces of wood (2×4’s work fine)
— A Variable AC/DC Power Supply or source of power (2300 watts of power is about the minimum amount of energy required to sustain an arc, and about 100A if you plan to just use current to make a metal melter)
The Furnace
— 1x Aluminum silicate or fireclay refractory brick (note that it should be a soft material in order to allow for easy cutting)
— Machinery and power tools to cut the brick
— Power drill
— Drill press
— Round file
— Filter mask and safety goggles (you DO NOT want to inhale or get the dust in your eyes)
Approximate Cost of Project:
The fun thing about DIY projects is that you can scavenge most of the parts from other things or find them laying around your home. For this project, the only thing we actually bought was a pair of vice grips and 14ft of copper wire. However, if you don’t have any of this we have included the approximate price of it all.
$7 of 8 gauge (AWG) stranded copper wire (usually runs for $0.49 a foot)
$8 for a two-pack of 6V lantern batteries
$10 for a pair of small vice grips
$2 for a pair of hose clamps for the vice grips
$1 for about a foot of copper pipe
$10 a roll of electrical tape
$14 for a 9″x4.5″x2.5″ refractory (firebrick) aluminum silicate brick
The microwave transformer can be salvaged from a broken microwave (assuming it’s not the transformer that is broken of course) for free. There really isn’t another way to get these without making a special parts order or buying a new microwave to tear it out (which is a waste, please don’t do that). As for the miscellaneous wood, we haven’t counted it, as anything will work as a base plate and the jig can be made with anything you want as long as it fits the dimensions. The variable power supply can range anywhere from $30 to a couple hundred dollars depending on the quality and size. We fortunately already had a few in our workshops (either built-in or stand-alone) so we did not need to buy them. Please note that you will need this to safely (at least comparatively) operate this arc welder/EAF.
$52, excluding electricity, labor, time, and tools to build.
Step 2: Transformer Cannibalization and Jig
The first and hardest part of the project is the actual arc welder component of the EAF. Be prepared to fully use clamps, vice clamps, and a bit of brute strength.
The first step is to take your microwave transformer and remove the top part of the contraption. Pry out the two copper coils and magnetic shunts (the metal pieces that separate the primary coil from the secondary coil). The primary coil is the one with the thicker wiring and the two tabs on it. This is the piece that we will need, so take great care when handling it. And make sure that the insulating pieces of paper do not get stripped off. Then, clean out the iron core/shell of the transformer. Replace the primary coil, but place the tabs/terminals facing down.
Build a wooden “I” shape with the center having the same width (where the core drops into the hole) as the center of the transformer shell. The length of the «I» block should overhang the core by ⅛” on each side. and the height should be less than ⅛” below the height between the primary coil and the top of the iron core. The top and bottom plates of the jig can be screwed on, but we advise using glue as the jig is so small that splitting of the wood is very common (we tried twice before resorting to glue). Place a rectangular piece of paper on each side of the center.
Step 3: Winding a New Secondary Coil
This part is what gives the transformer a bit more «oomf» to it. Also, it allows us to hook it up to our leads to create an arc.
After cleaning out the transformer is done with, and creating an «I» block, place this block into a bench vice and wind your 8 gauge wire around your contraption how many wires high as you can and then repeat for however many layers outward (easier said than done, trust us). Fold the paper over the wiring and tape the sides shut (please do this, it’s an integral part of keeping it all together.) Remove the top of the “I” and pull out your wiring in one piece. Tape your wiring so it retains its shape for extra measure.
Place your new secondary coil back into the shell with the wire ends facing out in the opposite direction of the first coil. Replace the lid of your shell that you cut off and glue on with epoxy* or a very strong adhesive.
*Beware, as certain two part epoxies may react with metal and cause possible problems. Make sure the epoxy is safe for metal.
Step 4: Building the Leads
Now we’ll start to build the leads that will strike the high current arc used to melt metal. In our case, we can also use our battery parts as the metal to melt.
First, open up your 6V battery, most likely with some pliers, wire cutters or whatever may be at your disposal. After that, cut the wires connecting them and pull out the centers of 4 cells to get 4 carbon rods. Clean out the zinc casings and use a bench vice to crush them. We’ll be able to melt the zinc casings with it. Save this for later.
Strip about 2” from the wiring of your new transformer. Cut 4 pieces of 1” copper piping and place the transformer’s wires into them and crimp the pieces together to create a makeshift lug by sticking the unsqueezed side of the copper pipe and squeeze them shut. Cut 2x 2ft pieces of wire from the leftover 8 gauge copper wire, and strip 2″ (from each end) off them as well. Repeat the crimping of the copper piping. Attach the other stripped end to the vice grips using hose clamps. Use electrical tape to secure and insulate the handle areas for extra measure.
Safety: For safety reasons, try to work with only one hand because current can travel through your hands and across your heart with the potential to kill you. You can make a separate rig that holds one of the leads in place in order to accomplish this.
Step 5: Building the Furnace
This is easily the . well, the easiest part of the project. Just make sure to wear safety goggles and a mask for this, to prevent inhalation of the dust.
Cut brick widthwise into three equal 3” pieces (or 3″ from each side and then the 4” mark if you have a 9×4.5×3″ block). This should make two furnaces either way. Take the utmost care with the bricks, as they are extremely brittle. For our furnace, we used the middle 3″ piece and split it heightwise to provide lids for each furnace brick. If you split the brick into 4 pieces, then the smallest pieces should serve as the lids for the pieces.
Use a 2” forstner bit or a regular circular bit to drill roughly two inches deep into the center of the larger bricks. Empty out the chamber and either file or drill holes on the top of the walls for the electrode leads.
On a side you haven’t drilled a hole into, drill another one at an angle to meet with the bottom of the chamber. On the lids, drill two ⅜” holes into the side one inch from each of the ends. This is a place to put the electrodes into, especially when they’re extremely hot.
Finally, connect a power supply (on AC) to the terminals/tabs on the primary coil. With that, you’re ready to start operating the EAF. Just make sure to put on a welding mask and wearing insulated gloves. Electrical arcs also emit very intense UV rays, so wearing long sleeved clothing is beneficial to your health. Always include proper safety equipment in case anything goes wrong. Otherwise, happy metal melting!
Step 6: Time & Effort Analysis
The total time required to build the EAF was a little time consuming, based on how we built it and the materials we used. Transformers vary in size and constitution, although not by much. We built it over two months working on it a couple hours every day on average. If we were to fully commit our time, it would take less than 48 hours to complete, taking into account the gathering of materials, time spent constructing, winding the coil, cutting, gluing etc.
Following step-by-step instructions like this will definitely make it easier, as we took our information from a video. Specific materials are not always immediately available if at all, so you have to think of and ponder a myriad of factors into how you need to construct your own DIY project.
Most of the energy and effort spent went into winding the secondary coil and attempting to pack it into the transformer.
Step 7: Improvements
To improve this project, we should have realized that the dimensions of transformers and the amount of wire needed also varies. Our secondary coil could only fit 5 wires high and 3 wires out, while another transformer may fit 6 wires high. The videos make winding the wire seem a lot more simple than how it really went (with blood, sweat and tears). More safety precautions and some sort of case or cover for the EAF could be implemented. Another important factor is that the EAF can only run for about 2-4 minutes tops, whereas any longer would result in the electrical tape and rubber insulation completely melting from the intense heat. Furthermore, the carbon rods end up deteriorating after continued use.
Footnote: Our project failed to work, as we made our tolerances on the «I» block too small, and upon replacing the new secondary coil, we scraped off the insulated coating and exposed the copper wire to the laminated iron shell of the transformer (which is a huge problem for obvious reasons). Another possible issue is due to the sharp corners of the iron core, which also cut into the coating. We will be attempting to redo and replace the secondary coil, and possibly try to file/round the sharp edges. However, the procedure has been fixed for this instructable and should work as intended. We are submitting this for a school project, and plan to complete this and make it functional within the next week or two. We’ll be posting an update of the testing soon (with a video).
Other information:
The electrodes (Carbon/Graphite rods) had a resistance of about 3Ω, and our «failed» transformer had a voltage input of about 5V and an output of 0.1V. However, we found some cuts on the insulation of the secondary coil and opted not to test further due to the definite chance of a short circuit from the coils to the iron shell.
If you have any suggestions, criticism, or concerns, please let us know in the comments. Enjoy!
Be the First to Share
Did you make this project? Share it with us!
Источник


