- Bringing an Apple Extended Keyboard II back to life
- Cleaning, whitening and converting it to USB using a Teensy
- Apple Extended Keyboard II
- Пространства имён
- Действия на странице
- Содержание
- USB Keyboard Converter
- Make Your Own
- Building an ADB Keyboard Converter with Pro Micro
- Teensy 2.0
- Pro Micro
- Parts
- Soldering the Pro Micro Header Pins
- 1K Resistor
- S-Video (4-pin Mini-DIN) Socket
- Attaching the ADB Socket
- Dependencies
- Bootloader Mode
- Modify the Makefile
- Compile and Flash
- Make a Case
- Apple Extended Keyboard
- Contents
- Variants
- Apple Extended Keyboard II
- Предисловие
- Покупка и первое впечатление
- Послесловие
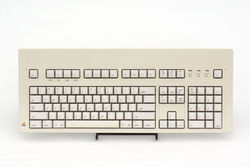
Bringing an Apple Extended Keyboard II back to life
Cleaning, whitening and converting it to USB using a Teensy

Dec 2, 2017 · 5 min read
A while back I wanted a nice mechanical keyboard for my Mac, but didn’t want to spend a whole lot. A f ter searching for a bit, I found a cheap Apple Extended Keyboard II (AEK2) on Ebay and purchased it for around 30€. It was yellow, had a few scratches on some of the keys, but otherwise seemed like in good condition. Keyboards with Alps switches can get serious issues over time, as they seem to handle dirt very badly. There was one other issue: It uses an ADB (Apple Desktop Bus) port and there are basically only three options to make it work via USB, as no modern computer supports ADB: The Griffin ADB-USB adapter, a discontinued adapter and therefor hard to find; a community built adapter; and making the adapter myself using a teensy 2.0. I chose the latter.

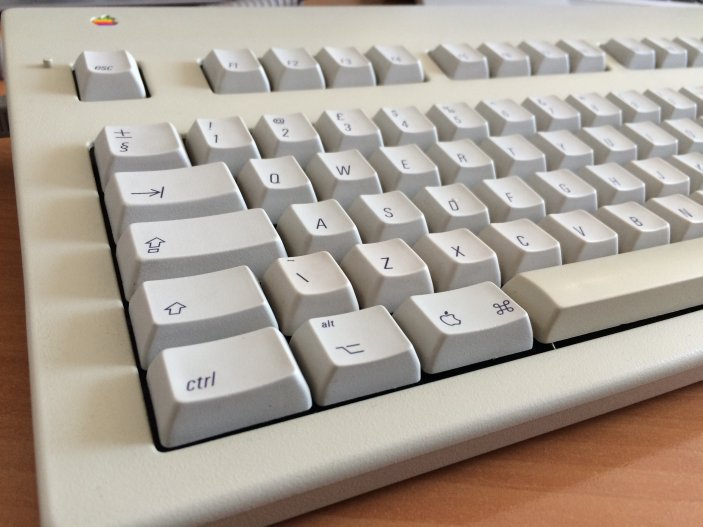
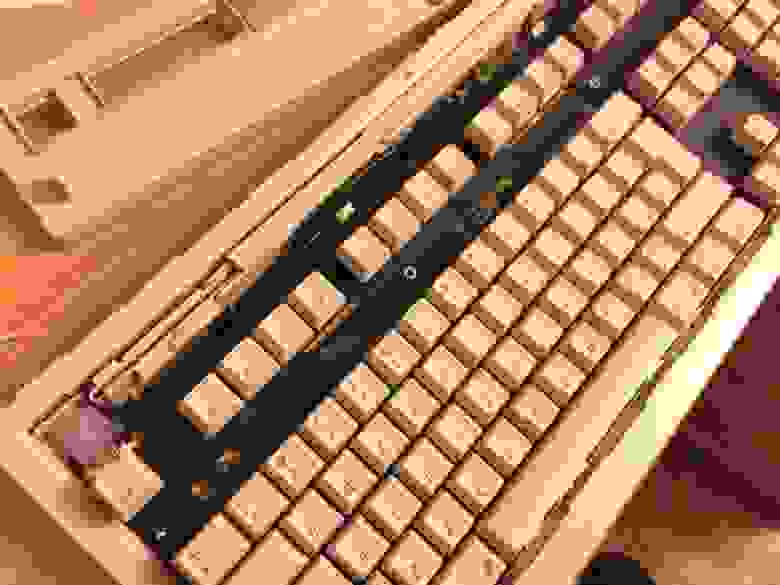
After I received the keyboard, I removed all keycaps with a removal tool and scrubbed them individually by hand (there are also other ways to clean keycaps, like denture tabs). Then I disassembled the case by removing the screw in the back and after some prying the top opened up. I carefully cleaned and wiped the inside and was happy that my purchase wasn’t too dirty on the inside.
After cleaning I wanted to get rid of the yellowing every ABS plastic experiences after some time. Luckily they keycaps (except the spacebar) on these keyboards are PBT and looked pristine after the wash. The spacebar and the case on the other hand needed to be treated with Retr0bright. Retr0bright is a mixture the community came up with to reverse yellowing of plastic.

I went out and purchased hydrogen peroxide creme used for bleaching hair (I got a 6% solution) and an O2 laundry booster (in my case Vanish Oxi Action), mixed them, applied the cream to the case and the spacebar using a regular brush, covered both with plastic wrap, and put them out in the sun for around 2h. The results were astonishing as seen below:

The keyboard looked almost like new, so next step was the USB conversion. Thus I bought a Teensy 2.0 USB controller, a few wires commonly used for Arduino tinkering and a 1k Ohm resistor. The TMK ADB-USB converter firmware I wanted to use has a nice readme explaining how ADB works, and it basically comes down to connecting three wires from the keyboard with three ports on the teensy and bridging two of the teensy board ports with a resistor. But don’t worry it sounds more complicated than it actually is.
As I didn’t need any of the ADB ports I removed the left ADB port to route the USB cable through that hole while at the same time using the cable it was connected to to connect with the Teensy. I cut the grey cable connecting to the ADB port PCB off and only leaving the second, the sixth and the eight wire (from the left) sticking out.

Those represent PD0 (2nd), VCC (6th) and GND (8th) respectively on the Teensy. I soldered the cables I bought to the wires sticking out, bridged the connection between D0 and VCC on the teensy with the resistor and soldered the cables into the Teensy. Afterwards I carefully wedged the Teensy into the keyboard and routed a USB cable through the hole created by removing the ADB port.
Источник
Apple Extended Keyboard II
Пространства имён
Действия на странице

The best mechanical keyboard on the other side of the spectrum. Also supports ADB so can be used on the Mac LC III, a Motorola 68000 Mac that also has an ethernet card or an Apple ][e Card.
It doubles as my primary mechanical keyboard, thanks to an ADB to USB adapter I made and put in an Altoids tin.
Содержание
USB Keyboard Converter
It’s what you need to make use of the Apple Extended Keyboard II.
They even sell X68000 keyboard adapters.
Make Your Own
You don’t even need much for this one, just a cheap Arduino Pro Micro and an S-Video female adapter. If you use something other than a teensy++ though, reconfigure the keymap.
A pull up resistor of 1K is required though, especially for mouse functionality. But you might get away with it if you have a short S-Video cable.

Building an ADB Keyboard Converter with Pro Micro


Teensy 2.0
If you decide to use a Teensy, at $15, that’s probably the best and least frustrating option.
You can also choose to use a converter firmware with simpler code built by gblargg. https://github.com/gblargg/adb-usb
Pro Micro
I decided to use an $8 Arduino Pro Micro to cut costs. However, the Pro Micro can be deeply frustrating to work with, so it might not be worth saving $7 when you might spend extra hours.
The first thing to notice is that the Pro Micro comes in both 5V and 3.3V forms. The Apple keyboard requires 5V to power up, so make sure you purchase the right one. Here’s a good cheap version that you can purchase on Amazon.
Parts
You will also need a decent soldering iron, so factor that in for cost and effort if you don’t already have one.
Soldering the Pro Micro Header Pins
The header pins of the Pro Micro come unsoldered. You’ll need to solder them on yourself.
1K Resistor
We need to connect a resistor(any of 1k-10kOhm) between VCC (5V) and data. The converter might work without the resistor, but we strongly recommend having it, especially if you have long cables or are using an ADB mouse.
Solder on the pull up 1K resistor from VCC pin to Pin 3, along the top.
S-Video (4-pin Mini-DIN) Socket
The ADB Cable is exactly the same pinout as an 4-pin S-Video socket. Just buy one of those on Amazon:
Next, we need to add wires to the socket. The easiest method is to use Breadboard Jumper Cable (Female to Female). It’s as simple as plugging them in: note that on the socket it might be a bit of a tight fit, but it works. If you want to keep the wires on there, hot glue them in.
Attaching the ADB Socket
With jumper cable attached, plugging in the socket to the Pro Micro is quick and easy and needs no soldering (other than the soldering already done to attach the header).
However, you do need to make sure the correct socket pins go to the right place on the Pro Micro. Observe the pinouts below:
ADB Male Pinout Diagram (or, female socket looking from behind)
The pinout is very simple:
| ADB Pin | Pro Micro Pin # | Teensy Pin # |
|---|---|---|
| 1 (Data) | 3 | D0 |
| 2 (Power) | N/A | N/A |
| 3 (+5V) | VCC | 5V |
| 4 (GND) | GND | GND |
The result should look something like this:
With that, we’re ready to install the firmware.
Dependencies
Use apt-get or yum/dnf to install:
- avr-gcc and avr-libc — Development dependencies.
- avrdude — The flasher program used for the Pro Micro.
- Example: Flashing a .hex binary (run as root): avrdude -p atmega32u4 -P /dev/ttyACM0 -b57600 -c avr109 -D -U flash:w:adb_usb_lufa.hex
Bootloader Mode
One major issue is that the Pro Micro comes set in bootloader mode by default, but after flashing it, there is no button like on the Teensy to send it back to bootloader mode.
This means that if you made a flashing mistake, to send it back to bootloader mode (for a mere 8 seconds!) you’ll need to tap the GND and RST pins together with a wire twice, immediately after plugging it into USB. You could wire up a button to make this easier, but you might as well get a Teensy at that point.
Modify the Makefile
Before building, you need to modify the Makefile to fit your board. Open up tmk_keyboard/converter/adb_usb/Makefile and change the following variables to these new values:
Compile and Flash
Now we can compile and flash the ADB Converter.
You have a choice between KEYMAP=plain (Standard Apple Keyboard Layout) and KEYMAP=hasu (Hasu’s PS/2 Style Layout).
Run this command as root from the tmk_keyboard/converter/adb_usb/ directory:
This will compile the code and program the Pro Micro all in one shot.
Make a Case
This is optional, but you can put the keyboard controller into an Altoids tin and keep it encased and stable using glue gun. It’s cheap, durable, and looks pretty cool.
Источник
Apple Extended Keyboard
This article is a stub. You can help Deskthority by expanding it.
 | |
| Model no. | M0115 |
|---|---|
| FCC ID | BCG5K5M0115 |
| Branding | Apple |
| Manufacturer | Alps Electric? |
| Layouts | 105-key (ANSI) Macintosh |
| Keyswitches | Alps SKCM Orange, Alps SKCM Salmon, Alps SKCL Lock |
| Switch mount | Plate mount |
| Interface | ADB |
| Years of production | 1987–1990 |
| Precedes | Apple Extended Keyboard II |
| Price | $229 USD (1987) |
The Apple Extended Keyboard is a keyboard for vintage Apple Macintosh.
The keyboard was introduced with the Macintosh II and Macintosh SE, which did not come with a keyboard. Instead, buyers had the option of buying an Apple Standard Keyboard or the more expensive Extended keyboard with more keys. This is the first «full-size» keyboard from Apple, with inverted-T arrow keys and navigation cluster. It was succeeded by the Apple Extended Keyboard II in 1990.
Normal keys have either Alps SKCM Orange and Alps SKCM Salmon switches. The caps lock key has an Alps SKCL Lock switch. Like the other Apple keyboards from the same era, the keycaps are in Apple’s special profile and with dye sublimated legends in italic type. There are bidirectional ADB ports under the top left and right corners of the keyboard.
Construction appears to be ABS for the case and space bar, and PBT for the remaining keycaps.
Contents
Variants
Switch variations: Alps SKCM Orange and Salmon switches. Both types are undamped tactile switches. Two different space bar stabilisers have been spotted.
«M0115B» with same layout but different ‘3’ key and rear label. The ‘3’ key has the GBP symbol instead of # and the rear label says «Assembled in Ireland».
«M0115J» with same layout but Japanese legends exists.
Источник
Apple Extended Keyboard II
Несмотря на обилие конструкций клавиатур на сегодняшнем рынке, механика все же заслуженно лидирует уже не один десяток лет. Речь в этом посте пойдёт об одной, не заслуженно забытой на отечественных просторах, из достойнейших клавиатур.
Предисловие
Ввиду довольно сумбурного образа жизни, насыщенного переездами и беготней, работать приходится на ноутбуке. За много лет работы с портативными компьютерами, полюбить встроенные клавиатуры у меня так и не получилось и при малейшей возможности я всегда пытаюсь подключить внешнюю. Дома у меня имеется, вполне неплохая, HP Standard Keyboard, а вот на работе, до недавнего времени, приходилось довольствоваться 4-х долларовой A4Tech.
Однажды жарким июльским днем, почитывая на работе Хабрахабр, наткнулся я на пост под названием «Королева щелчка», и осознал что уживаться нам с A4Tech больше не получится. Немного потерзав Google на тему совместимости облюбованной мною IBM Model M и MacBook, понял что физическое отсутствие кнопки Win (на которую, при работе с OS X мапится кнопка Cmd) всё-таки будет не совсем удобно. И тут мне на глаза попалась героиня этого поста — Apple Extended Keyboard II.
Покупка и первое впечатление
С точки зрения раскладки все оказалось идентично современной, приятный vintage — дизайн, отзывы на разных бордах также оказались весьма тёплые. В общем было принято волевое решение под названием «Надо брать». С процессом покупки техники на всем известном интернет-аукционе все знакомы, поэтому останавливаться на нем не буду.
Спустя некоторое время мне был доставлен довольно увесистый свёрток с вожделенной техникой.
Мне досталась модель M3501 собранная в Ирландии с кнопками Alps SKCM Cream Damped. К моему сожалению родной коробки и бумажек у продавца не сохранилось и комплектация состояла из самой клавиатуры и ADB кабеля.

Первое что сразу ощущается — это все таки вес, после работы с практически невесомыми современными клавиатурами, AEKII с её 1,22 кг. кажется просто камнем. Корпус и клавиша «пробел» выполнены из ABS пластика, поэтому некоторая желтизна на них отразилась, остальные же клавиши сделанные из PBT — сохранились практически в первозданном состоянии. Отдельное внимание хотелось бы обратить на «залипающую» клавишу «CapsLock» — по ощущениям крайне необычно, пока ещё затрудняюсь сказать удобно это или нет. Некоторое время для меня оставалось загадкой присутствие пластиковых штырьков, возле клавиш «Esc» и «Power», которые оказались всего лишь держателями для бумажных этикеток с подписью функциональных клавиш. Ну и конечно же бросается в глаза, ещё старый, «радужный» логотип Apple.
За время пока клавиатура ещё ехала с Великобритании ко мне, я начал искать варианты подключения её по USB.
Первый, и самый простой, вариант решения этой задачи была покупка ADB to USB адаптера от Griffin. Но поскольку этот вариант сулил дополнительными расходами в приблизительно $50 и ещё двумя неделями томительного ожидания он был отброшен и поиски продолжились. Второй вариант, на который и пал мой выбор — самодельный ADB to USB конвертер. На нем хотелось бы остановиться подробнее.
Для получения необходимого результата понадобились:
- контроллер Teensy 2.0 (ATmega32U4) и прошивка к нему, разработанная tmk
- miniUSB кабель который был пущен на органы
- разборный USB A коннектор
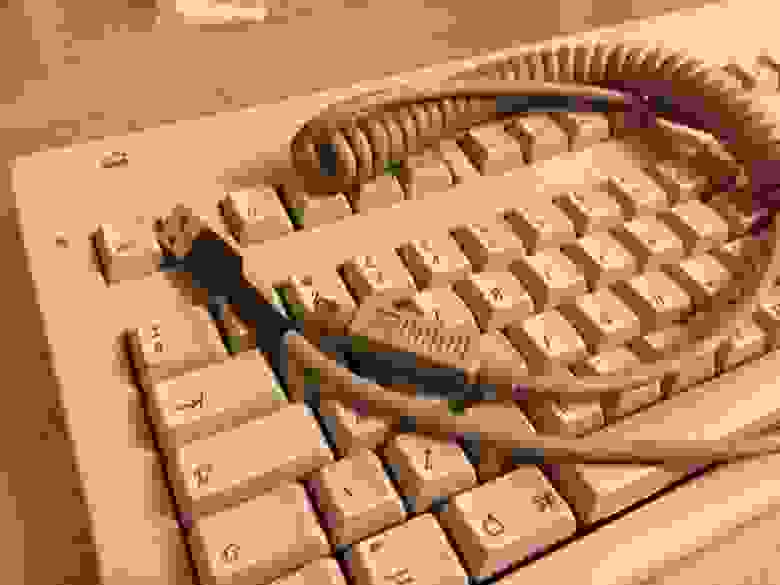
ADB выполнен в форме 4-штырькового miniDIN разъёма, кстати полностью идентичен S-Video. Протокол ADB требует только один провод для передачи данных, два используются для питания и четвёртый провод — клавиша питания, которая подключалась непосредственно к блоку питания компьютера (в моем случае я её не использовал, если кому интересно здесь можно найти инструкции по подключению). К одному из двух, физически присутствующих, разъёмов была подключена Teensy c подтягивающим 1кОм резистором между +5В и информационным проводом.

После этого была собрана и залита прошивка и… УРА!, AEKII послала первые команды к ноутбуку.
Но тут возник вопрос что делать с кабелем. Поскольку Teensy довольно миниатюрен, он спокойно поместился в корпусе клавиатуры, но вот обычный чёрный USB кабель соединяющий контроллер с ноутбуком смотрелся чуть меньше чем никак. Плюс ко всему, выбрасывать оригинальный curly ADB кабель совершенно не хотелось. Сбегав в соседний магазин с радиодеталями, мною был приобретён разборный USB коннектор и термоусадка. Спустя ещё часик второй ADB разъем был зверски выдран аккуратно выпаян из платы и к нему припаян miniUSB соединяющий с контроллером.
ADB кабель был обрезан с одной стороны и к нему припаян USB коннектор.
Послесловие
В итоге за вполне приемлемые деньги, я получил отличную клавиатуру, поработав всего один день за которой, написав эту статью, я окончательно понял что больше не хочу и думать о возврате на резинопленочную. Умеренная жёсткость, отличная тактильная отдача ну и конечно же этот прекрасный клик — все таки осталось в этом мире ещё чуточка прекрасного.
Источник


