- Move apps and create folders on your iPhone, iPad, or iPod touch
- How to organize your apps
- How to put apps in a folder
- How to move an app to a different page
- Move from Android to iPhone, iPad, or iPod touch
- Before you begin
- Tap Move Data from Android
- Open the Move to iOS app
- Wait for a code
- Use the code
- Connect to a temporary Wi-Fi network
- Choose your content and wait
- Set up your iOS device
- Finish up
- If you need help with the transfer
- If you need help after the transfer
- Question: Q: How to move itunes backup location
- All replies
- Move from Android to iPhone, iPad, or iPod touch
- Before you begin
- Tap Move Data from Android
- Open the Move to iOS app
- Wait for a code
- Use the code
- Connect to a temporary Wi-Fi network
- Choose your content and wait
- Set up your iOS device
- Finish up
- If you need help with the transfer
- If you need help after the transfer
Move apps and create folders on your iPhone, iPad, or iPod touch
You can organize the apps on your Home Screen, put them in folders, and move them to other pages, or screens. You can also reorder your pages.
How to organize your apps
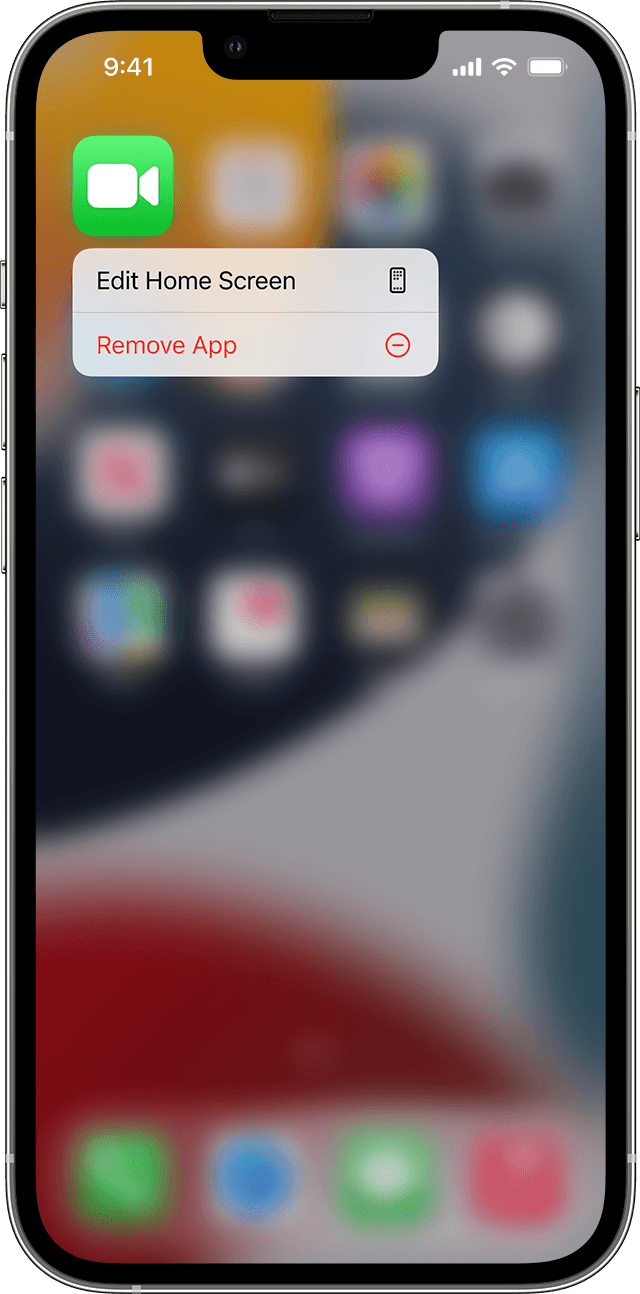
- Touch and hold any app on the screen, then tap Edit Home Screen .
- Drag the app to another spot, like the Dock at the bottom of the screen.
- On iPhone X and later, tap Done to save. On iPhone 8 and earlier, press the Home button.

How to put apps in a folder
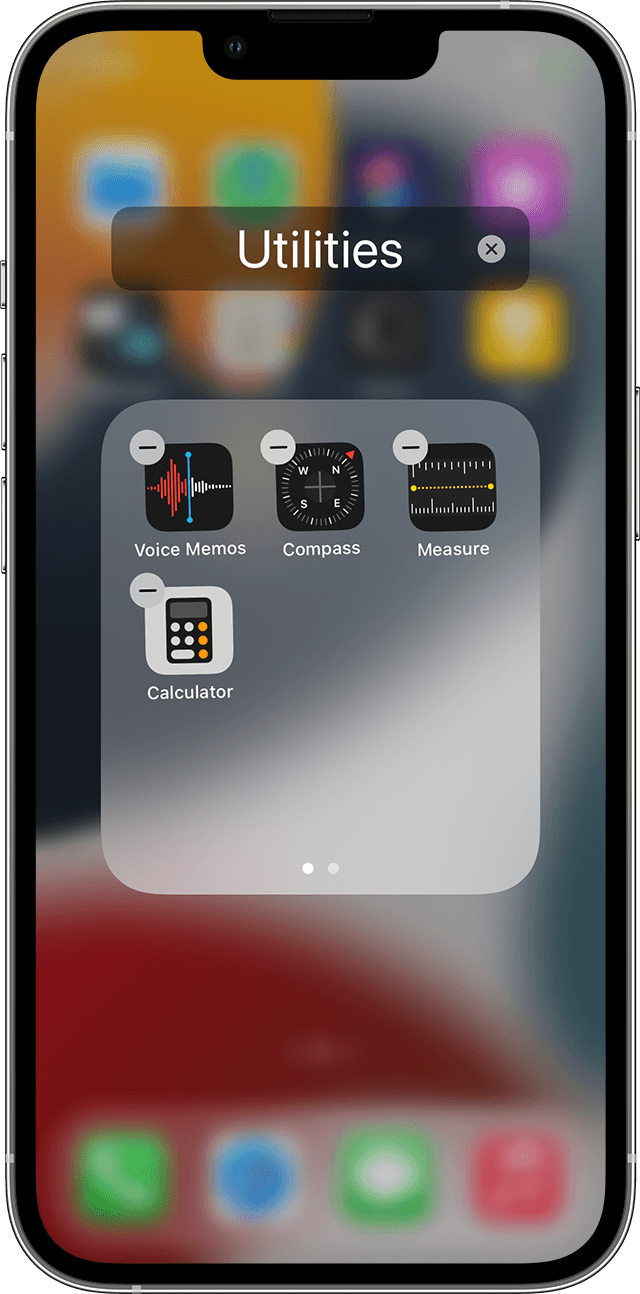
If you have a lot of apps, you can put your related apps in folders. Here’s how:
- To make a folder, drag an app onto another app.
- To rename the folder, tap the name field or the Close button , then enter the new name.
- Drag apps into the folder. Folders can have more than one page.
How to move an app to a different page
You start with one page of apps. To make a new page, touch and hold an app until the apps jiggle, then drag an app to the right edge of the screen. You might need to wait a second for the new page to appear. To delete a page, consolidate all of your apps to another Home Screen. When there are no apps present the page will delete.
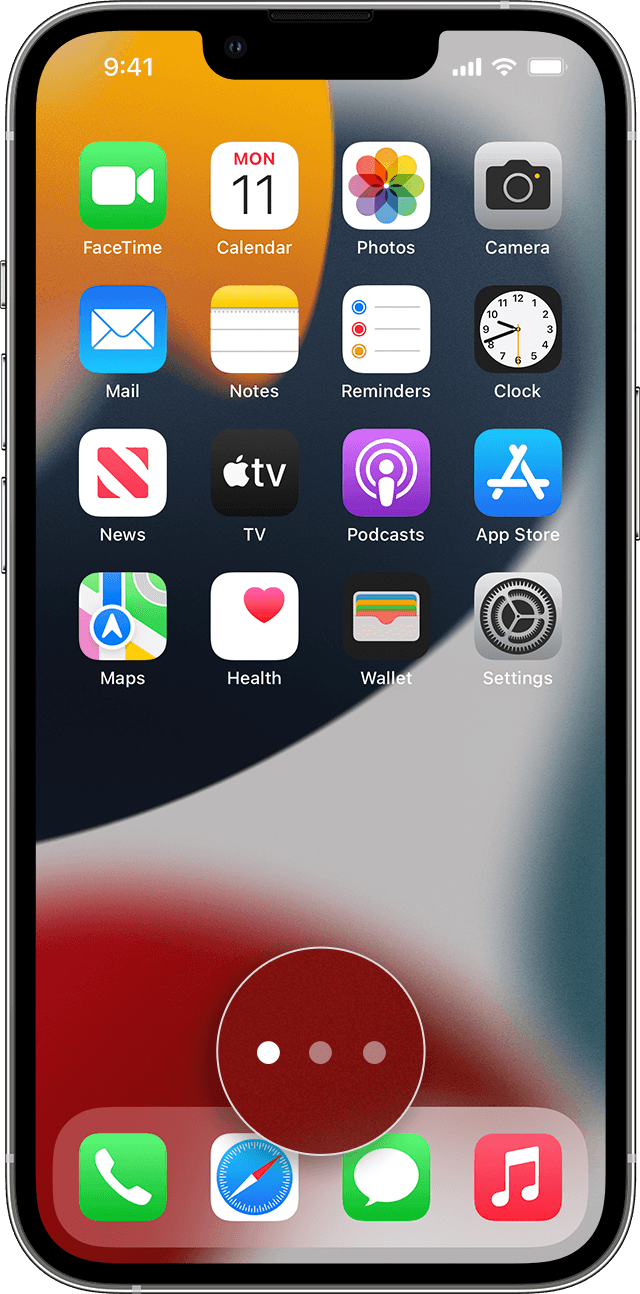
When you have more than one page, a bright dot in a row of dots above the Dock shows you which page you’re on. You can move an app to a different page and create new pages:

If there are dots to the left or right of the bright dot, you can drag an app to the right side of the screen to move the app to the next page in that direction. Or swipe left to see the apps on that page.

If there are no dots to the right of the bright dot, dragging an app to that side of the screen makes a new page.
Источник
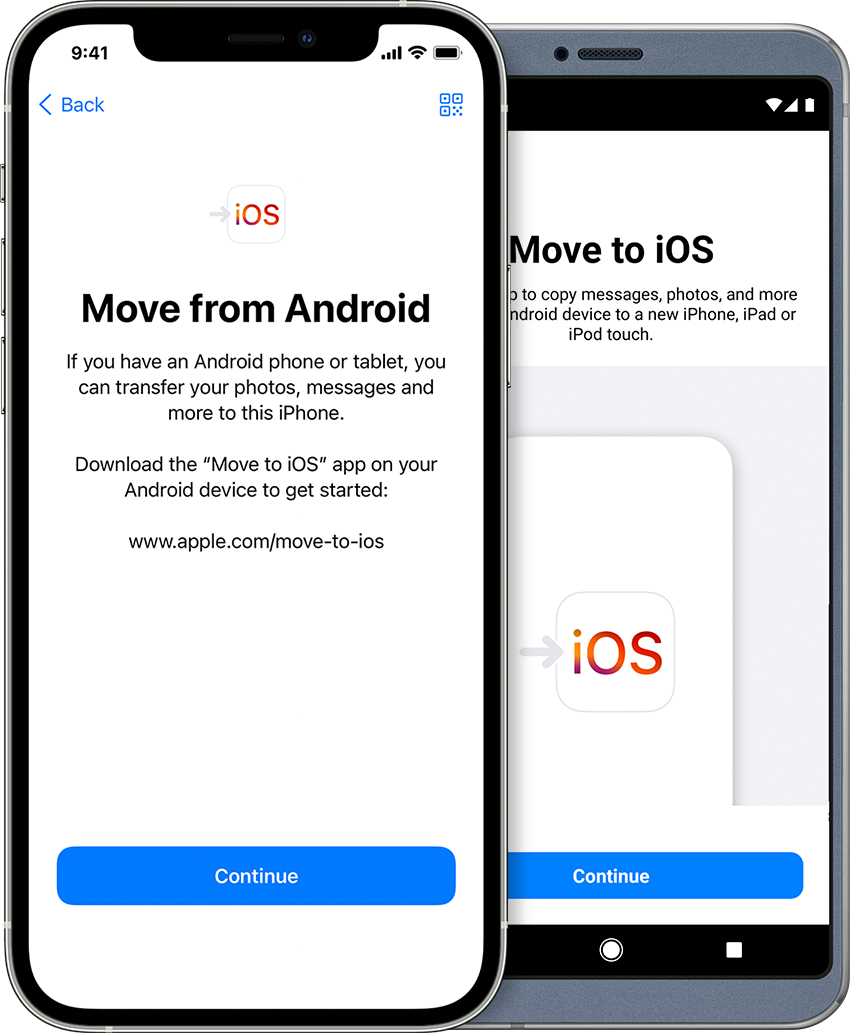
Move from Android to iPhone, iPad, or iPod touch
Ready to transfer to iOS? Download the Move to iOS app to get help switching from your Android device to your new iPhone, iPad, or iPod touch.
If you can’t use the Google Play Store, learn how to download Move to iOS.
Before you begin
- On your Android device, make sure that Wi-Fi is turned on.
- Plug your new iOS device and your Android device into power.
- Make sure that the content you’re moving, including what’s on your external Micro SD card, will fit on your new iOS device
- If you want to transfer your Chrome bookmarks, update to the latest version of Chrome on your Android device.
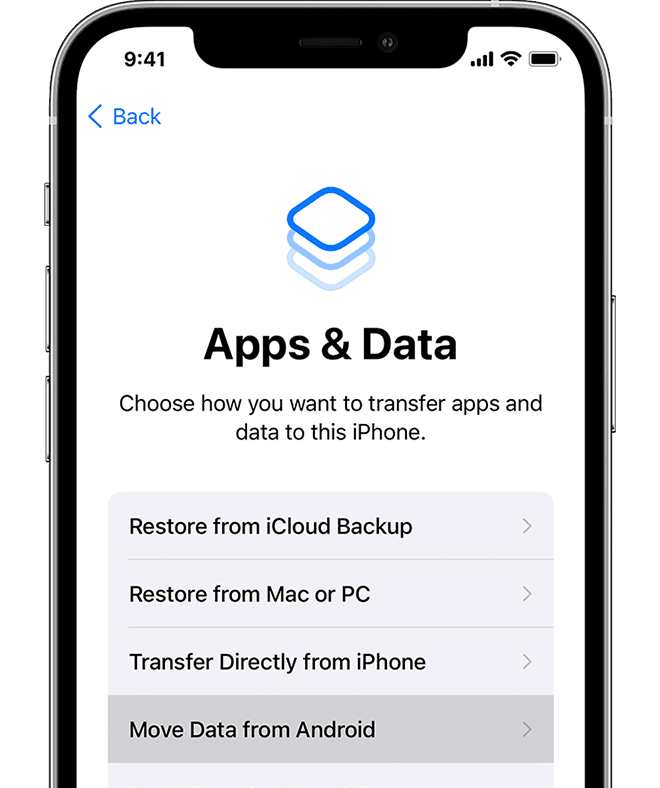
Tap Move Data from Android
While you set up your new iOS device, look for the Apps & Data screen. Then tap Move Data from Android. (If you already finished setup, you need to erase your iOS device and start over. If you don’t want to erase, just transfer your content manually.)
Open the Move to iOS app
On your Android device, open the Move to iOS app. If you don’t have the Move to iOS app, you can tap the QR code button on your new iOS device and scan the QR code using the camera on your Android device to open the Google Play Store. Tap Continue, and read the terms and conditions that appear. To continue, tap Agree.
Wait for a code
On your iOS device, tap Continue when you see the Move from Android screen. Then wait for a ten-digit or six-digit code to appear. If your Android device shows an alert that you have a weak internet connection, you can ignore the alert.
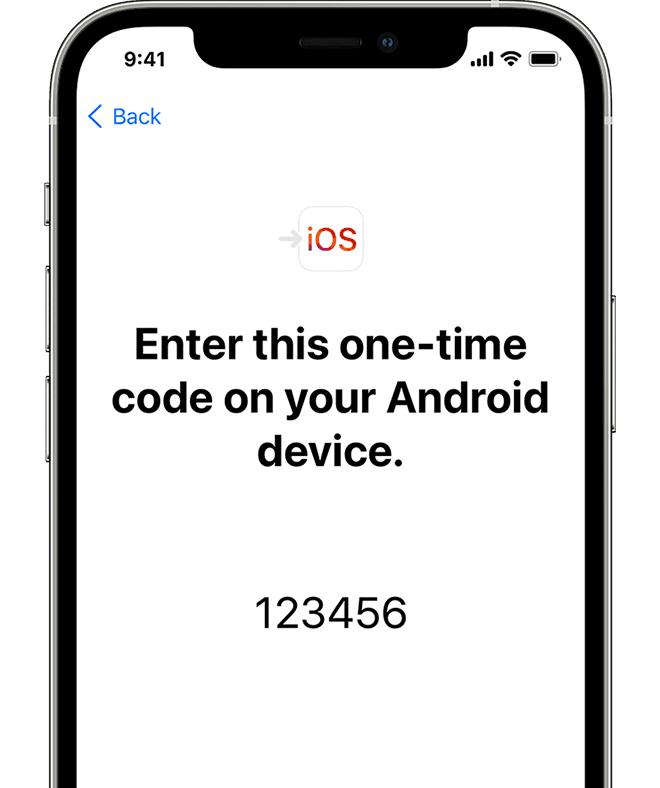
Use the code
Enter the code on your Android device.
Connect to a temporary Wi-Fi network
Your iOS device will create a temporary Wi-Fi network. When asked, tap Connect to join that network on your Android device. Then wait for the Transfer Data screen to appear.
Choose your content and wait
On your Android device, select the content that you want to transfer and tap Continue. Then—even if your Android device shows that the process is complete—leave both devices alone until the loading bar that appears on your iOS device finishes. The whole transfer can take a while, depending on how much content you’re moving.
Here’s what gets transferred: contacts, message history, camera photos and videos, photo albums, files and folders, accessibility settings, display settings, web bookmarks, mail accounts, and calendars. If they’re available on both Google Play and the App Store, some of your free apps will also transfer. After the transfer completes, you can download any free apps that were matched from the App Store.
Set up your iOS device
After the loading bar finishes on your iOS device, tap Done on your Android device. Then tap Continue on your iOS device and follow the onscreen steps to finish setup for your iOS device.
Finish up
Make sure that all of your content transferred. Music, books, and PDFs need to be moved over manually.
Need to get the apps that were on your Android device? Go to the App Store on your iOS device to download them.
If you need help with the transfer
- Make sure that you leave both devices alone until the transfer finishes. For example, on your Android device, the Move to iOS app should stay onscreen the whole time. If you use another app or get a phone call on your Android before the transfer finishes, your content won’t transfer.
- On your Android device, turn off apps or settings that might affect your Wi-Fi connection, like the Sprint Connections Optimizer or the Smart Network Switch. Then find Wi-Fi in Settings, touch and hold each known network, and forget the network. Then try the transfer again.
- Restart both of your devices and try again.
- On your Android device, turn off your cellular data connection. Then try the transfer again.
If you need help after the transfer
- Get help if Messages doesn’t work as expected after you transfer your content.
- If you don’t see apps from your Android device on your new iOS device, find and download them in the App Store on your new device.
- You might find that only some content transferred and your iOS device ran out of space, or your iOS device might appear full even though the transfer didn’t finish. If so, erase your iOS device and start the transfer again. Make sure that your Android content doesn’t exceed the available space on your iOS device.
Information about products not manufactured by Apple, or independent websites not controlled or tested by Apple, is provided without recommendation or endorsement. Apple assumes no responsibility with regard to the selection, performance, or use of third-party websites or products. Apple makes no representations regarding third-party website accuracy or reliability. Contact the vendor for additional information.
Источник
Question: Q: How to move itunes backup location
All I want to do is move the location where iTunes backs up everything. I.E. I want to move all my apps, pictures etc to my External HDD, HOWEVER. When I try to change the settings it still wants to back up my phone to the C:\\ drive. Which is nearly full. If anybody could help that would be great!
My laptop is running the Intel Core 2350M (2.3gHz), 6GB of 1333mhz RAM. A 320GB HDD.
iPhone 6, iOS 8.1.2, I am running Windows 7
Posted on Jan 16, 2015 10:23 AM
All replies
Loading page content
Page content loaded
Relocate iOS device backups
- Make a new folder called MobileSync at the root of the drive you want the backup data to live on, e.g. as D:\MobileSync
- Use Windows Explorer to move current Backup folder at \Users\ \AppData\Roaming\Apple Computer\MobileSync\Backup into the folder you just made. If the backup folder is large this may take some time.
- To make iTunes look for the data in the new location copy the text below, open a command prompt, use the menu icon at the top left to paste in the command, edit the drive letter/path if needed, and then press .
If you want the backup elsewhere replace D:\MobileSync accordingly.
Note that while this method works for iOS device backups it cannot be used to redirect sections of the media library.
See also Make a split library portable if your library files are on one drive with the media on another.
Jan 16, 2015 2:07 PM
Man, this didn’t help unfortunately. I followed it all to the word but now it says that I can’t back up anything because the backup is corrupt. Thanks for the help though. If you do know how to fix this just say. Thanks!
Jan 17, 2015 7:01 AM
Try renaming the device backup folder inside \MobileSync\Backup to force iTunes to generate a completely new backup set for your device. If it works throw away the old folder.
Jan 17, 2015 7:07 AM
It made a new backup folder but now it reverted to trying to store on the C:\ Drive. I’ll try and move the backup location again but if that does not work then I don’t know what to do. But I really appreciate your help 🙂.
Jan 17, 2015 8:16 AM
Relocate iOS device backups
- Make a new folder called MobileSync at the root of the drive you want the backup data to live on, e.g. as D:\MobileSync
- Use Windows Explorer to move current Backup folder at \Users\ \AppData\Roaming\Apple Computer\MobileSync\Backup into the folder you just made. If the backup folder is large this may take some time.
- To make iTunes look for the data in the new location copy the text below, open a command prompt, use the menu icon at the top left to paste in the command, edit the drive letter/path if needed, and then press .
If you want the backup elsewhere replace D:\MobileSync accordingly.
Note that while this method works for iOS device backups it cannot be used to redirect sections of the media library.
See also Make a split library portable if your library files are on one drive with the media on another.
Great help turingtest2!
I also have the tiny SSD issue loaded with main software/games and these 50GB backups keep growing, so it was time to change it over to one of the storage drives. Your instructions worked great, I did have issues though getting the «Cannot create a file when that file already exists» prompt, but deleting the original C drive «Backup» folder inside of MobileSync after copying it to the new destination resolved the issue.
Источник
Move from Android to iPhone, iPad, or iPod touch
Ready to transfer to iOS? Download the Move to iOS app to get help switching from your Android device to your new iPhone, iPad, or iPod touch.
If you can’t use the Google Play Store, learn how to download Move to iOS.
Before you begin
- On your Android device, make sure that Wi-Fi is turned on.
- Plug your new iOS device and your Android device into power.
- Make sure that the content you’re moving, including what’s on your external Micro SD card, will fit on your new iOS device
- If you want to transfer your Chrome bookmarks, update to the latest version of Chrome on your Android device.
Tap Move Data from Android
While you set up your new iOS device, look for the Apps & Data screen. Then tap Move Data from Android. (If you already finished setup, you need to erase your iOS device and start over. If you don’t want to erase, just transfer your content manually.)
Open the Move to iOS app
On your Android device, open the Move to iOS app. If you don’t have the Move to iOS app, you can tap the QR code button on your new iOS device and scan the QR code using the camera on your Android device to open the Google Play Store. Tap Continue, and read the terms and conditions that appear. To continue, tap Agree.
Wait for a code
On your iOS device, tap Continue when you see the Move from Android screen. Then wait for a ten-digit or six-digit code to appear. If your Android device shows an alert that you have a weak internet connection, you can ignore the alert.
Use the code
Enter the code on your Android device.
Connect to a temporary Wi-Fi network
Your iOS device will create a temporary Wi-Fi network. When asked, tap Connect to join that network on your Android device. Then wait for the Transfer Data screen to appear.
Choose your content and wait
On your Android device, select the content that you want to transfer and tap Continue. Then—even if your Android device shows that the process is complete—leave both devices alone until the loading bar that appears on your iOS device finishes. The whole transfer can take a while, depending on how much content you’re moving.
Here’s what gets transferred: contacts, message history, camera photos and videos, photo albums, files and folders, accessibility settings, display settings, web bookmarks, mail accounts, and calendars. If they’re available on both Google Play and the App Store, some of your free apps will also transfer. After the transfer completes, you can download any free apps that were matched from the App Store.
Set up your iOS device
After the loading bar finishes on your iOS device, tap Done on your Android device. Then tap Continue on your iOS device and follow the onscreen steps to finish setup for your iOS device.
Finish up
Make sure that all of your content transferred. Music, books, and PDFs need to be moved over manually.
Need to get the apps that were on your Android device? Go to the App Store on your iOS device to download them.
If you need help with the transfer
- Make sure that you leave both devices alone until the transfer finishes. For example, on your Android device, the Move to iOS app should stay onscreen the whole time. If you use another app or get a phone call on your Android before the transfer finishes, your content won’t transfer.
- On your Android device, turn off apps or settings that might affect your Wi-Fi connection, like the Sprint Connections Optimizer or the Smart Network Switch. Then find Wi-Fi in Settings, touch and hold each known network, and forget the network. Then try the transfer again.
- Restart both of your devices and try again.
- On your Android device, turn off your cellular data connection. Then try the transfer again.
If you need help after the transfer
- Get help if Messages doesn’t work as expected after you transfer your content.
- If you don’t see apps from your Android device on your new iOS device, find and download them in the App Store on your new device.
- You might find that only some content transferred and your iOS device ran out of space, or your iOS device might appear full even though the transfer didn’t finish. If so, erase your iOS device and start the transfer again. Make sure that your Android content doesn’t exceed the available space on your iOS device.
Information about products not manufactured by Apple, or independent websites not controlled or tested by Apple, is provided without recommendation or endorsement. Apple assumes no responsibility with regard to the selection, performance, or use of third-party websites or products. Apple makes no representations regarding third-party website accuracy or reliability. Contact the vendor for additional information.
Источник


