- How to use account recovery when you can’t reset your Apple ID password
- What is account recovery?
- After you start account recovery
- Check the status of your request
- Cancel your request
- How to create a new Apple ID
- Create an Apple ID on your iPhone, iPad, or iPod touch
- Create an Apple ID when you set up your device
- Create an Apple ID using the App Store on your device
- Create an Apple ID on your Mac
- Create an Apple ID on your Windows PC
- Create an Apple ID on another device
- Create an Apple ID on the web
- If you see a message that you need to sign in to iTunes
- Learn more
- How to configure Sign In with Apple
How to use account recovery when you can’t reset your Apple ID password
If you use two-factor authentication and can’t sign in or reset your password, you can regain access after an account recovery waiting period.
What is account recovery?
Account recovery is a process designed to get you back into your Apple ID account when you don’t have enough information to reset your password. For security reasons, it might take several days or longer before you can use your account again. We know this delay is inconvenient, but it’s important so that we can keep your account and information safe.
Before you start the account recovery waiting period, try to reset your password. Learn how to reset your Apple ID password on a trusted device or through the Apple Support app on a family member’s iPhone, iPad, or iPod touch. You can also visit an Apple Store and ask to use a device on site. If you set up an account recovery contact, they can also help you reset your password.
Use account recovery only as a last resort when you can’t sign in or reset your Apple ID password.

After you start account recovery
After you request account recovery, you get an email with a confirmation of your request and the date and time of when you can expect to regain access.
- If you submitted your account recovery request with iforgot.apple.com through your device’s browser, you should avoid using that device during this period. Using that device might cancel account recovery.
- To avoid delays, turn off other devices that are signed in with your Apple ID until account recovery is complete.
When the wait period is over, Apple sends you a text or automated phone call with instructions to regain access to your account. Follow the instructions to immediately regain access to your Apple ID.
In some cases, you might be able to speed up the account recovery process or reset your password immediately by verifying a six-digit code sent to your primary email address. You might also be able to shorten the wait time by providing credit-card details to confirm your identity. If you’re given this option, an authorization request goes to the card issuer.*
Check the status of your request
At any time, you can see how long it will be until your account is ready for recovery, or when more information will be available. Just go to iforgot.apple.com and enter your Apple ID.
Cancel your request
- If you remember your information and can sign in successfully, your wait period cancels automatically and you can use your Apple ID immediately.
- To cancel a recovery request that you did not make, follow the instructions in your email confirmation.
* Apple Pay doesn’t work as a credit card. If you enter your credit-card details correctly, and are asked to reenter your security information, contact your card issuer. The issuer might have declined your authorization attempts.
Источник
How to create a new Apple ID
Use the same Apple ID to enjoy all Apple services. All you need is your full name, date of birth, an email address, and phone number.
Not sure if you have an Apple ID, or forgot what it is? To find your Apple ID, enter your name and email address at iforgot.apple.com.
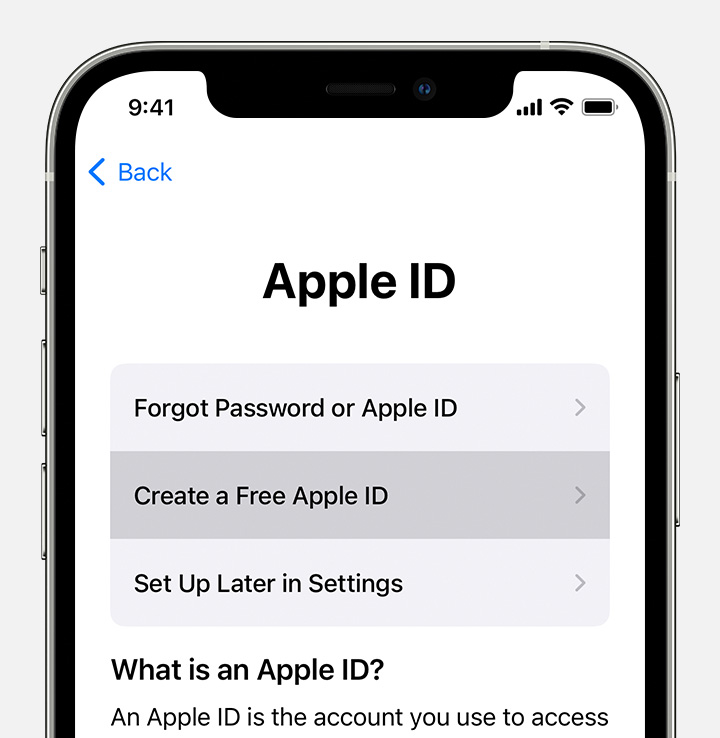
Create an Apple ID on your iPhone, iPad, or iPod touch
Create an Apple ID when you set up your device
- Tap «Forgot password or don’t have an Apple ID?».
- Tap Create a Free Apple ID.

- Select your birthday and enter your name. Tap Next.
- Tap «Use your current email address», or tap «Get a free iCloud email address.»
- When prompted, follow the onscreen steps to verify your email address and set up two-factor authentication. If you choose to skip this step, you’ll be prompted to do this later in Settings.
Create an Apple ID using the App Store on your device
- Open the App Store and tap the sign-in button .
- Tap Create New Apple ID. If you don’t see this option, make sure that you’re signed out of iCloud.
- Follow the onscreen steps. The email address that you provide will be your new Apple ID.*
- Enter your credit card and billing information, then tap Next. You can also choose None. Learn what to do if None isn’t showing or you can’t select it. You won’t be charged until you make a purchase.
- Confirm your phone number. This can help to verify your identity and recover your account if needed. Tap Next.
- Check your email for a verification email from Apple and verify your email address.
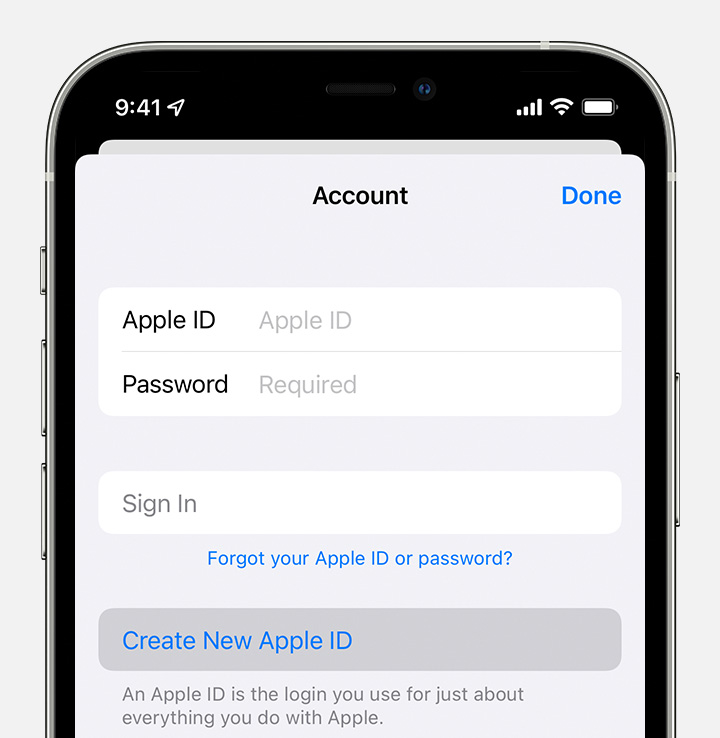
After you verify your email address, you can use your Apple ID to sign in to the iTunes Store, App Store, and other Apple services such as iCloud.
* In China mainland, you might be required to provide a +86 phone number for your Apple ID. You can change the number later, or change your country or region to a location that doesn’t require it. This number is only used for verification purposes.
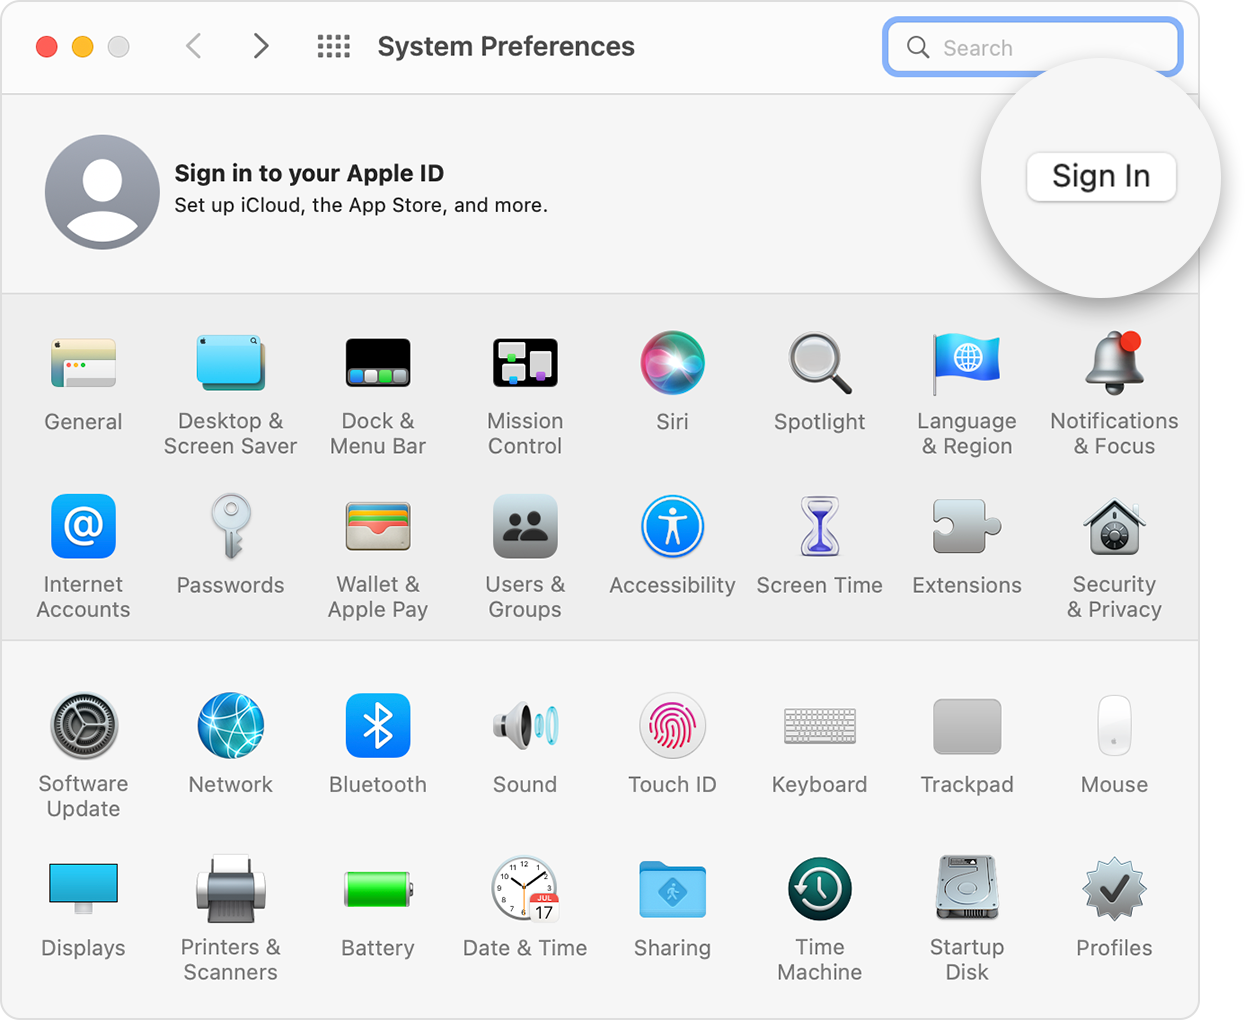
Create an Apple ID on your Mac
- Choose Apple menu > System Preferences.
- Click Sign In.
- Click Create Apple ID, then follow the onscreen steps. The email address that you provide will be your new Apple ID.*
- Enter your credit card and billing information, then click Continue. You can also choose None. Learn what to do if None isn’t showing or you can’t select it. You won’t be charged until you make a purchase.
- Check your email for a verification email from Apple and verify your email address.
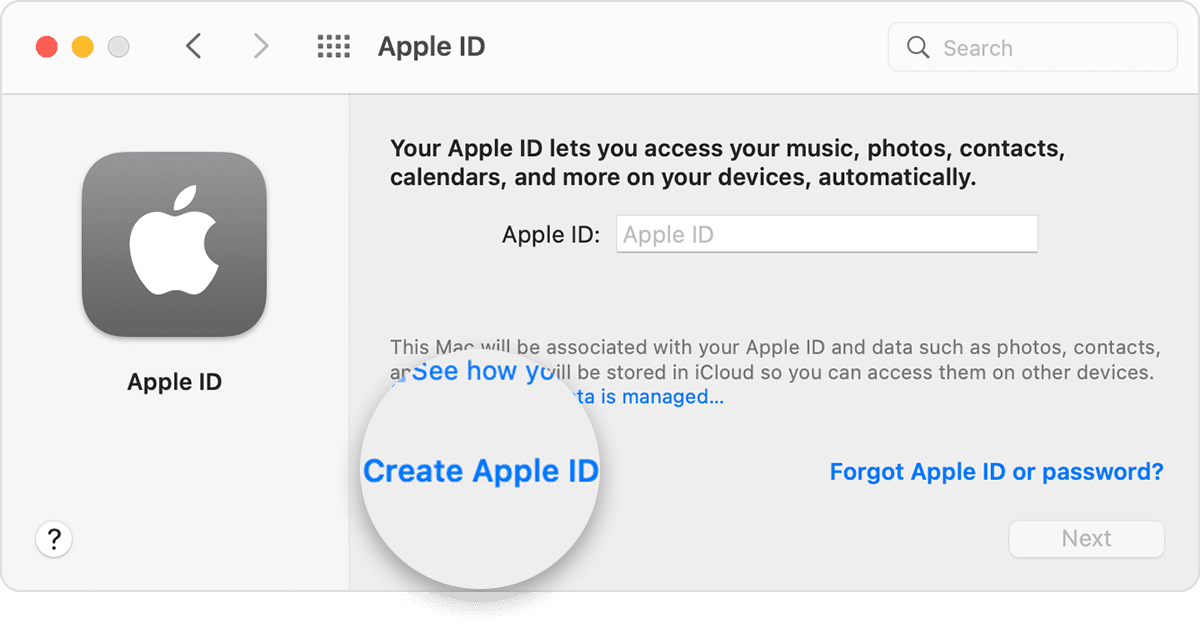
After you verify your email address, you can use your new Apple ID to sign in to the App Store and other Apple services such as iCloud.
* In China mainland, you might be required to provide a +86 phone number for your Apple ID. You can change the number later, or change your country or region to a location that doesn’t require it. This number is only used for verification purposes.
Create an Apple ID on your Windows PC
- Open iTunes for Windows. Make sure that you have the latest version.
- From the menu bar at the top of your computer screen or at the top of the iTunes window, choose Account > Sign In. Then click Create New Apple ID.
- Follow the onscreen steps. The email address that you provide will be your new Apple ID.*
- Enter your credit card and billing information, then click Continue. You can also choose None, and learn what to do if None isn’t showing or you can’t select it. We’ll charge you only when you make a purchase.
- Check your email for a verification email from Apple and verify your email address.
* In China mainland, you might be required to provide a +86 phone number for your Apple ID. You can change the number later, or change your country or region to a location that doesn’t require it. This number is only used for verification purposes.
Create an Apple ID on another device
To create an Apple ID on an Apple TV, Android device, smart TV, or streaming device, you can usually follow the steps provided onscreen and enter your full name, date of birth, an email address or phone number, and a payment method. If you set up the Apple TV app on your smart TV, you might be redirected to activate.apple.com to create your Apple ID. You can also use the steps below to create your Apple ID on the web.
Create an Apple ID on the web
- Go to appleid.apple.com and click Create Your Apple ID.
- Follow the onscreen steps. The email address that you provide will be your new Apple ID.*
- Enter a phone number that you can always access.
- Check the boxes to subscribe to Apple Updates if you’d like. This keeps you up to date on the latest news, software, products, and services from Apple.
- Click Continue.
- Follow the onscreen steps to verify your email address and phone number.

After you verify your email address, you can use your new Apple ID to sign in to the iTunes Store and other Apple services such as iCloud.
* In China mainland, you might be required to provide a +86 phone number for your Apple ID. You can change the number later, or change your country or region to a location that doesn’t require it. This number is only used for verification purposes.
If you see a message that you need to sign in to iTunes
If you created a new Apple ID on the web and see a message that you need to sign in to iTunes, follow the steps below for your device:
- On an iPhone, iPad, or iPod touch: Open Settings, then tap «Sign into device» and sign in with your Apple ID.
- On a Mac: Choose Apple menu > System Preferences, then select Apple ID and sign in with your Apple ID.
- On an Apple TV: Sign in to the App Store, iTunes Store, or Apple Music with your Apple ID.
- On a PC: Sign in to iTunes with your Apple ID.
- On an Android device: Sign in to Apple Music on Android with your Apple ID.
Learn more
- An Apple ID is the account you use to access Apple services like iCloud, the App Store, the iTunes Store, Apple Music, and more.
- If you see a message that says that the email address that you entered is already associated with an Apple ID, you might have already created an Apple ID. Try signing in with that email address. If you don’t remember your password, you can reset your password to regain access to your account.
- Already have an Apple ID? Sign in to all Apple services on your device.
- Learn how to change or remove your Apple ID payment information.
- Learn about how two-factor authentication protects your Apple ID.
Store availability and features might vary by country or region.
Источник
How to configure Sign In with Apple


One of the interesting things Apple rolled out at their WWDC19 conference was “Sign In with Apple”. Which is an authentication service provided by Apple where developers can allow users to sign into their applications with an Apple Id.
Going through the Apple official docs and configuring this seems to be a tedious task atm. So here I will quickly guide you through the basic setup 🙂
Log in to your Apple developer account.
We will need to obtain an App Id with “Sign In with Apple” capabilities.
- Go to Certificates, Identifiers & Profiles > Identifiers and click on the + sign in the upper left next to “Identifiers”.
- Select App IDs and hit continue.
- Here enter any Description and a Bundle ID (Apple recommends using a reverse-domain name style string ex: com.domainname.appname). Scroll down the Capabilities and make sure to tick on Sign In with Apple. And finally, click continue and in the next page verify the details and click Register.
Now we need to obtain a Services Id. This will also serve as the cliend_id when you will be making API calls to authenticate the user.
- Again go to Certificates, Identifiers & Profiles > Identifiers and click on the + sign in the upper left next to “Identifiers”.
- This time select Services IDs and hit continue.
- Here enter any Description and an Identifier (Apple recommends using a reverse-domain name style string ex: com.domainname.appname). Make sure to tick on Sign In with Apple. Here you will have to click on the Configure button next to “Sign In with Apple”.
- Clicking the Configure button from the previous step will display a screen with Web Authentication Configuration. Make sure the App ID we obtained previously is selected as the Primary App ID. Next, you will have to add the Web Domain you will be using this service in (however I did not have to verify the domain to try out Sign In with Apple, but its best if you can get this done). I used example-app.com. Finally, add the Return URLs (you can add multiple) which will be the valid URLs to redirect the user after the user authenticates with Sign In with Apple (for quick testing purposes I used https://example-app.com/redirect). Click Save.
- Click on Continue and in the next page verify the details and click Register.
Now we need to create a secret key that will be used to get our client_secret which will also be needed to make a token request from the Apple.
- Go to Certificates, Identifiers & Profiles > Keys and click on the + sign in the upper left next to “Keys”.
- Give a Key Name and make sure to tick Sign In with Apple. Here also we will have to click on Configure. And in the screen that appears next(Configure Key) select the same App Id we used previously under Choose a Primary App ID and click Save.
- Click on Continue and in the next page verify the details and click Register.
- Download the key and keep it in a safe place as you will never be able to download it again. Click on Done after downloading the key.
Well, that’s pretty much it with configurations.
We already have our client_id now we need one more thing to call the API; the client_secret which we will create using the private key we just downloaded.
The client secret has to be a JWT and according to Apple docs, we need to encrypt the token using the Elliptic Curve Digital Signature Algorithm (ECDSA) with the P-256 curve and the SHA-256 hash algorithm. One of the easy ways to get this done is using ruby-jwt. Firstly check whether you already have Ruby setup if not you can get it from here.
Below are the details we will need to include in the JWT.
Let’s get the client_secret.
After setting up Ruby run the command sudo gem install jwt this will setup ruby-jwt.
Add the necessary details and save the following as secret_gen.rb
You can run the secret_gen.rb file using the command ruby secret_gen.rb from the terminal and it will give you the client_secret.
Okay… Now we are ready to test Sign In with Apple 🙂
Add your redirect_uri(should be a Return URL we configured previously) and the client_id and paste this in your browser and hit enter.
You will be prompted to authenticate (I had to enable two-factor authentication for my Apple Id to continue). And in the end, you will be redirected to the redirect_uri and end up with a code.
Run the following cURL command in the terminal after replacing the code with the code you got performing the above, the redirect_uri and client_id as previously used and the client_secret obtained by running secret_gen.rb.
After running the above you should end up with an access token and an id token.
Some useful info like request details when using “Sign in with Apple” can be found in this document provided by apple.
If your wondering about the Sign In with Apple flow, it’s somewhat based on the OIDC Authorization Code flow.
Also, did you know that using WSO2 Identity Server you can add Sign In with Apple to your app in under 5mins with ZERO code? You can find how it’s done over here.
If your interested in learning more about “Sign In with Apple” join this free webinar on Apple Sign In: A Zero-Code Integration Approach Using WSO2 Identity Server.
Источник


