- Locate backups of your iPhone, iPad, and iPod touch
- Find backups stored on your Mac or PC
- Search for the backup folder on your Mac
- Search for the backup folder on Windows 7, 8, or 10
- Delete or copy backups on your Mac or PC
- Copy backups to another location
- Delete backups
- Locate and manage backups stored in iCloud
- Question: Q: How to move itunes backup location
- All replies
- How to change iTunes backup location?
- iTunes backup location
- To locate iTunes backup folder on Windows 10, 8, 7:
- To locate iTunes backup folder on Mac:
- Why change iTunes backup location
- Change iTunes backup location automatically
- Move iTunes backup location
- YouTube tutorial
- Save even more PC space by moving the entire iTunes library
- Move the iTunes backup folder
- Manually – for Advanced Users
- See also:
Locate backups of your iPhone, iPad, and iPod touch
Find a list of your iOS or iPadOS backups on your Mac, PC, and iOS or iPadOS device. Learn how to delete backups, copy them, and more.
Find backups stored on Mac or PC
Delete or copy backups stored on Mac or PC
Find and manage backups stored in iCloud
Find backups stored on your Mac or PC
To avoid ruining any of your backup files, here’s what you should know:
- The Finder and iTunes save backups to a Backup folder. The location of the Backup folder varies by operating system. Though you can copy the Backup folder, you should never move it to a different folder, external drive, or network drive.
- Don’t edit, relocate, rename, or extract content from your backup files, because these actions might ruin the files. For example, to restore from a relocated backup file, you need to move it back or the file won’t work. Backups serve as a safe copy of your entire device. So while you might be able to view or access a backup file’s contents, the contents usually aren’t stored in a format that you can read.
Search for the backup folder on your Mac
To find a list of your backups:
- Click the magnifier icon in the menu bar.
- Type or copy and paste this:
/Library/Application Support/MobileSync/Backup/
To find a specific backup:
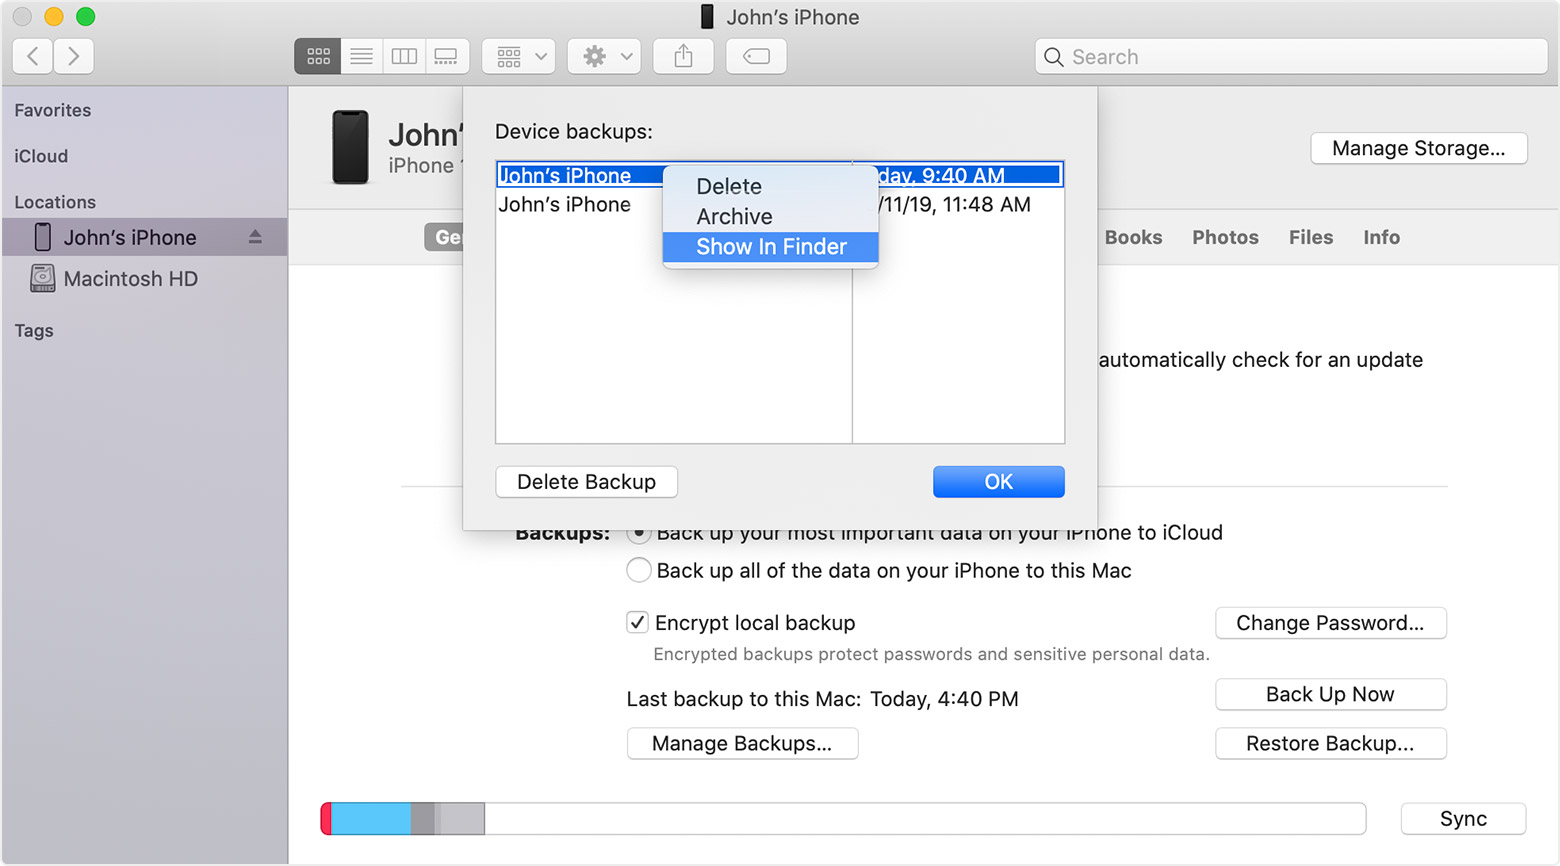
- On a Mac with macOS Catalina 10.15 or later, open the Finder. On a Mac with macOS Mojave 10.14 or earlier, or on a PC, open iTunes. Click your device.
- In the Finder, under the General tab, click Manage Backups to see a list of your backups. From here, you can right-click on the backup that you want, then choose Show in Finder, or you can select Delete or Archive. In iTunes, choose Preferences, then click Devices. From here, you can right-click on the backup that you want, then choose Show in Finder, or you can select Delete or Archive.

- Click OK when you’re finished.
Search for the backup folder on Windows 7, 8, or 10
- Find the Search bar:
- In Windows 7, click Start.
- In Windows 8, click the magnifying glass in the upper-right corner.
- In Windows 10, click the Search bar next to the Start button.
- In the Search bar, enter %appdata%. If you don’t see your backups, enter %USERPROFILE%.
- Press Return.
- Double-click these folders: «Apple» or «Apple Computer» > MobileSync > Backup.

Delete or copy backups on your Mac or PC
Don’t edit, relocate, rename, or extract content from your backup files, because these actions might ruin the files. Use the following sections to make copies of your backups or delete backups that you no longer need.
Copy backups to another location
If you need copies of your backups, you can find the Backup folder and copy the entire folder (not just part of it) to another place, like an external drive or network-storage location.
When you use Time Machine, it automatically copies your Backup folder when you back up the Home folder on your Mac.
Delete backups
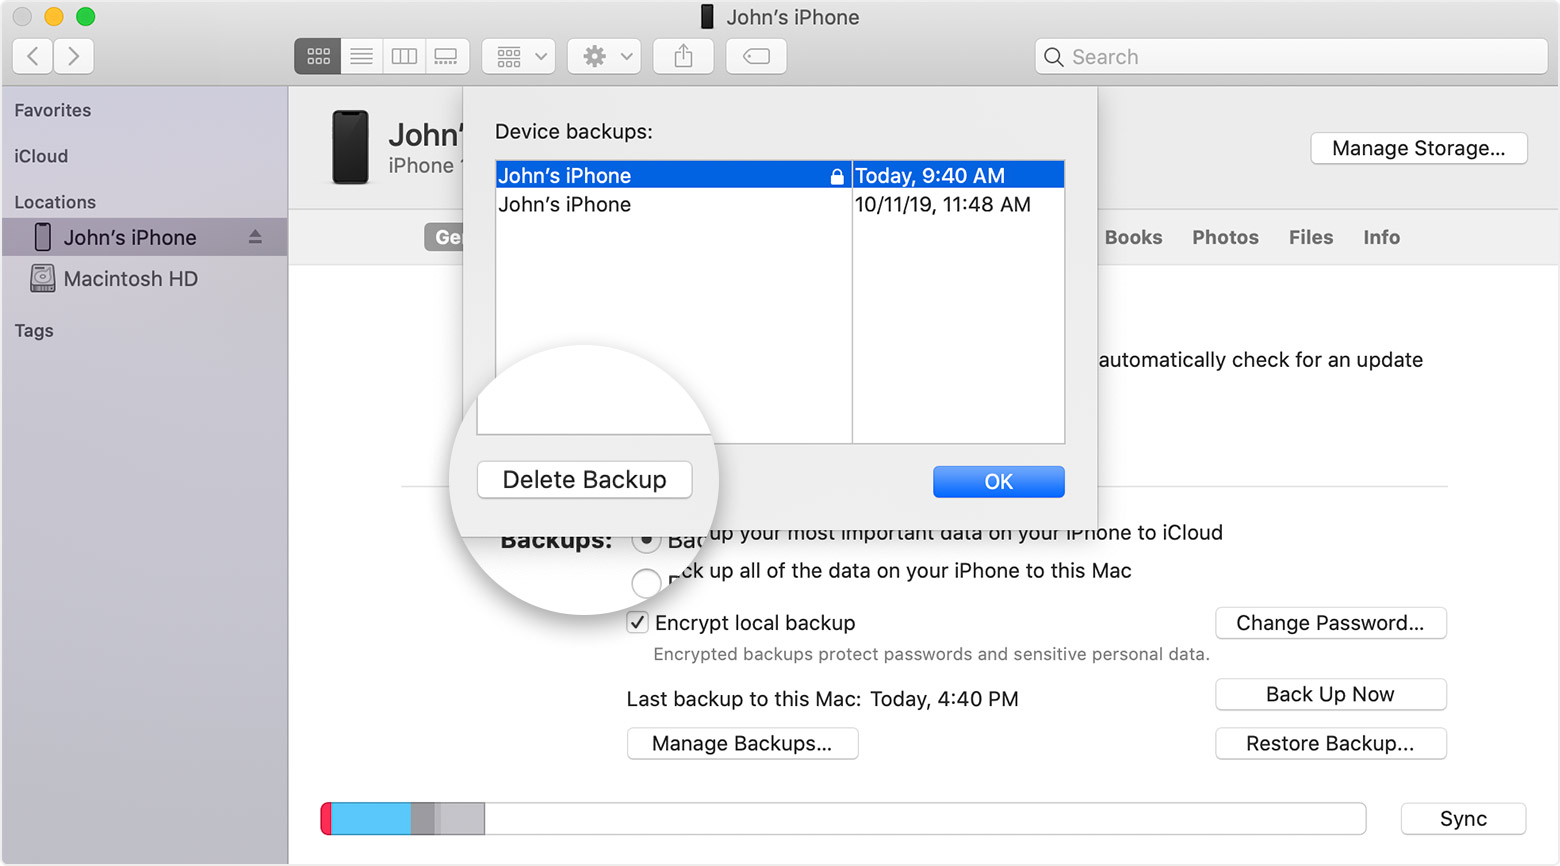
- On a Mac with macOS Catalina 10.15 or later, open the Finder. On a Mac with macOS Mojave 10.14 or earlier, or on a PC, open iTunes. Click your device.
- In the Finder, under the General tab, click Manage Backups to see a list of your backups. From here, you can right-click on the backup that you want, then select Delete or Archive. In iTunes, choose Preferences, then click Devices. From here, you can right-click on the backup that you want, then choose Delete or Archive. Click OK when you’re finished.
- Click Delete Backup, then confirm.
Locate and manage backups stored in iCloud
If you use iCloud Backup, you won’t find a list of your backups on iCloud.com. Here’s how to find your iCloud backups on your iOS or iPadOS device, Mac, or PC.
On your iPhone, iPad, or iPod touch:
- Using iOS 11 or later and iPadOS, go to Settings > [your name] > iCloud > Manage Storage > Backups.
- Using iOS 10.3, go to Settings > [your name] > iCloud. Tap the graph that shows your iCloud usage, then tap Manage Storage.
Tap a backup to see more details about it, choose which information to back up, or delete the backup.
You can choose which content to back up only from the Settings menu of the device that stores that content. For example, while you can view your iPad backup from your iPhone, you can choose which iPad content to back up only from the Settings menu of your iPad.
On a Mac with macOS Catalina 10.15 or later:
- Choose Apple () menu > System Preferences.
- Click Apple ID.
- Click iCloud.
- Click Manage.
- Select Backups.
On a Mac with macOS Mojave 10.14 or earlier:
- Choose Apple () menu > System Preferences.
- Click iCloud.
- Click Manage.
- Select Backups.
- Open iCloud for Windows
- Click Storage.
- Select Backup.
Источник
Question: Q: How to move itunes backup location
All I want to do is move the location where iTunes backs up everything. I.E. I want to move all my apps, pictures etc to my External HDD, HOWEVER. When I try to change the settings it still wants to back up my phone to the C:\\ drive. Which is nearly full. If anybody could help that would be great!
My laptop is running the Intel Core 2350M (2.3gHz), 6GB of 1333mhz RAM. A 320GB HDD.
iPhone 6, iOS 8.1.2, I am running Windows 7
Posted on Jan 16, 2015 10:23 AM
All replies
Loading page content
Page content loaded
Relocate iOS device backups
- Make a new folder called MobileSync at the root of the drive you want the backup data to live on, e.g. as D:\MobileSync
- Use Windows Explorer to move current Backup folder at \Users\ \AppData\Roaming\Apple Computer\MobileSync\Backup into the folder you just made. If the backup folder is large this may take some time.
- To make iTunes look for the data in the new location copy the text below, open a command prompt, use the menu icon at the top left to paste in the command, edit the drive letter/path if needed, and then press .
If you want the backup elsewhere replace D:\MobileSync accordingly.
Note that while this method works for iOS device backups it cannot be used to redirect sections of the media library.
See also Make a split library portable if your library files are on one drive with the media on another.
Jan 16, 2015 2:07 PM
Man, this didn’t help unfortunately. I followed it all to the word but now it says that I can’t back up anything because the backup is corrupt. Thanks for the help though. If you do know how to fix this just say. Thanks!
Jan 17, 2015 7:01 AM
Try renaming the device backup folder inside \MobileSync\Backup to force iTunes to generate a completely new backup set for your device. If it works throw away the old folder.
Jan 17, 2015 7:07 AM
It made a new backup folder but now it reverted to trying to store on the C:\ Drive. I’ll try and move the backup location again but if that does not work then I don’t know what to do. But I really appreciate your help 🙂.
Jan 17, 2015 8:16 AM
Relocate iOS device backups
- Make a new folder called MobileSync at the root of the drive you want the backup data to live on, e.g. as D:\MobileSync
- Use Windows Explorer to move current Backup folder at \Users\ \AppData\Roaming\Apple Computer\MobileSync\Backup into the folder you just made. If the backup folder is large this may take some time.
- To make iTunes look for the data in the new location copy the text below, open a command prompt, use the menu icon at the top left to paste in the command, edit the drive letter/path if needed, and then press .
If you want the backup elsewhere replace D:\MobileSync accordingly.
Note that while this method works for iOS device backups it cannot be used to redirect sections of the media library.
See also Make a split library portable if your library files are on one drive with the media on another.
Great help turingtest2!
I also have the tiny SSD issue loaded with main software/games and these 50GB backups keep growing, so it was time to change it over to one of the storage drives. Your instructions worked great, I did have issues though getting the «Cannot create a file when that file already exists» prompt, but deleting the original C drive «Backup» folder inside of MobileSync after copying it to the new destination resolved the issue.
Источник
How to change iTunes backup location?
Hello! iTunes backup seems to take up a lot of space on my disc C. Could you please help me to change iTunes backup location?
Do you know, that iTunes backups are done automatically every time you connect your iPhone to iTunes (if you don’t have the iCloud Backup option enabled) and sync. These incremental backups are then stored on your PC. iTunes keeps the iOS backup folder directly on the system drive. Such local backups can take up several gigabytes of space on your computer. Therefore, it is better to move iTunes backups to hard drive, for example.
Moreover, iTunes doesn’t validate backups . It means that iTunes could make a corrupted backup and after that will make corrupted incremental backups, then it becomes impossible to restore all the other backups. It is better to delete this iPhone backup and make a new backup.
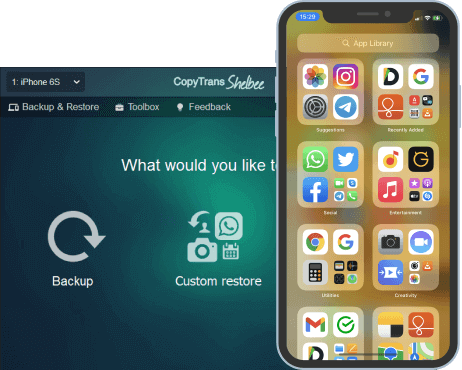
To avoid problems with iTunes backup, I advise you to back up your iPhone with CopyTrans Shelbee .
Advantages of CopyTrans Shelbee:
✔️ Can do full or incremental backup;
✔️ Allows to choose the folder to save backup;
✔️ Validates backup made;
✔️ Compatible with iTunes backup;
✔️ Supports encrypted iPhone backup;
✔️ Can restore full iPhone backup or just some selected data.
iTunes does not allow to change the backup folder location. What’s the solution?
Here is a quick overview of what we are going to cover in this article:
iTunes backup location
iTunes saves backups to a Backup folder and backs up only certain iOS data such as app files, settings and camera roll photos from iPhone, iPad, or iPod Touch each time you sync. The location of the Backup folder depends on the operating system.
To locate iTunes backup folder on Windows 10, 8, 7:
- Find the Search bar:
- In Windows 10: click on the Search bar next to the Start button.
In Windows 8: click on the magnifying glass in the upper-right corner.
In Windows 7: click on Start. - In the Search bar, enter %appdata% or %USERPROFILE% (if you downloaded iTunes from the Microsoft Store).
- Press Return.
- Double-click on these folders: “Apple” or “Apple Computer” > MobileSync > Backup.
Alternatively, go to: \Users\*Username*\AppData\Roaming\Apple Computer\MobileSync\Backup\.
To locate iTunes backup folder on Mac:
- Click on the magnifier icon in the menu bar.
- Type or copy and paste this: ˜/Library/Application Support/MobileSync/Backup/
- Press Return.
Why change iTunes backup location
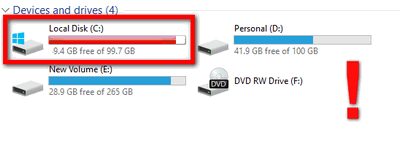
It is often unaccounted for how quickly the iOS backup files may accumulate on the system drive and take up valuable system resources ultimately leading to a less than ideal system performance. That’s why sometimes the best solution is to change iTunes backup folder location.
Change iTunes backup location automatically
Use CopyTrans Shelbee to automatically change the location of your iTunes backup folder and move its contents wherever you like. Begin by downloading CopyTrans Shelbee from the following page: Download CopyTrans Shelbee
Close iTunes and start CopyTrans Shelbee. Click Toolbox. 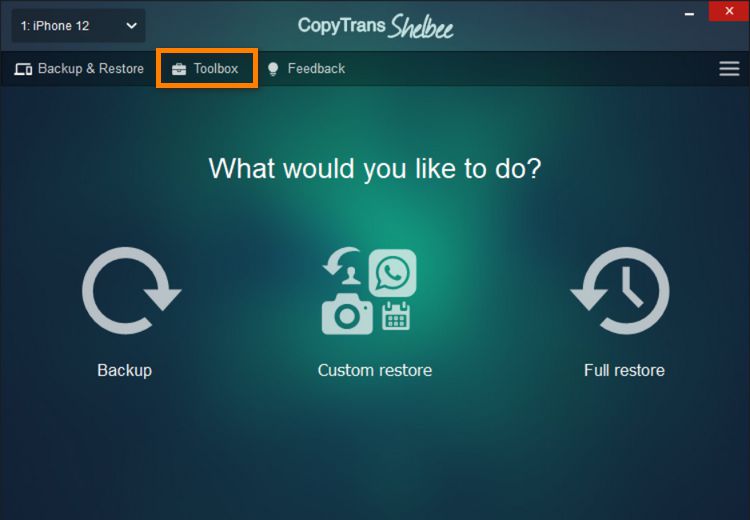
Click on the Pencil symbol to choose a new location for your iTunes backup folder. 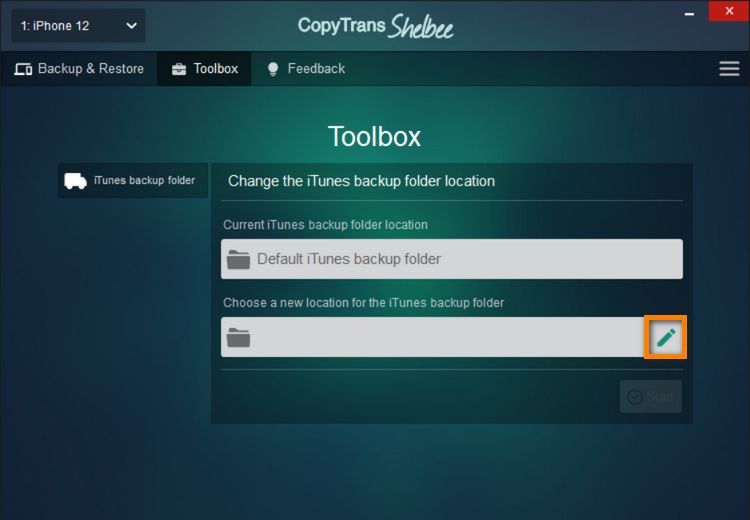
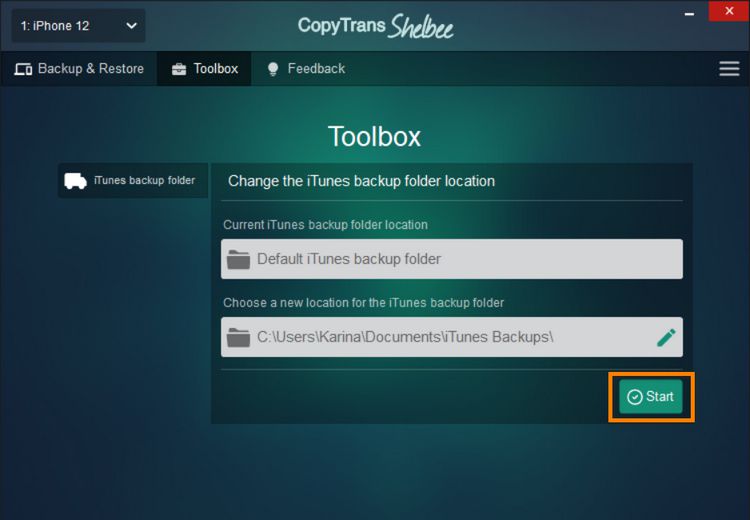
Select the folder and click OK. ![]()
Tap Start.
Stand by until CopyTrans Shelbee changes the iTunes backup folder to the destination of your choice and moves all folder contents to the new location. 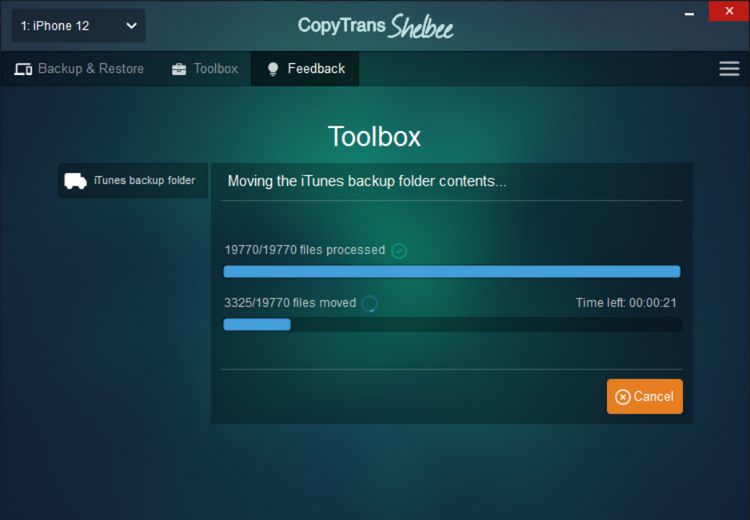
That’s all! The iTunes location was changed and its contents were successfully moved. 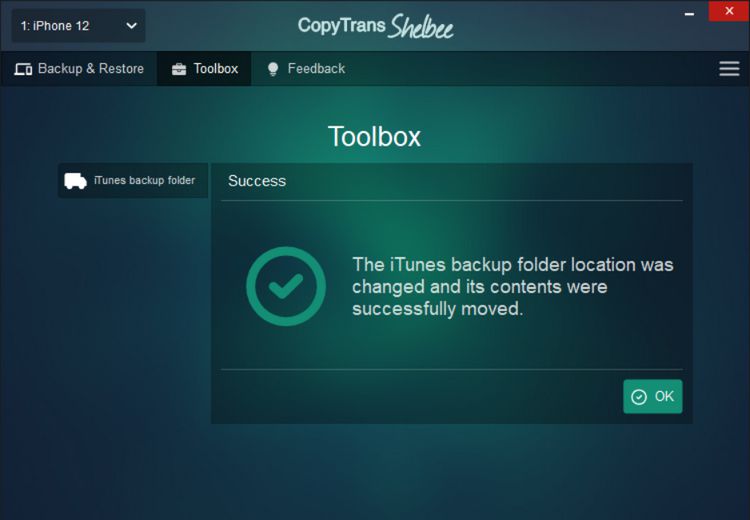
Move iTunes backup location
YouTube tutorial
If you’re more of a text person, please see our written instructions above.
☑ backup and restore iOS apps;
☑ backup iPhone to any PC folder or to external drive;
☑ validate backups and check for password issues;
☑ restore from iTunes and other local backups.
Save even more PC space by moving the entire iTunes library
Changing the iTunes backup location is a good start but if you really want to get the job done why not claim back additional PC space from iTunes? CopyTrans TuneSwift allows you to move the entire iTunes library contents including songs, playlists, podcasts, books, apps etc. to another drive in a few of clicks. The iTunes backup location is not affected by this move. Download CopyTrans TuneSwift
Ensure iTunes is closed and run CopyTrans TuneSwift. Choose Transfer:
Select PC (Windows), then tap on External hard drive or New folder/drive on this computer: 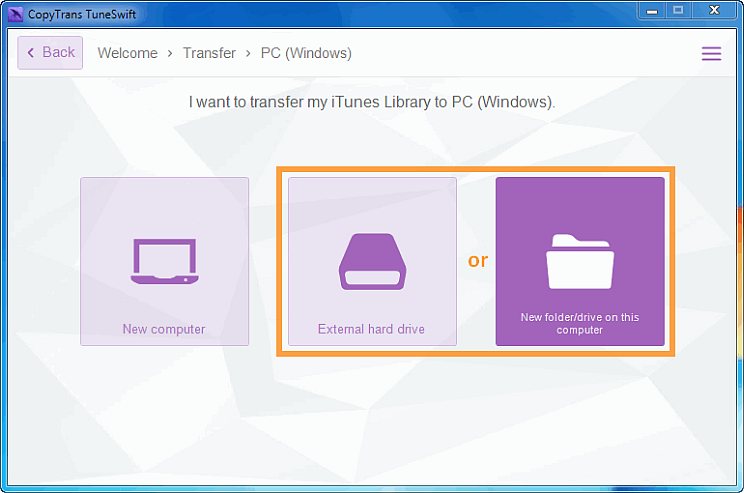
Once the transfer completes, your iTunes library is moved to the location of your choice and you have plenty of newly freed-up space on your PC hard drive. Neat!
Move the iTunes backup folder
Manually – for Advanced Users
The steps below are intended for advanced Windows users who would like to change the default iTunes backup location.
We recommend using the automatic method as the manual method below involves the use of advanced Windows utilities including Command Prompt
Please note that the instructions do not work for Windows XP.
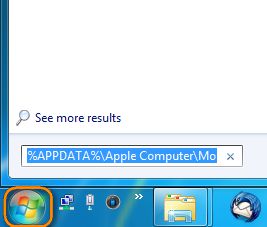
Locate your current iTunes backup folder. If you are using Windows 10, 8 or 7, use the Windows Start Menu to locate the iTunes backup folder and enter the following in the Search box:
for classic iTunes: %APPDATA%\Apple Computer\MobileSync
for Microsoft Store iTunes: %USERPROFILE%\Apple\MobileSync\Backup
Move the current iTunes iOS backup folder to the new desired destination via simple drag-and-drop: 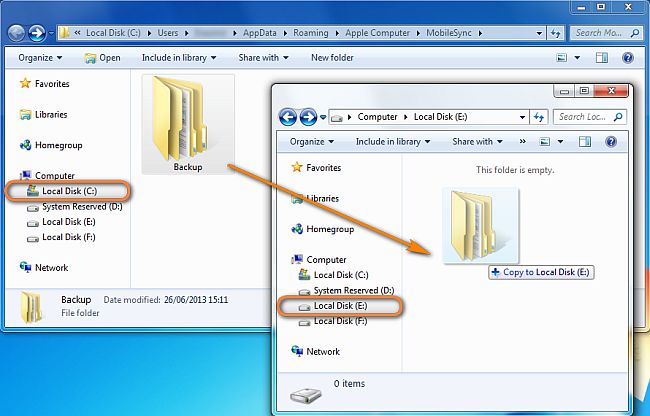
NOTE: Make sure that you have the “Backup” folder fully copied to the new destination drive. Once you do so, you can either delete the “Backup” folder from the original location or rename it to “Backup_OLD”. At the end of this guide, you can delete the “Backup_OLD” folder
At the original folder location, press the SHIFT key, right-click and select Open command window here:
Important: For Windows 10 users choose Open Powershell window here.
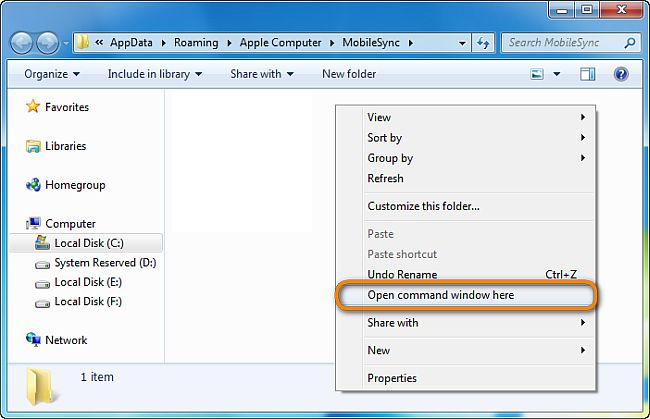
This will open a command window adjusted for that folder: 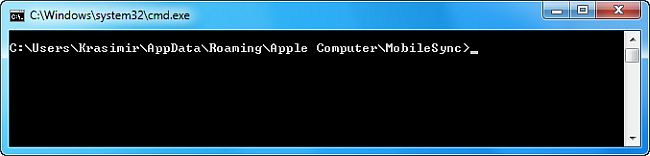
NOTE: If CMD is not showing up with the shift click, go to the MobileSync folder, then type CMD and press Enter in the directory (User>Name>Appdata>Roaming>etc). The CMD prompt should pop up and you can continue through step 6.
In the command prompt window, manually type in the following command where E:\ is the new drive location (drive letter may vary) and “Backup” is the name of the iOS backup directory you just moved:
for classic iTunes: mklink /J “%APPDATA%\Apple Computer\MobileSync\Backup” “E:\Backup”
for Microsoft Store iTunes: mklink /J “%USERPROFILE%\Apple\MobileSync\Backup” “E:\Backup”
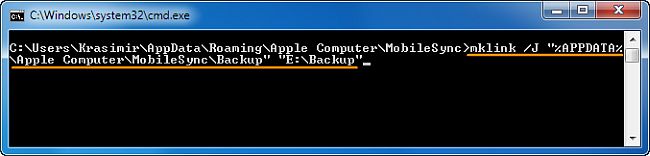
Info: “mklink” is the Windows shell command for adding a symbolic link. The “/J” switch refers to a specific kind of symbolic link called directory junction. Refer to this article to learn more about symbolic links.
You will now see the command prompt window return a success in creating a junction 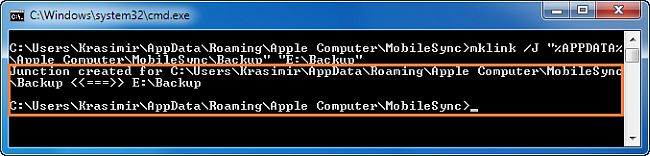
A new folder shortcut called “Backup” will appear in the original location: 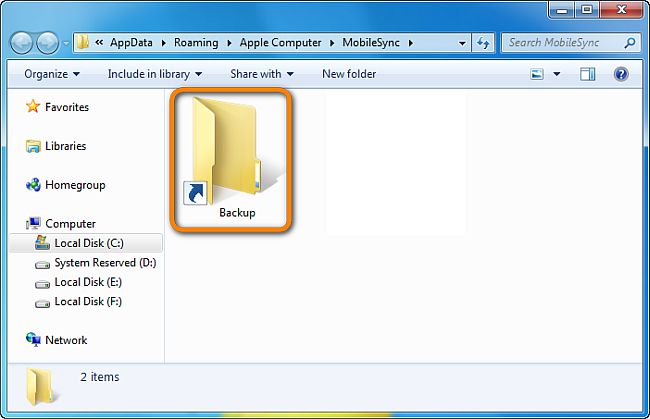
Double click on the “Backup” folder shortcut and while it may seem you are still within the MobileSync folder on the C: drive, what you actually see is the contents of the “Backup” folder you previously moved to the new location. You can think of it as a virtual tunnel created through your computer directory space: 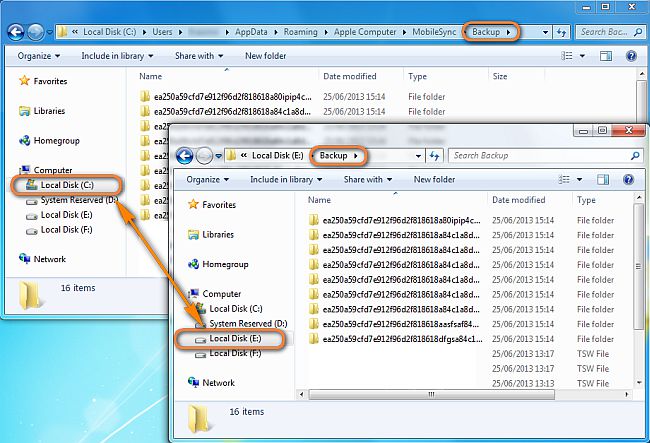
That’s it. You have now learned how to move iOS backup folder from the primary partition to another drive and, in the process, freed up valuable system space: 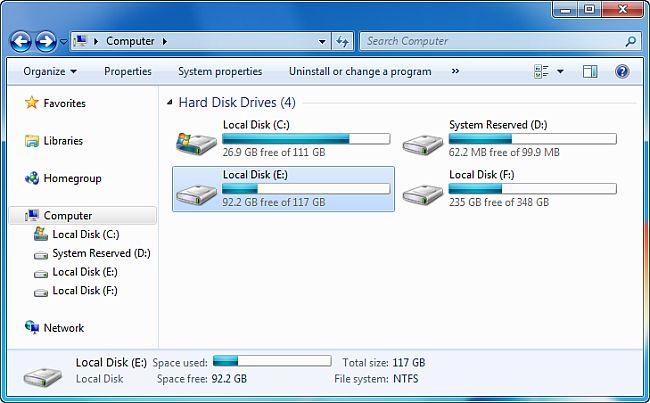
See also:
Krasimir is an avid marketing aficionado and a tech-support specialist in charge of the English-speaking market. He grew up in Bulgaria and on the island of Mauritius where he became passionate about windsurfing and photography.
Источник


