- Upgrade or install memory in your Mac mini
- Before you begin
- Choose your model
- 2012, 2011, 2010
- Remove the bottom cover
- Remove the original memory modules
- Install the new memory
- Replace the bottom cover
- 2009 and earlier
- Confirm that your Mac sees the new memory
- Upgrade or install memory in your Mac mini
- Before you begin
- Choose your model
- 2012, 2011, 2010
- Remove the bottom cover
- Remove the original memory modules
- Install the new memory
- Replace the bottom cover
- 2009 and earlier
- Confirm that your Mac sees the new memory
- [FAQ] Модернизируем Mac Mini(до 2009 года включительно)
- «Замена оперативной памяти»
- «Замена HDD»
- «Замена CD-ROM на Optibay»
Upgrade or install memory in your Mac mini
Learn how to remove or install memory into your Mac mini computer.
Before you begin
To minimize the possibility of damage to the computer components due to static discharge, it’s important to wear an antistatic wrist strap while you work with your computer’s memory.
Choose your model
Mac mini models have different memory (RAM) installation requirements. Choose your Mac mini model for more information. If you need help determining which Mac mini you have, find out how to identify Mac mini models.
Mac mini (M1, 2020) has memory that is integrated into the Apple M1 chip and can’t be upgraded. You can configure the memory in your Mac mini when you purchase it.
Mac mini (2018) does not have user-installable RAM. You can configure the memory in your Mac mini (2018) when you purchase it. To upgrade the memory in your Mac mini (2018), go to an Apple Store or Apple Authorized Service Provider.
RAM availability varies by country and region.
Mac mini (Late 2014) has memory that is integrated into the main logic board and can’t be upgraded.
2012, 2011, 2010
To remove and install memory in your Mac mini (Late 2012), Mac mini (Mid 2011), or Mac mini (Mid 2010), use the following steps.
Remove the bottom cover
- Turn off your Mac mini. From the Apple menu (), choose Shut Down.
- Disconnect the power cord and all other cables from your Mac mini.
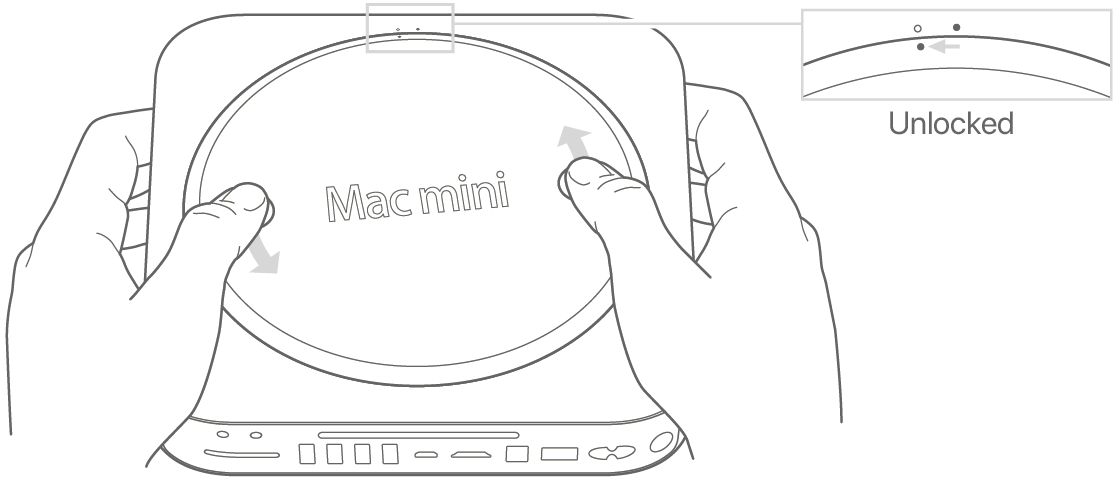
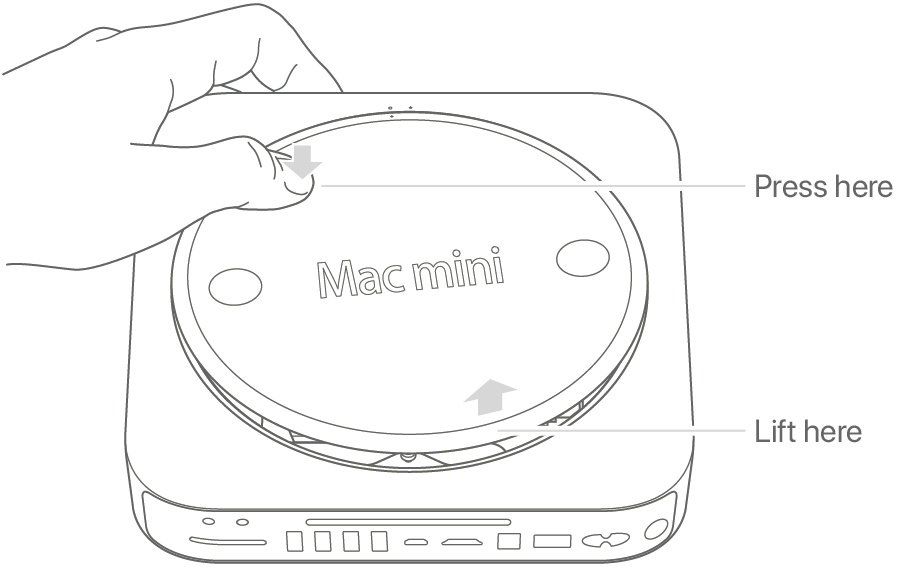
- Lay your Mac mini upside down on a soft cloth or towel, and then rotate the bottom cover counterclockwise to the unlocked position.
Press on the cover to pop up the opposite side, and then remove the cover.
Remove the original memory modules
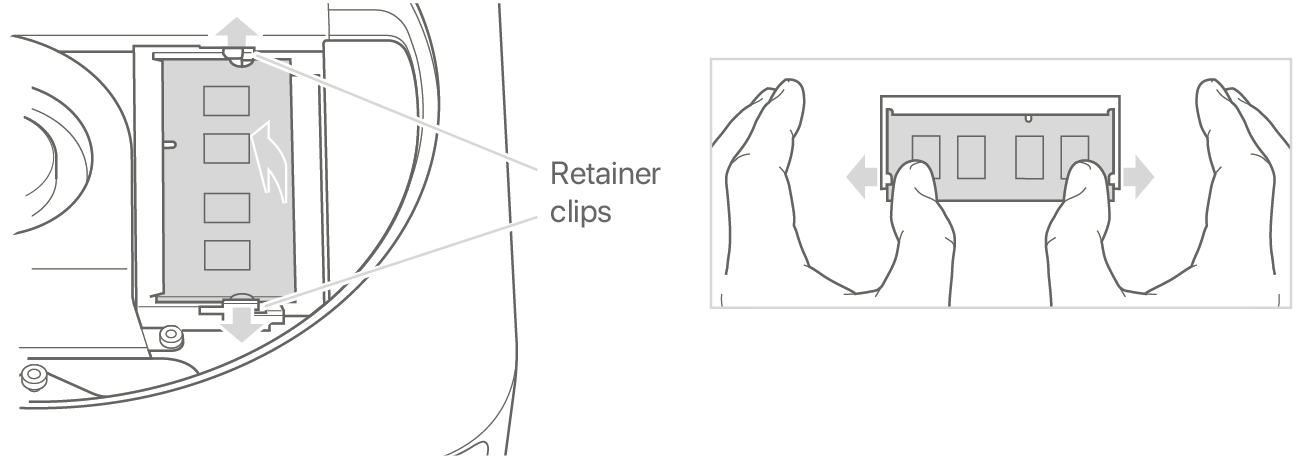
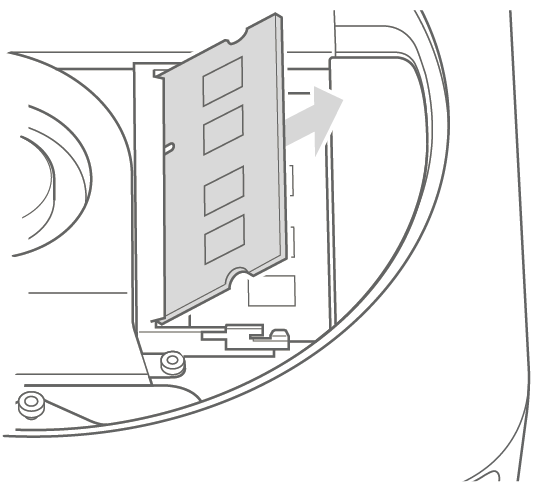
- Gently spread the clips at the ends of the top memory module just enough to let the free edge pop up.
Pull the module out of the slot.
Install the new memory
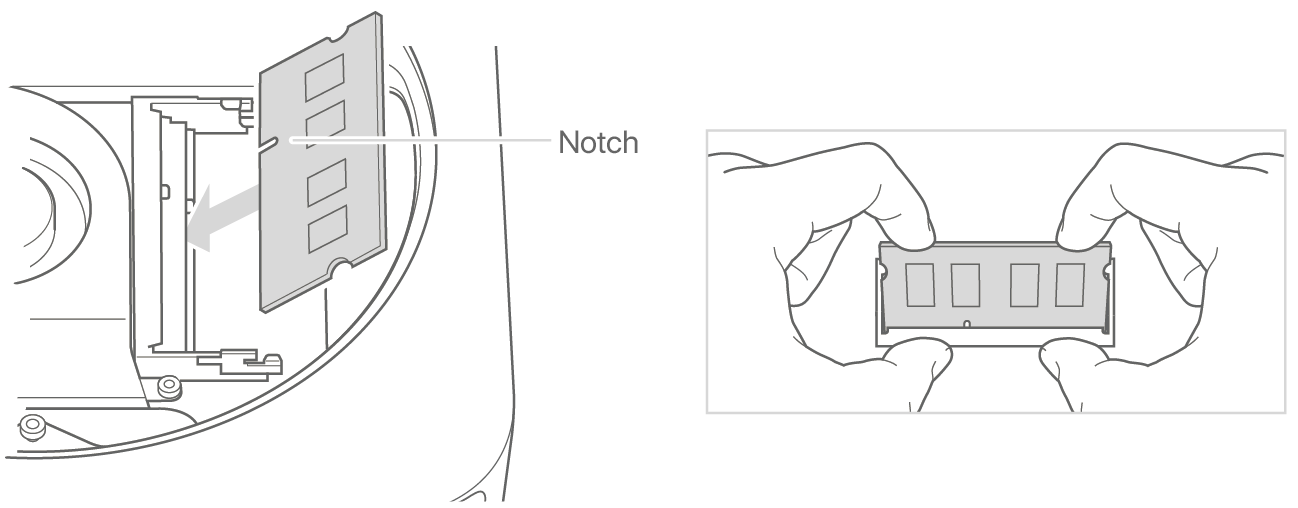
- Carefully press the notched edge of the new memory module into the bottom slot while keeping the opposite edge slightly raised.
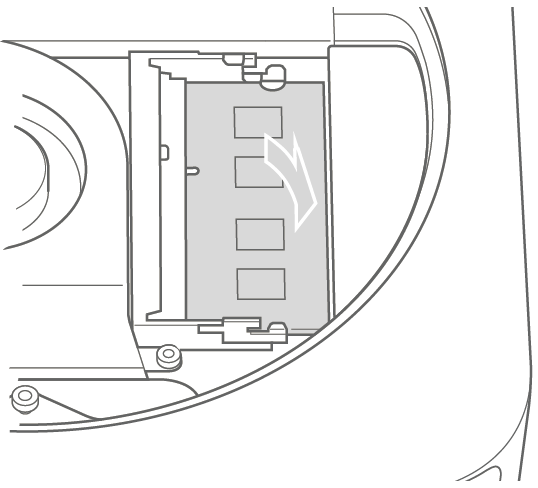
- Press down on the raised edge until the clips snap into place.
- Repeat to install the top memory module.
Replace the bottom cover
Don’t connect the power cord or turn on your Mac mini until you replace the bottom cover. Never operate your Mac mini without the cover in place.
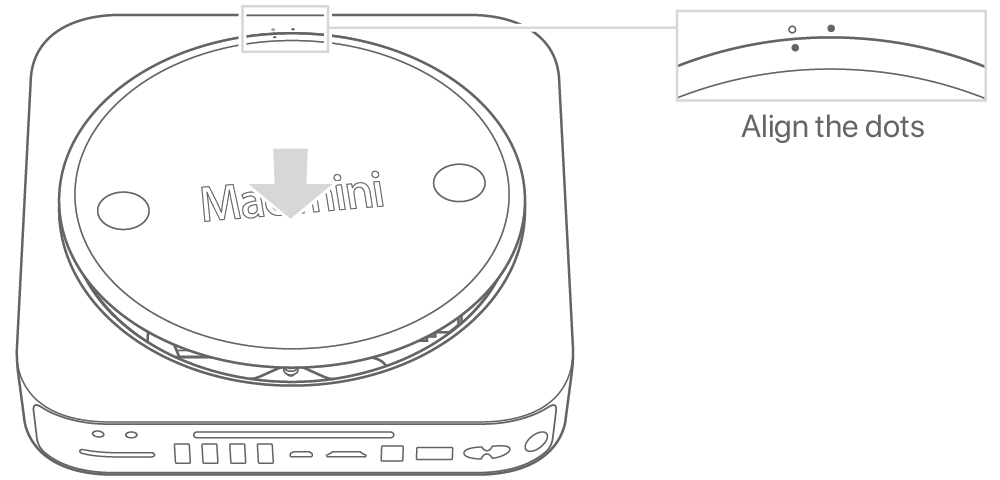
- Replace the bottom cover using the alignment dots to place it in the unlocked position.
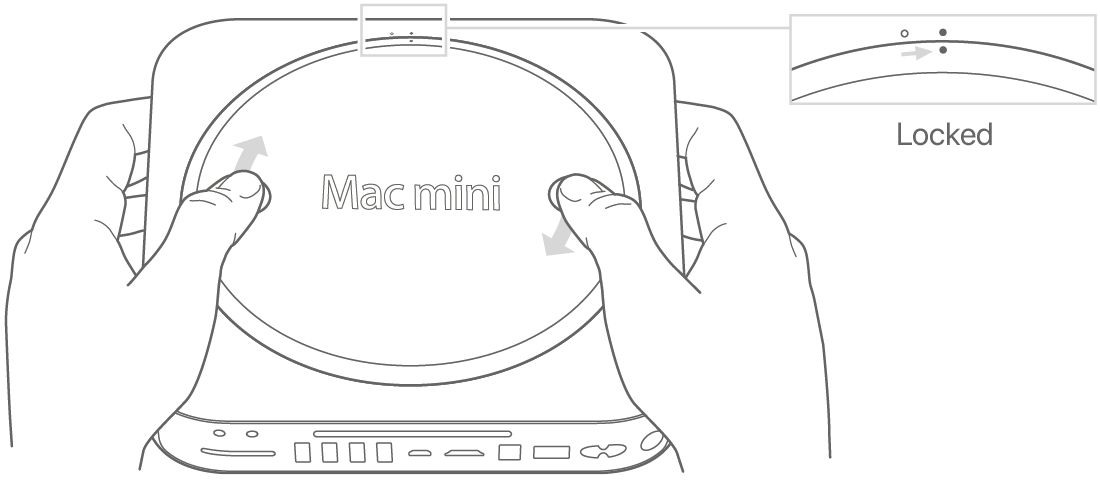
- Rotate the cover clockwise to lock it in place.
- Reconnect the power cord and any other cables you disconnected.
2009 and earlier
To remove or install memory in the following Mac mini models, go to an Apple Authorized Service Provider.
Confirm that your Mac sees the new memory
To check that the computer recognizes the new memory:
- Start up your computer.
- When you see your desktop, choose Apple menu , then choose About This Mac.
- Confirm that the memory listed matches the memory you installed.
If the reported memory size isn’t correct or if your Mac mini repeatedly plays three tones, it may be having trouble recognizing a memory module. If this happens, shut down your Mac mini, verify the module specifications against the requirements for your Mac mini model, and then repeat the memory installation instructions to make sure that the modules are installed correctly. If you still have issues, remove the memory and consult the support information that came with the memory, or contact the vendor who provided the memory.
Источник
Upgrade or install memory in your Mac mini
Learn how to remove or install memory into your Mac mini computer.
Before you begin
To minimize the possibility of damage to the computer components due to static discharge, it’s important to wear an antistatic wrist strap while you work with your computer’s memory.
Choose your model
Mac mini models have different memory (RAM) installation requirements. Choose your Mac mini model for more information. If you need help determining which Mac mini you have, find out how to identify Mac mini models.
Mac mini (M1, 2020) has memory that is integrated into the Apple M1 chip and can’t be upgraded. You can configure the memory in your Mac mini when you purchase it.
Mac mini (2018) does not have user-installable RAM. You can configure the memory in your Mac mini (2018) when you purchase it. To upgrade the memory in your Mac mini (2018), go to an Apple Store or Apple Authorized Service Provider.
RAM availability varies by country and region.
Mac mini (Late 2014) has memory that is integrated into the main logic board and can’t be upgraded.
2012, 2011, 2010
To remove and install memory in your Mac mini (Late 2012), Mac mini (Mid 2011), or Mac mini (Mid 2010), use the following steps.
Remove the bottom cover
- Turn off your Mac mini. From the Apple menu (), choose Shut Down.
- Disconnect the power cord and all other cables from your Mac mini.
- Lay your Mac mini upside down on a soft cloth or towel, and then rotate the bottom cover counterclockwise to the unlocked position.
Press on the cover to pop up the opposite side, and then remove the cover.

Remove the original memory modules
- Gently spread the clips at the ends of the top memory module just enough to let the free edge pop up.
Pull the module out of the slot.

Install the new memory
- Carefully press the notched edge of the new memory module into the bottom slot while keeping the opposite edge slightly raised.
- Press down on the raised edge until the clips snap into place.
- Repeat to install the top memory module.
Replace the bottom cover
Don’t connect the power cord or turn on your Mac mini until you replace the bottom cover. Never operate your Mac mini without the cover in place.
- Replace the bottom cover using the alignment dots to place it in the unlocked position.
- Rotate the cover clockwise to lock it in place.
- Reconnect the power cord and any other cables you disconnected.
2009 and earlier
To remove or install memory in the following Mac mini models, go to an Apple Authorized Service Provider.
Confirm that your Mac sees the new memory
To check that the computer recognizes the new memory:
- Start up your computer.
- When you see your desktop, choose Apple menu , then choose About This Mac.
- Confirm that the memory listed matches the memory you installed.
If the reported memory size isn’t correct or if your Mac mini repeatedly plays three tones, it may be having trouble recognizing a memory module. If this happens, shut down your Mac mini, verify the module specifications against the requirements for your Mac mini model, and then repeat the memory installation instructions to make sure that the modules are installed correctly. If you still have issues, remove the memory and consult the support information that came with the memory, or contact the vendor who provided the memory.
Источник
[FAQ] Модернизируем Mac Mini(до 2009 года включительно)
Как в случае с MacBook Pro, пути у нас 3: апгрейд оперативной памяти, замена HDD на больший или на SSD и гибрид HDD и SSD. Рассмотрим все варианты:
1. Меняем оперативную память. Все просто: смотрим таблицу в конце поста. Рейки должны быть SO-DIMM(как на ноутбуках)
2. Меняем HDD. Железо в Mac Mini обычное, ноутбучное, HDD на 2,5″, толщина 9.5mm. Размер уточняйте. Чеки рекомендую сохранять.
3. И то, и другое. Заказываем с eBay Optibay(на 12,7mm), покупаем второй HDD/SSD и ставим. Самый дорогой вариант. Но самый скоростной
Вот и все. Определились с путем апгрейда? Купили железо? Приступаем!
Mac Mini апгрейдить сложнее чем MacBook Pro, но еще не iMac. Берем лопатку и открываем корпус, постепенно открывая пластиковые защелки:
Теперь мы открыли Mac Mini. Дальше — легче. Перед нами будет вот такая картина:
На рисунке обведены 3 антенны(на модели 2009 3, более старых — возможно 2, не разбирал) и коннектор к плате(желтым цветом). Его надо отсоединить(запомните, откуда отсоиденяли!). Под одной из антенн(самая большая) есть пластиковые держатели. Их необходимо сжать и извлечь антенну. Остальные антенны необходимо аккуратно приподнять вверх. У одной из антенн провод примотан изолентой:
изоленту необходимо аккуратно оторвать(она нам еще понадобится, мы ее обратно прилепим). Далее отверните 4 болта:
И расположите их так, как отвернули(это может помочь вам при закрытии). Далее вытаскиваем коробку из корпуса:
Вот и все. А теперь по этапам:
«Замена оперативной памяти»
Все как и на MacBook Pro: рейки обрамляет пластмассовый держатель. Мы отгибаем его по краям таким образом:
Вытаскиваем старую память, ставим новую и закрываем.
«Замена HDD»
Далее отрываете аккуратно провод с изолентой от корпуса HDD.
Отверните 4 крестовых винта:
Аккуратно извлеките HDD. Сборка в обратном порядке.
«Замена CD-ROM на Optibay»
Нам необходимо снять дисковод и нам для этого нужно отвернуть 6 болтов: два с одного бока:
И сзади, на плате:
Аккуратно отдоедините SuperDrive от платы:
Извлеките Superdrive. Нам будет необходимо переместить эти 4 «штучки»(просто не знаю, как их назвать-то) на Optibay:
Сборка в обратном порядке. Не забудьте поставить HDD в Optibay! SSD лучше ставить на место HDD. Вот и все)
Как видите, апгрейд Mac Mini не самый сложный. Куда сложнее апгрейд iMac, который описать я не смогу, ибо не имел с ним дел. Буду непротив, если найдется пользователь, который знает, как апгрейдить iMac. Фотографии взяты с iFixit. Исправления принимаются)
Источник

