- Unable to decrypt apple pay token
- Answers
- Payment Token Format Reference
- Payment Token Format Reference
- Top-Level Structure
- Header Keys
- Payment Data Keys
- Авторизация в Apple Pay для самых маленьких
- Введение
- Краткий обзор
- Обзаводимся сертификатами
- Отправляем запрос
- Примечание
- Working With Apple Pay
- Merchant
- What is Apple Pay
- Benefits
- Difference between Apple pay and InApp Purchase
- Availability
- Apple pay Architecture
- Payment Flow :
- How Do I process the Payment / How You Get Money (Payment Processing)
- Merchant ID vs Payment Processing certificate
- Getting Started
- STEP 1 → Register a Merchant ID
- STEP 2 → Create a Payment Processing certificate
- STEP 3 → Enable Apply Pay On App
- STEP 4 → Device Availability
- Restricted Account
- Locked Account
- STEP 5 → Payment Network Support
- STEP 6 → Design Apple Pay Button
- Guidlines:
- STEP 7 → Creating a Payment Request
- Recommendation
- Recommendation
Unable to decrypt apple pay token
Enabling an apple pay support in web app and processing the payment via Cybersource payment gateway.
Apple Payment token received as part of payment has been sent to cybersource for payment processing.
CyberSource is saying token is not valid and unable to decrypt. Cybersource is expecting token length to arround 3000 to 5000.
Token Reeived from apple is around 500.
Here is the token , its length is 425 . What am i missing here. What is the minimum length of Apple Pay token, Can you share any reference to payment token length.
Answers
It depends. quoting off the ‘net:
What is an Apple Pay PKPaymentToken?
The PKPaymentToken is an encrypted data package created by the Apple Pay server using your public key. This package contains several components including the network token and a cryptogram.
What is the cryptogram?
The cryptogram returned by Apple Pay is a component of the PKPaymentToken that is unique to the transaction and acts as a security key. It is 40 characters in length and created using the merchant’s public key supplied to Apple during the merchant registration process.
What is a network token?
A network token is a surrogate value for a PAN that is between 13 and 19 digits (typically format preserving) and is MOD-10 compliant (passes Luhn check). All network tokens will use BIN ranges designated for tokens and never overlap or conflict with a real PAN.
>CyberSource is saying token is not valid and unable to decrypt
Источник
Payment Token Format Reference
Payment Token Format Reference
A payment token is created by the Secure Element based on a payment request. The payment token has a nested structure, as shown in Figure 1-1 .
Figure 1-1 Structure of a payment token 
The Secure Element encrypts the token’s payment data using either elliptic curve cryptography (ECC) or RSA encryption. The encryption algorithm is selected by the Secure Element based on the payment request. Most regions use ECC encryption. RSA is used only in regions where ECC encryption is unavailable due to regulatory concerns.
Top-Level Structure
The paymentData property of PKPaymentToken contains a UTF-8 serialization of a plain-text JSON dictionary with the following keys and values:
payment data dictionary, Base64 encoded as a string
Encrypted payment data.
Additional version-dependent information used to decrypt and verify the payment.
detached PKCS #7 signature, Base64 encoded as string
Signature of the payment and header data. The signature includes the signing certificate, its intermediate CA certificate, and information about the signing algorithm.
Version information about the payment token.
The token uses EC_v1 for ECC-encrypted data, and RSA_v1 for RSA-encrypted data.
To decrypt the encrypted payment data, do the following:
Verify the signature as follows:
Ensure that the certificates contain the correct custom OIDs: 1.2.840.113635.100.6.29 for the leaf certificate and 1.2.840.113635.100.6.2.14 for the intermediate CA. The value for these marker OIDs doesn’t matter, only their presence.
Ensure that the root CA is the Apple Root CA — G3. This certificate is available from apple.com/certificateauthority .
Ensure that there is a valid X.509 chain of trust from the signature to the root CA. Specifically, ensure that the signature was created using the private key corresponding to the leaf certificate, that the leaf certificate is signed by the intermediate CA, and that the intermediate CA is signed by the Apple Root CA — G3.
Validate the token’s signature:
For ECC ( EC_v1 ), ensure that the signature is a valid ECDSA signature (ecdsa-with-SHA256 1.2.840.10045.4.3.2) of the concatenated values of the ephemeralPublicKey , data , transactionId , and applicationData keys.
For RSA ( RSA_v1 ), ensure that the signature is a valid RSA signature (RSA-with-SHA256 1.2.840.113549.1.1.11) of the concatenated values of the wrappedKey , data , transactionId , and applicationData keys.
Inspect the CMS signing time of the signature, as defined by section 11.3 of RFC 5652. If the time signature and the transaction time differ by more than a few minutes, it’s possible that the token is a replay attack.
Use the value of the publicKeyHash key to determine which merchant public key was used by Apple, and then retrieve the corresponding merchant public key certificate and private key.
Restore the symmetric key:
For ECC ( EC_v1 ):
Use the merchant private key and the ephemeral public key, to generate the shared secret using Elliptic Curve Diffie-Hellman (id-ecDH 1.3.132.1.12).
Use the merchant identifier field (OID 1.2.840.113635.100.6.32) of the public key certificate and the shared secret, to derive the symmetric key using the key derivation function described in NIST SP 800-56A, section 5.8.1, with the following input values:
The shared secret calculated above using ECDH.
The byte ( 0x0D ) followed by the ASCII string «id-aes256-GCM» . The first byte of this value is an unsigned integer that indicates the string’s length in bytes; the remaining bytes are a variable-length string.
The ASCII string «Apple» . This value is a fixed-length string.
The SHA-256 hash of your merchant ID string literal; 32 bytes in size.
You can derive Party V Info from your Payment Processing certificate in either of two ways.
The plaintext merchant ID is included in the UID field of the Common Name. Calculate the SHA-256 hash of that plaintext string. Use the result for Party V Info.
The hex encoded hash of the merchant ID is included in OID 1.2.840.113635.100.6.32. Hexadecimal-decode that hash string to produce the original (non-hex-encoded) 32 byte hash. Use the result for Party V Info.
Supplemental Public and Private Info
Note: Because the SHA-256 hash function produces exactly the needed amount of key material, there is only one iteration of the key-derivation function’s loop.
For RSA ( RSA_v1 ), the symmetric key is encrypted by a merchant’s public key using the RSA/ECB/OAEPWithSHA256AndMGF1Padding algorithm. Use your RSA private key to decrypt the wrapped key blob and access the symmetric key.
Use the symmetric key to decrypt the value of the data key.
For ECC ( EC_v1 ), Decrypt the data key using AES–256 (id-aes256-GCM 2.16.840.1.101.3.4.1.46), with an initialization vector of 16 null bytes and no associated authentication data.
For RSA ( RSA_v1 ), Decrypt the data key using AES–128 (id-aes128-GCM 2.16.840.1.101.3.4.1.6), with an initialization vector of 16 null bytes and no associated authentication data.
Confirm that this payment has not yet been credited by verifying that a payment with the same transactionId has not been processed. For efficiency, consider only those payments whose transaction time is within the time window of the current transactionId , as determined in step 1.e.
Verify the transaction details:
Check that the currencyCode is as expected.
Check that the transactionAmount is correct, as compared with the total charge of the transaction.
Check that the applicationData field matches the hash of the data used in the original payment request, and that the data is correct. For example, check that an order number in the data from the original payment request is the order number to which this payment is being applied. See applicationData in PKPaymentRequest for more information.
Use the decrypted payment data to process the payment.
Note: The exact procedure used to process the payment varies depending on your payment processor and payment network. Please contact your payment processor for the full details.
Important: If the signature is invalid or any of the hashes don’t match, ignore the transaction.
Header Keys
The header contains the following keys and values:
SHA–256 hash, hex encoded as a string
Optional. Hash of the applicationData property of the original PKPaymentRequest object. If the value of that property is nil , this key is omitted.
X.509 encoded key bytes, Base64 encoded as a string
Ephemeral public key bytes.
A Base64 encoded string
The symmetric key wrapped using your RSA public key.
SHA–256 hash, Base64 encoded as a string
Hash of the X.509 encoded public key bytes of the merchant’s certificate.
A hexadecimal identifier, as a string
Transaction identifier, generated on the device.
Payment Data Keys
After being decrypted, the encrypted payment data contains the following keys and values:
Device-specific account number of the card that funds this transaction.
date as a string
Card expiration date in the format YYMMDD.
ISO 4217 numeric currency code, as a string to preserve leading zeros.
Источник
Авторизация в Apple Pay для самых маленьких

Внимание будет уделено конкретному моменту — это получения криптограммы со стороны Apple после того как покупатель прошёл TouchID или FaceID. Языком на бэкенде будет PHP.
Меня зовут Александр, я младший PHP-программист компании Moguta, и мне пришлось столкнуться на своем пути с интеграцией Apple Pay в нашу Moguta.CMS. Сегодня я расскажу как авторизовать себя через Apple Pay для проведения оплаты без вникания в матчасть защищенных соединений и сертификатов, так как мне в начале своего пути не хватало такого материала.
Введение
Я не буду расписывать здесь всю простыню по внедрению Apple Pay себе на сайт. Инструкций о том, как зарегистрировать аккаунт разработчика Apple, где сделать Payment Processing сертификат, куда отправить полученный ответ, полно на рунете, достаточно спросить у Гугла «интеграция apple pay на сайт» и выбрать приглянувшийся агрегатор платежей, который подробно распишет вам по шагам все необходимые действия.
Краткий обзор
Минимальным требованием для этой инструкции будет наличие MacOS для работы с ключами, так как работать с сертификатами на других ОС — это уже отдельный материал, которому я здесь уделять внимание не буду.
Давайте сначала сориентируемся где будет место наших боевых действий. Алгоритм следующий:
- Пользователь начинает процесс оплаты через Apple Pay в интернет-магазине;
- Интернет-магазин отправляет сведения о платеже в Apple;
- Apple присылает в ответ ссылку, на которую необходимо отправить данные продавца;
- Интернет-магазин отправляет данные продавца по ссылке через Two-Way TLS;
- Apple присылает данные, содержащие PaymentData;
- Интернет-магазин переадресует PaymentData в платежный шлюз и обрабатывает ответ;
Нас интересует 4ый пункт, так как обычным cURL запросом тут не обойтись.
Обзаводимся сертификатами
Для того, чтобы Apple поверила, что имеет дело лично с нами, сначала нужно завести сертификат Merchant Identify (не путать с Payment Processing, он нужен для платежного шлюза). Для начала сформируем запрос на сертификат по официальной инструкции. Полученный файл прикрепляем в Apple Pay Merchant Identity Certificate вашего Merchant ID.

В ответ получаем merchant_id.cer, который добавляем в связку. Генерируем на основе его закрытого ключа .p12-файл. Для этого вызываем контекстное меню закрытого ключа и выбираем «Экспортировать. «
Вытаскиваем ключ следующей командой (тот пароль, который запросит терминал, будет являться паролем для ключа, он нам понадобиться при соединение с Apple)
и перегоняем наш сертификат в pem
Теперь у нас есть все необходимые файлы, которыми будем доказывать яблочному серверу, что мы те, за кого себя выдаем.
Отправляем запрос
Опускаем момент получения ссылки на валидацию (подробнее читайте в другой статье на Хабре), переходим к тому моменту, когда скрипт на JS в Safari отправил нашему серверу просьбу на авторизацию в Apple.
Для этого мы используем PHP с cURL. Пример кода:
Из полученного ответа выдергиваем paymentData и отправляем нашему платежному шлюзу. Поздравляю, авторизация пройдена, можно грести деньги.
Примечание
Судьба не дала мне долго радоваться налаженному соединению, и Apple отдала мне следующий ответ:
Текст сообщения не достаточно очевиден, как хотелось бы. Информации в сети опять же нету. Как оказалось, скорее всего это означает, что в поле merchantIdentifier вы просто ввели неверное значение.
Буду рад услышать в комментариях предложения, советы или критику.
Надеюсь, что статья принесет пользу таким же заблудшим душам, как и я.
Источник
Working With Apple Pay
Jun 27, 2020 · 18 min read
Note: Primarily purpose of this article is to put all the contents in one place . Majority of the contents were taken from WWDC. All code follows iOS 11 Api’s
Merchant
A merchant is a company or individual who sells a service or goods. Like If you are using Uber app , then Uber company is the merchant
What is Apple Pay
Apple pay is an easy, private and secure way to pay within application as well as contactlessly and it allows for one touch payments and you can use it for physical goods and services
How excited people when apple first introduced apple pay in 2014. Here is the link
Benefits
- Easy to use (user don’t need to re enter payment , contact, billing and shipping information )
- Secure (pay using touch ID / FaceID)
- Private (Card number not exposed Instead you sending a device number along with the unique token that valid only for that purchase)
- It’s so easy that you don’t need to onboard your users
- Merchant see higher checkout conversion rates and faster checkouts after integrating Apple Pay
Difference between Apple pay and InApp Purchase
- Apple pay used for physical goods and services mean like gym membership , ride sharing , grocery delivery and buying stuff from store
- Where inApp purchases used for in app content and functionality , In app currency and digital subscription

Availability
Apple pay is available o n all devices that has a secure element chip. So secure elements is this hardware chip that dedicated to securely storing your card information and is available on iPhone 6, 6plus and future devices
Apple pay Architecture
- The first thing you need to create a Merchant Identifier , They require this and it uniquely identifies you as a merchant , Now you can set your merchant identifier up on the developer portal or through the Xcode capability window and it’s backed by the private key in a certificate . They used this certificate to securely encrypt the payment information that we generate so it’s unique to you as a merchant , No body else can decrypt the payment information . It’s just another great security benefit of apple pay . use reverse DNS format. EXAMPLE: merchant.com.wwdc.emporium. Apps that use Apple Pay need to enable the Apple Pay capabilities in Xcode. You also register a merchant ID and create a Payment Processing certificate, which is a cryptographic key that is used to securely send payment data to your server.
- Display Apple pay button in app
- Your app then receive a payment token in response (Now a payment token contains all the information you need to charge the payment , It’s encrypted using your merchant identifier certificate, so unique to you only you as the developer can decrypt it )
- Send this token to your processor and display a success sheet in your app
Payment Flow :
- First app will show/ display the your checkout flow
- Then you can ask iOS whether the user has any Apple Pay cards available because if the users doesn’t have any apple pay cards available or the device doesn’t support it, you want take them to traditional payment flow
- Now if they do , then we will present the apple pay sheet, iOS will check wether the touch Id / face ID is valid. If it is valid , apple will actually pass this information down to the dedicated secure element, which is gonna securely wrap all of this payment information in your up, this includes the cryptogram which is an encrypted piece of data required to make the payment , It’s then going to send it to apple servers. Now on apple servers it just get rewrapped using your merchant identifier , so that’s all apple are doing . This is because Apple don’t want to ship your certificate in the app right . So their server re routes the payment and encrypts it uniquely to you and its passed back up through the system where you can then send it for processing , Now assuming the processing is successful you can dismiss the payment sheet and display you own confirmation screen
How Do I process the Payment / How You Get Money (Payment Processing)
So there is two way you can process your apple pay token
- To use a payment platform , The payment platform can handle this decryption and the understanding of the cryptogram on your behalf, When you sign up, you provider them with your merchant identifier and Certificate , and they decrypt it for you and you simply send them the payment token and some payment platform actually provide native iOS development kits Swift/Objc. ( Recommended)
- To process the payment your self , Now apple recommend this if you are experienced working with payments and you have some existing payment infrastructure and if you do this you are gonna decrypt it the payment token on your server and then you gonna send this to the underlying cryptogram that the secure element generated to your Merchant Acquirers , your acquiring bank and do a transaction
Merchant ID vs Payment Processing certificate
A merchant ID identifies you to Apple Pay as being able to accept payments. This identifier you register with Apple that uniquely identifies your business as a merchant able to accept payments. This ID never expires, and can be used in multiple websites and iOS apps.
A Payment Processing certificate that is associated with your merchant ID is used to encrypt/decrypt payment information. Apple Pay servers use the certificate’s public key to encrypt payment data. You (or your payment service provider) use the private key to decrypt the data to process payments
Getting Started
STEP 1 → Register a Merchant ID
- In Member Center, select Certificates, Identifiers & Profiles.
- Under Identifiers, select Merchant IDs.
- Click the Add button (+) in the upper-right corner.
- Enter a description and identifier, and click Continue.
- Review the settings, and click Register.
- Click Done.
STEP 2 → Create a Payment Processing certificate
- In Member Center, select Certificates, Identifiers & Profiles.
- Under Identifiers, select Merchant IDs.
- Select the merchant ID from the list, and click Edit.
- In the Payment Processing Certificates section, click Create Certificate. Follow the instructions to obtain or generate your certificate signing request (CSR), and click Continue.
- Click Choose File, select your CSR, and click Generate.
- Download the certificate by clicking Download, and click Done.
STEP 3 → Enable Apply Pay On App
To enable Apple Pay for your app in Xcode, open the Capabilities pane. Select the switch in the Apple Pay row, and then select the merchant IDs you want the app to use as shown in Figure 2

If you want to see Step 1 to 3 through video, here is the link
STEP 4 → Device Availability
As shown in Figure 3 , we Determined whether this device can process payment requests of not in our case true we can pass first check
canMakePayments() → Determine whether this device can process payment requests. YES if the device is generally capable of making in-app payments. NO if the device cannot make in-app payments or if the user is restricted/locked from authorizing payments.
Restricted Account
Many Apple Pay Cash users can’t tell the difference between a locked and restricted account. If you can still transfer the balance from your account to your bank or make payments in stores, within apps, and on the internet, that means that your account is just restricted. Apple has the right to restrict your account if its security system spots any suspicious activity on it.
Locked Account
On the other hand, if your account is locked, you will no longer be able to make purchases via Apple Pay Cash, or send and receive money. That also means that you won’t be able to transfer your balance to your bank account. Just like with a restricted account, Apple may lock your account if it discovers an activity that is considered suspicious on your account.

STEP 5 → Payment Network Support
Payment Network → When you go to the grocery store and swipe your card, the terminal transmits your account information to a third-party company. That company then sends the request to your financial institution, which approves or denies it based on your balance or credit limit. The third-party company then sends that information back to the merchant terminal, which approves or denies the purchase. The third-party company involved in all of this is known as a payment network. Common payment networks today include Visa , MasterCard , and Maestro .
As shown in Figure 4 we Determined whether this device can process payment requests using specific payment network brands YES if the user can authorize payments on this device using one of the payment networks supported // by the merchant // NO if the user cannot authorize payments on these networks or if the user is restricted from authorising payments.
Note: If you implement step 5 you don’t need to do step 4. User may not be able to make payments for a variety of reasons. For example, this functionality may not be supported by their hardware, or it may be restricted by parental controls. On devices that support making payments but don’t have any payment cards configured, the canMakePayments() method returns true because the hardware and parental controls allow making payments, but the canMakePayments(usingNetworks:) method returns false regardless of network.

As shown in Figure 5 in my real device I have only master card , it return false,

STEP 6 → Design Apple Pay Button
The system provides several Apple Pay button types and styles you can use in your app. Don’t create your own Apple Pay button design or attempt to mimic the system-provided button designs . For System provided button use PKPaymentButtonType (iOS). For more details please have a look
When you use the system-provided APIs, you get: Apple-approved configuration , localization , maintain ideal proportions as you change its size
Guidlines:
- Make the Apple Pay button no smaller than other payment buttons, and avoid making people scroll to see it.
- In a side-by-side layout, place the Apple Pay button to the right of an Add to Cart button.
- In a stacked layout, place the Apple Pay button above an Add to Cart button.
- By default, an Apple Pay button has rounded corners. You can change the corner radius to produce a button with square corners or a pill-shaped button
As shown in Figure 6 we setup Apple Pay button

STEP 7 → Creating a Payment Request
Encapsulates a request for payment, including information about payment processing capabilities, the payment amount, and shipping information.
As shown in Figure 7 we created a payment request object. Few things to note
- supportedNetworks → First we provide some supported networks which is array of string (The payment networks supported by the merchant) since our application supports Visa and master card we provide this only. This affects which of your user’s cards show up in the Apple Pay sheet.
- merchantIdentifier → Provided the merchantIdentifier Identifies the merchant, as previously agreed with Apple. Must match one of the merchant identifiers in the application’s entitlement. This also helps us how to encrypt your payment correctly Now you already set this up on the developer portal
- countryCode → You pass then country code ( ISO country code, it should be the country code where your payment processor is in , the country in which you’ll making the charge, so it’s not the country that the user is in ). In short is the 2-character country code where your transaction takes place.
- currencyCode → Set this property to the three-letter ISO 4217 code for the currency used by this payment request. Apple Pay interprets the amounts provided in the summary items of this request as amounts in this currency. The currency code is validated.
- merchantCapabilities → Merchant capabilities so in turns out there two different ways of generating payment data one of them is called 3DS and the other is called EMV. Now you don’t need to know how these works . Most of you use 3DS ,and you should check with your payment processor or you’re acquiring bank as to the right setting for you . So agin majority of you will be 3DS but the payment platform or processor can give you the exact advice that you need here
- paymentSummaryItems → Finally what we actually charge PKPaymentSummary piece of information you like to charge it has amount and a label , amount is the class NSDecimalNumber , precisely represents number in base 10 which is very important when you are working on in finance and with currency

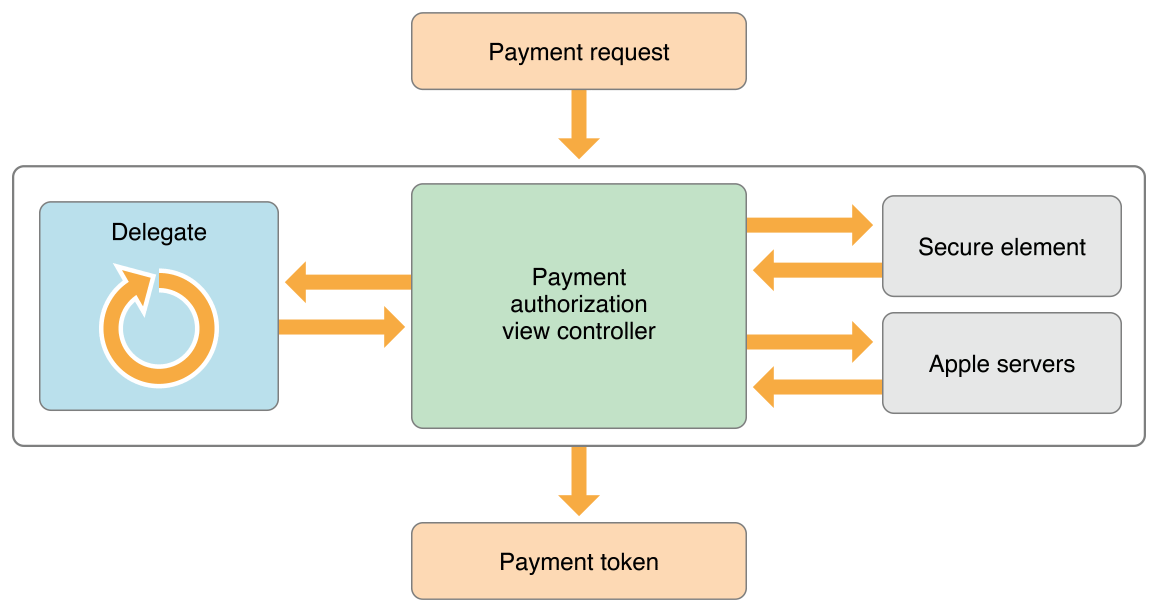
As show in Figure 8 This code creates a simple PKPaymentRequest object that represents a single Apple Pay payment, as well as the creation of a PKPaymentAuthorizationViewController constructed with the PKPaymentRequest instance responsible for displaying the Apple Pay payment sheet. Finally, the ViewController presents the PKPaymentAuthorizationViewController .
Recommendation
new in iOS 15, if you are in Xcode and see this error
While creating payment summary object make sure price digits should follow https://en.wikipedia.org/wiki/ISO_4217 as per country wise , we faced problem our coutry is Saudia which has 2 digit standard and we passed apple pay amount 11.397 which is three digit . In this case apple pay sheet will not open, Imagine in your production some people are saying the are unable to use or see apple pay sheet at all and you are tesing in your end with 11.39 two digit cases and you say it is working fine, It tool us 2 days to reproduce the issue
PKPaymentAuthorizationViewController(paymentRequest: paymentRequest) will return nil , And sorry no documentation for that thing
Recommendation
- Use line items to explain additional charges, discounts, pending costs, and add-on donations. A line item includes a label and cost. Don’t use line items to show an itemized list of products that make up the purchase. I saw apple reject application with this “3.1.6 Apple Pay: Apps using Apple Pay must provide all material purchase information to the user prior to sale of any good or service and must use Apple Pay branding and user interface elements correctly, as described in the Apple Pay Identity Guidelines and Human Interface Guidelines. Apps using Apple Pay to offer recurring payments must, at a minimum, disclose the following information:”
- Provide a business name after the word PAY on the same line as the total. Use the same business name people will see when they look for the charge on their bank or credit card statement. This provides reassurance that payment is going to the right place. For example: PAY [BUSINESS_NAME].
- paymentSummaryItems the last index apple automatically male it as Bold, it expect last item in this array will be total so it makes it bigger
Источник


