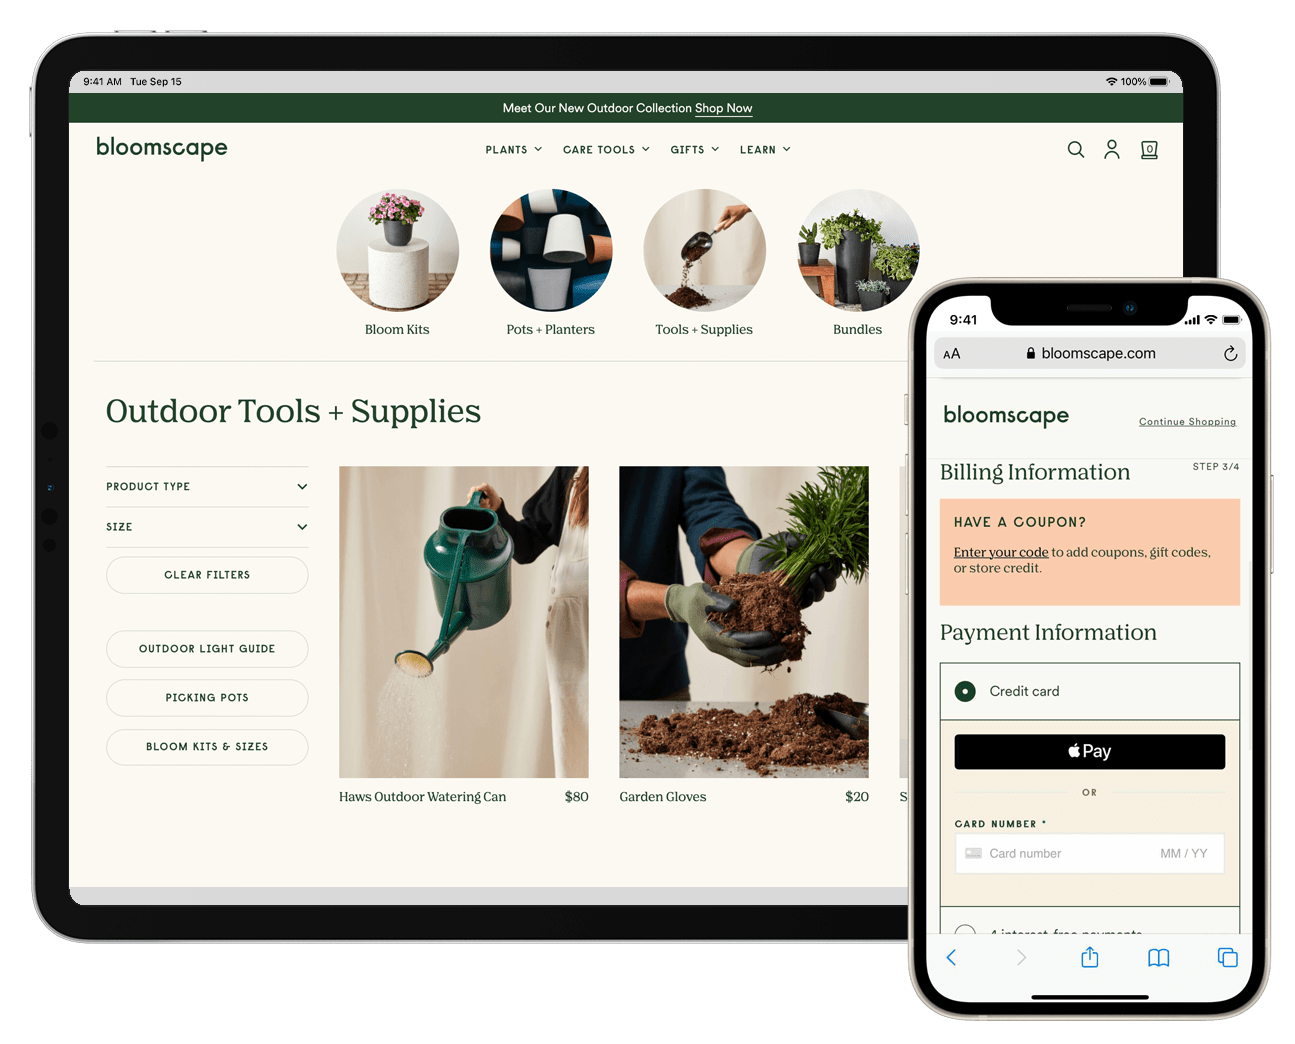
- Подключаем оплату через Apple Pay на сайте
- Создание платежной сессии
- Верификация платежной сессии
- Проведение платежа
- WooCommerce
- Grow your business by making checkout easy with Apple Pay and WooCommerce
- A fast, simple, and secure shopping experience
- Increase conversion rates
- Faster checkout
- Privacy and security for shoppers
- Higher purchase frequency
- Support multiple payment use cases
- Enable Apple Pay in your online store today
- How do I set up Apple Pay if I already have WooCommerce Payments?
- How do I set up Apple Pay if I don’t have WooCommerce Payments?
- How do I set up Apple Pay if I already have Stripe?
- How do I set up Apple Pay if I don’t have Stripe?
- How do I set up Apple Pay if I already have Square?
- How do I set up Apple Pay if I don’t have Square?
- Are there additional fees to accept Apple Pay?
- How can I communicate to my shoppers that my online store accepts Apple Pay?
- How to Set Up Apple Pay on a WordPress Site
- Apple Pay for WordPress
- How to Set Up Apple Pay for WordPress
- Apple Pay WordPress Plugins
- Apple Pay for WooCommerce
- Step 1: Set Up Stripe for WooCommerce
- Step 2: Enable Apple Pay Payments Within Stripe
- Improving the Digital Experience from Start to Finish
- Related Posts.
- Subscribe.
Подключаем оплату через Apple Pay на сайте
Сейчас, в том числе и у нас на сайте, и в приложениях ivi, есть явная тенденция роста аудитории на мобильных устройствах. Также растет и доля покупок, совершаемых в интернете с мобильных устройств. В отличие от десктопа, помимо традиционных вариантов оплаты, доступны системы мобильных платежей, например Apple Pay, Android Pay, Samsung Pay. Эти системы можно использовать не только для оплаты в терминалах, принимающих банковские карты, но и для оплаты в приложениях и на веб-сайтах.

Внедрение мобильных платежей мы начали с веб-версии ivi и выбрали мобильный сайт и систему Apple Pay.
Apple Pay — система мобильных платежей от Apple, позволяющая мобильным устройствам проводить платежи в магазинах и в интернете. Пользователь привязывает карту к телефону, и далее при оплате требуется только подтверждение платежа отпечатком пальца или цифровым кодом.
В этой статье я расскажу об использовании библиотеки Apple Pay JS.
Библиотека предназначена для использования Apple Pay на сайтах. Apple Pay JS API поддерживается на:
- iOS начиная от 10 версии в браузере Safari и моделях iPhone, поддерживающих бесконтактные платежи (SE и старше 6);
- macOS от версии 10.12 в браузере Safari на компьютерах с Touch ID или при подключенном iPhone или Apple Watch для подтверждения платежей.
Для того чтобы принимать платежи через Apple Pay на сайте, вам потребуется:
- Девелоперский аккаунт Apple;
- HTTPS на странице, использующей Apple Pay;
- Выбрать платежный шлюз, с которым вы будете работать. Мы пользуемся услугами Payture.
Далее нужно зарегистрировать Merchant ID, создать сертификаты Merchant Identity Certificate и Payment Processing Certificate и верифицировать домены, на которых будет использоваться Apple Pay. Описание процесса есть в инструкции от Payture.
- Merchant ID — идентификатор продавца, представляющий его в Apple Pay;
- Payment Processing Certificate — сертификат, используемый для передачи платежных данных на стороне платежного шлюза. Сервера Apple Pay используют публичный ключ этого сертификата для шифрования платежных данных. Приватный ключ используется для расшифровывания данных при проведении платежа;
- Merchant Identity Certificate — TLS сертификат, используемый для подтверждения данных продавца и авторизации платежных сессий через сервера Apple. Платежная сессия создается при инициализации процесса оплаты. Сертификат используется только на стороне сайта.
Стоит обратить внимание на то, что при верификации нужно указать полное доменное имя, т.е. маску домена указать не получится.
После всей подготовительной работы можно приступить к интеграции Apple Pay на сайт. Процесс интеграции состоит из 3 основных частей:
- Создание платежной сессии, показ диалога платежа и обработка событий платежной сессии. Тут используется Apple Pay JS API;
- Верификация платежной сессии. Требуется для того, чтобы система Apple Pay могла убедиться, что запрос идет от зарегистрированного продавца. Реализуется на бекенде;
- Проведение платежа через платежный шлюз и завершение платежной сессии.
Создание платежной сессии
Перед показом кнопки оплаты через Apple Pay нужно проверить доступен ли Apple Pay на устройстве. Реализуется это так:
Далее с помощью Apple Pay JS API можно проверить есть ли у пользователя активные карты, привязанные к Apple Pay. Предоставляется 2 метода canMakePayments и canMakePaymentsWithActiveCard . Первый проверяет только факт поддержки Apple Pay, второй помимо этого позволяет узнать есть ли по крайней мере 1 карта, привязанная к Apple Pay.
У нас, например, эти проверки используются для того, чтобы решить показать кнопку оплаты через Apple Pay над остальными способами оплаты или под ними. В случае если добавленных карт нет, выводится кнопка Set Up Apple Pay, по клику открываются настройки телефона с разделом Wallet. В итоге пользователь уходит с сайта, а процесс оплаты прерывать не стоит, поэтому кнопка располагается под основными типами оплаты и даже не видна без скролла экрана.
Страницы оплаты для настроенного и ненастроенного Apple Pay:

Как только кнопка отображена на странице, можно создать платежную сессию для того чтобы отобразить диалог оплаты. Сессия может быть создана только по явному пользовательскому действию. По клику на кнопку нужно выполнить следующий код:
В примере приведен минимальный набор свойств у объекта ApplePayPaymentRequest. Для отображения более подробной информации о покупке нужно использовать другие свойства этого объекта.
Для обработки событий платежной сессии нужно реализовать как минимум следующие методы:
- onvalidatemerchant срабатывает при открытии платежной формы Apple Pay. В обработчике этого события требуется верифицировать платежную сессию. Процесс верификации описан далее;
- onpaymentauthorized срабатывает когда пользователь подтверждает платеж на платежной форме Apple Pay с помощью Touch ID, Face ID или кода. Здесь доступен платежный токен, который нужно передать в платежный шлюз для проведения платежа;
После создания объекта ApplePaySession нужно вызвать метод begin для отображения диалога оплаты:
В результате пользователь увидит следующее:
При показе формы срабатывает событие onvalidatemerchant . Для того чтобы продолжить платеж реализуем следующий этап.
Верификация платежной сессии
В параметре события onvalidatemerchant приходит поле validationURL . На этот адрес с бекенда нужно отправить данные, подписанные сертификатом Merchant Identity Certificate.
Метод performValidation возвращает промис от запроса на валидацию. Обработчик этого запроса находится на нашей стороне, реализация такая: на URL из параметра события onvalidatemerchant отправляется post запрос.
В теле запроса содержится json:
Параметры MERCHANT_IDENTIFIER и DISPLAY_NAME берутся из девелоперского аккаунта (их настроили в самом начале), а HOST — это домен, с которого делается оплата.
Запрос должен быть подписан сертификатом Merchant Identity Certificate. В ответе придет json, его и нужно вернуть. После получения этого ответа, вызываем у платежной сессии метод completeMerchantValidation .
Процесс верификации сессии пройден, теперь пользователю требуется подтвердить платеж пальцем или кодом. После этого срабатывает событие onpaymentauthorized . Переходим к этапу проведения платежа.
Проведение платежа
В параметре события onpaymentauthorized содержится объект с платежным токеном, который нужно передать в платежный шлюз. Вся информация, содержащаяся в токене, описана в документации.
Как только платеж проведен, завершаем оплату на стороне клиента.
в success нужно передать один из 2 статусов window.ApplePaySession.STATUS_SUCCESS или window.ApplePaySession.STATUS_FAILURE .
На этом процесс оплаты через Apple Pay заканчивается. Более подробно про Apple Pay JS можно почитать в официальной документации.
Источник
WooCommerce
The most customizable eCommerce platform for building your online business. Get started today for free.
Grow your business by making checkout easy with Apple Pay and WooCommerce
Now more than ever, shoppers want a fast, simple, and secure online checkout experience. With Apple Pay enabled on your website, you can reduce cart abandonment and generate higher purchase frequency.
Don’t have a WooCommerce store? Get started.

A fast, simple, and secure shopping experience
With Apple Pay enabled, customers can buy with a single touch on their iPhone, iPad, and Mac. View the full list of compatible devices.

Increase conversion rates
A better checkout experience boosts conversion rates. Websites supporting Apple Pay report an increase in checkout conversions.

Faster checkout
Shoppers can complete purchases with a single touch. No lengthy forms necessary. Apple Pay can increase checkout speed significantly.

Privacy and security for shoppers
All transactions require authentication with Face ID, Touch ID, or passcode. Learn more about Apple Pay privacy and security.

Higher purchase frequency
With a high satisfaction rate, Apple Pay drives stickiness as shoppers are more likely to come back.

Support multiple payment use cases
Delivery, click and collect, and subscriptions are available for integration.
Enable Apple Pay in your online store today
Apple Pay for WooCommerce is currently available via the WooCommerce Payments, Stripe, and Square extensions.
Designed exclusively for WooCommerce stores. See payments, track cash flow into your bank account, and stay on top of disputes – all from the comfort of your store. Available in the U.S. only.

Accept payments on your WooCommerce store with Stripe. Available in multiple countries.

Accept payments on your WooCommerce store with Square. Available in the U.S. only.
How do I set up Apple Pay if I already have WooCommerce Payments?
- Within your WP Admin dashboard, navigate to Payments >Settings and enable Payment Request Button.
- Click Save changes.
- You’re all set!
How do I set up Apple Pay if I don’t have WooCommerce Payments?
- Download and install the WooCommerce Payments extension.
- Follow the step-by-step instructions for setup and configuration.
- Within your WP Admin dashboard, navigate to Payments >Settings and enable Payment Request Button.
- Click Save changes.
- You’re all set!
How do I set up Apple Pay if I already have Stripe?
- Within WooCommerce, navigate to Settings >Payments >Stripe and check the ‘EnablePayment Request Buttons’ box.
- Check that your domain has been automatically verified by logging into dashboard.stripe.com and navigating to Settings >Payment Methods >Apple Pay.
- You’re all set!
How do I set up Apple Pay if I don’t have Stripe?
- Download and install the Stripe extension.
- Create a new Stripe account.
- Follow the step-by-step instructions for setup and configuration.
- Within WooCommerce, navigate to Settings >Payments >Stripe and check the ‘EnablePayment Request Buttons’ box. Check that your domain has been automatically verified by logging into dashboard.stripe.com and navigating to Settings >Payments >Apple Pay.
- You’re all set!
How do I set up Apple Pay if I already have Square?
- Within WooCommerce, navigate to WooCommerce >Settings >Payments >Square and enable Digital Wallets in the gateway settings.
- Check that your domain has been automatically verified by navigating to WooCommerce >Status >Logs and check your latest Square log.
- You’re all set!
How do I set up Apple Pay if I don’t have Square?
- Download and install the Square extension.
- Create a new Square account.
- Follow the step-by-step instructions for setup and configuration.
- Within WooCommerce, navigate to WooCommerce >Settings >Payments >Square and enable Digital Wallets in the gateway settings.
- Check that your domain has been automatically verified by navigating to WooCommerce >Status >Logs and check you latest Square log.
- You’re all set!
Are there additional fees to accept Apple Pay?
No – Apple doesn’t charge any additional fees.
How can I communicate to my shoppers that my online store accepts Apple Pay?
Create campaigns to drive awareness and usage of Apple Pay with this marketing guide. It includes best practices and a link to download the Apple Pay mark.
Apple Pay, Face ID, iPad, iPhone, Mac, and Touch ID are trademarks of Apple Inc., registered in the U.S. and other countries.
WooCommerce — the most customizable eCommerce platform for building your online business.
Источник
How to Set Up Apple Pay on a WordPress Site
Posted in eCommerce, Entrepreneurship, WordPress by Samantha Rodriguez
Last updated on October 4th, 2021
If you’re using WooCommerce, you get a lot of options for which payment gateways to use on your site. Out of the box, the plugin supports PayPal and Stripe. If you want to integrate more options, however, you’ll need to do a bit of tinkering.
These days, Near-Field Communication (NFC) payments are growing in popularity. Apple Pay, a payment gateway that leverages that technology, is also on the rise. Adding support for it to your eCommerce website can net you additional conversions.
In this article, we’re going to talk about Apple Pay and how it works with WordPress. Then we’ll introduce some plugins you can use to integrate WordPress with Apple Pay. Finally, we’ll teach you how to use Apple Pay alongside WooCommerce. Let’s dive right in!
Apple Pay for WordPress
As you may know, WordPress doesn’t support online payment processing out of the box. For that, you’ll need to use a third-party service. This is where Apple Pay comes in to the picture.
Before we get to the technical details, let’s talk about why you should consider using Apple Pay. This service enables your users to pay with credit and debit cards stored on their phones, so they don’t have to re-enter the information every time they buy something.
Apple Pay is hardly the only platform that does this. What sets it apart is its NFC integration, and the fact that it’s built into the iOS ecosystem. Apple users may be more likely to make a purchase on your site if they see an option they recognize and trust.
As a business owner, the first question you need to ask yourself is: “How much will it cost me to use this payment gateway?” Apple Pay charges a base 3% fee for credit card payments, and it processes debit charges for free.
That 3% is slightly higher than the base rate of competitors such as PayPal and Stripe. However, Apple Pay doesn’t add on any extra charges, so it usually works out in your favor.
It’s also worth noting that there’s nothing stopping you from adding multiple payment gateways to WordPress. However, in this guide we’re going to focus on integrating Apple Pay specifically.
How to Set Up Apple Pay for WordPress
With WordPress, the easiest way to add new features to your website is usually through plugins. Apple Pay integration is no exception.
When it comes to plugins, your best option is WooCommerce, which is WordPress’ eCommerce standard-bearer. WooCommerce enables you to add Apple Pay support to your website, and the process isn’t complicated.

Unfortunately, there are almost no dedicated plugins that support Apple Pay outside of the WooCommerce ecosystem. That means you’ll definitely want to use WooCommerce, unless you’re up to the challenge of developing a new standalone plugin.
Apple Pay WordPress Plugins
If you look around for Apple Pay WordPress plugins, you’ll find several options. However, upon closer inspection, you’ll see that they’re all WooCommerce extensions designed for Stripe. That is because Stripe lets you easily add Apple Pay support to your website through its platform.
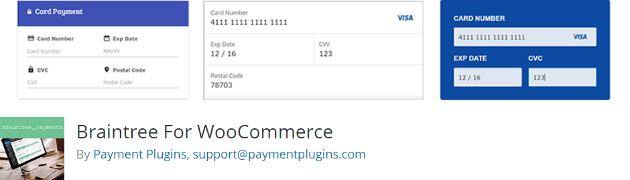
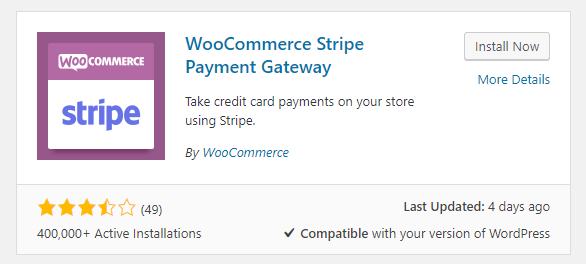
For example, there’s the WooCommerce Stripe Payment Gateway extension, which includes support for Apple Pay, Alipay, and regular credit card payments:

There’s also Braintree for WooCommerce, which is one of the only non-Stripe related options. This extension supports credit cards, PayPal, Google Pay, and Apple Pay:
It’s important to note that WooCommerce supports Apple Pay integration natively, so you don’t need an extension. However, the process for enabling it is rather time-intensive, so we’ll be teaching you how to set up Apple Pay for WordPress through Stripe instead.
Apple Pay for WooCommerce
As we’ve mentioned, WooCommerce is the most popular WordPress eCommerce solution. In 2017, the developers added support for Apple Pay through the platform. However, enabling this integration manually can be a bit complicated, to say the least.
With that in mind, we’re going to teach you how to enable Apple Pay using the Stripe with WooCommerce extension. Before we proceed, make sure you install and activate WooCommerce itself.
Step 1: Set Up Stripe for WooCommerce
It’s worth noting that for Stripe to work with WooCommerce, you’ll need to enable SSL on your WordPress website. Fortunately, WP Engine makes it easy to add an SSL certificate to your site.
When you first install WooCommerce, the plugin will walk you through a setup wizard. There, you’ll find the option to enable Stripe payments on your website:

Toggle this setting on, and then finish going through the rest of the wizard.
If you installed WooCommerce earlier, and skipped the Stripe setting, don’t worry. You can still enable Stripe support for WooCommerce. Go to the Plugins > Add New tab in your dashboard, and use the search bar to look for the WooCommerce Stripe Payment Gateway extension:
Click on the Install Now button, and give the platform a second to set everything up. Once the plugin is ready, click on Activate as well.
Step 2: Enable Apple Pay Payments Within Stripe
Before you can get started with Stripe and Apple Pay payments, you’ll need to do two things. The first is to add your Stripe account keys to WooCommerce, and the second is to enable Apple Pay payments.
Fortunately, you can do both on the same screen. To find the right options, navigate to the WooCommerce > Settings > Payments tab and look for the Stripe setting. Once you find it, click on Manage:

On the next screen, you’ll find two fields labeled Live Publishable Key and Live Secret Key:

You can get both of those from your Stripe account. Once you do, paste them into the corresponding fields. Afterwards, scroll down until you see the Payment Request Buttons option, and enable it:

This setting automatically enables Apple Pay when someone tries to pay via Stripe using Safari. All you have to do is save the changes to your WooCommerce settings, and you’re good to go.
Improving the Digital Experience from Start to Finish
Your choice of payment gateways affects more than how much you pay in fees. Ideally, you want to choose an option that’s as easy as possible for your visitors to use. That way, you’re removing obstacles between your business and potential sales.
Services such as Apple Pay might not have hit critical mass yet, but it’s likely that NFC payments will continue to increase in popularity. Using Apple Pay on your website is a smart move, and with WooCommerce the process of setting it up is simple.
If you’re a WP Engine user, you’ll be happy to know that all of our plans are optimized for eCommerce, and for WooCommerce in particular. Check them out today!

Make WooCommerce
even better, up to 40% faster and 18% more sales.
Related Posts.
Subscribe.
Get weekly WordPress tips, tricks and news delivered to your inbox.
Источник


