- Make purchases using Apple Pay
- How to pay using Apple Pay in stores and other places
- Pay with your iPhone
- Pay with your Apple Watch
- How to pay using Apple Pay online or within apps
- Implementing Apple Pay
- Build your app and website.
- Developer Account Setup
- Apple Pay for Apps
- Apple Pay on the Web
- Apple Pay in Messages
- Integrate, test, and verify.
- E-Commerce Platforms and Payment Service Providers
- Sandbox Testing
- Check the guidelines.
- App Store Review Guidelines
- Apple pay on the Web Acceptable Use Guidelines
- Apple Pay Sandbox test cards with Payment Not Completed
- Answers
- Apple Pay on the Web Interactive Demo
- Overview
- Requirements
- Display an Apple Pay button
- Try it: Display Settings
- Create a Payment Request
- Try it: ApplePayPaymentRequest
- Complete Merchant Validation
- Respond to Payment Sheet Interactions
- Request a Shipping Address
- Try it: completeShippingContactSelection
Make purchases using Apple Pay
You can pay using Apple Pay in stores, within apps and on the web, and more.
How to pay using Apple Pay in stores and other places
With your iPhone or Apple Watch, you can use Apple Pay in stores, restaurants, gas stations, taxis, or wherever else you see one of these symbols 1 .
Pay with your iPhone
- To use your default payment card:
- If your iPhone has Face ID, double-click the side button. Authenticate with Face ID or enter your passcode.
- If your iPhone has Touch ID, rest your finger on the Touch ID sensor.
- To use a different card, tap your default card to see your other cards. Tap a new card and authenticate.
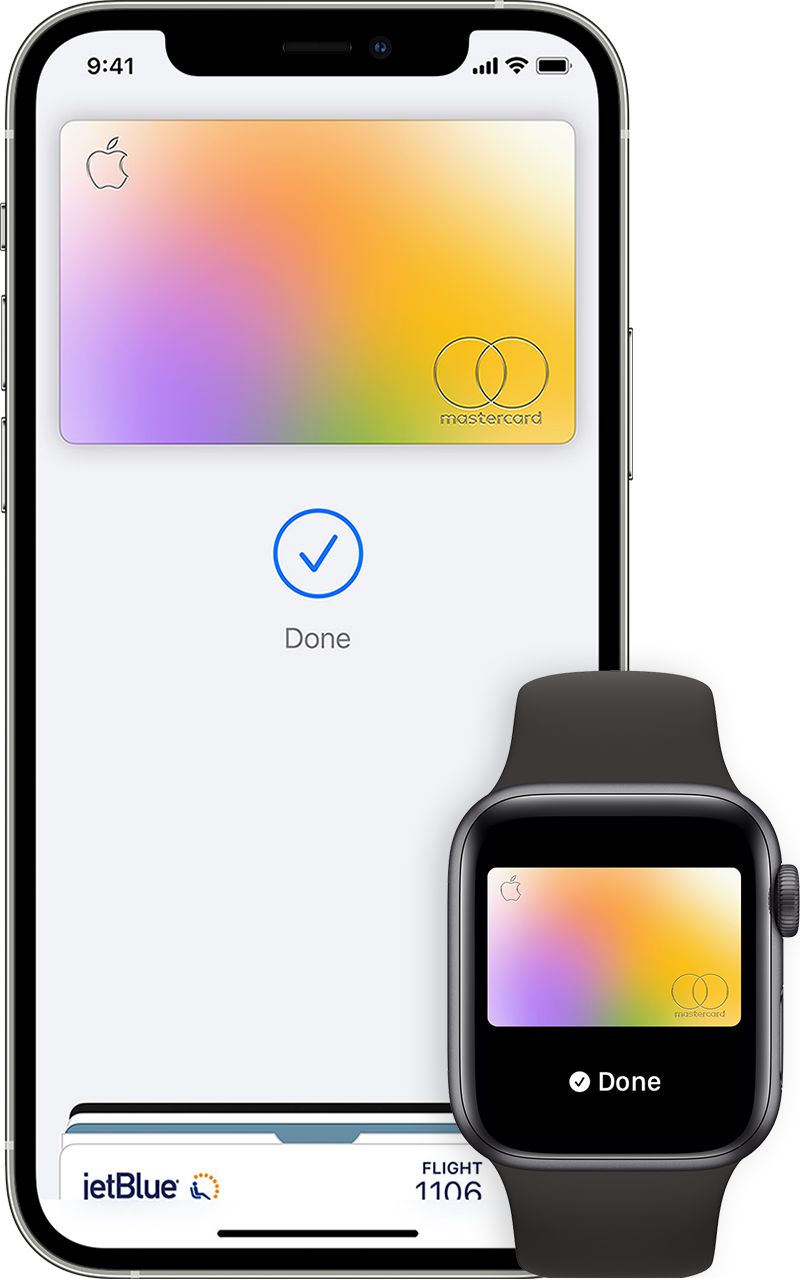
- Hold the top of your iPhone near the contactless reader until you see Done and a checkmark on the display.
Pay with your Apple Watch
- Double-click the side button.
- Your default card opens automatically. Scroll down to choose another card.
- Hold the display of your Apple Watch near the contactless reader until you feel a gentle tap and hear a beep.
Want to see your recent purchases? Learn how to check your Apple Pay transaction history.

How to pay using Apple Pay online or within apps
You can use Apple Pay to pay online in Safari 2,3 or within apps when you see Apple Pay as a payment option.
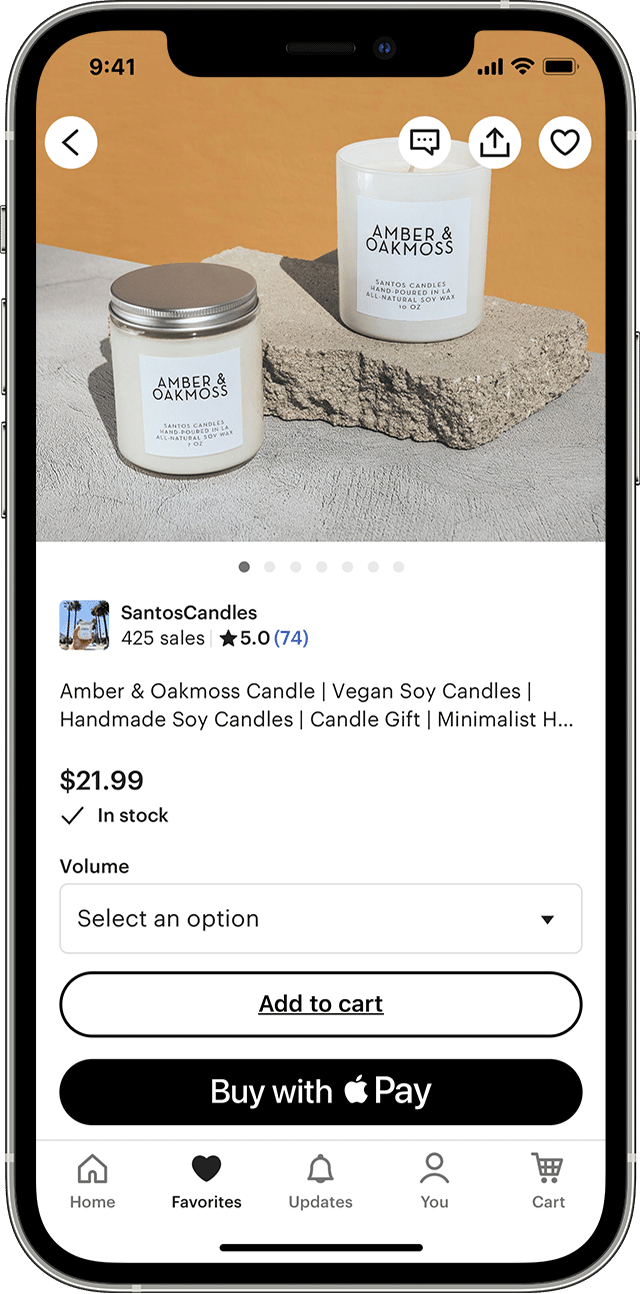
- Tap the Apple Pay button or choose Apple Pay as your payment method.
- To pay with a different card, tap the Next button
 or the Expand Menu button next to your default card.
 - If necessary, enter your billing, shipping, and contact information. Apple Pay stores that information, so you won’t need to enter it again.
- Confirm the payment.
- iPhone or iPad with Face ID: Double-click the side button, then use Face ID or your passcode.
- iPhone or iPad without Face ID: Use Touch ID or your passcode.
- Apple Watch: Double-click the side button.
- Mac with Touch ID: Follow the prompts on the Touch Bar and place your finger on Touch ID. If Touch ID is off, tap the Apple Pay icon on the Touch Bar and follow the prompts on the screen.
- Mac without Touch ID: Confirm the payment on your Bluetooth-connected iPhone or Apple Watch. Make sure that you’re signed in with the same Apple ID on all devices.
- When your payment is successful, you’ll see Done and a checkmark on the screen.
![]()
- In addition to accepting Apple Pay, the merchant must accept your payment card and payment network.
- In China mainland, you can use Apple Pay on the web in Safari only on a compatible iPhone and iPad with the latest version of iOS or iPadOS.
- In Italy, you can use your iPhone and Apple Watch to make Apple Pay purchases in stores with your Maestro card. Maestro cards can’t be used within apps and on the web. In the Netherlands, you can add Maestro cards to all compatible devices except Mac.
Information about products not manufactured by Apple, or independent websites not controlled or tested by Apple, is provided without recommendation or endorsement. Apple assumes no responsibility with regard to the selection, performance, or use of third-party websites or products. Apple makes no representations regarding third-party website accuracy or reliability. Contact the vendor for additional information.
Источник
Implementing Apple Pay
Discover how to set up your developer account to support Apple Pay, verify that transactions are completed successfully, and make sure your implementation of Apple Pay follows guidelines for apps and the web.
Build your app and website.
Developer Account Setup
Learn about the identifiers and certificates in your Apple Developer account that are needed to implement Apple Pay for apps and websites. If you’re supporting Apple Pay in your app and website, we recommend using the same Merchant ID and certificate for both. Contact your payment service provider to confirm any additional transaction requirements applicable to your region.
Apple Pay for Apps
Get APIs for payment sheet interactions, authorization, updates, errors, and more.
Apple Pay on the Web
Safari supports two JavaScript APIs that let you accept Apple pay payments from customers on your website.
Apple Pay in Messages
Allow customers to pay quickly and easily with Apple Pay in an iMessage app or directly in a Messages for Business session.
Integrate, test, and verify.
E-Commerce Platforms and Payment Service Providers
The most popular e-commerce platforms and payment service providers support Apple Pay within apps and on the web. Use an Apple Pay SDK from a payment service provider to integrate Apple Pay in your app or website.
Apple Pay Web Merchant Registration API
Approved e-commerce platform and payment service providers can use the Apple Pay Web Merchant Registration API, along with their merchant IDs, to register and unregister their merchants’ websites for Apple Pay.
Sandbox Testing
The Apple Pay sandbox environment allows you test your implementation of Apple Pay with test credit and debit cards.
Check the guidelines.
App Store Review Guidelines
Before submitting your app for review, make sure it follows these guidelines to help progress smoothly through the review process.
Apple pay on the Web Acceptable Use Guidelines
Before deploying Apple Pay on your website, make sure your implementation follows these guidelines.
Design guidelines
Learn how to optimize the design and checkout experience for Apple Pay.
Payment service providers
Support Apple Pay quickly and reliably with an SDK or API from a payment service provider (PSP).
View payment service providers
Contact us
Have a question or request? We can help by phone or email.
Источник
Apple Pay Sandbox test cards with Payment Not Completed
Testing apple pay in our app is not working in the sandbox environment. When using a test card — the response returns with «Payment not completed». We’ve tested with these cards:
Discover: 6011 0009 9446 2780
Visa: 4761 1200 1000 0492
The code works fine in production but we’d like to have a sandbox environment for further testing. Has anyone encountered this?
Answers
There are a few things that can cause this; first, if your Apply Pay supportted regions is set to the United States, then you will need to test with American Express. Second, if you are not signed into a testing device with an iCloud account that supports a sandbox user.
DTS Engineering, CoreOS
meaton3 at apple.com
I use a sandbox account, I configured Settings>General>Language&Region>Region to US, I selected the region my sandbox account as US but I get the error «Could Not Add Card» when I try to add Discover card. Could you please help with that? Thank you.
I have had this issue more times than I care to count.
After several emails with people at Apple that didn’t get me far (they acknowledged the issue likely was on their side), I tried creating a new sandbox Apple ID in App Store Connect and signed into iCloud on the device, and added the sandbox cards again, and this worked.
This suggested to me that the sandbox Apple IDs can somehow become corrupted or otherwise unusable for this purpose.
@Daniil Evsienko, are you signed out of your iCloud account and signed into your test device with your sandbox testing account?
If so, plug your device into your macOS workstation and open the Console.app and filter on your test device. When you try and add your test card and receive the error does it provide any other messages in the Console app that you can add here for debugging purposes?
Matt Eaton
DTS Engineering, CoreOS
meaton3@apple.com
I am using a sandbox account and I have set United States in region column, I configured Settings>General>Language&Region>Region to US. I have added test cards (VISA and Master) and my cards is successfully activated. But I am trying pay then I got error «Payment Not Completed». I have tried many approaches like make other sandbox user, change devices regions as US, but error same. Note: I am trying from India. I don’t know any issue with the country.
Could you please help with that? Thank you.
A few things you can do here to debug this:
1) Make sure that you are correctly completing the Providing Merchant Validation steps outlined on the this page. Note that this includes getting an Apple Pay Payment session on your server and sending it back to your client side.
2) Make sure the your have a valid Apple Pay Session that you are passing into completeMerchantValidation to complete step 1.
3) Make sure you are authorizing the payment via one of the approved methods, i.e., Face ID, Touch ID, or a passcode. Note that Touch ID can be done directly on a macOS device while Face ID, Touch ID, or a passcode are done while a paired iOS or possibly watchOS device.
Matt Eaton
DTS Engineering, CoreOS
meaton3@apple.com
We have similar kind of issue, after passing the apple pay session to completeMerchantValidation() giving the error ‘Payment not completed’ and the onpaymentauthorized() event not triggered and the touch id not shown in the payment sheet.
oncancel() triggered with <"isTrusted":true>. Any suggestion will be great
These errors are a bit harder to track down, but when debugging this, there are a few things I recommend:
1) Make sure that the Payment Session your are passing into completeMerchantValidation is a valid formatted JSON object. I have seen this issue happen due to a malformed object sent back from the server.
2) Make sure you are testing with a Sandbox testing account if you are testing in a Sandbox environment:
3) If you hit a wall here you a log out was passd is giving when you reproduce the error. For example, try testing in Safari on macOS; try opening two terminals and run each of these commands in a separate Terminal:
$ log stream —level debug —predicate ‘process == «passd»‘
$ log stream —level debug —predicate ‘subsystem == «com.apple.passkit”’
Then open Safari and reproduce the error on macOS. The error should be in one of these two logs from the Terminal and should lead you in the right direction to track this down.
Источник
Apple Pay on the Web
Interactive Demo
Try an Apple Pay test transaction using the button below.
Transactions made on this site do not charge your card.
Overview
Use this page to learn how to enable Apple Pay on the web using Apple Pay JS or the Payment Request API. This demo preconfigures the Apple Pay button below with default values. Explore further by modifying values in the code blocks throughout the page to customize payment sheet experiences. This demo displays a transcript of server responses after each transaction for context. Click or tap the the «Show Transcript» tab to view the transaction transcript.
As well as letting you try out the Apple Pay JavaScript APIs, this demo can also serve as a tutorial for your own implementation. It assumes you have already set up your environment to process Apple Pay transactions, and are familiar with Apple Pay best practices. Before starting your integration, we recommend reviewing Getting Started with Apple Pay and the Apple Pay on the Web Human Interface Guidelines. For more information about supporting Apple Pay on your website, see Apple Pay on the Web.
This demo generates source code that you can copy into your own project. Click or tap the the «Show Source» tab to view the source code. The demo updates the source code as you change values in the code blocks through the page. Once you are happy with the configuration, click or tap the «Copy» button inside the «Show Source» tab to copy the source code to your clipboard.
Requirements
This demo uses Apple Pay JS version 3, and to run this demo you must be using:
- iOS devices running iOS 11 or later
- Safari 11 on macOS 10.13 or later
Display an Apple Pay button
To display an Apple Pay Button, use the following code to load the button script into your webpage from the content delivery network:
The JavaScript Apple Pay button provides a variety of Apple Pay button types that you can use on your website to initiate a transaction. You can specify the Apple Pay button style, type, and localization using attributes. Use CSS to set other properties, such as the size and corner radius. Using the official Apple Pay button element ensures your site will display the latest style, render correctly across devices, and follow Apple Guidelines. For design guidance, see Human Interface Guidelines > Apple Pay > Buttons and Marks.
Try it: Display Settings
Use the following tools to try the different display settings on the button shown below:
Button Corner Radius
Corner Radius: 3px
Button Padding Y
Button Padding Y: 0px
Button Padding X
Button Padding X: 0px
Button Box Sizing
Create a Payment Request
When your customer clicks or taps the Apple Pay button, you must first construct an ApplePaySession object which includes the ApplePayPaymentRequest dictionary detailing the transaction details the payment sheet will display.
The ApplePayPaymentRequest requires details including: the total payment for the transaction, the currency, and the supported payment networks. You can optionally pass lineItems to show additional charges and discounts, and shippingMethods to allow the customer to choose from different shipping options. If you require address or contact details from your customer, request them by passing values in the requiredShippingContactFields or requiredBillingContactFields .
Try it: ApplePayPaymentRequest
Modify the values in the ApplePayPaymentRequest shown below and click or tap the Apple Pay button to view the payment sheet. Choose Basic Request to see a payment sheet with only the required fields. Choose Detailed Request to show code including optional fields, such as lineItems.
Complete Merchant Validation
Before being able to display the payment sheet to the customer, you must generate a valid payment session by interacting with Apple Pay Servers. For security reasons, your server must do this, not your browser client code, unlike everything else in this demo. To start the merchant validation process, call the begin method on the session object you created above.
Once you do, the browser will invoke your onvalidatemerchant handler, which must fetch a merchant session from your server.
Refer to the instructions in Requesting an Apple Pay Payment Session document to implement your server endpoint responsible for fetching the merchant session object from Apple Pay servers. If successful, Apple Pay servers will return a merchant session object, which your server must then pass back as the response to the browser.
Once you have the merchant session response object in the browser, you must complete your onvalidatemerchant handler by passing that object to the completeMerchantValidation method on the session object. The browser will then display the payment sheet.
The following code shows an example of how to validate merchant:
Respond to Payment Sheet Interactions
After merchant validation is complete, Apple Pay provides the information about your customer’s payment sheet selections so that you can calculate the final transaction cost. The final details of a transaction may depend on user payment method, billing address, shipping address, or shipping method. To handle these adjustments, implement the optional handlers onpaymentmethodselected , onshippingmethodselected , and onshippingcontactselected . When the browser calls one of these handlers, you have 30 seconds to process it and call the corresponding callback function, otherwise the transaction times out. All callbacks accept an object with newTotal (required) and newLineItems (optional) keys. In addition, you may specify newShippingMethods to update shipping methods, and errors to indicate problems with the user’s selected shipping address when calling completeShippingContactSelection . You may also call the callbacks with an empty object or null value if the payment sheet needs no changes.
| Event Handlers | Callback Function | Update Structure | Update Properties |
|---|---|---|---|
| onpaymentmethodselected | completePaymentMethodSelection | ApplePayPaymentMethodUpdate | newTotal (required) newLineItems (optional) |
| onshippingmethodselected | completeShippingMethodSelection | ApplePayShippingMethodUpdate | newTotal (required) newLineItems (optional) |
| onshippingcontactselected | completeShippingContactSelection | ApplePayShippingContactUpdate | newTotal (required) newLineItems (optional) newShippingMethods (optional) errors (optional) |
Demo Note: The test transaction always passes in a default success response when it calls completePaymentMethodSelection . The test transaction passes in newLineItems and newTotal when it calls completeShippingMethodSelection . See responses in the transcript.
Request a Shipping Address
If you pass requiredShippingContactFields in the payment request with a postalAddress value, Apple Pay provides redacted address information before the user authenticates the transaction. After the user authenticates, Apple Pay provides the full contact information.
The redacted payment information includes only the data needed to complete required transaction tasks, such as calculating taxes or shipping costs, and may differ based on the user’s geographic region.
The following code shows an example of a redacted payment information:
Try it: completeShippingContactSelection
Choose ‘Success’ with or without updating line items and total below. Choose ‘Failure’ to see completeShippingContactSelection response with custom errors. You may edit the ApplePayShippingContactUpdate response object below to experiment with different responses. Click or tap the Apple Pay button below to see how the payment sheet displays updates or address errors.
Источник


