- If your iPhone is stuck on the Apple logo
- Rotate the screen on your iPhone or iPod touch
- Rotate the screen on an iPhone without a Home button
- Rotate the screen on an iPhone or iPod touch with a Home button
- Still need help?
- If your iPhone won’t turn on or is frozen
- If your screen is black or frozen
- On your iPhone 8 or later, including iPhone SE (2nd generation)
- On your iPhone 7 or iPhone 7 Plus
- On your iPhone 6s and earlier, including iPhone SE (1st generation)
- If your iPhone turns on but gets stuck during start up
- Use Switch Control on your device to control another Apple device
- Use your iPhone, iPad, or iPod touch to control another device
- Use your Mac to control another device
- Stop controlling another device
- Stop controlling a Mac
- Stop controlling an iPhone, iPad, or iPod touch
- Turn off Switch Control
- Turn off Switch Control on an iPhone, iPad, or iPod touch
- Turn off Switch Control on a Mac
- Turn Mac screen sharing on or off
- Turn on screen sharing on your Mac
- Turn off screen sharing on your Mac
If your iPhone is stuck on the Apple logo
If you have iOS 13 or later, and tried to restore your iPhone from a backup or tried to migrate your iPhone from a previous device, you might see the Apple logo and progress bar on your screen for more than one hour. Learn what to do.
If you have the issue above, follow these steps:
- Make sure that the progress bar on your iPhone screen hasn’t moved for at least one hour.
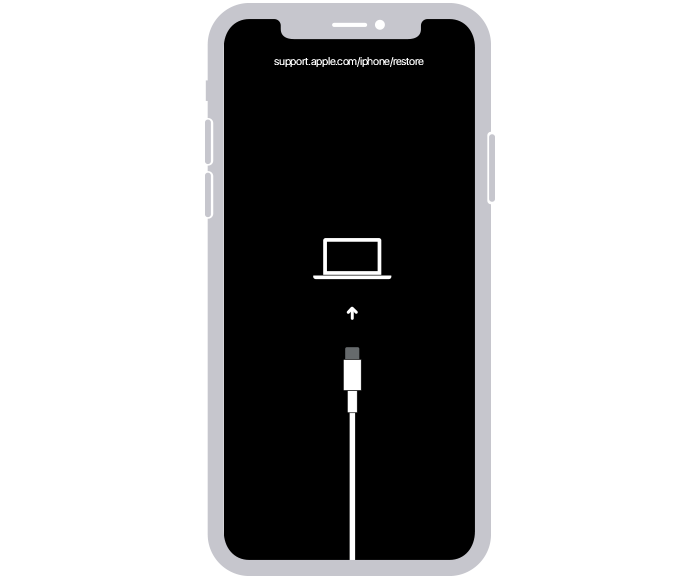
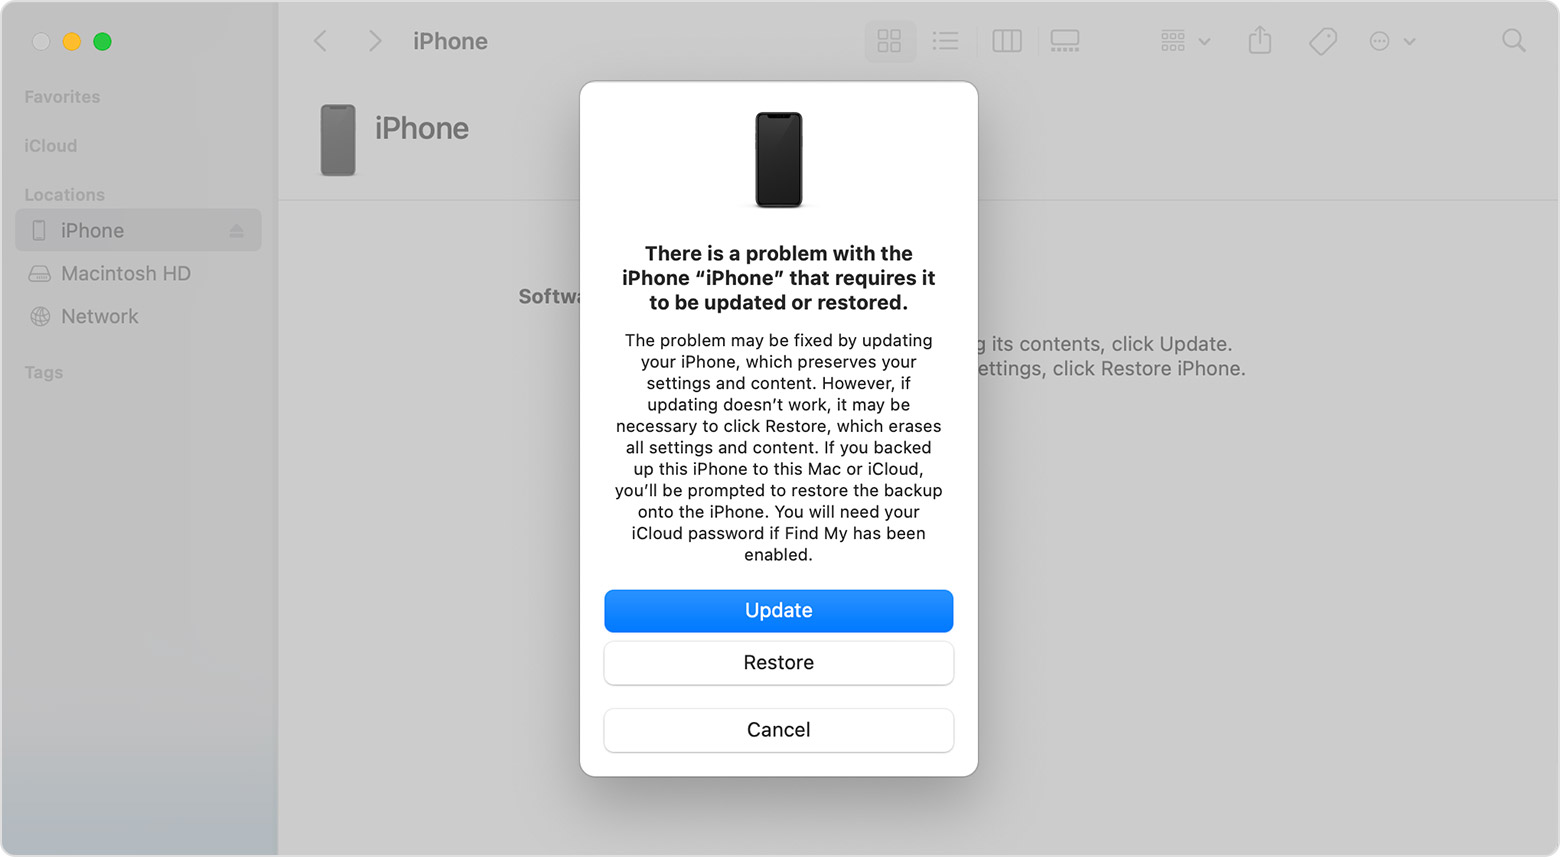
- If the progress bar hasn’t moved for more than one hour, connect your device to a computer, then put your device into recovery mode with these steps:
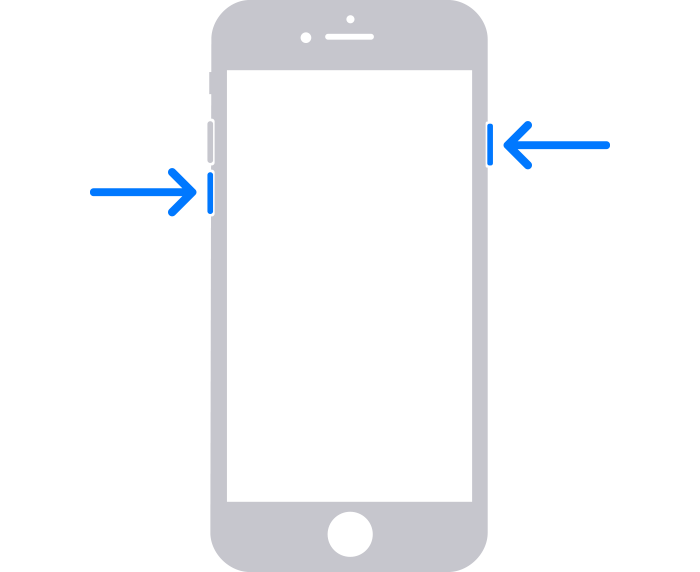
- iPhone 8 and later: Press and release the Volume Up button. Press and release the Volume Down button. Press and hold the Side button. Keep holding the Side button until you see the recovery mode screen.
- iPhone 7 and iPhone 7 Plus: Press and hold both the Volume Down button and the Sleep/Wake button. Keep holding the Volume Down button until you see the recovery mode screen.
- iPhone 6s and earlier: Press and hold both the Sleep/Wake button and the Home button. Keep holding the Home button until you see the recovery mode screen.
- On a Mac with macOS Catalina 10.15 or later, open the Finder. On a Mac with macOS Mojave 10.14 or earlier, or on a PC, open iTunes. When asked to update or restore, choose Update. This will update your device to the latest version of iOS. If you choose Restore, it will erase your iPhone.
Источник
Rotate the screen on your iPhone or iPod touch
The screen on your iPhone and iPod touch can rotate so that you can see apps — like Safari and Messages — in portrait or landscape mode. Learn how to rotate the screen on your iPhone or iPod touch, or get help if the feature doesn’t work.
Some apps don’t support rotation, so your screen might not rotate even if Portrait Orientation Lock isn’t turned on.
Rotate the screen on an iPhone without a Home button
- Swipe down from the top-right corner of your screen to open Control Center.
- Tap the Portrait Orientation Lock button to make sure that it’s off.
- Turn your iPhone sideways.
If the screen still doesn’t rotate, try a different app — like Safari or Messages — which are known to work in landscape mode.
Rotate the screen on an iPhone or iPod touch with a Home button
- Swipe up from the bottom edge of your screen to open Contol Center.
- Tap the Portrait Orientation Lock button to make sure that it’s off.
- Turn your iPhone or iPod touch sideways.
If the screen still won’t rotate, try another app — like Safari or Messages — which are known to work in landscape mode.
Still need help?
Contact Apple Support about your iPhone or iPod touch.
Источник
If your iPhone won’t turn on or is frozen
If your iPhone has a frozen screen, doesn’t respond when you touch it, or becomes stuck when you turn it on, learn what to do.
iPhone screen is black or frozen
iPhone is stuck on the Apple logo
If your screen is black or frozen
Follow the steps for your device.
On your iPhone 8 or later, including iPhone SE (2nd generation)
- Press and quickly release the volume up button.
- Press and quickly release the volume down button.
- Press and hold the side button until you see the Apple logo.

- If your phone doesn’t turn on, follow these steps to check your hardware and charge your phone. You might need to charge for up to an hour.
- If your phone still doesn’t turn on, contact Apple Support.
On your iPhone 7 or iPhone 7 Plus
- Press and hold both the side button and the volume down button until you see the Apple logo.
- If your phone doesn’t turn on, follow these steps to check your hardware and charge your phone. You might need to charge for up to an hour.
- If your phone still doesn’t turn on, contact Apple Support.
On your iPhone 6s and earlier, including iPhone SE (1st generation)
- Press and hold both the Home button and the side button or the top button until you see the Apple logo.
- If your phone doesn’t turn on, follow these steps to check your hardware and charge your phone. You might need to charge for up to an hour.
- If your phone still doesn’t turn on, contact Apple Support.

If your iPhone turns on but gets stuck during start up
If you see the Apple logo or a red or blue screen during startup, try these steps:
- Connect your iPhone to a computer. On a Mac with macOS Catalina, open the Finder. On a Mac with macOS Mojave or earlier, or on a PC, open iTunes. Find out which macOS your Mac is using.
- Select your iPhone on your computer.
- While your iPhone is connected, follow these steps:
- On your iPhone 8 or later, including iPhone SE (2nd generation): Press and quickly release the volume up button. Press and quickly release the volume down button. Then press and hold the side button.
Источник
Use Switch Control on your device to control another Apple device
With Use Other Devices for Switch Control, you can control your other Apple devices remotely on the same Wi-Fi network without adjusting any switch connections. This enables you to navigate your Mac or Apple TV with the same switch setup that you use to control your iPhone.
Use your iPhone, iPad, or iPod touch to control another device
- Connect your devices to the same Wi-Fi network.
- Sign in to iCloud with the same Apple ID on both devices.
- If you want to control a Mac, choose Apple menu > System Preferences on your computer.
- Select Accessibility. In the sidebar, choose Switch Control.
- Check the checkbox next to «Allow platform switching to control your computer.»
- If you haven’t already, turn on Switch Control on your iPhone, iPad, or iPod touch.
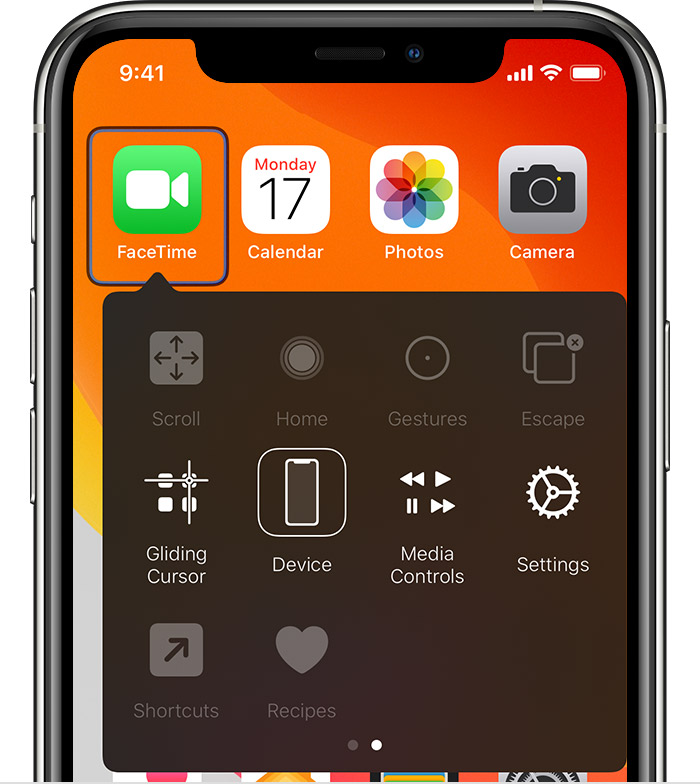
- Use your switch to navigate the Switch Control menu. Select Device.
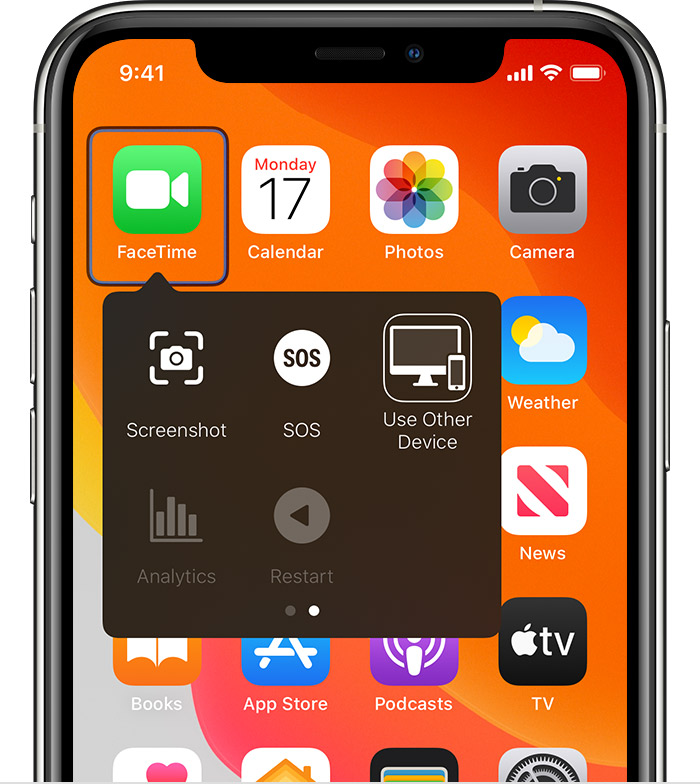
- Select Use Other Device.
- Select the device that you want to control, then select Connect. Now you can use the switch connected to your iPhone, iPad, or iPod touch to control the other device.
Use your Mac to control another device
- Connect your devices to the same Wi-Fi network.
- Sign in to iCloud with the same Apple ID on both devices.
- If you haven’t already, turn on Switch Control on your Mac.
- Use your switch to navigate the Switch Control Home panel. Choose Devices.
- Select the device that you want to control, then select Connect. Now you can use the switch connected to your Mac to control the other device.

Stop controlling another device
To stop controlling another device, press and hold your switch for ten seconds. Your switch will control the original device again.
You can also follow these steps:
Stop controlling a Mac
- Use your switch to navigate the Switch Control Home panel. Choose Devices.
- Select Disconnect. Your switch will control the original device again.
Stop controlling an iPhone, iPad, or iPod touch
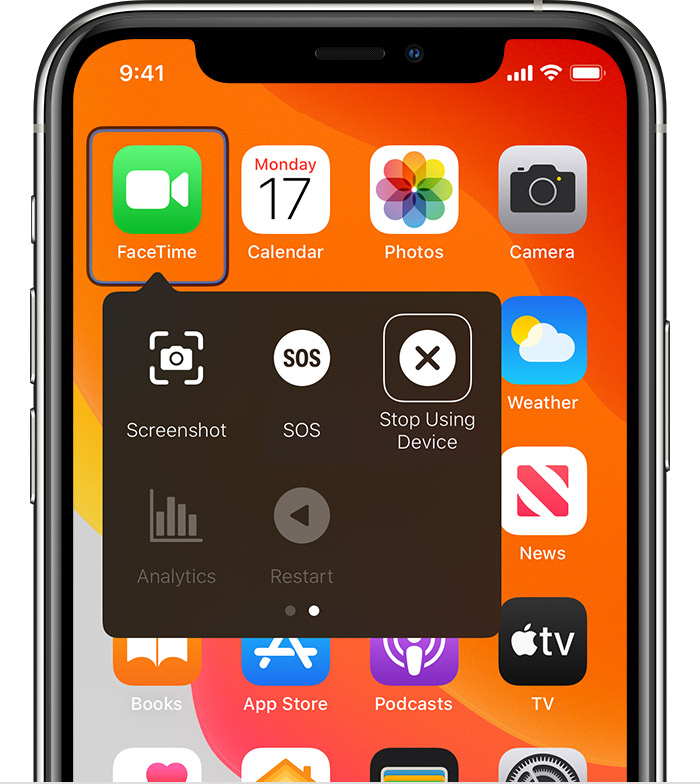
- Use your switch to navigate the Switch Control menu. Select Device.
- Select Stop Using Device. Your switch will control the original device again.
Turn off Switch Control
If you’d like to turn off Switch Control entirely, follow these steps for your device:
Turn off Switch Control on an iPhone, iPad, or iPod touch
Use your switch to navigate to Settings > Accessibility > Switch Control, and turn the setting off.
You can also triple-click the Home button or the Side button on certain models at any time to exit Switch Control.
Turn off Switch Control on a Mac
Use your switch to navigate to System Preferences > Accessibility > Switch Control, and deselect Enable Switch Control.
Источник
Turn Mac screen sharing on or off
You can use screen sharing to access your Mac while you’re away, solve a problem on someone else’s Mac, or collaborate with others on a project such as a website or presentation.
When screen sharing is enabled on your Mac, your Mac desktop can be viewed from another Mac on your network. While your screen is being shared, the user of the other Mac sees what’s on your screen and can open, move and close files and windows, open apps, and even restart your Mac.
Turn on screen sharing on your Mac
On your Mac, choose Apple menu

> System Preferences, then click Sharing  .
.
If Remote Management is selected, deselect it.
You can’t have both Screen Sharing and Remote Management on at the same time.
Select the Screen Sharing tickbox.
To specify who can share your screen, select one of the following:
All users: Any of your computer’s users can share your screen, except sharing-only users and guest users. If your Mac is connected to a network account server, anyone with an account on that server can share your screen using their network username and password. See Join your Mac to a network account server.
Only these users: Screen sharing is restricted to specific users.
If you selected “Only these users”, click the Add button  at the bottom of the users list, then do one of the following:
Select a user from Users & Groups, which includes all the users of your Mac except sharing-only users and guest users.
Select a user from Network Users or Network Groups, which includes users and groups with network server accounts. Network users and members of network groups can use their network name and password to connect to your Mac for screen sharing.
To set additional options for screen sharing, click Computer Settings, then select one or both of the following:
Anyone may request permission to control screen: Before other computer users begin sharing the screen of your Mac, they can ask for permission instead of entering a username and password.
VNC viewers may control screen with password: Other users can share your screen using a VNC viewer app — on iPad or a Windows PC, for example — by entering the password you specify here. If you select this option, you should create a very secure password.
Turn off screen sharing on your Mac
On your Mac, choose Apple menu
> System Preferences, then click Sharing .
Deselect the Screen Sharing tickbox.
For additional remote management capabilities, such as installing and configuring apps, helping remote users and creating detailed reports, you can purchase Apple Remote Desktop from the App Store. Apple Remote Desktop is used to remotely manage Mac computers in a commercial or business environment.
Screen sharing and Apple Remote Desktop screen sharing are compatible with Virtual Network Computing (VNC), an industry standard for controlling computers remotely on a network using TCP/IP.
Источник


