- Finish setting up your iPhone, iPad, or iPod touch
- Check Mail, Contacts, and Calendar settings
- Turn on Notifications for your apps
- Download content and restore in-app purchases
- Pair your Bluetooth accessories
- Add your cards to Apple Pay
- Manage your subscriptions
- How to create a new Apple ID
- Create an Apple ID on your iPhone, iPad, or iPod touch
- Create an Apple ID when you set up your device
- Create an Apple ID using the App Store on your device
- Create an Apple ID on your Mac
- Create an Apple ID on your Windows PC
- Create an Apple ID on another device
- Create an Apple ID on the web
- If you see a message that you need to sign in to iTunes
- Learn more
- Set up Find My on your iPhone, iPad, iPod touch, or Mac
- How to turn on Find My for your iPhone, iPad, or iPod touch
- How to add your AirPods, Apple Watch, or Beats product to Find My
- Set up your iPhone, iPad, or iPod touch
- If you’re switching to a new device
- If you’re setting up your first iOS device
- Turn on your device
- If you have another device, use Quick Start
- Activate your device
- Set up Face ID or Touch ID and create a passcode
- Restore or transfer your information and data
- Sign in with your Apple ID
- Turn on automatic updates and set up other features
- Set up Siri and other services
- Set up Screen Time and more display options
- Finish up
Finish setting up your iPhone, iPad, or iPod touch
When you move your content to a new iOS device, you might need to complete a few steps to finish the process.
Check Mail, Contacts, and Calendar settings
![]()
Mail: Launch the Mail app and wait for your email to download to your device. If prompted, enter the password for your email again. If you need to set up your email, learn what to do.
Contacts: Open the Contacts app and make sure that your contacts transferred. If you’re missing any contacts, learn how to set up and manage your Contacts.
Calendar: Open the Calendar app and make sure that your calendar events transferred. You can also use iCloud to keep your Calendar up to date.
![]()

Turn on Notifications for your apps
You might need to open some of your apps to enable the notifications for those apps. Open each app and if prompted, tap Allow Notifications. For some apps, you might need to turn on your Notifications in Settings > Notifications. Learn more about Notifications.
Download content and restore in-app purchases
You might need to redownload the content, such as music, movies, TV shows, or podcasts that you had on your previous device. Here’s what you should do:
- Open the Settings app, then tap your name. Tap Media & Purchases, then tap View Account. Make sure that you’re signed in with the same Apple ID that you use to make purchases.
- If you’re missing music, movies, TV shows, or podcasts, learn how to redownload the missing content.
- If you previously made in-app purchases, you need to restore them.
Pair your Bluetooth accessories
After you set up your new iOS device, you need to pair your Bluetooth accessories, like headphones and speakers, and connect your device to your car stereo. On your iOS device:
- Go to Settings > Bluetooth and make sure that Bluetooth is on.
- Put your accessory in Discovery Mode and wait for it to show up on your iOS device.
- Tap the accessory name to pair it. You might need to enter a PIN or passcode. Learn more about pairing Bluetooth accessories.
Add your cards to Apple Pay
You can use Apple Pay as soon as you add your credit, debit, or prepaid card to Wallet. Remember to add your cards to any device that you want to use with Apple Pay. Here’s how:
- Go to Settings > Wallet & Apple Pay.
- Add your card and wait for your bank to verify your information. If your bank needs more information to verify your card, they’ll ask for it.
Manage your subscriptions
Some apps and services offer subscriptions to access their content. These subscriptions will automatically renew until you choose to cancel the subscription. If you have any subscriptions, learn how to view, change, or cancel them.
Источник
How to create a new Apple ID
Use the same Apple ID to enjoy all Apple services. All you need is your full name, date of birth, an email address, and phone number.
Not sure if you have an Apple ID, or forgot what it is? To find your Apple ID, enter your name and email address at iforgot.apple.com.
Create an Apple ID on your iPhone, iPad, or iPod touch
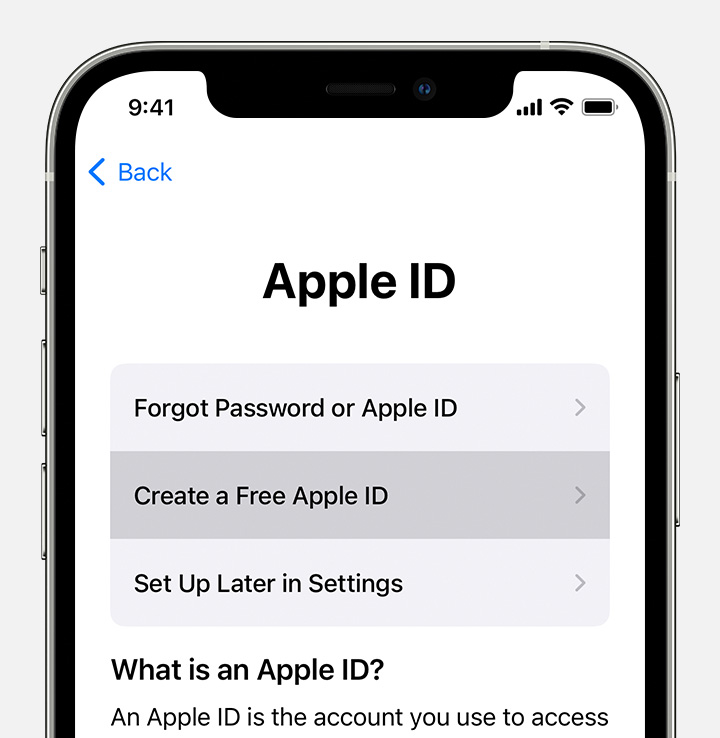
Create an Apple ID when you set up your device
- Tap «Forgot password or don’t have an Apple ID?».
- Tap Create a Free Apple ID.

- Select your birthday and enter your name. Tap Next.
- Tap «Use your current email address», or tap «Get a free iCloud email address.»
- When prompted, follow the onscreen steps to verify your email address and set up two-factor authentication. If you choose to skip this step, you’ll be prompted to do this later in Settings.
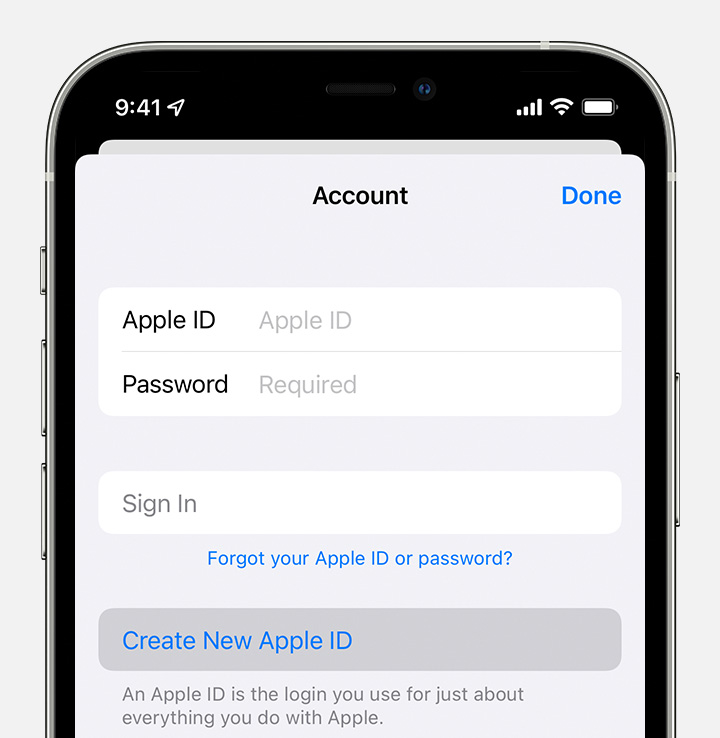
Create an Apple ID using the App Store on your device
- Open the App Store and tap the sign-in button .
- Tap Create New Apple ID. If you don’t see this option, make sure that you’re signed out of iCloud.
- Follow the onscreen steps. The email address that you provide will be your new Apple ID.*
- Enter your credit card and billing information, then tap Next. You can also choose None. Learn what to do if None isn’t showing or you can’t select it. You won’t be charged until you make a purchase.
- Confirm your phone number. This can help to verify your identity and recover your account if needed. Tap Next.
- Check your email for a verification email from Apple and verify your email address.
After you verify your email address, you can use your Apple ID to sign in to the iTunes Store, App Store, and other Apple services such as iCloud.
* In China mainland, you might be required to provide a +86 phone number for your Apple ID. You can change the number later, or change your country or region to a location that doesn’t require it. This number is only used for verification purposes.
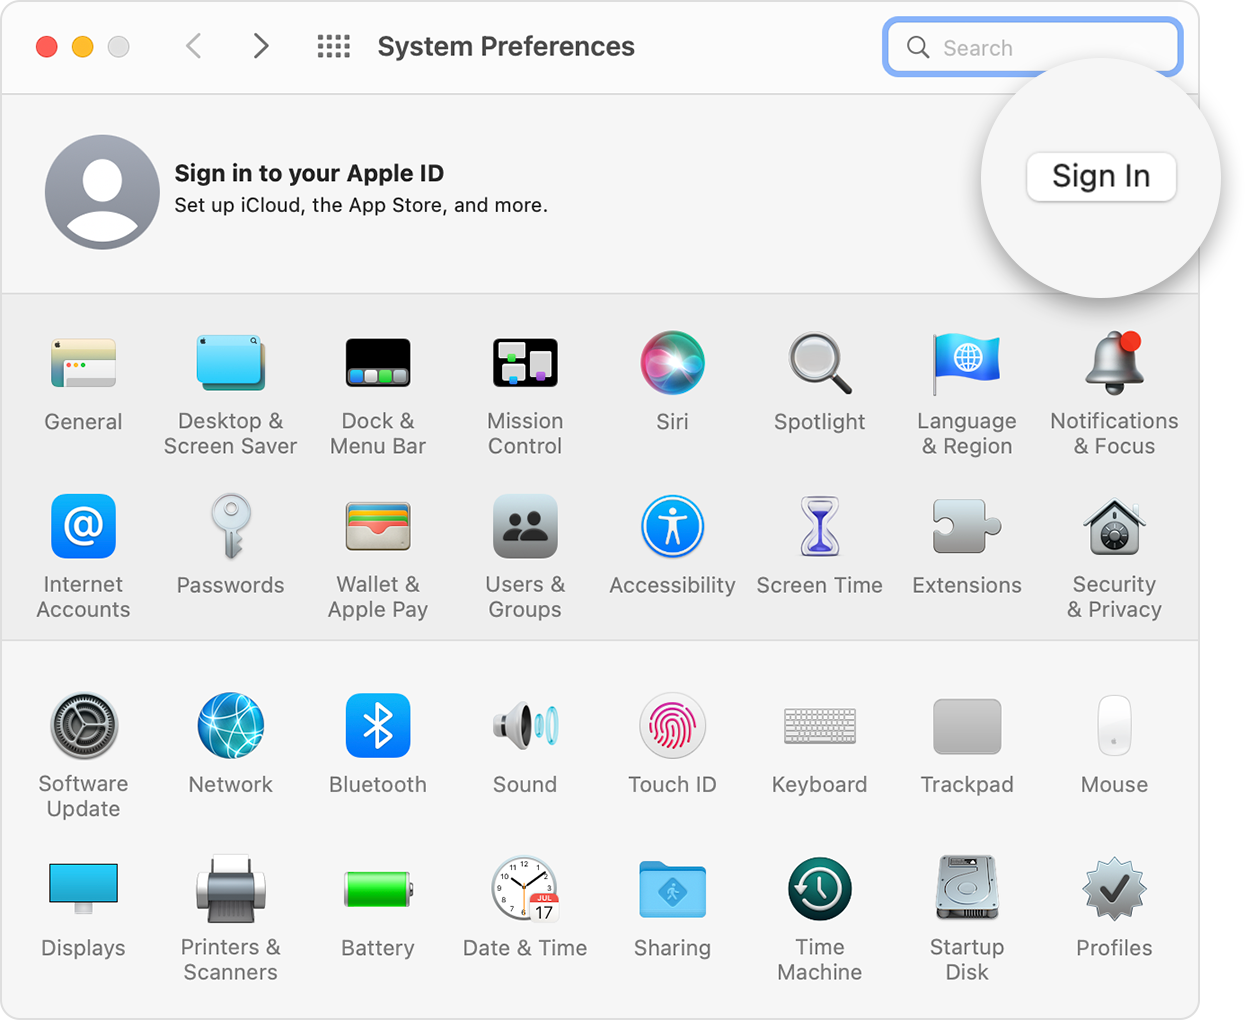
Create an Apple ID on your Mac
- Choose Apple menu > System Preferences.
- Click Sign In.
- Click Create Apple ID, then follow the onscreen steps. The email address that you provide will be your new Apple ID.*
- Enter your credit card and billing information, then click Continue. You can also choose None. Learn what to do if None isn’t showing or you can’t select it. You won’t be charged until you make a purchase.
- Check your email for a verification email from Apple and verify your email address.
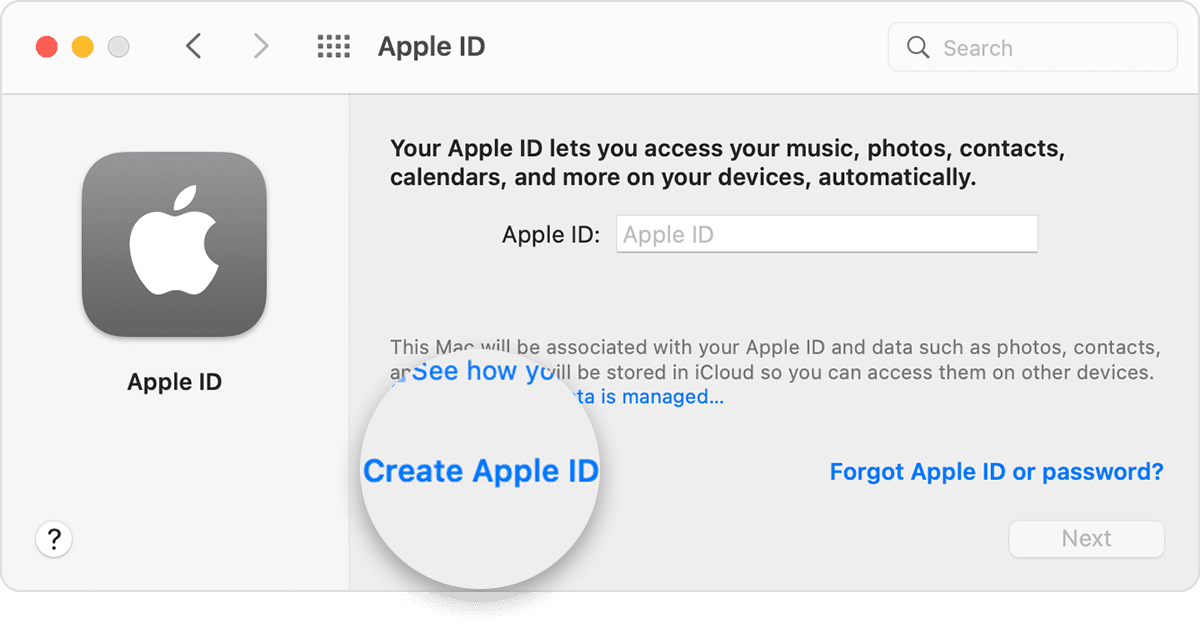
After you verify your email address, you can use your new Apple ID to sign in to the App Store and other Apple services such as iCloud.
* In China mainland, you might be required to provide a +86 phone number for your Apple ID. You can change the number later, or change your country or region to a location that doesn’t require it. This number is only used for verification purposes.
Create an Apple ID on your Windows PC
- Open iTunes for Windows. Make sure that you have the latest version.
- From the menu bar at the top of your computer screen or at the top of the iTunes window, choose Account > Sign In. Then click Create New Apple ID.
- Follow the onscreen steps. The email address that you provide will be your new Apple ID.*
- Enter your credit card and billing information, then click Continue. You can also choose None, and learn what to do if None isn’t showing or you can’t select it. We’ll charge you only when you make a purchase.
- Check your email for a verification email from Apple and verify your email address.
* In China mainland, you might be required to provide a +86 phone number for your Apple ID. You can change the number later, or change your country or region to a location that doesn’t require it. This number is only used for verification purposes.
Create an Apple ID on another device
To create an Apple ID on an Apple TV, Android device, smart TV, or streaming device, you can usually follow the steps provided onscreen and enter your full name, date of birth, an email address or phone number, and a payment method. If you set up the Apple TV app on your smart TV, you might be redirected to activate.apple.com to create your Apple ID. You can also use the steps below to create your Apple ID on the web.
Create an Apple ID on the web
- Go to appleid.apple.com and click Create Your Apple ID.
- Follow the onscreen steps. The email address that you provide will be your new Apple ID.*
- Enter a phone number that you can always access.
- Check the boxes to subscribe to Apple Updates if you’d like. This keeps you up to date on the latest news, software, products, and services from Apple.
- Click Continue.
- Follow the onscreen steps to verify your email address and phone number.

After you verify your email address, you can use your new Apple ID to sign in to the iTunes Store and other Apple services such as iCloud.
* In China mainland, you might be required to provide a +86 phone number for your Apple ID. You can change the number later, or change your country or region to a location that doesn’t require it. This number is only used for verification purposes.
If you see a message that you need to sign in to iTunes
If you created a new Apple ID on the web and see a message that you need to sign in to iTunes, follow the steps below for your device:
- On an iPhone, iPad, or iPod touch: Open Settings, then tap «Sign into device» and sign in with your Apple ID.
- On a Mac: Choose Apple menu > System Preferences, then select Apple ID and sign in with your Apple ID.
- On an Apple TV: Sign in to the App Store, iTunes Store, or Apple Music with your Apple ID.
- On a PC: Sign in to iTunes with your Apple ID.
- On an Android device: Sign in to Apple Music on Android with your Apple ID.
Learn more
- An Apple ID is the account you use to access Apple services like iCloud, the App Store, the iTunes Store, Apple Music, and more.
- If you see a message that says that the email address that you entered is already associated with an Apple ID, you might have already created an Apple ID. Try signing in with that email address. If you don’t remember your password, you can reset your password to regain access to your account.
- Already have an Apple ID? Sign in to all Apple services on your device.
- Learn how to change or remove your Apple ID payment information.
- Learn about how two-factor authentication protects your Apple ID.
Store availability and features might vary by country or region.
Источник
Set up Find My on your iPhone, iPad, iPod touch, or Mac
Make sure that you set up Find My so that if you ever lose a device or item, including your paired AirPods, Apple Watch, or a personal item with an AirTag attached, you can locate it.
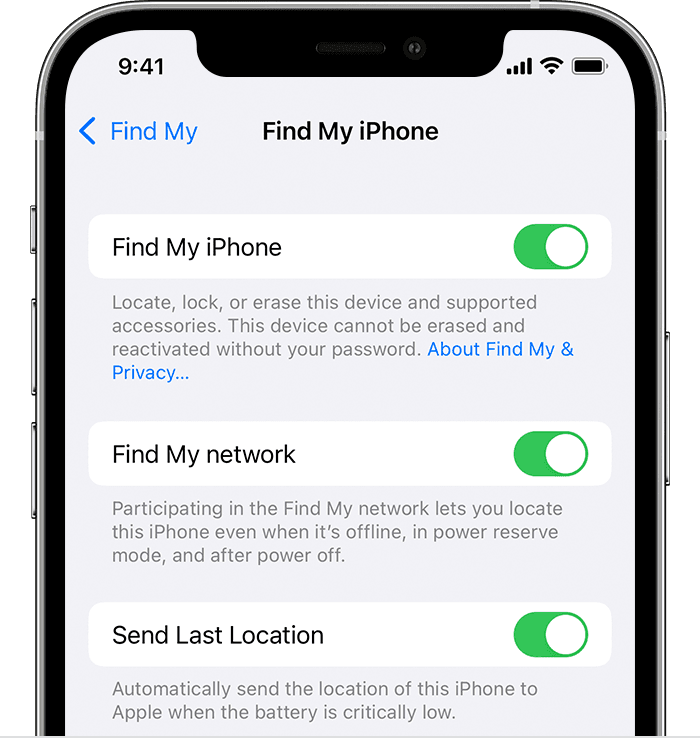
How to turn on Find My for your iPhone, iPad, or iPod touch
- Open the Settings app.
- Tap your name, then tap Find My.
- If you want friends and family to know where you are, turn on Share My Location.
- Tap Find My [device], then turn on Find My [device].
- To see your device even when it’s offline, turn on Find My network.*
- To have the location of your device sent to Apple when the battery is low, turn on Send Last Location.
If you want to be able to find your lost device on a map, make sure that Location Services is turned on. To do this, go to Settings > Privacy > Location Services, and turn on Location Services.
* The Find My network is an encrypted, anonymous network of hundreds of millions of Apple devices that can help you locate your device.
How to add your AirPods, Apple Watch, or Beats product to Find My
If your AirPods, Apple Watch, or supported Beats product are paired with your iPhone, they’re automatically set up when you turn on Find My iPhone.
To make sure you can find your devices even if they’re powered off or disconnected, check that Find My network is turned on.
Источник
Set up your iPhone, iPad, or iPod touch
Learn how to set up your iPhone, iPad, or iPod touch.
If you’re switching to a new device
If you want to transfer your information from another device to your new iPhone, iPad, or iPod touch, follow these steps:
Make sure that you back up your previous iOS device so that you can transfer the content to the new device.
If you’re setting up your first iOS device
If you already set up your new device but want to start over, learn how to erase your iPhone, iPad, or iPod touch.
Otherwise, follow these steps:
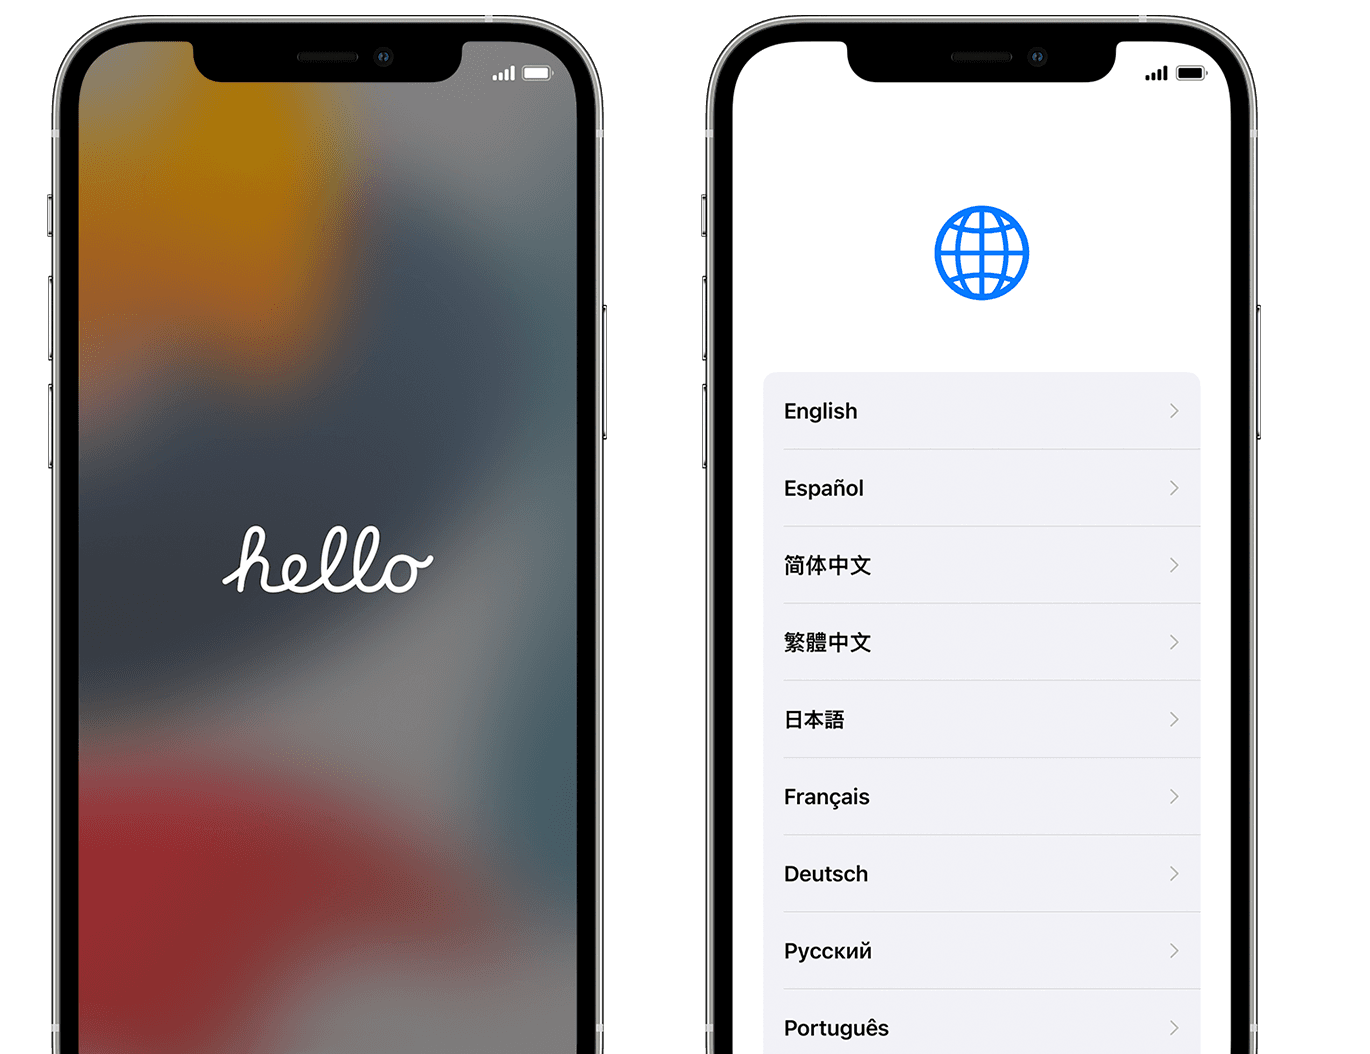
Turn on your device
Press and hold the device’s power button until you see the Apple logo. You’ll then see «Hello» in many languages. Follow the steps to get started. If you’re blind or have low vision, you can turn on VoiceOver or Zoom from the Hello screen.
When asked, choose your language. Then tap your country or region. This affects how information looks on your device, including date, time, contacts, and more. At this point, you can tap the blue accessibility button to set up Accessibility Options that can optimize your setup experience and the use of your new device.
If you have another device, use Quick Start
If you have another device, you can use it to automatically set up your new device with Quick Start. Bring the two devices close together, and then follow the instructions.
If you don’t have another device, tap «Set Up Manually» to continue.

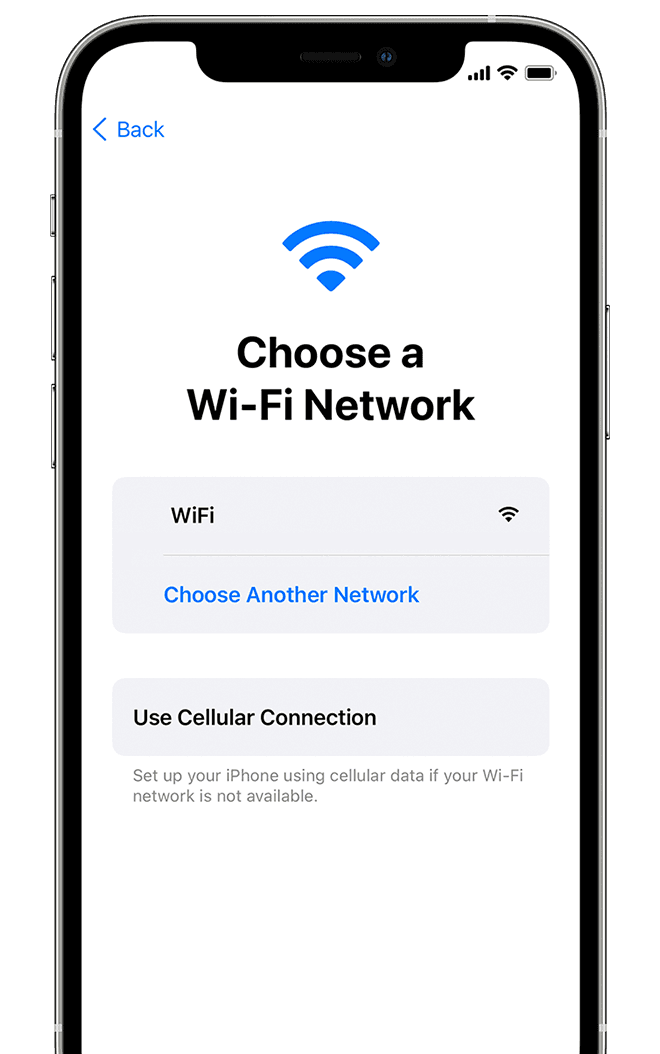
Activate your device
You need to connect to a Wi-Fi network, a cellular network, or iTunes to activate and continue setting up your device.
Tap the Wi-Fi network that you want to use or select a different option. If you’re setting up an iPhone or iPad (Wi-Fi + Cellular), you might need to insert your iPhone SIM card or iPad SIM card first.
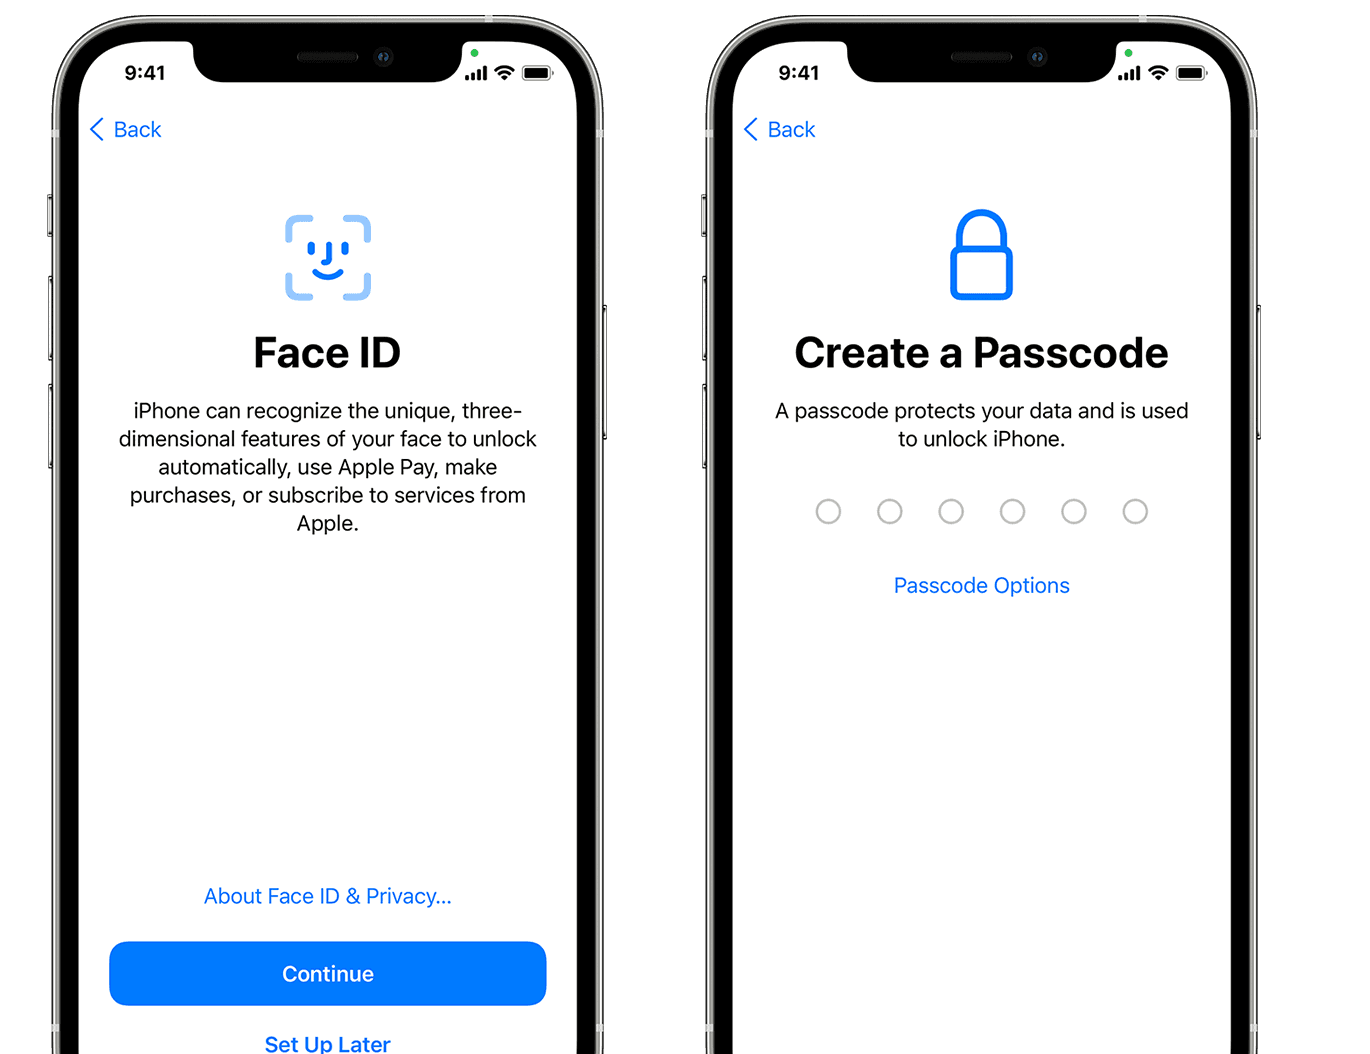
Set up Face ID or Touch ID and create a passcode
On some devices, you can set up Face ID or Touch ID. With these features, you can use face recognition or your fingerprint to unlock your device and make purchases. Tap Continue and follow the instructions, or tap «Set Up Later in Settings.»
Next, set a six-digit passcode to help protect your data. You need a passcode to use features like Face ID, Touch ID, and Apple Pay. If you’d like a four-digit passcode, custom passcode, or no passcode, tap «Passcode Options.»
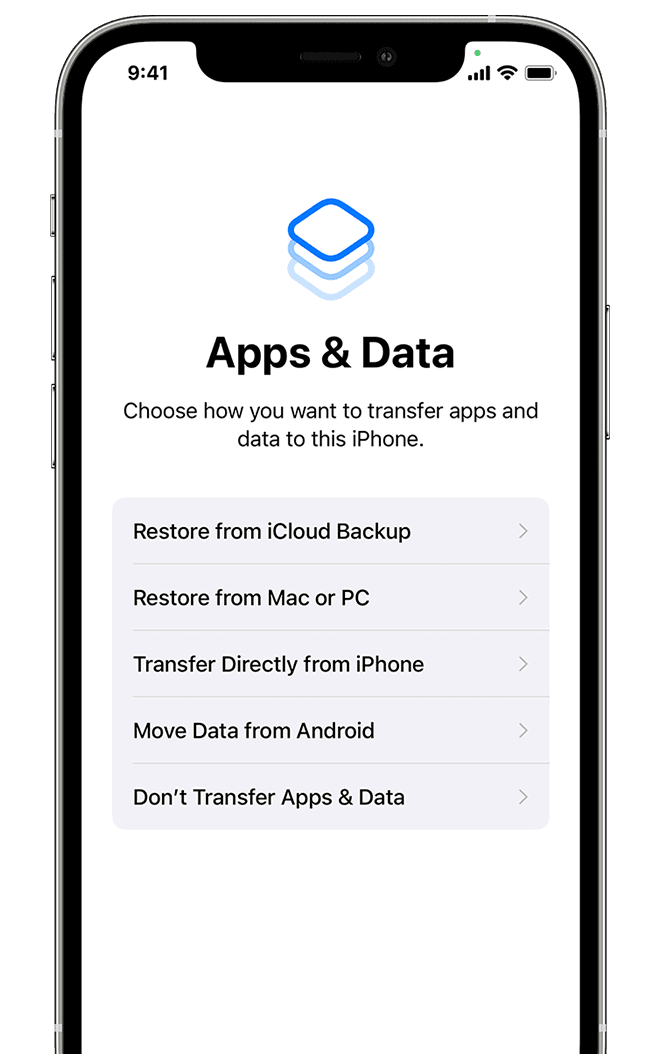
Restore or transfer your information and data
If you have an iCloud backup or a backup made from your computer or an Android device, you can restore or transfer your data from your old device to your new device.
If you don’t have a backup or another device, select Don’t Transfer Apps & Data.
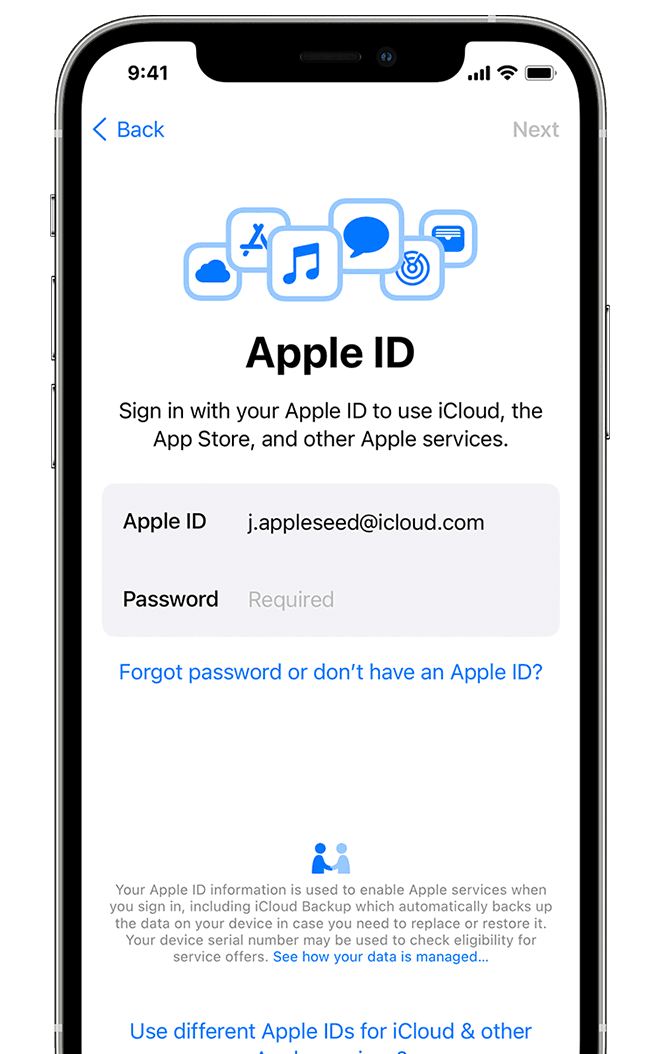
Sign in with your Apple ID
Enter your Apple ID and password, or tap «Forgot password or don’t have an Apple ID?» From there, you can recover your Apple ID or password, create an Apple ID, or set it up later. If you use more than one Apple ID, tap «Use different Apple IDs for iCloud and iTunes?»
When you sign in with your Apple ID, you might be prompted for a verification code from your previous device.
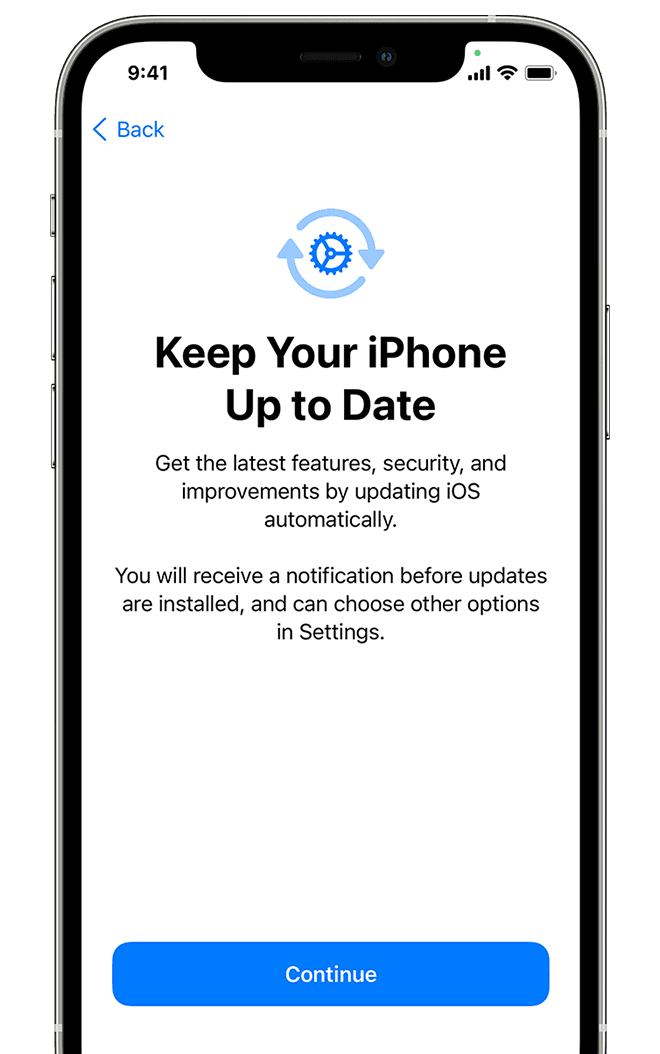
Turn on automatic updates and set up other features
On the next screens, you can decide whether to share information with app developers and allow iOS to update automatically.
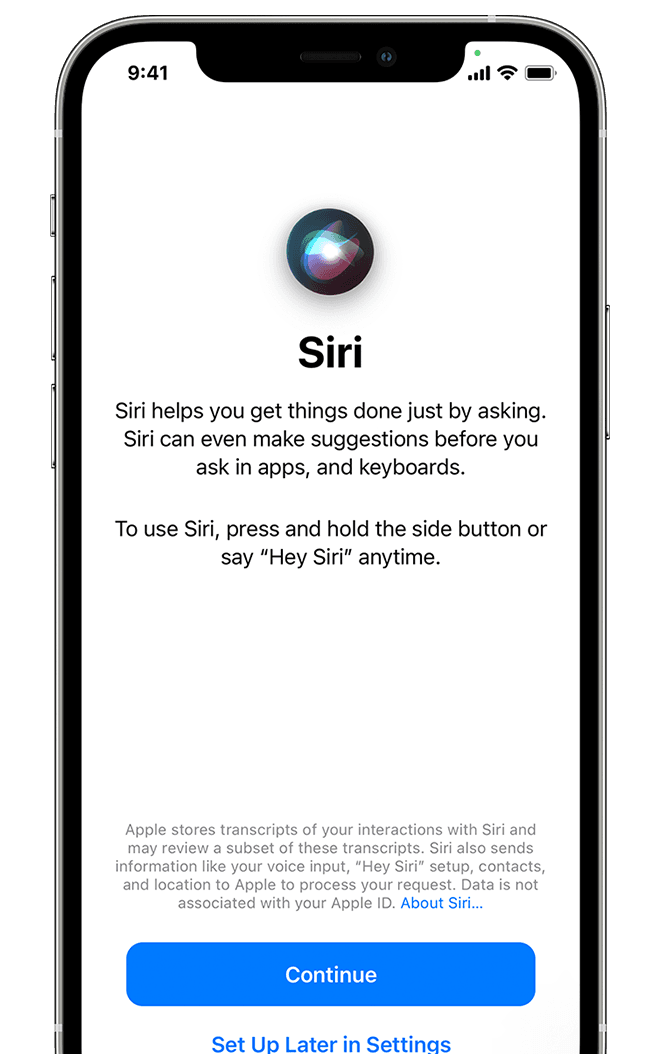
Set up Siri and other services
Next, you’ll be asked to set up or enable services and features, like Siri. On some devices, you’ll be asked to speak a few phrases so that Siri can get to know your voice.
If you signed in with your Apple ID, follow the steps to set up Apple Pay and iCloud Keychain.
Set up Screen Time and more display options
Screen Time gives you insight into how much time you and your kids spend on your devices. It also lets you set time limits for daily app use. After you set up Screen Time, you can turn on True Tone if your device supports it, and use Display Zoom to adjust the size of icons and text on your Home screen.
If you have an iPhone X or later, learn more about using gestures to navigate your device. If you have an iPhone with a Home button, you can adjust the click for your Home button.

Finish up
Tap «Get Started» to begin using your device. Make a safe copy of your data by backing up, and learn about more features in the user guide for your iPhone, iPad, or iPod touch.
Information about products not manufactured by Apple, or independent websites not controlled or tested by Apple, is provided without recommendation or endorsement. Apple assumes no responsibility with regard to the selection, performance, or use of third-party websites or products. Apple makes no representations regarding third-party website accuracy or reliability. Contact the vendor for additional information.
Источник


