- Transfer files between two Mac computers using target disk mode
- Transfer files between two Mac computers using target disk mode
- How to boot your Mac in Target Disk Mode
- What is Target Disk Mode?
- How to enter Target Disk Mode via System Preferences
- How to enter Target Disk Mode at boot time
- How to exit Target Disk Mode
- How to use your Mac as a disk in Target Disk Mode
- Target Disk Mode not working?
- Five reasons to use Target Disk Mode
- 1. High-speed file sharing
- 2. Install macOS on another Mac
- 3. Format or partition volumes
- 4. Troubleshoot your Mac
- 5. Migrate your data to a new Mac
- See also:
- Transfer files between two Mac computers using target disk mode
- Question: Q: Target disk mode -big sur
- Helpful answers
Transfer files between two Mac computers using target disk mode
If you have two Mac computers with FireWire or Thunderbolt ports, you can connect them so that one of them appears as an external hard disk on the other. This is called target disk mode.
Note: If either of the computers has macOS 11 or later installed, you must connect the two computers using a Thunderbolt cable.
Connect the two computers with a FireWire or Thunderbolt cable.
On the Mac you want to use as the external disk in target disk mode, do one of the following:
If the computer is off, start it up while pressing and holding the T key.
If the computer is on, choose Apple menu

> System Preferences, click Startup Disk  , then click Target Disk Mode.
When the computer has started up, a disk icon appears on the desktop of the other computer.
Transfer files by dragging them to and from the disk.
Eject the disk by dragging its icon to the Trash.
While you drag, the Trash icon changes to an Eject icon.
On the Mac you used as a disk, push the power button to shut it down, then disconnect the cable.
Источник
Transfer files between two Mac computers using target disk mode
If you have two Mac computers with FireWire or Thunderbolt ports, you can connect them so that one of them appears as an external hard disk on the other. This is called target disk mode.
Note: If either of the computers has macOS 11 or later installed, you must connect the two computers using a Thunderbolt cable.
Connect the two computers with a FireWire or Thunderbolt cable.
On the Mac you want to use as the external disk in target disk mode, do one of the following:
If the computer is off, start it up while pressing and holding the T key.
If the computer is on, choose Apple menu
> System Preferences, click Startup Disk , then click Target Disk Mode.
When the computer has started up, a disk icon appears on the desktop of the other computer.
Transfer files by dragging them to and from the disk.
Eject the disk by dragging its icon to the Trash.
While you drag, the Trash icon changes to an Eject icon.
On the Mac you used as a disk, push the power button to shut it down, then disconnect the cable.
Источник
How to boot your Mac in Target Disk Mode
Our tutorial series dealing with the many ways you can start up your Mac continues with Target Disk Mode, a feature Apple conceived to allow your Mac to act as an external disk for another Mac.
It’s not surprising that the vast majority of average Mac owners are totally oblivious to the existence of Target Disk Mode, and who could blame them? After all, Target Disk Mode isn’t exactly front and center on macOS.
In this tutorial, you’re going to be taught how to activate Target Disk Mode through the System Preferences application, or enter it directly at boot time with a simple keystroke. I’m also going to explain in layman’s terms why, when and how Target Disk Mode should be used.
What is Target Disk Mode?
As mentioned, Target Disk Mode lets your Mac be used as an external hard disk connected to another Mac. Once the computer is in Target Disk Mode and available as an external volume to the host Mac, you can copy files to or from that volume.
Any Mac with a FireWire or Thunderbolt port can be started up in Target Disk Mode.
How to enter Target Disk Mode via System Preferences
If your Mac is already turned on, you can restart it in Target Disk Mode using the Startup Disk pane in the macOS System Preferences application.
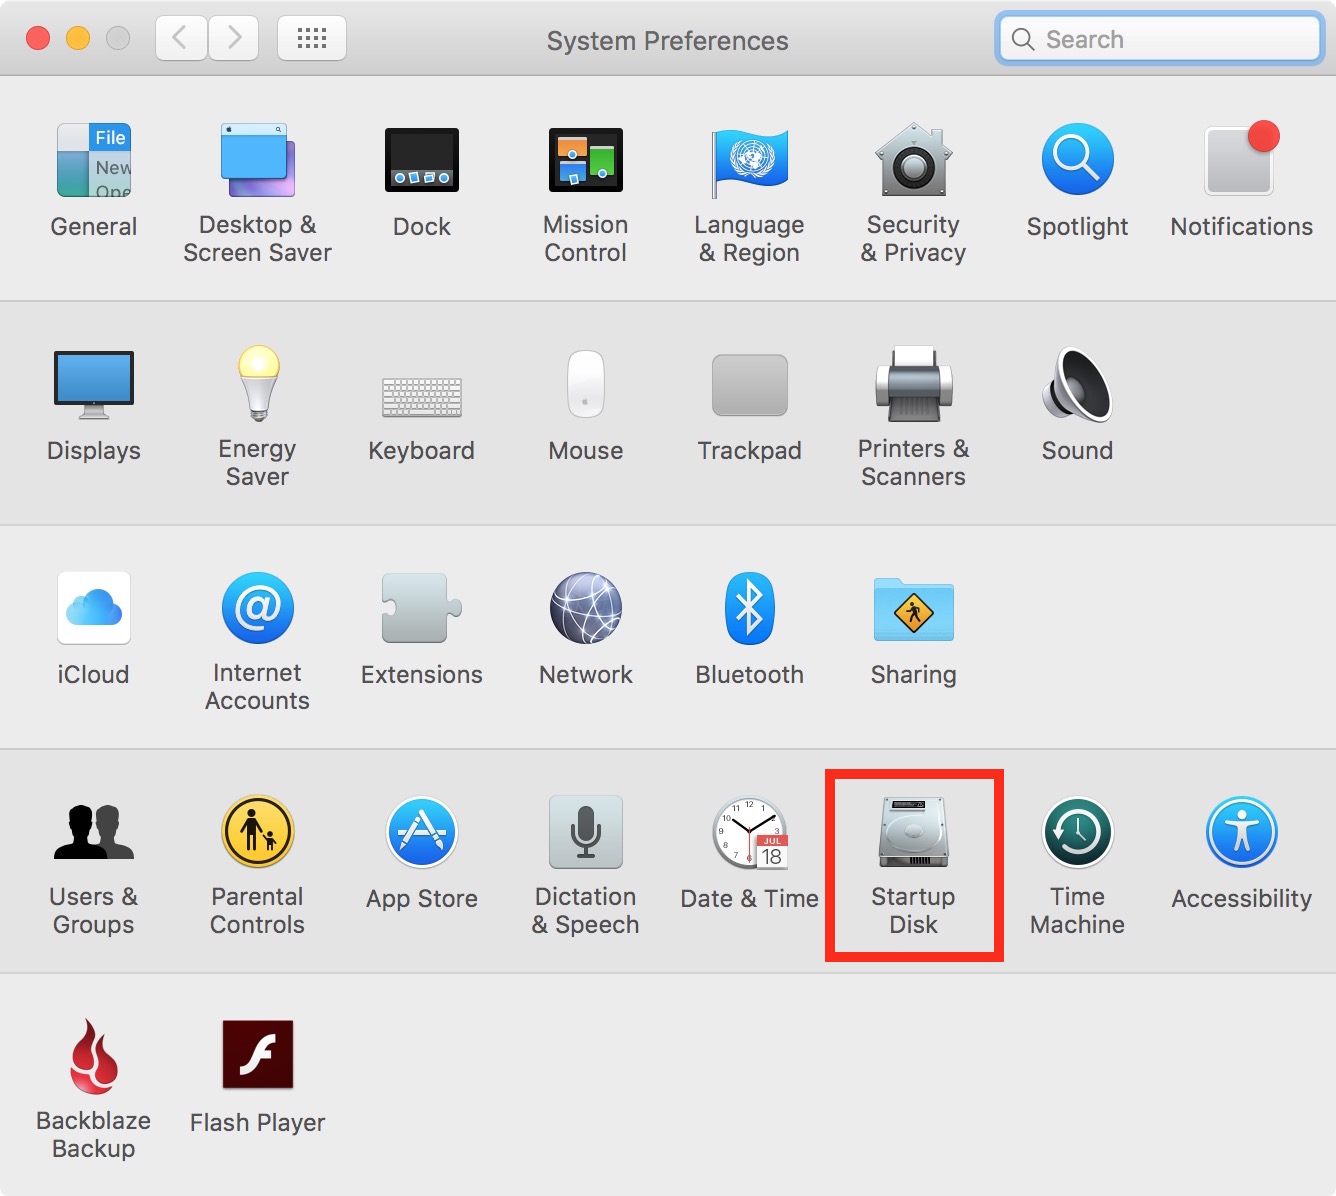
Step 1: Open System Preferences by clicking its icon in the Dock, or choose Apple menu > System Preferences. Alternatively, use Spotlight search to locate the app.
Step 2: Click the icon labeled Startup Disk.
Step 3: Click on the Lock icon and enter your admin password if necessary, then click on the Target Disk Mode button.
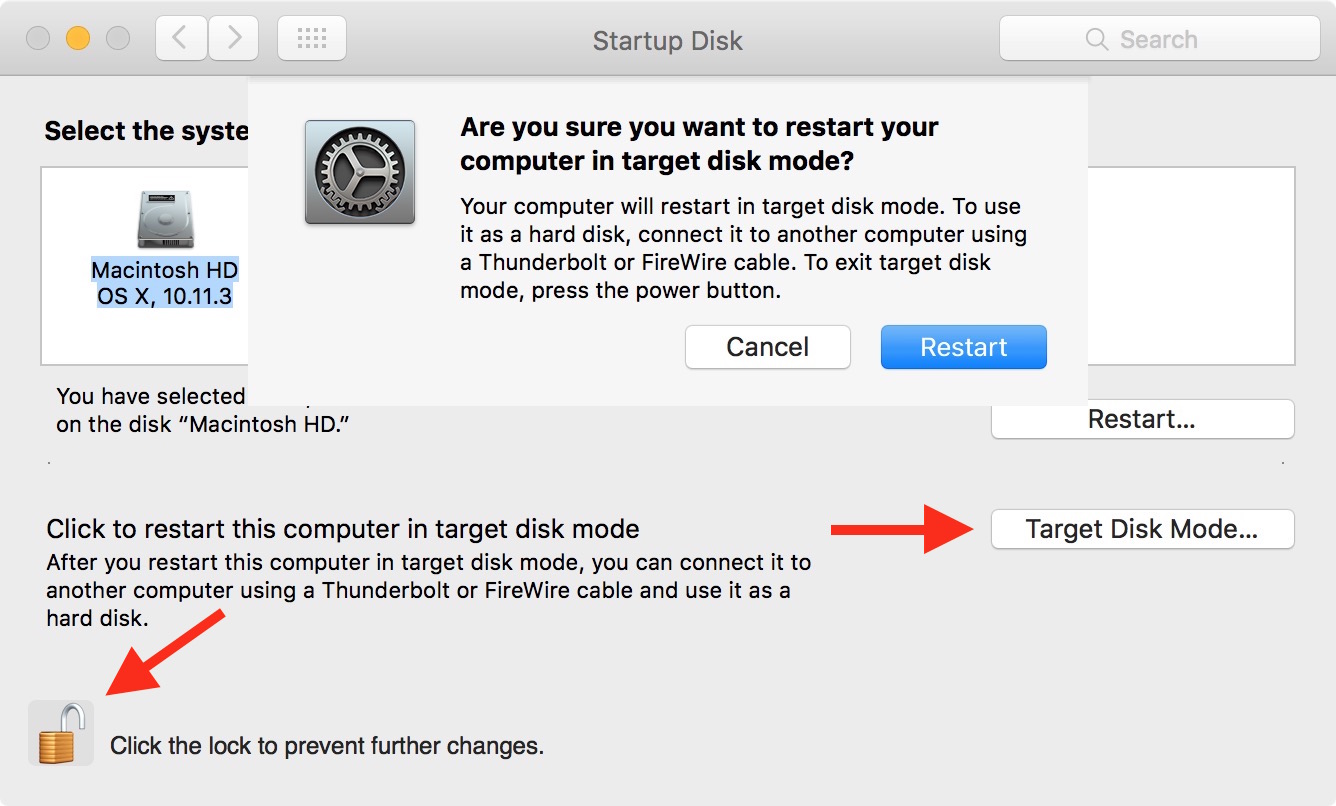
A message pops up asking “Are you sure you want to restart your computer in target disk mode?” Confirm and continue by clicking the Restart button.
How to enter Target Disk Mode at boot time
If your Mac is turned off, you can bypass booting into the macOS desktop and start the machine up directly into Target Disk Mode.
Step 1: Turn on your Mac by pressing the power button.
Step 2: Hold down the “T” key immediately upon hearing the startup chime.
How to exit Target Disk Mode
To exit Target Disk Mode, follow these steps:
Step 1: First eject the disk of the Mac in Target Disk Mode by dragging its icon to the Trash on your other Mac. The Trash icon will change to an Eject icon when you do this. You can also choose Eject (or Put Away) from the File menu.
Step 2: Now press and hold the power button located on the Mac in Target Disk Mode until it restarts.
Step 3: Lastly, disconnect the FireWire or Thunderbolt cable from both Macs.
How to use your Mac as a disk in Target Disk Mode
Great, tour Mac is now in Target Disk Mode. Now what?
Easy, connect it to another Mac using a Thunderbolt or FireWire-to-FireWire cable to start using it as an external disk. The other Mac should be booted into macOS normally, not in Target Disk Mode.
Once a disk icon appears on the desktop of your other Mac, double-click it to start browsing the files on that computer. You can transfer files between the computers as you normally would, by dragging them to or from the disk.
Target Disk Mode not working?
Are you having issues entering Target Disk Mode? If so, this may help.
Is your cable working? Make sure your FireWire-to-FireWire or Thunderbolt cable is in good condition. Oh, and double check the connection.
Peripherals? Are there any other devices connected to the computer via FireWire or Thunderbolt? If so, disconnect them before entering Target Disk Mode.
Know thy keystroke. Make sure you are starting up the computer while pressing and holding down the T key.
Check the keyboard. Do you own a desktop Mac? If so, check that its keyboard is connected directly and not through an Apple Thunderbolt Display or a hub. If you use a wireless keyboard, make sure its batteries are charged.
Have you set up a firmware password on your Mac? Not to be confused with your macOS account password or FileVault disk encryption password, a firmware password prevents the computer from starting up from any device other than your designated startup disk, meaning it won’t be able to enter Target Disk Mode.
Using macOS 10.3.9 or earlier? macOS 10.3.9 or earlier cannot mount volumes from an Intel-based Mac in Target Disk Mode.
Is FileVault turned on? If the home directories on your Mac are encrypted using the macOS File Vault feature, you cannot browse them in Target Disk Mode. In order to make the files visible on another Mac, log in as the FileVault-protected user and temporarily disable disk encryption on by clicking the Turn Off FileVault button in System Preferences > Security & Privacy > FileVault.
After transferring home directory contents to the target computer, enable FileVault protection again if you like.
Unresponsiveness? Some Intel-based Macs can become unresponsive while being used in Target Disk Mode for long periods of time. This can be corrected by checking for software updates on the computer that becomes unresponsive while in Target Disk Mode.
Using a notebook? If you boot a Mac notebook in Target Disk Mode, plug in its AC power adapter.
Five reasons to use Target Disk Mode
You may be wondering why on Earth would anyone in their right mind use their Mac as a disk for another Mac. Here are some of the more obvious scenarios when this might be helpful:
1. High-speed file sharing
If you have gigabytes’ worth of files on your Mac, you’ll spend quite some time waiting until they transfer to another Mac via Wi-Fi or USB. Thankfully, Target Disk Mode relies on high-speed Thunderbolt or FireWire which can transfer hundreds of megabytes in just a few seconds. This method is particularly useful if the display on one of your Macs isn’t working and you need to get to its files.
2. Install macOS on another Mac
Should you need to install macOS on a Mac that doesn’t have an optical drive, or haven’t created a macOS install USB drive, or hate re-downloading the installer again from the App Store, Target Disk Mode is your friend. One Mac will be the installer and the recipient machine where macOS is going to be installed on will be in Target Disk Mode.
3. Format or partition volumes
Booting a Mac in Target Disk Mode lets you format its volumes, or partition its drive to use as a startup volume. Simply use Disk Utility on the other Mac to erase the disk on the Mac in Target Disk Mode before you repartition the drive.
4. Troubleshoot your Mac
Sometimes your Mac might refuse to start up, or you might be unable to get past the login screen. If booting into the macOS built-in Safe Mode or Verbose Mode won’t resolve startup issues, connect that machine to another Mac via Target Disk Mode and perform a health check of its disk in Disk Utility.
5. Migrate your data to a new Mac
Say you bought a new Mac and want to move content from your old machine over to a new one the fastest possible way. Start up your old Mac in Target Disk Mode and connect it to the new machine via either a Thunderbolt or FireWire-to-FireWire cable.
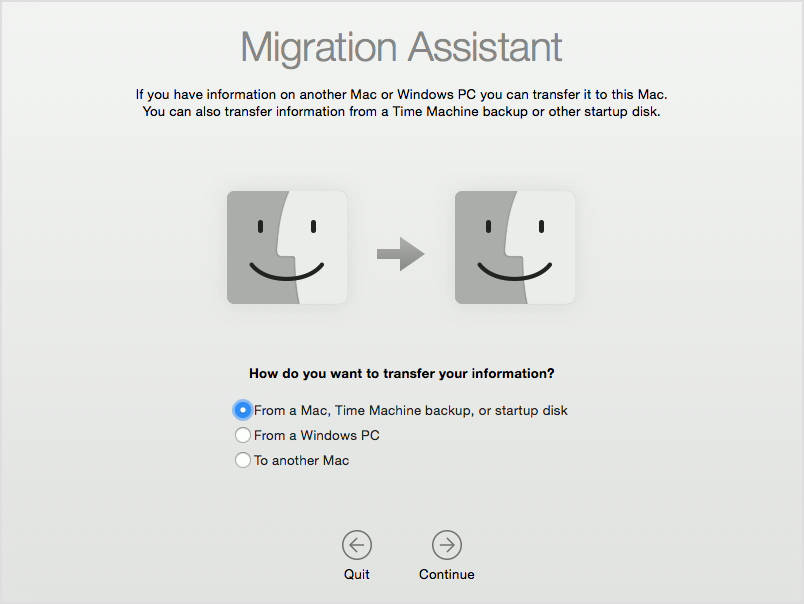
Now open the Migration Assistant application on your new Mac (you can find it by choosing Go > Utilities, or using Spotlight or Launchpad), select “From a Mac, Time Machine backup, or startup disk” and click Continue.
Did you like this tutorial?
We’re open to suggestions and smart ideas so do feel free to chime in with your thoughts in the comment section below.
See also:
If you like this tutorial, please consider bookmarking and passing it along to your friends and other Mac support folks.
Источник
Transfer files between two Mac computers using target disk mode
If you have two Mac computers with FireWire or Thunderbolt ports, you can connect them so that one of them appears as an external hard disk on the other. This is called target disk mode.
Note: If either of the computers has macOS 11 or later installed, you must connect the two computers using a Thunderbolt cable.
Connect the two computers with a FireWire or Thunderbolt cable.
On the Mac you want to use as the external disk in target disk mode, do one of the following:
If the computer is off, start it up while pressing and holding the T key.
If the computer is on, choose Apple menu
> System Preferences, click Startup Disk , then click Target Disk Mode.
When the computer has started up, a disk icon appears on the desktop of the other computer.
Transfer files by dragging them to and from the disk.
Eject the disk by dragging its icon to the Trash.
While you drag, the Trash icon changes to an Eject icon.
On the Mac you used as a disk, push the power button to shut it down, then disconnect the cable.
Источник
Question: Q: Target disk mode -big sur
2018 MacBook Air 90gb free of 128gb
running latest Catalina
Is there a way to upgrade the MacOS?
Each time I try. It kicks me into Target disk mode. I don’t have another MacBook to connect.
Currently just booted up with command, shift, options R (command R wouldn’t work.)
This should install Mojave. Do I just give up on big sur and reinstall Catalina? Or is it easier to install big sur after Mojave?
MacBook Air 13″, macOS 10.15
Posted on Nov 30, 2020 3:49 AM
It threw another fit at me and told me the install failed. Force shutdown went to restart with shift command options but I turned it on too quickly and it restarted as normal. And it’s now installed Big Sur.
thank you for your help
Posted on Nov 30, 2020 4:51 AM
Helpful answers
Nov 30, 2020 3:55 AM
Thanks for teh reply. I have tried to restart (5 TIMES NOW) in safe mode but it goes directly to the reboot (29 minutes) and ends with that same screen. It wont let me action anything on the computer — i cant even check my memory.
Any suggestions most welcome please?
Dec 8, 2020 2:31 AM
HI, I am having the same problem with the Big Sur upgrade.
Each time I try. It kicks me into Target disk mode. It gives me the greyed out option of restart or Target Disk.
When i restart it starts at 29min remaining and goes through the whole process again.
Dec 7, 2020 11:30 PM
Hi, wonder if you had any success. I have exactly same issue with reboot at 29 minutes then at 22 minutes going to “an error occurred applying the software update” and after pressing “ok” goes to “choose startup disk” screen/target disk mode. Thanks!
Dec 26, 2020 5:42 AM
I was having a similar issue to others in this thread but I didn’t get lucky like the OP. Full story below, but in short, Apple Support was no help to me and using a combination of booting into Recovery Mode and commands via Terminal was the solution to making space for the update to complete successfully.
I was stuck in a cycle starting at 29 minutes where it would get as close as 5/6 minutes left before erroring out and giving me the same options: greyed out «restart/reinstall» option and then the option to go into Target Disk Mode. After 2 days of researching and a couple of hours with Apple Support on Chat and Phone, came to the conclusion that there wasn’t enough space on the drive to complete the update so it was just stuck in this cycle. Why it doesn’t make sure there’s enough space before starting, I don’t know, but that’s what it came down to.
Apple Support’s only options were to try Target Disk Mode or erase the disk and start over. I didn’t have a Time Machine backup and though I had my most important files backed up elsewhere, I wanted to avoid wiping the disk. I tried Target Disk Mode, which worked for about 15 seconds before cycling back into the same routine starting over at 29 minutes again, and ultimately failing each time. So I didn’t have enough time via the other Mac I hooked up to get into the files and delete anything to try the update again.
I took to the web to see if there were any last options to avoid erasing the disk and losing all my data. There is! I restarted the Mac and got it into Recovery Mode. After checking available storage in Disk Utility, it was clear that lack of space was likely the issue (only 15MB free). Here’s where Terminal comes in. I was able to use some «basic» text commands to locate a couple of large unnecessary files in my Downloads folder, delete them, and then restarted the Mac again. It went back through the same cycle — starting at 29 minutes left, but instead of getting stuck, the update completed and I’m back in business without losing any data.
I say «basic» because it was all brand new to me but I made sure not to do anything too risky. And read multiple forums out there before trying anything.
So. if Apple Support is telling you to erase the disk, and you don’t have a backup of everything. all is not lost. You need to be comfortable trying things in Terminal which can be a bit offputting to folks. But I was down to my last resort and ready to erase the disk, so it was worth a try for me.
If anyone is in the same position and down to their last resort, let me know, and I’d be happy to walk through the steps I took in more detail.
Источник


