- How to create a bootable installer for macOS
- What you need to create a bootable installer
- Download macOS
- Use the ‘createinstallmedia’ command in Terminal
- В какой формат форматировать внешний USB-диск (флешку) для работы на Mac (macOS)?
- Отформатируйте ваш диск при помощи Дисковой утилиты
- Что делать, если Дисковая утилита предлагает только формат APFS
- APFS, HFS+, exFAT или FAT? В какой формат форматировать внешний USB-диск (флешку) для работы на Mac (macOS)?
- Доступные файловые системы
- Apple File System (APFS)
- Mac OS Extended (HFS+)
- exFAT
- MS-DOS (FAT)
- 2022 Top 3 USB Format Tools For Mac Are Here to Help
- #1. Pick The Best USB Format Tool for Mac — 3 Top Tools
- #2. Set a Suitable File SystemВ for USB or External USB DriveВ on Mac
- #3. Format USB Drive forВ MacВ on Mac/Windows Computers
- Method 1. Format USB or External Hard Drive for Mac using Mac Disk utility
- Method 2. Format USB Drive for Mac using Terminal Command
- Method 3. Format USB or External Hard Drive for MacВ on a Windows PC
- Pick a Right USB Format Tool andВ Format Your USB Drive for Mac Now
How to create a bootable installer for macOS
You can use an external drive or secondary volume as a startup disk from which to install the Mac operating system.
These advanced steps are primarily for system administrators and others who are familiar with the command line. You don’t need a bootable installer to upgrade macOS or reinstall macOS, but it can be useful when you want to install on multiple computers without downloading the installer each time.
What you need to create a bootable installer
- A USB flash drive or other secondary volume formatted as Mac OS Extended, with at least 14GB of available storage
- A downloaded installer for macOS Monterey, Big Sur, Catalina, Mojave, High Sierra, or El Capitan
Download macOS
- Download: macOS Monterey, macOS Big Sur, macOS Catalina, macOS Mojave, or macOS High Sierra
These download to your Applications folder as an app named Install macOS [ version name ]. If the installer opens after downloading, quit it without continuing installation. To get the correct installer, download from a Mac that is using macOS Sierra 10.12.5 or later, or El Capitan 10.11.6. Enterprise administrators, please download from Apple, not a locally hosted software-update server. - Download: OS X El Capitan
This downloads as a disk image named InstallMacOSX.dmg. On a Mac that is compatible with El Capitan, open the disk image and run the installer within, named InstallMacOSX.pkg. It installs an app named Install OS X El Capitan into your Applications folder. You will create the bootable installer from this app, not from the disk image or .pkg installer.
Use the ‘createinstallmedia’ command in Terminal
- Connect the USB flash drive or other volume that you’re using for the bootable installer.
- Open Terminal, which is in the Utilities folder of your Applications folder.
- Type or paste one of the following commands in Terminal. These assume that the installer is in your Applications folder, and MyVolume is the name of the USB flash drive or other volume you’re using. If it has a different name, replace MyVolume in these commands with the name of your volume.
Monterey:*
Big Sur:*
Catalina:*
Mojave:*
High Sierra:*
El Capitan:
* If your Mac is using macOS Sierra or earlier, include the —applicationpath argument and installer path, similar to the way this is done in the command for El Capitan.
After typing the command:
- Press Return to enter the command.
- When prompted, type your administrator password and press Return again. Terminal doesn’t show any characters as you type your password.
- When prompted, type Y to confirm that you want to erase the volume, then press Return. Terminal shows the progress as the volume is erased.
- After the volume is erased, you may see an alert that Terminal would like to access files on a removable volume. Click OK to allow the copy to proceed.
- When Terminal says that it’s done, the volume will have the same name as the installer you downloaded, such as Install macOS Monterey. You can now quit Terminal and eject the volume.


Источник
В какой формат форматировать внешний USB-диск (флешку) для работы на Mac (macOS)?
Самый простой способ увеличить хранилище вашего Mac – докупить к нему внешний USB-накопитель (HDD или SSD). Сразу после этого ваша задача – отформатировать его в «правильной» файловой системе. Но в какой?
Бесплатная Дисковая утилита от Apple позволяет легко отформатировать диск, назначить для него том или даже разбить на несколько дисков.
А теперь давайте посмотрим на доступные варианты файловых систем и выберем из них лучшую.
Отформатируйте ваш диск при помощи Дисковой утилиты
Распакуйте свой диск и подключите его к Mac. Строго говоря, он уже отформатирован – для использования с Windows (тогда это будет NTFS) или под максимально широкую совместимость (Fat32). Но для пользователя Mac ни одна из этих файловых систем не подходит.
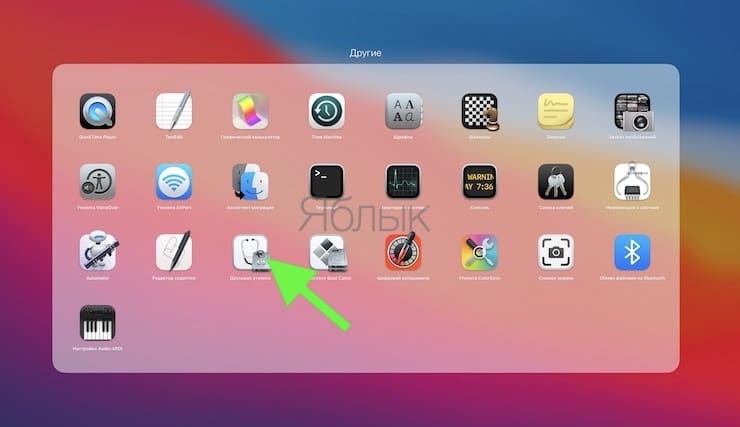
Для начала откройте Дисковую утилиту. Проще всего это сделать через Spotlight (иконка с лупой в правом верхнем углу экрана). Найти Дисковую утилиту можно и в Launchpad (в папке Другие).
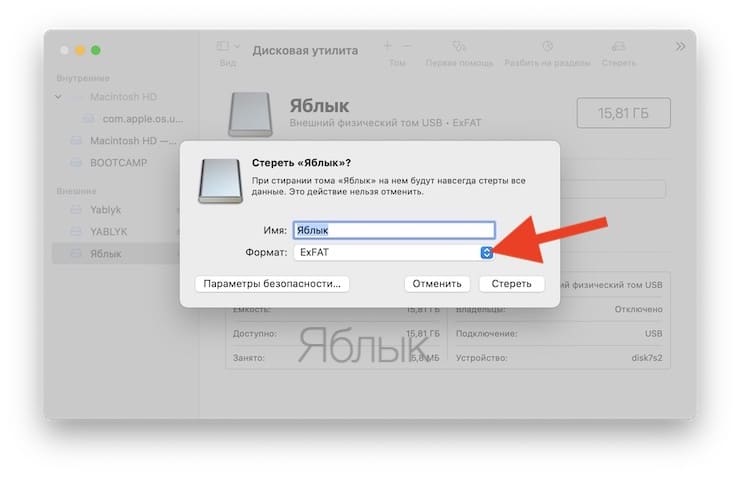
Для того, чтобы отформатировать новый диск в другую файловую систему:
1. Выберите его в меню слева.
2. Нажмите Стереть.
Важно: не забывайте, что вы потеряете все данные, которые находятся на этом диске.
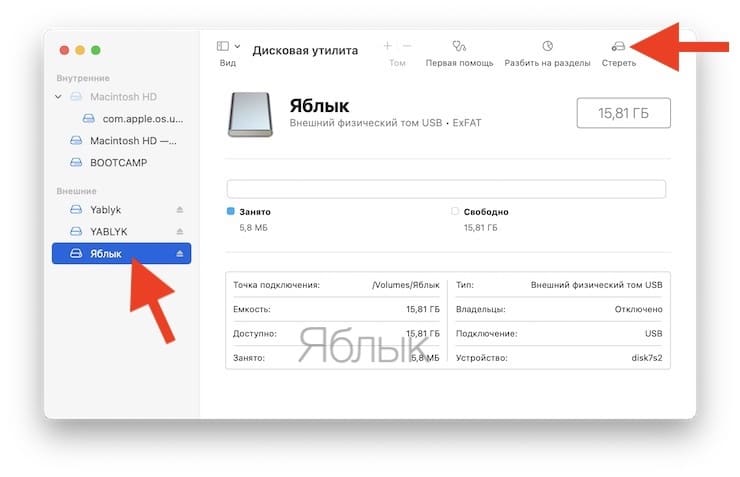
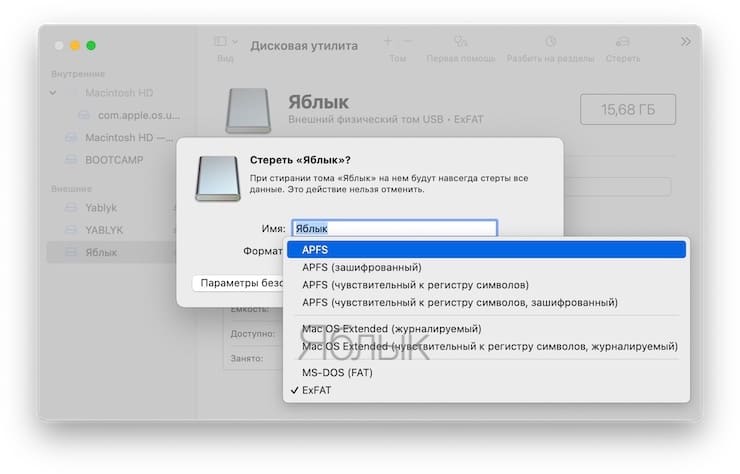
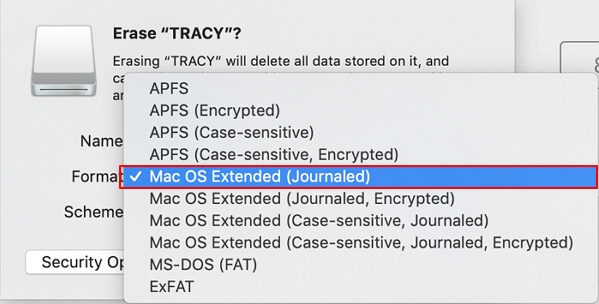
3. В появившемся окне необходимо выберите формат файловой системы (обзор всех форматов ниже) и нажмите кнопку Стереть.
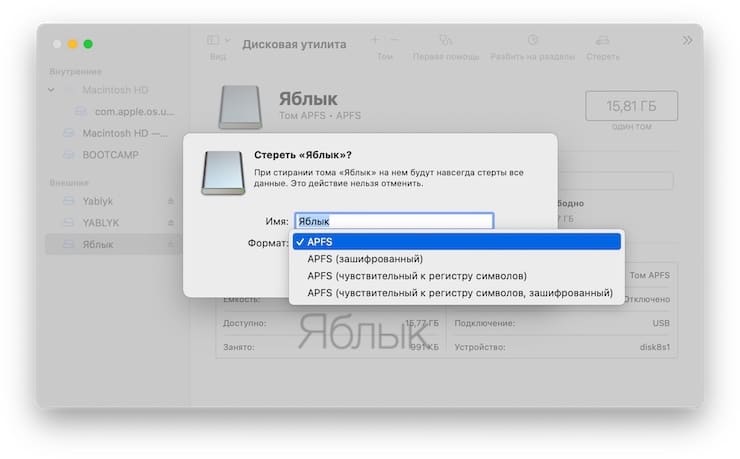
Что делать, если Дисковая утилита предлагает только формат APFS
В случае, если Дисковая утилита предлагает в качестве формата лишь APFS, значит ваш накопитель уже отформатирован в формат APFS.
Для того чтобы вернуть возможность отформатировать накопитель в любой другой из возможных форматов (перечень ниже), необходимо удалить том APFS. Для этого:
1. Нажмите правой кнопкой мыши на подключенный накопитель в боком меню Дисковой утилиты.

2. Выберите Удалить том APFS…
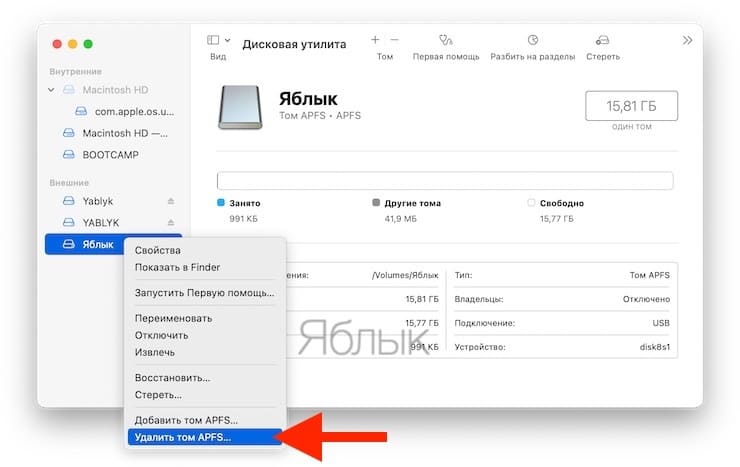
3. Подтвердите удаление нажатием кнопки Удалить.
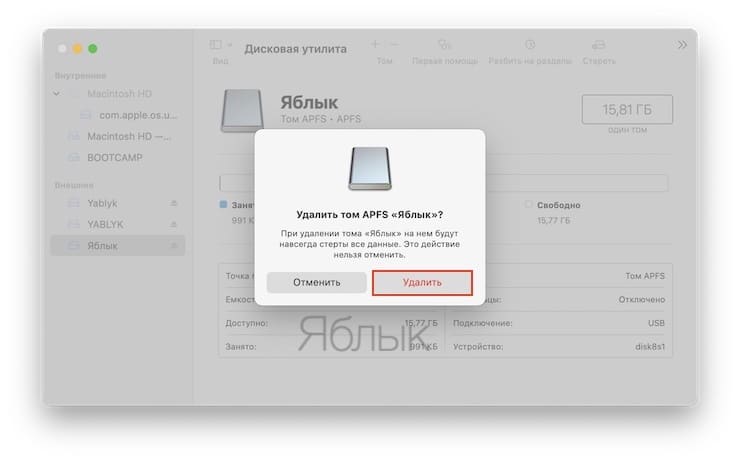
После удаления тома APFS список доступных форматов будет увеличен.
APFS, HFS+, exFAT или FAT? В какой формат форматировать внешний USB-диск (флешку) для работы на Mac (macOS)?
Доступные файловые системы
- Apple File System (APFS)
- Mac OS Extended (HFS+)
- exFAT (Extended File Allocation Table)
- MS-DOS (FAT)
Давайте рассмотрим каждую из них более подробно.
Apple File System (APFS)
Новейшая разработка Apple. Впервые представлена в начале 2017 года для iOS-устройств. APFS пришла на смену устаревшей файловой системе Mac OS Extended. Ей уже комплектуются все новые Mac.
Apple File System оптимизирована для использования с твердотельными накопителями (SSD) и флэш-накопителями, но с ней вполне можно использовать и традиционные механические жесткие диски (HDD). Вам стоит выбрать эту опцию, если вы взяли внешний SSD или новую USB-флэшку и точно не будете использовать их с Windows-компьютерами.
Главное преимущество APFS по сравнению с файловой системой Apple предыдущего поколения – это скорость. Копирование и вставка проходят практически мгновенно благодаря тому, как файловая система организует ваши данные. В APFS большое внимание уделено и таким технологиям, как шифрование и улучшенная работа с мета-данными (т.к. macOS активно работает с мета-данными файлов, хранящихся в системе).
К числу минусов можно отнести то, что APFS пока нельзя использовать для бэкапа данных с помощью Time Machine. Также у APFS нет нативной поддержки Windows. Чтобы решить эту проблему, придется покупать платный софт вроде Paragon APFS for Windows или искать бесплатные альтернативы.
Подходит: для системных дисков macOS, гибридных дисков, SSD и флэшек, которые используются только на macOS.
Не подходит: для дисков, использующихся со старыми Mac.
Mac OS Extended (HFS+)
Эта файловая версия, также известная как HFS+ (Hierarchical File System +), была основной для компьютеров Mac с 1998 года вплоть до 2017-го, когда Apple представила APFS. Если вы покупали Mac между этими датами (и не обновлялись с 2017 года), то он наверняка работает на macOS, установленной на диске HFS+.
Эта система по-прежнему полностью работоспособна на Maс как с механическими жесткими дисками, так и для SSD – хотя SSD будет работать лучше под управлением APFS. Если у вас очень старый Mac (на который уже нельзя установить новейшую версию macOS), выбор macOS Extended в качестве файловой системы позволит подключать к компьютеру внешние диски.
Главный недостаток HFS+ тот же, что и у APFS – для работы с Windows-компьютерами потребуется дополнительное ПО вроде Paragon HFS+ for Windows.
exFAT
Эту файловую систему создала Microsoft. exFAT предлагает схожую с FAT32 совместимость без раздражающих ограничений последней (вроде максимального объема файла в 4 ГБ).
Это – формат для тех, кто точно будет использовать внешний диск или флешку и с Windows, и с Mac. И macOS, и Windows могут и читать, и записывать данные с exFAT-дисков. Так что данный формат можно назвать отличным «гибридом» для двух миров.
Подходит: для дисков, которые используются и под Mac, и под Windows.
Не подходит: для дисков, преимущественно используемых на Mac (проблему может решить сторонний драйвер).
MS-DOS (FAT)
Apple также поддерживает файловую систему FAT32 – в Дисковой утилите она обозначается как MS-DOS (FAT). Связываться с этой системой в целом нет никакой необходимости. Единственное исключение – если вам нужно подключиться к реально старому компьютеру под управлением Windows (справедливости ради, в госучреждениях и у бизнеса такие ПК еще существуют). Если выбрать эту файловую систему, работать можно будет с дисками объемом до 2 ТБ и максимальным размером файла в 4 ГБ. С первым ограничением легко можно жить, а вот со вторым могут возникать проблемы. exFAT – практически всегда более удобное решение.
Подходит: для дисков, которые необходимо использовать с Windows XP или более ранними версиями Windows.
Не подходит: для всего остального.
Бонус: добавьте поддержку NTFS
NTFS, пришедшая на смену FAT32 в Windows XP, по-прежнему остается доминирующей файловой системой в Windows-мире. Соответственно, в теории имело бы смысл «подружить» macOS с NTFS.
Прямо сейчас у macOS уже есть частичная поддержка NTFS – операционная система для компьютеров Mac читает отформатированные в этом формате флэшки. А вот записывать файлы на них она еще не научилась.
Есть сразу несколько способов включить нативную поддержку чтения файловой системы NTFS в Mac. Первый из них – экспериментальная поддержка или сторонний драйвер – подходит только очень опытным пользователям, т.к. имеется риск испортить весь жесткий диск и потерять все данные. Второй, куда более надежный – покупка платного драйвера с поддержкой NTFS вроде Paragon NTFS for Mac (около 1000 рублей) или Tuxera NTFS for Mac (около 1 500 рублей). Да, придется отдать деньги – зато эти драйверы позволяют не только записывать данные на диски в формате NTFS, но и форматировать в эту файловую систему внешние жесткие диски для полноценного использоваться как в Windows, так и на Mac. Воспользуйтесь этим вариантом, если вам по каким-либо причинам неудобно форматировать новый диск в формате exFAT.
Источник
2022 Top 3 USB Format Tools For Mac Are Here to Help
Are you looking for a reliableВ format tool that canВ format and changeВ the file system of your USB flash drive or external USB driveВ to make it detectable on Mac computers?
Follow through the belowВ guide, you’ll learn how to setВ a suitable file system forВ your USB flash drive and make it detectableВ on Mac:
This guide also works to format your external hard drive, SD card, hard drive, etc., devices to recognizedВ on Mac computers.В
#1. Pick The Best USB Format Tool for Mac — 3 Top Tools
The first thing that comes up in your mind could be which tool that you can use to format the USB flash drive or external USB drive, right?
Here, in this part, we’ve collected 3 top recommended USB format tools that can help you fully format and reset the file system of your device to be usable on Mac:В
| USB Format Tool for Mac | Pros | Format Process |
|---|---|---|
| Disk Utility for Mac |
|
|
| Terminal Command for Mac |
|
|
| Format Software for Windows |
|
|
So how to select a suitable tool to format your USB flash drive or external hard drive for Mac? For a quick guide, read the tips here:
- 1. To format a USB flash drive on Mac, Disk Utility is better a better choice. The terminal is far more complex for beginners.
- 2. To prepare a USB flash drive ready for Mac on a Windows computer, you can try the third-party format software.
After picking the right USB format tool, you can now move to the next guide and decide which format that you should set for the USB flash drive or external hard drive.
#2. Set a Suitable File SystemВ for USB or External USB DriveВ on Mac
Note that Windows uses NTFS butВ Mac can’t write files to volumes with NTFS format. Mac computer can only read NTFS devices.
Here is a list of macOS supported file systemsпјљ
- Apple File System — APFS: Used by macOS 10.13 or later.
- Mac OS Extended: Used by macOS 10.12 or earlier.
- FAT32 and ExFAT: Compatible with both Windows and macOS.
Usually, both APFS and Mac OS Extended file systems are mostly used on Mac hard drives, while the FAT/FAT32 and exFAT are common formats for external storage devices.
So how to set a suitable format for your USB flash drive or external USB drive? Here areВ our suggestions:
- If theВ USBВ drive is less than 64GB, set it as FAT32. If it’s larger than 64GB, set its file system as exFAT.
- If you tend to use it as a Time Machine backup disk, format it as Mac OS Extended Journaled.
#3. Format USB Drive forВ MacВ on Mac/Windows Computers
So how do IВ format a USBВ stick on a Mac computer? Here, we’ll show you how to format your USB flash drive or external hard drive for Mac usage.В
- If you want to directly format the USB on your Mac computer, follow Method 1 and Method 2.
- If you want to format USB on your Windows computer and make it usable on Mac, try Method 3.
Method 1. Format USB or External Hard Drive for Mac using Mac Disk utility
Disk UtilityВ offers users similar features in the disk management tool, such as to create, delete, resize, merge and format partitions. You can try the following steps to format USB or external hard drive for Mac with Disk Utility on Mac:
Step 1. Connect the USB or external hard drive to your Mac computer.
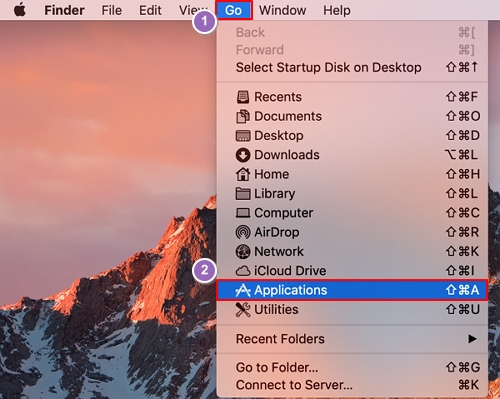
Step 2. On the Apple menu, click «Go» and select «Applications».
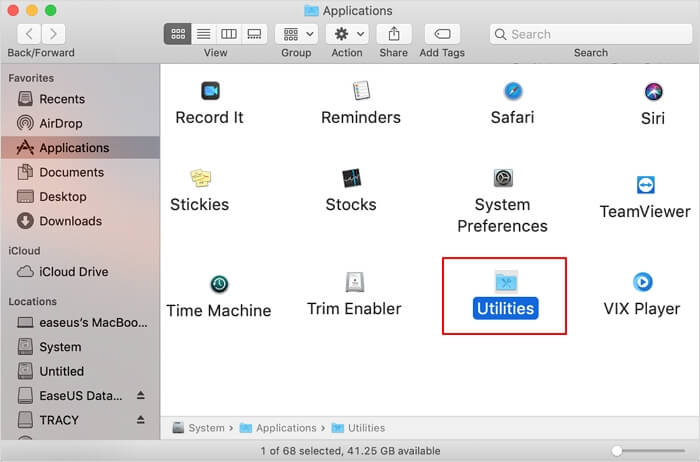
Step 3.В Double-click «Utilities» in the Applications window.
Step 4.В Double-click to open Disk UtilityВ in the Utilities window to open it.
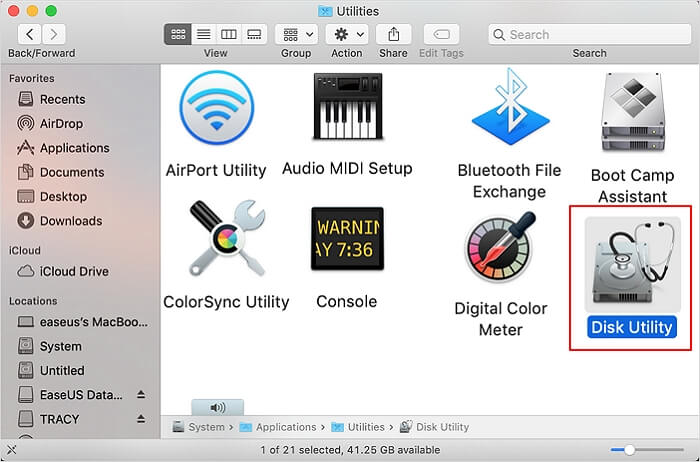
Step 5.В Select your USB or external drive, clickВ «Erase», then click the FormatВ columnВ and select a format for your USB.
For example, Mac OS Extended (Journaled) or MS-DOS (FAT).
Step 6.В Reset the drive name and click «Erase» to confirm the operationВ on the next pop-up window.
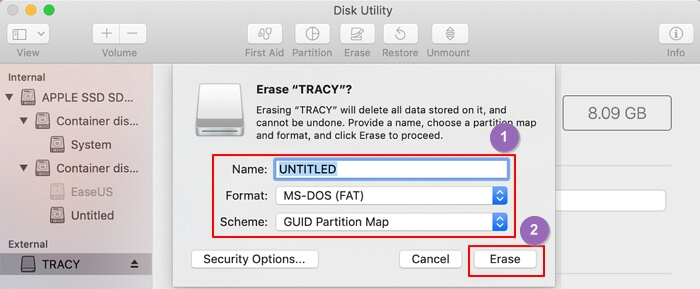
Wait for the process to complete and then you’ll get a new Mac compatibleВ file system on your external hard drive or USB, which will make your device detectableВ and workable onВ Mac.
Method 2. Format USB Drive for Mac using Terminal Command
Terminal command lines work the same as Disk Utility, however, it’s more complex for beginners. If you prefer to use this method, make sure that you follow the steps below carefully:
Step 1. Connect the USB flash drive or external hard driveВ to your Mac computer.
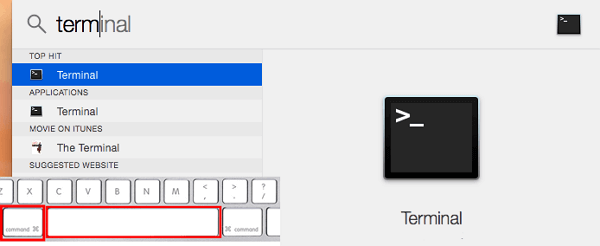
Step 2.В PressВ cmd + space to run Spotlight, type: terminal, and hit Enter.
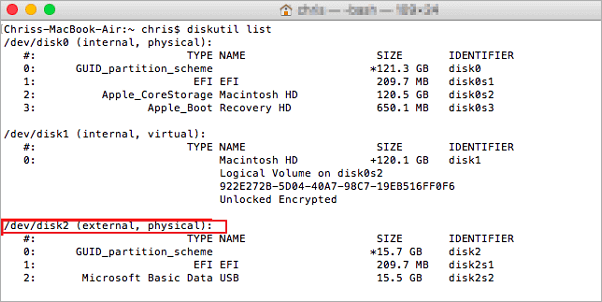
Step 3. Type: diskutil list and find out which disk is your USB drive.
Step 4. Type: sudo diskutil eraseDisk FAT32 MBRFormat /dev/disk2В and press Return.
- sudo gives you user right.
- Diskutil calls disk utility program.
- eraseDisk commands to format.
- FAT32В isВ the file system. (You can also replace it with another file system.)
- MBRFormat tells disk utility to format with a Master Boot Record.
- /dev/disk2 is the location of the USB drive.
Step 5.В Wait for the process to complete and then close Terminal.
After this, you can use your USB on Mac in a detectable and readable format now.
Method 3. Format USB or External Hard Drive for MacВ on a Windows PC
If you need a simpler format tool to format USB or external hard drive to FAT32 on a Windows computer so to make itВ work on Mac, you can apply a third-party format tool for help.
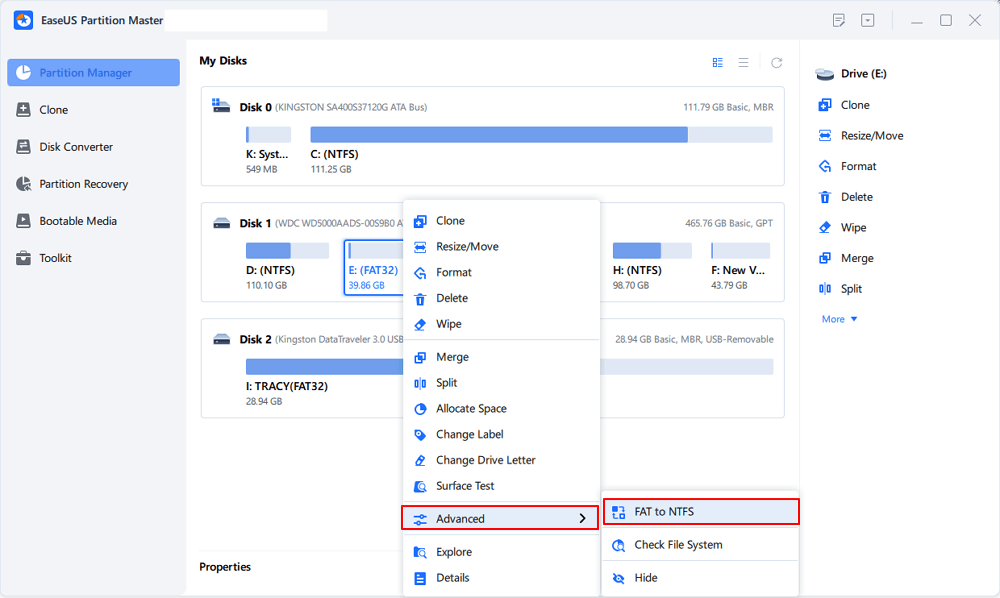
EaseUS partition software is a popular diskВ management tool that is available for resolve all types of partition managementВ jobs such as format disk partition, extend system partition, settle low disk space problems.
оћѓ ChristmasВ Sale,В hugeВ discount
It allows you to format a USB or external hard drive on your Windows PC in only 4 simple steps:
- Right-click the external drive or USBВ you intend to format and choose «Format».
- Set the Partition label, File system (NTFS/FAT32/EXT2/EXT3/EXT4/exFAT), and Cluster size, then click «OK».
- Click «OK» to continue.
- Click the «Execute Operation» buttonВ and click «Apply» to format the hard drive partition.
After this, you can connect the formattedВ external hard drive or USB drive to your Mac computer and use it to save data by then.В
You May Also Interest In:

Note that if you want to transfer a USB flash drive from NTFS to FAT32 without formatting it as you have saved some important data on it, EaseUS Partition Master can help.
Pick a Right USB Format Tool andВ Format Your USB Drive for Mac Now
On this page, we presented 3 reliable USB format tools for you to format a USB flash drive or external hard drive on Mac or Windows computers, making the storageВ deviceВ usable on Mac.
For Mac beginners, Disk Utility is good for you to try. As for Windows users who want to format a USB drive for Mac, EaseUS partition manager software — Partition Master worths your trust.
оћѓ ChristmasВ Sale,В hugeВ discount
After picking the right tool, you can just revert to the right tutorial, take action to format your driveВ usable for Mac computer now.
Источник


