- Check your Apple ID device list to see where you’re signed in
- See where you’re signed in
- Use your iPhone, iPad, iPod touch, or Apple Watch to see where you’re signed in
- Use your Mac to see where you’re signed in
- Use your PC to see where you’re signed in
- Use the web to see where you’re signed in
- Add a device to the list
- Remove a device from the list
- Use your iPhone, iPad, or iPod touch to remove a device
- Use your Mac to remove a device
- Use your PC to remove a device
- Use the web to remove a device
- Permanently remove a device from your account page
- What happened to iTunes?
- Now there’s an app for every media type
- Use Finder to sync and manage your iPhone, iPad, and iPod touch
- Upgrade your iTunes library
- Here are some things to know
- Where’s my media?
- All of your music is now in the Apple Music app
- Everything you watch is now in the Apple TV app
- Find podcasts in the Apple Podcasts app
- Listen to audiobooks in the Apple Books app
- If you think your Apple ID has been compromised
- Signs your Apple ID has been compromised
- Gain control of your Apple ID
- Know which Apple ID is signed in to your device
- Make sure your Apple ID is secure
Check your Apple ID device list to see where you’re signed in
Learn which devices appear in your Apple ID device list, how to see your device’s details, and how to remove a device, if necessary.
See where you’re signed in
Use the steps below to see the devices that you’re currently signed in to with your Apple ID.
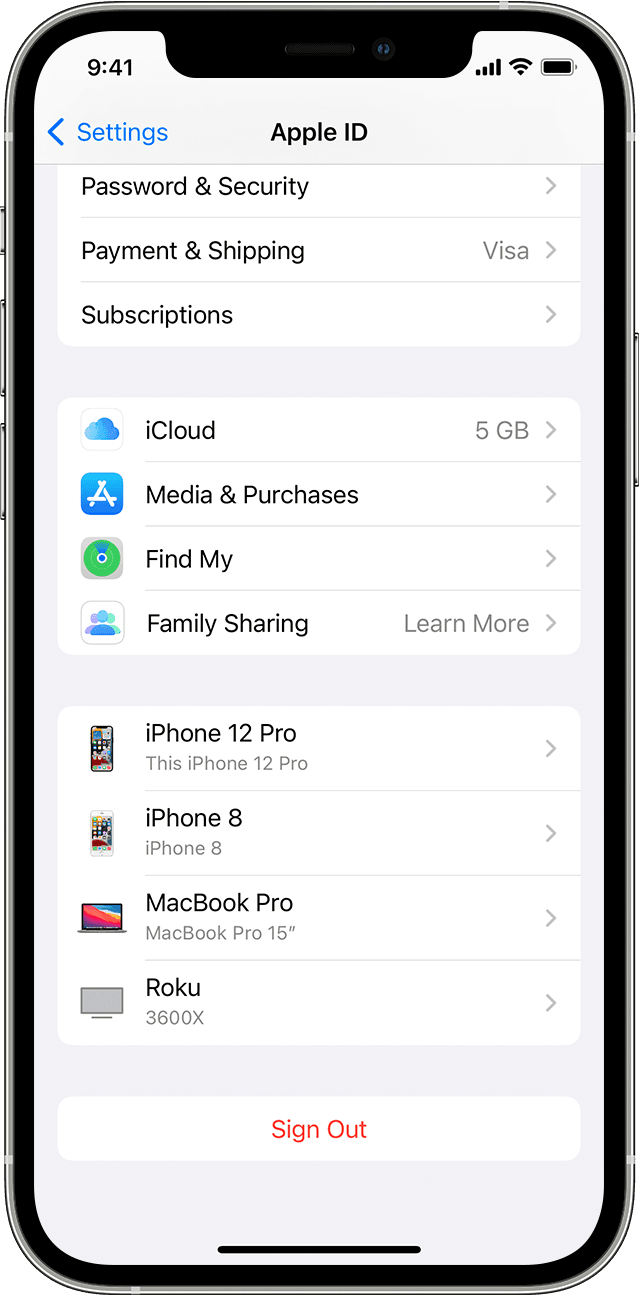
Use your iPhone, iPad, iPod touch, or Apple Watch to see where you’re signed in
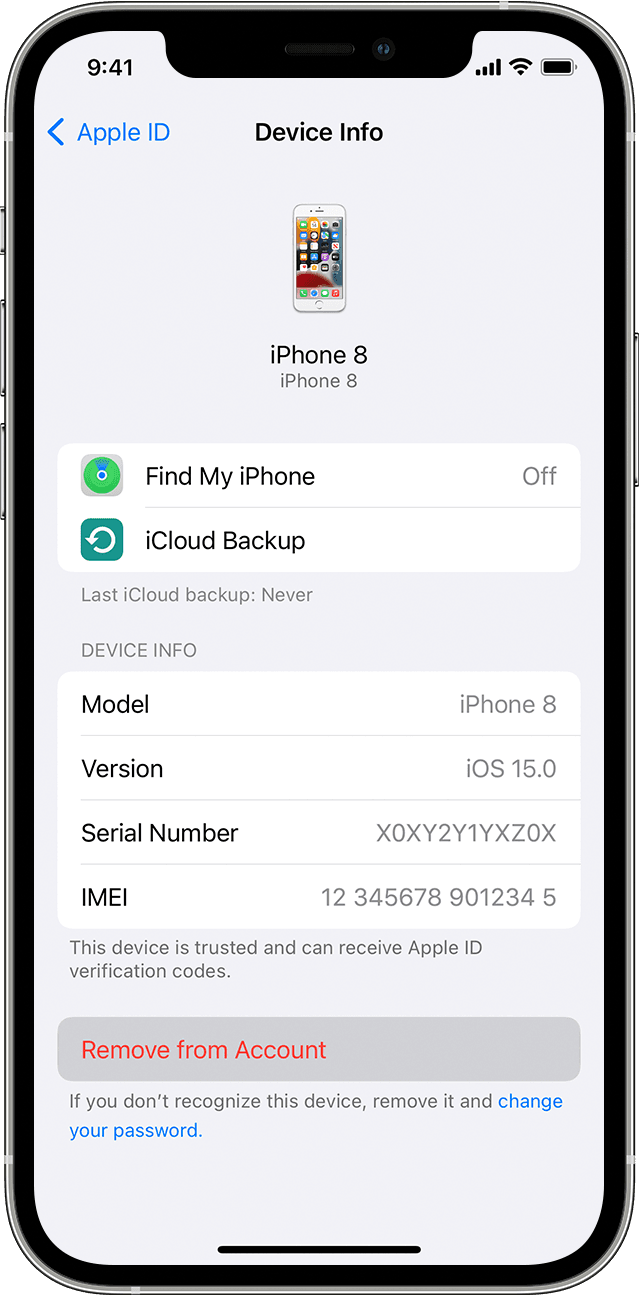
- Tap Settings > [your name], then scroll down.
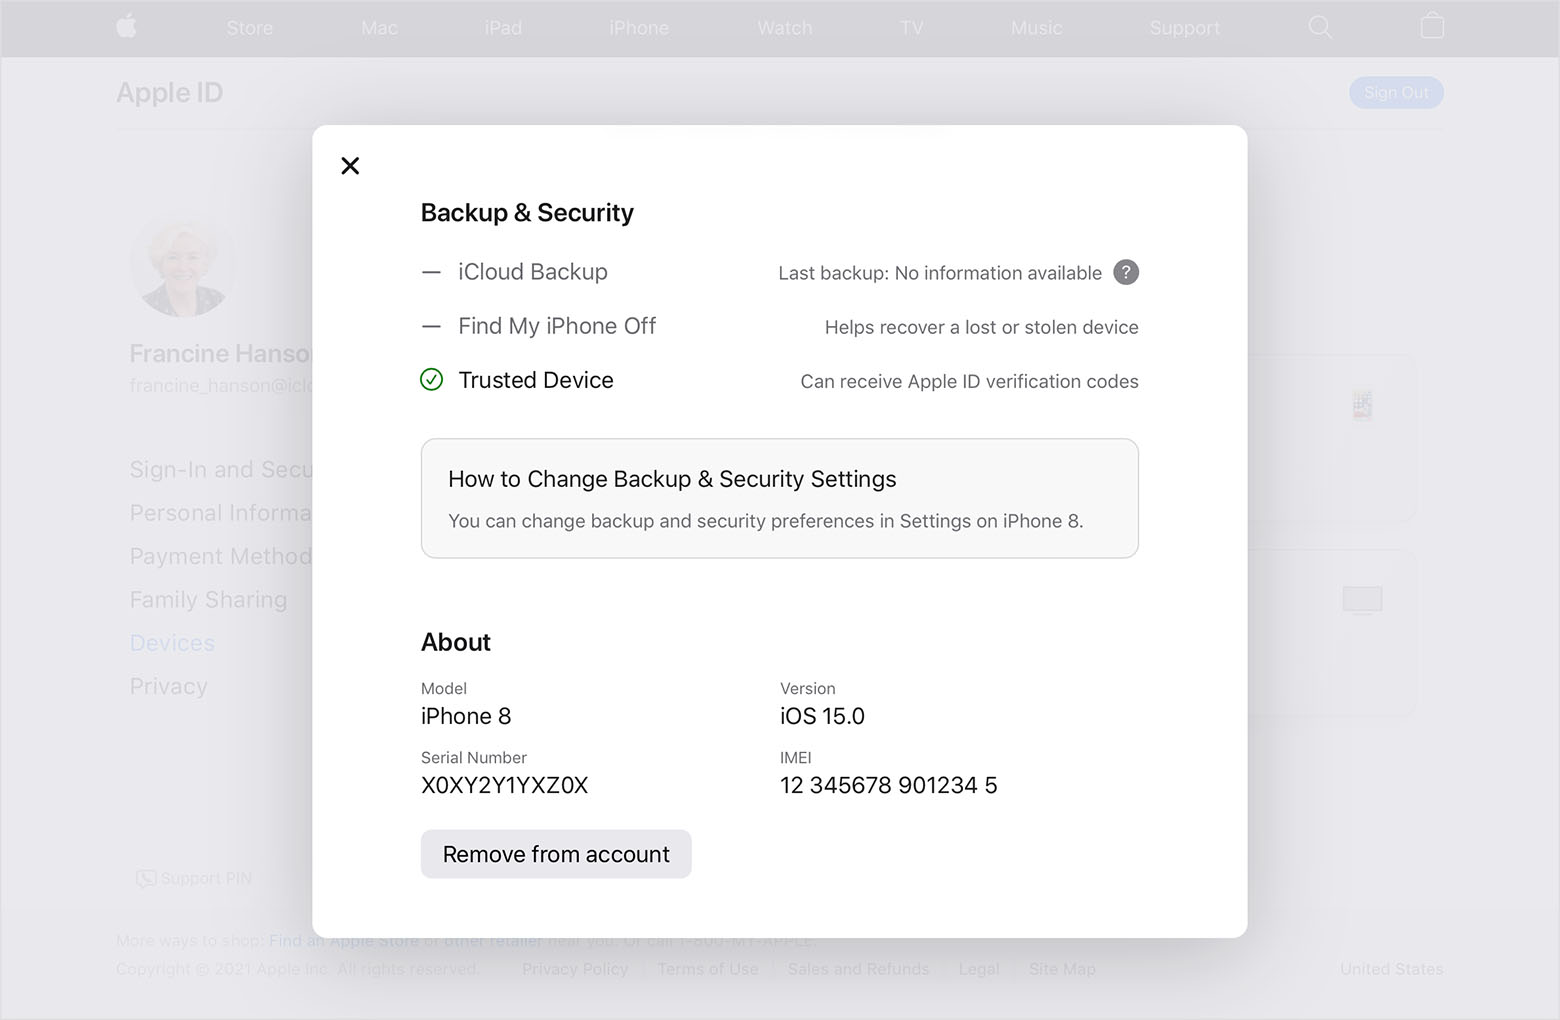
- Tap any device name to view that device’s information, such as the device model, serial number, OS version, and whether the device is trusted and can be used to receive Apple ID verification codes. The information might vary depending on the device type. You might need to answer your security questions to see device details.
![]()
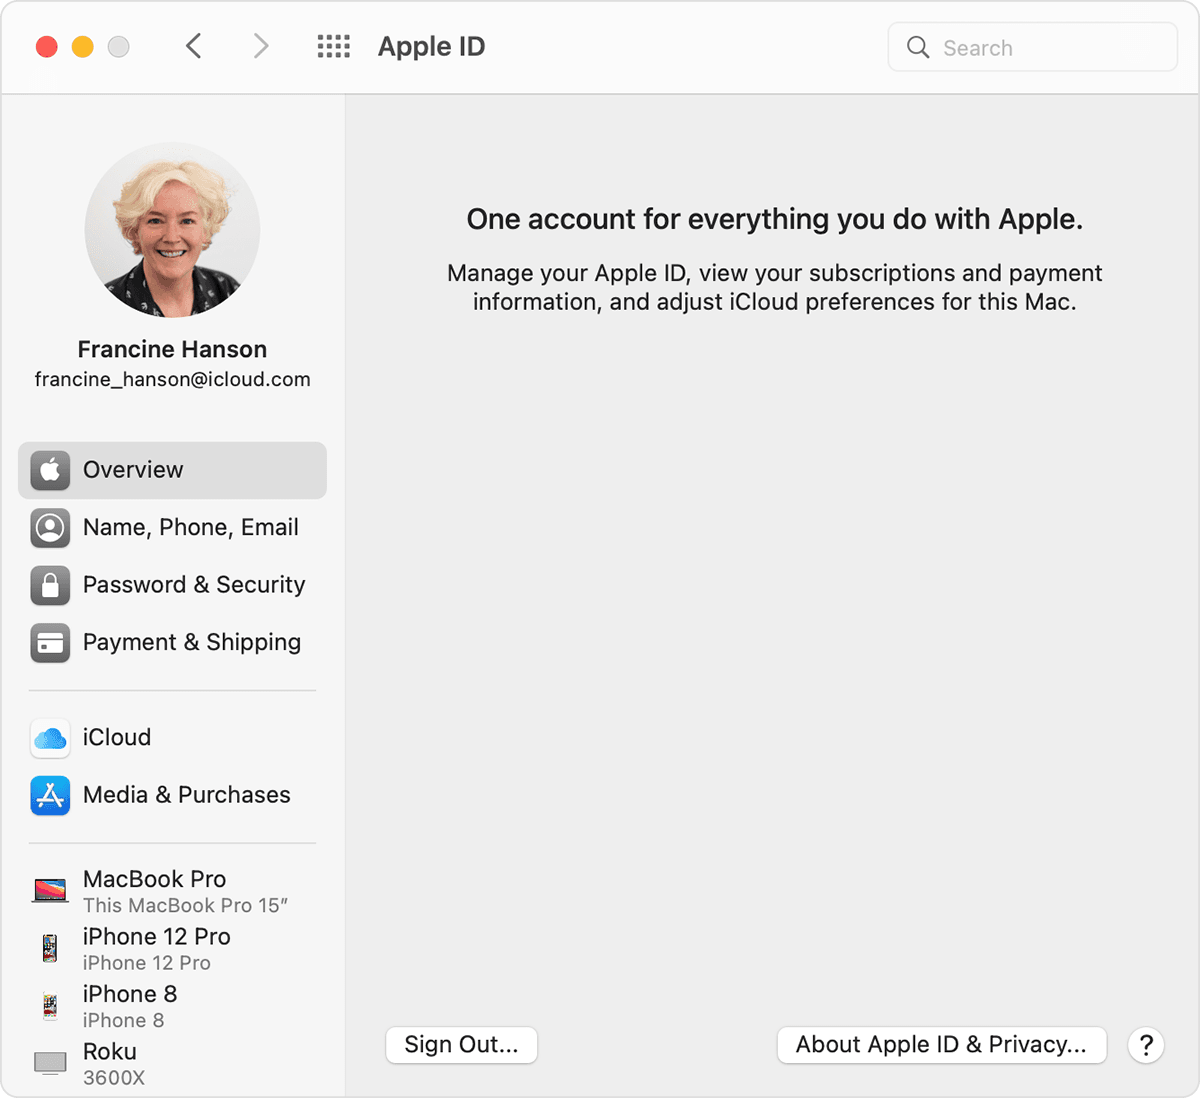
Use your Mac to see where you’re signed in
- Choose Apple menu > System Preferences.
- Click Apple ID.

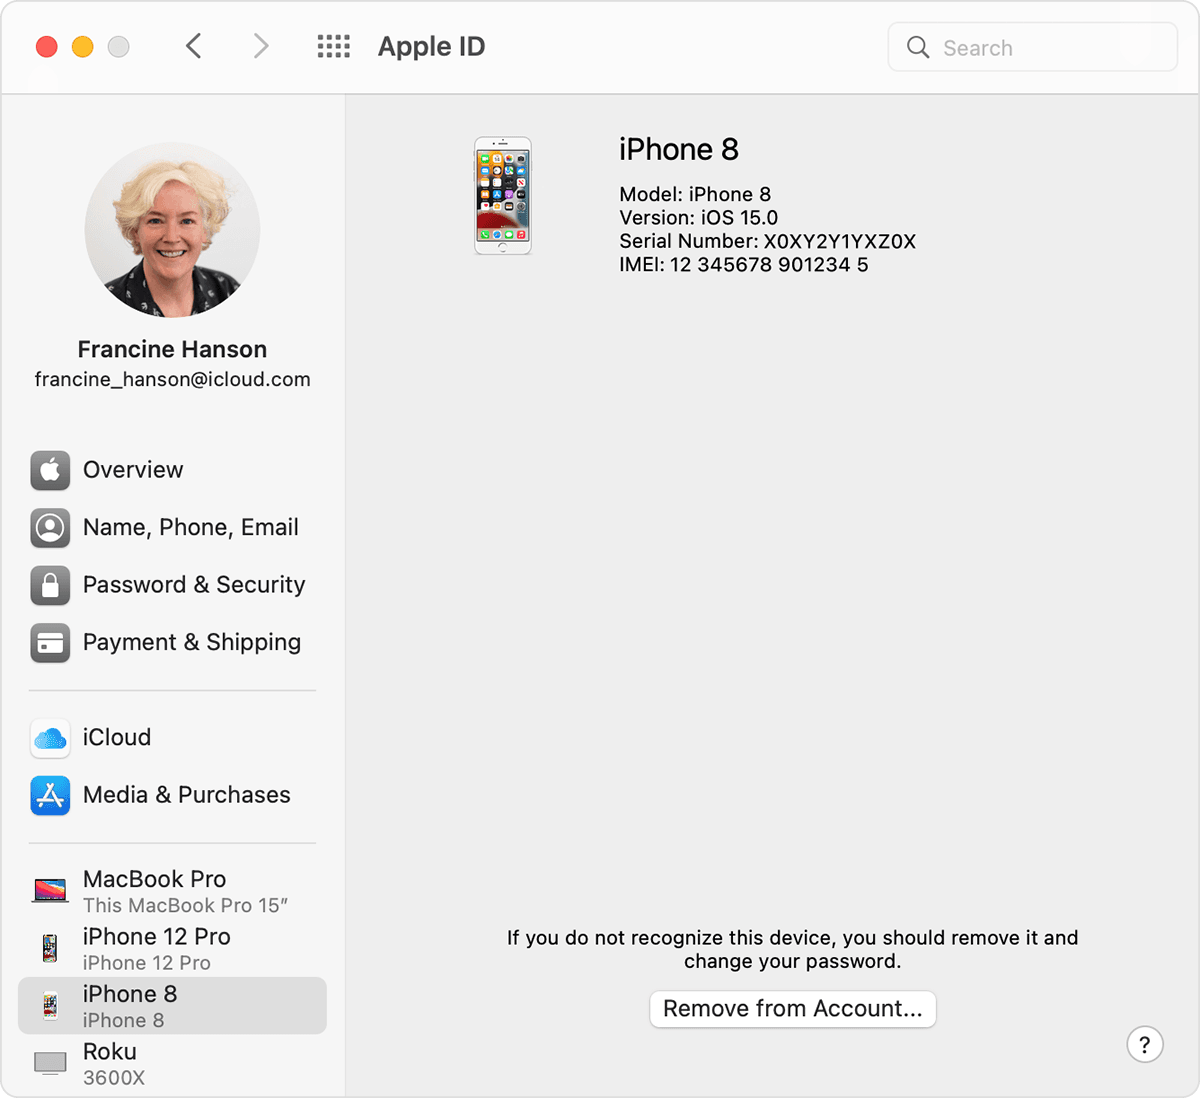
- Click any device name to view that device’s information, such as the device model, serial number, and OS version. The information might vary depending on the device type. You might need to answer your security questions to see device details.
Use your PC to see where you’re signed in
- Open iCloud for Windows.
- Click Account Details, then click Manage Apple ID.
- Click any device name to view that device’s information, such as the device model, serial number, and OS version. The information might vary depending on the device type.
Use the web to see where you’re signed in
From the Devices section of your Apple ID account page, you can see all of the devices that you’re currently signed in to with your Apple ID, including Android devices, consoles, and smart TVs:
- Sign in to appleid.apple.com,* then select Devices.
- If you don’t see your devices right away, click View Details and answer your security questions.
- Click any device name to view that device’s information, such as the device model, serial number, and OS version. The information might vary depending on the device type.

* Depending on how you created your Apple ID, you might be required to provide additional information.
Add a device to the list
To add a device to the list, you need to sign in with your Apple ID. After you sign in on a device with your Apple ID, that device appears in the list. Here’s where you need to sign in:
- For iOS or iPadOS, sign in to iCloud, iMessage, FaceTime, iTunes & App Stores, or Game Center on the device. You can also see your paired Apple Watch.
- For macOS or Windows 10 and later, sign in to iCloud on the device.
- For Apple TV HD and later, sign in to the iTunes and App Store on the device.
- For Apple TV (3rd generation) and earlier, sign in to the iTunes Store on the device.
Your AirPods will appear in the Find My app, but they won’t appear in your Apple ID device list. You can remove your AirPods from your account using Find My. Devices running iOS 7 or earlier or OS X Mavericks or earlier won’t appear in your device list.
Remove a device from the list
If your device is missing, you can use Find My to find your device and take additional actions that can help you recover it and keep your data safe. If you aren’t using your device anymore, or if you don’t recognize it, you might want to remove it from the list.
If you set up two-factor authentication for your Apple ID, removing a device will ensure that it can no longer display verification codes. It also won’t have access to iCloud and other Apple services, including Find My, until you sign in again with two-factor authentication. The device won’t reappear in the list unless you sign in again.
Use your iPhone, iPad, or iPod touch to remove a device
- Tap the device to see its details, then tap Remove from Account.
- Review the message that appears, then tap again to confirm that you want to remove the device.
- Want to permanently remove the device from your account page?
![]()
Use your Mac to remove a device
- Choose Apple menu > System Preferences.
- Click Apple ID.
- Click the device to see its details, then click Remove from Account.
- Review the message that appears, then click again to confirm that you want to remove the device.
- Want to permanently remove the device from your account page?
Use your PC to remove a device
- Open iCloud for Windows.
- Click Account Details, then click Manage Apple ID.
- Click the device to see its details, then click Remove from Account.
- Review the message that appears, then click again to confirm that you want to remove the device.
- Want to permanently remove the device from your account page?
Use the web to remove a device
- Sign in to appleid.apple.com, then select Devices.
- Click the device to see its details, then click «Remove from account.»
- Review the message that appears.
- Click again to confirm that you want to remove the device.
- Want to permanently remove the device from your account page?
Permanently remove a device from your account page
If you’re still signed in with your Apple ID on the device, it might reappear on your account page the next time your device connects to the Internet. To permanently remove the device from your account page, sign out of iCloud, iTunes & App Stores, iMessage, FaceTime, and Game Center on that device, or erase that device.
Источник
What happened to iTunes?
With macOS Catalina, your iTunes media library is now available in the Apple Music app, Apple TV app, Apple Books app, and Apple Podcasts app. And Finder is where you can manage and sync content on your iPhone, iPad, and iPod touch.
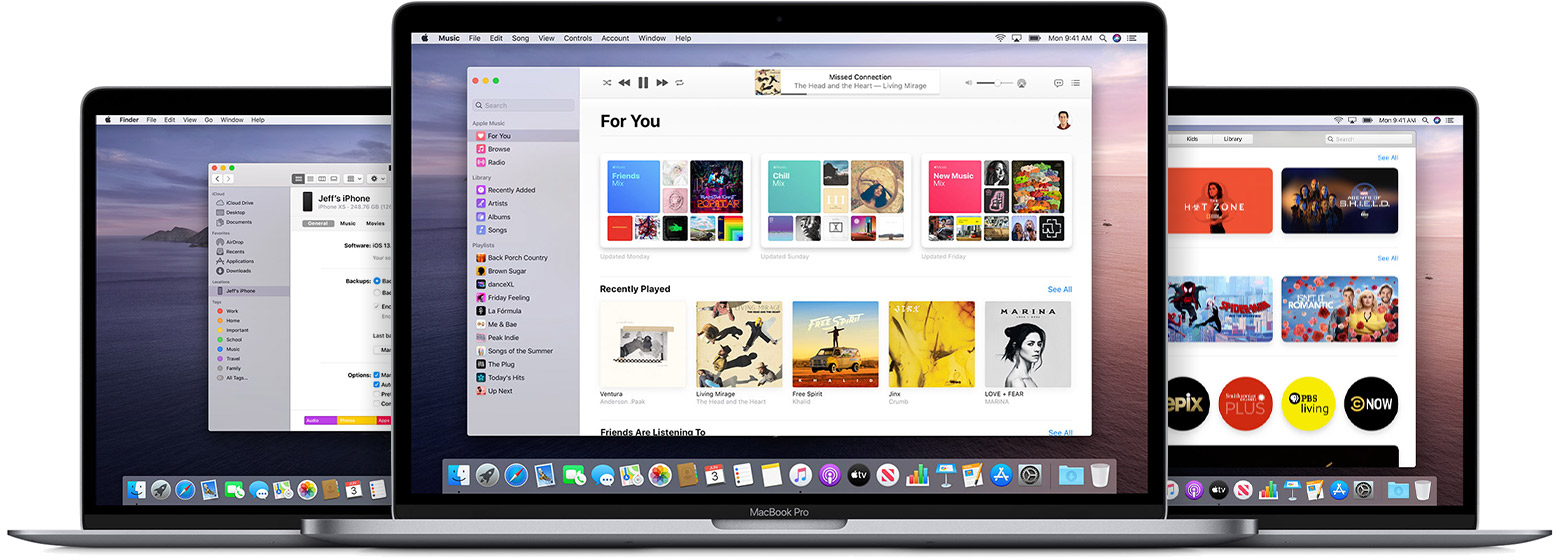
Now there’s an app for every media type
With macOS Catalina, your music, videos, podcasts, and audiobooks are organized in to their own dedicated apps — the Apple Music app, Apple TV app, Apple Podcasts app, and Apple Books app. You can also access your iTunes Store purchases in these apps.
If you have a PC, you can continue to use iTunes for Windows to manage your media library, make purchases, and manually sync and manage your iPhone, iPad, or iPod touch.
Use Finder to sync and manage your iPhone, iPad, and iPod touch
Finder is the new place to back up, update, or restore your iPhone, iPad, and iPod touch. Just connect your device to your Mac and it appears in the Finder sidebar. And you can easily drag and drop files to your device.

Upgrade your iTunes library
After you update to macOS Catalina, just open the Apple Music app or Apple TV app to use your iTunes library in the new apps. Have multiple iTunes libraries? Learn how to switch between them in macOS Catalina.
If you open the Apple Podcasts app or Apple Books app first, you won’t see any of your media until you open the Apple Music app or Apple TV app.
Here are some things to know
- The Apple Music app and Apple TV app read the contents of your iTunes library — so don’t delete your iTunes library.
- If you open the Apple Music app and don’t see all of your album artwork, leave the Apple Music app open so your album artwork can finish downloading.
- If you previously used multiple iTunes libraries, your audiobooks are imported in to the Apple Books library and podcasts are imported in to the Apple Podcasts library on your computer.
Where’s my media?
Here’s where you can find your entire media collection, access your iTunes Store purchases, and synced libraries.
![]()
All of your music is now in the Apple Music app
The Apple Music app is where you can find all of your music, including music that you imported in to iTunes, purchased from the iTunes Store, and playlists and smart playlists that you created in iTunes. And if you subscribe to Apple Music, you can stream and download millions of songs, and access your entire music library across all of your devices.
Looking for the iTunes Store?
If you don’t see the iTunes Store in the sidebar, here’s how to find it:
- Open the Apple Music app.
- In the menu bar, choose Music > Preferences.
- Go to the General tab and select iTunes Store.
- Click OK.
![]()
Everything you watch is now in the Apple TV app
The Apple TV app is the new home for all of your movies, TV shows, and home videos — including your purchases from iTunes. Browse movies and TV shows that you can buy, rent movies, and subscribe to just the channels that you want to watch. And soon you can discover new favorites with Apple TV+.
![]()
Find podcasts in the Apple Podcasts app
Find all of the shows that you’ve subscribed to or added to iTunes in the Apple Podcasts app. Continue listening to your favorite podcast episodes. And discover new shows that you might like based on the ones that you’re already listening to.
Listen with the Apple Podcasts app on your iPhone or iPad .
Listen with the Apple Podcasts app on your Mac.
![]()
Listen to audiobooks in the Apple Books app
Find your audiobooks, including the ones that you purchased from iTunes, in the Apple Books app. Discover new books to read in the Book Store. Or buy audiobooks from the new Audiobook Store so you can listen on the go.
The Apple Music app, Apple TV app, Apple Podcast app, and Apple Books app aren’t available in all countries and regions. Learn what’s available in your country or region.
Источник
If you think your Apple ID has been compromised
Are you concerned that an unauthorized person might have access to your Apple ID? These steps can help you find out and regain control of your account.
Signs your Apple ID has been compromised
Your Apple ID might be compromised if you receive an account notification from Apple for a change you didn’t make, or if you notice account details or changes you don’t recognize. For example:
- You receive an email or notification that your Apple ID was used to sign in to a device you don’t recognize or did not sign in to recently (for example, «Your Apple ID was used to sign in to iCloud on a Windows PC»).
- You receive a confirmation email from Apple that your Apple ID password was changed or your account information was updated, but you don’t remember making any changes.
- Your device was locked or placed in Lost Mode by someone other than you.
- You see messages you didn’t send, or items you didn’t delete.
- You see charges or notices for purchases that you didn’t make. Learn what to do if you see an unfamiliar iTunes Store or App Store charge on your credit or debit card statement.
- Your password no longer works, or it might have been changed or locked.
- You don’t recognize some or all of your account details.
If you received an email, text message, or phone call that you’re not sure is valid or you think might be phishing, here are some tips to help determine its legitimacy.
Gain control of your Apple ID
If you think your Apple ID is compromised, use these steps to gain control of it and review your account information:
- Sign in to your Apple ID account page. If you can’t sign in or you receive a message that the account is locked when you try to sign in, try to reset or unlock your account.
- Change your Apple ID password and choose a strong password.
- Review all the personal and security information in your account. Update any information that isn’t correct or that you don’t recognize, including:
- Your name.
- Your primary Apple ID email address.* If you need to change your email address, update the features and services that you use with Apple ID, so that each one is using your updated Apple ID.
- All alternate email addresses, rescue email addresses, and phone numbers.
- The devices that are associated with your Apple ID, if you’ve already set up two-factor authentication.
- Security questions and answers. If you think they might be easy to guess, you should change your security questions.
- Check with your email address* provider to make sure that you control every email address associated with your Apple ID. If you don’t control the email addresses associated with the Apple ID, you should change the password for the email address or use a different email address.
- Set up two-factor authentication for your Apple ID. This additional security feature is designed to prevent anyone from accessing your account, even if they know your password.
* In China mainland and India, you can use your phone number as your Apple ID.
If you completed the steps above and think your account might still be compromised, contact Apple Support.
Know which Apple ID is signed in to your device
If you’re signed in on your device with an Apple ID that you don’t recognize, use these steps to sign out, then back in with a different Apple ID. To make sure that you’re signed in to Apple IDs that only you control or trust, you can check the following settings on each of your devices:
iPhone, iPad, or iPod touch:
- Settings > [your name]
- Settings > [your name] > iTunes & App Store
- Settings > Messages > Send & Receive
- Settings > FaceTime
- System Preferences > Apple ID
- System Preferences > Internet Accounts
- Messages > Preferences > Accounts
- Facetime > Preferences > Settings
- Mail > Preferences > Accounts
- Calendar > Preferences > Accounts
You should also check iCloud for Windows, your AirPort Time Capsule or other AirPort Base Station, and your Apple TV (for iCloud Photos or Home Sharing).
Make sure your Apple ID is secure
Because you use your Apple ID for so many Apple products and services, you should make sure that your Apple ID is as secure as possible. You should be the only person who knows your password and can sign in with your Apple ID. If someone you don’t know or don’t trust can sign in with your Apple ID, your account is not secure.
Your Apple ID might not be secure for the following reasons:
- Someone else created an Apple ID on your behalf, or you’re using an Apple ID that was already signed in when you received your device.
- You’re sharing an Apple ID with family or friends. Your Apple ID is your personal account. If you want to share purchases with a family member, use Family Sharing. With Family Sharing, you can share a calendar, photos, reminders, and more without sharing your Apple ID.
- You don’t recognize the Apple ID that is signed in on your device.
- You shared your password with someone else intentionally or unintentionally. For example, someone else selected your password for you, you told someone your password, or you entered your password on a phishing site.
- You don’t have control of the email address or phone number associated with your Apple ID.
- Your password is weak or is compromised.
- You share your devices with someone else, your devices are not protected by a passcode, or your passcode is easy to guess.
Источник


