- Distributing Apps on Apple Business Manager and Apple School Manager
- Offering a Reduced Price for Educational Institutions
- Making a Custom App Available Only to Specific Organizations
- Finding the Organization ID
- Learn More
- Get Volume Purchase Program (VPP) Credit securely from Apple
- Buy VPP Credit
- Use the secure inbox
- Resend VPP Credit
- Apple volume purchase program
- Обновление до Apple School Manager
- Обновление до Apple Business Manager
- Apple Deployment Programs
- Apple Volume Purchase Program (VPP)
- Adding Apple VPP Account(s) to Systems Manager
- Renewing a VPP Token
- VPP Deployment Methods
- Device Assignment
- VPP Apple ID User Assignment
- Invite User to Receive Licenses
- Grant License for Desired App to User
- Deploying Apps with Systems Manager
- Revoking a User’s App License
- Apple Books (iBooks) App License
- Location Based VPP in Apple School Manager & Apple Business Manager
- Troubleshooting VPP Installs
Distributing Apps on Apple Business Manager and Apple School Manager
All apps on the App Store are automatically available for volume purchase for the same price in Apple Business Manager and Apple School Manager, which is where businesses and educational institutions download apps for volume distribution. Alternatively, you can offer your apps to educational institutions for a reduced price or identify specific organizations you’d like to let download your app. This includes the ability to distribute proprietary apps for internal use within your organization. Apple Business Manager and Apple School Manager are available in many regions.
Offering a Reduced Price for Educational Institutions
You can choose to provide your app for 50% of its listed price for educational institutions purchasing quantities of 20 or more. Please note that this option is only available before your app has been approved. Once you’ve created an App Store Connect app record and uploaded your app using Xcode, complete the following steps.
- From the App Store Connect Homepage, click My Apps, and select your app from the list.
- Under Pricing and Availability, go to the App Distribution Methods section.
- Select Public.
- Select “Offer a reduced price on Apple School Manager for volume purchases.”
Once your app is approved, it will be available in the Apps and Books section of Apple Business Manager or Apple School Manager.
Making a Custom App Available Only to Specific Organizations
A custom app is an app you’ve created for a specific organization, including a proprietary app for your organization’s internal use. You maintain the code and retain your intellectual property rights. You can offer a tailored look and feel, specific functionality for a process or workflow, special configuration for IT environments, security features for company data, and custom features for partners, clients, dealers, franchises, or employees.
You can specify one or more organizations that can see and download the app on Apple Business Manager or Apple School Manager. They can then distribute it through Mobile Device Management or redemption codes. Please note that this option is only available before your app has been approved.
Enter the Organization ID to make the app visible in the organization’s account on Apple Business Manager or Apple School Manager. For organizations still using the legacy Volume Purchase Program, you can assign an app to their volume purchasing Apple ID.
- From the App Store Connect Homepage, click My Apps, and select your app from the list.
- Under Pricing and Availability, go to the App Distribution Methods section.
- Select Private.
- Under Type, choose either Organization ID or Apple ID, and enter the required information.
If your app contains sensitive data, provide sample data and authentication for the App Review team. Once your app is approved, the organization will be able to see it in the Custom Apps section of Apple Business Manager or Apple School Manager.
You’ll also be able to invite testers to beta test your app before distribution.
Finding the Organization ID
Organizations can find their Organization ID by following these steps.
- Sign in to Apple Business Manager or Apple School Manager with an administrator account.
- In the sidebar, click Settings.
- Click Enrollment Information. The Organization ID appears in the first section under Organization Information.
Learn More
Get support and additional details on distributing custom apps.
Feedback Assistant
Submit bug reports and request enhancements to APIs and developer tools.
Send us feedback
Developer Forums
Ask questions and find answers by Apple engineers and other developers.
Contact Us
Tell us how we can help and we’ll find a solution by phone or email.
Источник
Get Volume Purchase Program (VPP) Credit securely from Apple
After your organization buys VPP Credit from Apple, your content purchaser can use the secure inbox to view order history and download redemption codes.
Buy VPP Credit
As an Apple School Manager or Apple Business Manager customer, your organization can buy VPP Credit from Apple or an Apple Authorized Reseller. When a member of your organization buys VPP Credit, they’ll provide these details:
- Credit value, which the buyer should calculate based on the total amount of money needed for the content purchaser account
- Institution or Company name
- Name and Apple ID of a registered content purchaser
We’ll make sure that the content purchaser account is valid. And when the order is ready, we’ll send an email with a link to a secure inbox. Your content purchaser will use this secure inbox to access VPP Credit for your organization.
Use the secure inbox
You can sign in to the secure inbox with your content purchaser Apple ID. After signing in, you can download a spreadsheet with a redemption code for each VPP Credit order. You can redeem and use this code to buy content using Apps and Books in Apple School Manager or in Apple Business Manager.
Resend VPP Credit
VPP Credit is available to download for 90 days from the secure inbox. After that time, your organization can resend the VPP Credit if they purchased it through your institution’s custom Apple Online Store.
- Go to your custom Apple Online Store.
- Go to the Account menu and choose Check Order Status.
- Sign in with the same Apple ID that you used to buy the VPP Credit. Or you can enter the order number.
- Click Resend Credit.
If you didn’t purchase the credit through your custom Apple Online Store, AppleCare can resend the VPP Credit.
- Send a request using the Business and Education Support form.
- Enter your contact information and company name.
- For the company type, select Business or Education.
- For the issue, select Other.
- In the «Details of your issue» section, include each VPP Credit order number and request that your expired VPP Credit be resent to your Apple ID.
- Click Submit.
Источник
Apple volume purchase program
Программы развертывания Apple — Device Enrollment Program (DEP) и Volume Purchase Program (VPP) с 1 декабря 2019 года перестанут существовать. Deployment Programs — DEP и VPP будут объединены в одну и их заменит единая программа — Apple Business Manager (для коммерческих компаний) и Apple School Manager (для образовательных учреждений).

Для того, чтобы продолжить использование программой регистрации устройств (DEP) и программой корпоративных закупок (VPP), нужно обновить свою учетную запись до Apple Business Manager (для компаний) или Apple School Manager (для школ, колледжей и ВУЗов).
Обновление до Apple School Manager
Если ваше учебное заведение в настоящее время использует программы развертывания Apple — DEP или VPP, вам нужно выполнить обновление до Apple School Manager.
Apple School Manager — это служба, позволяющая покупать содержимое, настраивать автоматическую регистрацию устройств с помощью системы Mobile Device Management (MDM), а также создавать учетные записи для учащихся и сотрудников учебного заведения.
Интернет-портал Apple School Manager предназначен для технических менеджеров, ИТ-администраторов, сотрудников учебного заведения и инструкторов.
Для обновления своей учетной записи Apple Enrollment Program до Apple School Manager* необходимо авторизоваться на сайте deploy.apple.com или school.apple.com с использованием учетной записи агента учебного заведения и далее следовать инструкциям.
Обновление до Apple Business Manager
Если ваша компания в настоящее время использует программу регистрации устройств (DEP), вам нужно выполнить обновление до Apple Business Manager.
Если ваша организация использует только программу корпоративных закупок (VPP), вы можете зарегистрироваться в Apple Business Manager, а затем пригласить существующих корпоративных закупщиков в свою новую четную запись Apple Business Manager для использования DEP.
Apple Business Manager дает возможность покупать приложения и контент (с помощью VPP), а также настраивать автоматическую регистрацию устройств (DEP) с помощью вашего MDM.
Интернет-портал Apple Business Manager предназначен для технических менеджеров и ИТ-администраторов (для EFB-администраторов — если рассматривать авиационную отрасль).
Для обновления своей учетной записи Apple Enrollment Program до Apple Business Manager* необходимо авторизоваться на сайте deploy.apple.com или business.apple.com с использованием учетной записи агента и далее следовать инструкциям.
После обновления до ABM будет получен доступ к:
- Учетным записям и их настройкам;
- MDM-серверам;
- MDM-устройствам;
- Токенам серверов;
- Заказам устройств;
- и др. возможностям, настроенным для учетной записи.
После получения доступа к Apple Business Manager у вас не будет доступа к сайту Apple Deployment Program.
Процесс «миграции» со старой классической учетной записи Apple Deployment Program на Apple School Manager или на Apple Business Manager заключается в отправке заявки на регистрацию через сайт deploy.apple.com или business.apple.com. В заявке необходимо указать все данные по компании/учебному заведению (юридическое название, DUNS-номер, телефон, адрес, . ) и по агенту (ФИО, e-mail и др.).
Процесс регистрации занимает несколько дней.
Apple Deployment Programs
Apple периодически «кормит завтраками», обещая добавить Россию и не только ее в список стран, допущенных к своим программам развертывания, но до сих пор это не сделано. Поэтому, если, находясь в России и не используя VPN, открыть в браузере сайт deploy.apple.com, то первым делом отобразится сообщение, что «Deployment programs не доступны для вашей страны» (Deployment programs are not available in your country):

Нет, это не конец 🙂 — нужно в правом нижнем углу кликнуть на ссылку выбора страны — «Choose your country or region» и выбрать другую «свою» страну. Список этот, к сожалению, не большой, хотя по сравнению с 2014 годом их количество выросло:
Всего 3 страны в теплых странах: Индия, ЮАР и Эмираты:

В регионе Пасифика список чуть побольше: Австралия, Гонконг, Япония, Новая Зеландия, Сингапур и Тайвань:

Больше всего стран, допущенных к Enrollment-программам Apple — конечно же в Европе: Бельгия, Чехия, Дания, Германия, Испания, Франция, Греция, Ирландия, Италия, Люксембург, Венгрия, Нидерланды, Норвегия, Австрия, Польша, Португалия, Швейцария, Финляндия, Швеция, Турция и Великобритания:

На материке «Южная Америка» повезло пока только Бразии, из Карибских стран — Мексике:

Зато в Северной Америке максимальное покрытие:

Таким образом, чтобы использовать ABM в стране, которая не допущена к программам развертывания Apple, необходимо иметь дочернюю компанию или филиал за границей — точнее в одной из стран из данного списка, чтобы зарегистрироваться в Apple от ее имени и использовать совместно или единолично для управления мобильными устройствами компании.
Дополнение: открывать сайт deploy.apple.com необходимо в браузере, интерфейс которого переключен на английский язык , в противном случае (например, при использовании русской локализации) будет сложно пользоваться им, так как вместо нормальных надписей будет отображаться вот такая ерунда:

И эта ерунда (отображение кодов HTML-элементов вебстраницы вместо их человеческих названий) будет начинаться с авторизации и продолжится в основном функционале сайта.
У сайта business.apple.com таких проблем не наблюдалось, но зато у него имеются другие ограничения — он дружит только с избранными браузерами, а именно:
- macOS — Safari 9 и новее;
- iPad — Safari, iOS 12 и выше;
- Windows — Google Chrome 35 и новее, Microsoft Edge.
Источник
Apple Volume Purchase Program (VPP)
The Volume Purchase Program (VPP) is an Apple portal for businesses and schools to purchase and license apps and books in volume. Systems Manager fully integrates with VPP to easily distribute, revoke, and centrally manage your licenses, supporting both of Apple’s methods of managed distribution and licensing via redemption code. This article will explain how to link your VPP account to Dashboard, and what the licensing distribution options are. VPP facilitates silent deployments of App Store and Mac App Store applications to iOS and macOS devices, while allowing your company/institution to maintain ownership of the applications you purchase.
In order to understand how Apple’s managed distribution model is designed, it is strongly recommended to review Apple’s Business and Education whitepapers on VPP app distribution before using this tool in Systems Manager.
Enrolling into VPP is free:
- Businesses can enroll in VPP here.
- Educational institutions can enroll in VPP here.
- Educational institutions with Apple School Manager access can enroll in VPP here
Note: Apple School Manager VPP accounts support location based VPP licenses where a single VPP account/token can be connected to Meraki Systems Manager with licenses purchased from many different VPP accounts. This makes purchasing licenses and syncing to Meraki Systems Manager a more simplified experience. For more information on location based VPP tokens and all of its features go here. Existing VPP accounts can be invited into the new Apple School Manager location based VPP accounts by following this.
Adding Apple VPP Account(s) to Systems Manager
Note: It is recommended that your Apple VPP token does not reside in multiple MDM solutions
- In Dashboard, navigate to the Organization > MDM page.
- Scroll down to Apple VPP Accounts.
- Select Add new.

- In the Add VPP account window input the required information:


Name: Name of the VPP administrator’s account. This will be shown on the email sent to invited users, and should indicate your organization.
Email: Email address on record for the VPP account.
VPP Location server tokens can be downloaded on Apple School Manager and Apple Business Manager accounts in Settings > Apps and Books > My Server Tokens here: 
Allowed admins: Which Dashboard administrators should be allowed to manage users and app licenses for this VPP in Dashboard.
Assignable networks: Which Systems Manager networks within an Organization are able to use VPP device assignment.
5. Click Update.
Note: If a «VPP service token can’t be blank» error appears when attempting to save, make sure there are no special characters or trailing numbers such as ‘(1)’ in the filename of the vpp service token. This can also indicate that your VPP token is already bound to another MDM solution. If this is the case, you will need to remove the token from the existing solution or generate a new VPP token to upload into Dashboard.
6. Once your account is synced, you should see your licenses populated in Systems Manager > Manage > VPP
Renewing a VPP Token
Renewing a VPP Token is as simple as repeating the steps for adding a VPP token to your Dashboard Organization, but instead of selecting Add New in step 3 above, you select the existing VPP Token entry and click Update Token. From there, you can download the new copy of your VPP Token from the ABM/ASM portal, upload it to your Dashboard Organization, and save your changes to complete the VPP Token renewal.
VPP Deployment Methods
There are three options for VPP license distribution. Please see Apple’s documentation for a full list of requirements and feature differences.
- Device Assignment
Assign licenses to specific iOS, iPadOS, macOS, or tvOS devices, based on serial numbers. This allows for pushing applications without requiring the device to be signed in with an Apple ID, as well as silently installing apps without any end user input when used with supervised devices.
- User Assignment
Assign licenses to a specific users, based on an Apple IDs. This is useful in cases like 1:1 deployments for schools, where students have their own iPads and unique Apple IDs to sign-in with. User assignment can also be used to license iOS App Store applications.
Distribute licenses as redeemable codes, which can be given to end users to claim. This method is deprecated by Apple, and not recommended over the two managed distribution methods.
Note: It is recommended to license apps either by device or user, not both.
Any unused VPP Redemption Codes can be migrated to the more robust Device Assignment or User Assignment licenses by following this.
Device Assignment
VPP Device Assignment grants app licenses directly to a device, identifying it by serial number. This makes VPP Device Assignment the best option to use when you do not want to associate your apps to end user’s Apple ID(s). Furthermore, on Supervised iOS devices and macOS 10.11+, apps install completely silently with VPP Device Assignment. For detailed steps on how to grant and revoke VPP Device Assignment licenses, please watch the video below:
The following requirements must be met in order to use VPP Device Assignment:
- iOS 9+, macOS 10.11+, or tvOS 12+
- Systems Manager Enterprise
- VPP enabled in Dashboard
- Available licenses on the VPP portal
In addition to the above requirements, the app itself must support device assignment. This can be checked by navigating to Systems Manager > Manage > VPP, and checking the Device-assignable column (shown below). An app with a Y supports device licensing:

To enable VPP device licensing for an app:
In Dashboard, make sure the app has been added under Systems Manager > Manage > Apps.
Select the app to view more details.
Enable VPP device licensing:
Free apps: Enable the checkbox for Use VPP device license.

Paid apps: Set the Purchase Method to VPP Device Assignment: 
Click Save Changes.
On app install, a license for the app will be associated with the serial number of the device that downloaded it, allowing anyone to use the app on that device.
VPP Apple ID User Assignment
VPP User Assignment grants apps to end user’s Apple ID(s). This is a great option for 1-to-1 deployments where end users are already using their own Apple IDs. For detailed steps on how to grant and revoke VPP Apple ID licenses, please watch the video below:
The following requirements must be met in order to assign licenses on a per-user basis:
- iOS 7+, or macOS 10.9+
- VPP enabled in Dashboard
- Available licenses on the VPP portal
- Each user must have a personal Apple ID to receive managed distribution apps. This licensed Apple ID must then be signed in on the iOS/macOS device in order to receive VPP apps.
Note: Apple limits each Apple ID to 10 devices, so it is not recommended to use a shared Apple ID across all of your organization’s devices.
Configuring user assignment consists of the following steps:
- Invite user to receive licenses.
- Grant license for the desired app to the user.
- Deploy the app with Systems Manager.
A license can also be reclaimed by revoking a user’s app license.
Invite User to Receive Licenses
You can bulk import and invite VPP users via CSV, as well as individually.
- Navigate to the Systems Manager > Manage >VPP page.
- Click on the User management tab.
- Select + Add user on the right of page.
- Input the account information of the user to grant VPP access.
- Find and check the desired user(s) in the list, and select Send invitation(s).
- Confirm that User status for the selected user(s) changes from New to Invited.
Invited users will receive an email from Cisco Meraki. Accepting the invitation will require the user to sign in to iTunes or the App Store with their Apple ID, and accept Apple’s VPP terms and conditions.
Note: Invitation links are unique and can only be accepted once. The Apple ID which is used to accept the invitation is not received or reported by Systems Manager.
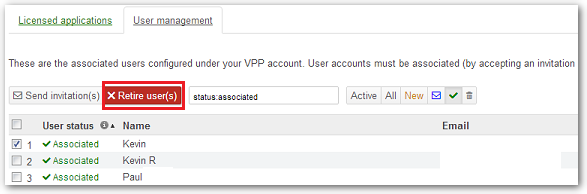
The following image shows a list of users with various statuses. Only ‘Associated’ users have accepted the invite.

Grant License for Desired App to User
To automatically assign licenses to users in scope, and avoid manually granting licenses to users, see this article.
- Navigate to the Systems Manager > Manage >VPP page.
- Click on the Licensed applications tab.
- Select the app to grant license for (if multiple VPP accounts have been added on the Org > Settings page, ensure the proper account is selected from the VPP account‘ drop-down menu).
- Check the box next to the user and click on + Grant license to user(s).
- Confirm license access to selected number of users.

At this point, ‘licensed’ users have been granted a VPP license for the selected app. Licensed users will be able to download this app onto their device by signing in with the licensed Apple ID, and navigating to the ‘Purchased’ tab in Apple’s App Store.
In order for the licensed app to be managed by Systems Manager the app must still be deployed via Systems Manager.
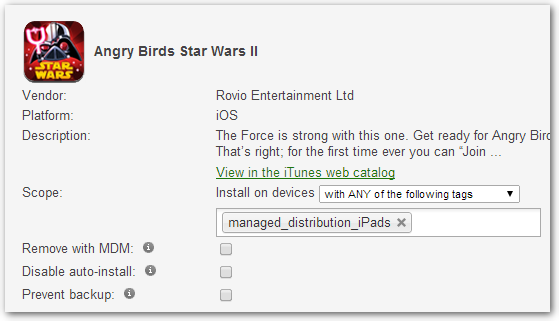
Deploying Apps with Systems Manager
- Navigate to the Systems Manager > Manage >Apps page.
- Select + Add new>iOS App Store app or macOS App Store app.
- Search for and choose the desired app already licensed.
- Define the scope of the app. This should cover the user/devices that were licensed through VPP.
- (Paid apps only) Set the Purchase method to VPP app assignment.
- Confirm clients in scope at bottom of page.
- Click Save Changes.
Revoking a User’s App License
To automatically revoke licenses from users who are no longer scoped for an app, and avoid manually revoking licenses from users, see this article.
In order to re-claim a license, the user’s app license must be revoked. A license can be revoked for a specific app, or a user’s access to all licensed apps can be revoked. As per Apple’s policies, a revoked user will be granted a 30-day grace period before any re-claimed apps are removed from the user’s purchase history. Once a license has been revoked for one user, it can be reassigned to another user after a brief time (typically about two minutes).
To revoke access to a specific app:
- Navigate to the Systems Manager > Manage >VPP page.
- On the Licensed applications tab, click on the name of the desired app.
- Check the box for the user to revoke access.
- Select Revoke license from user(s).

To revoke licenses for all distributed apps by retiring user:
- Navigate to the Systems Manager > Manage >VPP page.
- Select the User management tab.
- Check the box next to the user to revoke access.
- Select Retire user(s).
 a User’s App License
Apple Books (iBooks) App License
- Apple Books are assigned per user and not per device. Please take note when assigning an Apple book via VPP:
- VPP Apple book licenses must be granted to an Apple ID (user) and requires an Apple ID to sign in.
- VPP Apple book licenses are not device assignable.
- Apple Book licenses are permanent and cannot be revoked or reassigned.
Irrevocable next to an App verifies the license is permanent and cannot be revoked from the Apple ID it is assigned to.

Location Based VPP in Apple School Manager & Apple Business Manager
On Apple School Manager and Apple Business Manager, Apple has added a new concept called «Locations». Locations gives the Apple portal administrator the ability to transfer VPP licenses between different Locations (which will transfer the VPP licenses between different VPP tokens). Be sure to add the VPP tokens to Org > MDM for all/any of the Apple School Manager or Apple Business Manager Locations that you want to sync licenses from. Use the following screenshots to help confirm that the VPP licenses are in the desired VPP Location/token.


Troubleshooting VPP Installs
If you’ve followed the above steps and have issues installing apps onto your device, see the troubleshooting guide here.
Источник


