- Русские Блоги
- Xcode для Windows: Пять способов установки XCode на вашем компьютере
- Интернет Прокат Mac
- 2. Запустите Xcode на Windows с помощью VirtualBox
- 3. Использование VMware Player (бесплатно)
- 4. Купить Mac Mini для семей или использования в офисе
- 5. Установите черное яблоко (Hackintosh)
- Вывод
- How to Install Xcode on Windows 10/8/7 PC
- How to Install Xcode for Windows 10/8/7 PC
- Steps to Install Xcode on Windows Computers
- Xcode 13
- Easy setup
- Team comments inline
- Quick compare
- Cloud signing
- Bottom bar
- Vim mode
- CarPlay simulator
- Instant crash reports and feedback
- Custom documentation
- Xcode Cloud beta
- Get started
- How to develop iOS apps on Windows
- How to develop iPhone apps on Windows
- What is Xcode and why do you need it?
- Running Xcode on macOS in VirtualBox
- So, let’s imagine that you decided to use VirtualBox. What you should do next is make sure that the Windows computer on which you are going to install it is:
- Then, install macOS and boot your VM
- Dedicated software for linking VirtualBox with an iPhone/iPad
- Step-by-step guide:
Русские Блоги
Xcode для Windows: Пять способов установки XCode на вашем компьютере
Вы хотите развивать IOS App Но вы можете поддерживать компьютер операционной системы Apple, делать? Вам не придется беспокоиться, потому что вы можете запустить Xcode на компьютере Windows. Xcode является программным обеспечением для разработки приложений благонадежного MacOS, что позволяет людям легко разрабатывать IOS, MacOS, TVOs и программное обеспечение Watchos. Xcode оказывает исходный код в качестве свободного программного обеспечения с 2003 года, начиная с 10.1 версии с января 2019 года. Сайт разработчика Apple, также предыдущую версию загрузки.
Независимо от того, какая версия Xcode вы хотите использовать, вы должны знать, как запустить Xcode на Windows PC. Но почему вы хотите использовать Xcode на компьютере с Windows? Короче говоря, вы должны рассмотреть возможность использования Xcode для создания ИОС-дружественную версию IOS-дружественной версии, которые могут быть созданы для других операционных систем. Вы также можете использовать его, чтобы лучше контролировать свою способность создавать эти приложения.
Учитывая это, теперь вы увидите, как вы получите доступ к Xcode для Windows PC. Вы можете рассмотреть пять решений.
Пять способов установки XCode на ПК
Интернет Прокат Mac
Ваш первый выбор онлайн аренды Mac. В частности, вы не будете ставить физику MAC. Вместо этого вы получите облачный компьютер работать для вас. Принцип работы облачного MAC является то, что предприятие будет иметь ряд интернет-подключенных МЫ. Вы будете использовать подключение к удаленному рабочему столу или RDP войти в один из Mac. После этого вы сможете получить доступ к Mac с любого компьютера. Mac-in-Cloud с участием Mac-Stadium Waitages предоставит вам доступ к этим Mac. Вы можете оплатить онлайн, чтобы получить доступ к этим услугам в месяц.

Вы можете использовать клиент удаленного рабочего стола входит в ОС Windows или Linux, чтобы получить доступ к соответствующему RDP. Вы можете войти на MAC и установить Xcode, так что вы можете начать использовать приложение.
Есть различные формы, основанные на облаке на основе MAC. Вы можете использовать специальный Mac для полного доступа к одному компьютеру в центре обработки данных. Может быть использован для создания IOS APP Mac Build Server а также Build Server Используйте вместе для того, чтобы создать приложение для вас.
2. Запустите Xcode на Windows с помощью VirtualBox
Следующий выбор запуска Mac на Windows, является VirtualBox. VirtualBox является свободным программным обеспечением, что позволяет создать виртуальную машину MacOS. При использовании VirtualBox, вы можете обмениваться файлами между виртуальными машинами и физическими машинами.

Процесс настройки параметров новой MacOs на VirtualBox легко понять. После установки VirtualBox и запустить новую виртуальную машину, вы можете редактировать виртуальную машину, добавив его графическую память и ядро, чтобы сделать его более подходящим для MacOS. Вам необходимо запустить соответствующий код MacOS через командную строку, хотя код должен быть легко смотреть онлайн.
3. Использование VMware Player (бесплатно)
VMware Player является полезным программным обеспечением, которое может запустить вторую операционную систему на одном компьютере. VMware Player позволяет запускать виртуальную машину MAC на Windows.

Конструкция VMware Player позволяет изолировать рабочий стол с устройствами и позволяют вырезать и прошлые наклейки и общие черты папки на оригинальной операционной системе. Ограниченные виртуальные машины полностью зашифрованы и защищены паролем, гарантируя, что только авторизованные пользователи могут взаимодействовать с данными читается на компьютере. Настройки конфиденциальности в MacOS настройках и характеристиках сети будут отличаться от ваших родных настроек. Что еще более важно, при запуске VMware Player, вы можете загрузить Xcode более легко на вашем компьютере.
4. Купить Mac Mini для семей или использования в офисе
Mac мини небольшой портативный компьютер, который является относительно недорогим для подключения HDMI, USB и Thunderbolt. Она также может быть установлена Xcode, то вы можете использовать программное обеспечение удаленного рабочего стола на ПК для управления Mac Mini, например, Screens 。

5. Установите черное яблоко (Hackintosh)
Вы можете установить персональный компьютер, который может запустить MacOS называется черное яблоком. Установка дополнительных усилий и более технический характер. Но хорошая новость заключается в том, что есть много ресурсов, чтобы помочь вам построить такой компьютер. Черный Apple, сообщество очень технически, поэтому мы должны обратить внимание на детали.
Вывод
После того, как правильная функция будет завершена, вы можете легко установить Xcode на Windows PC. У вас есть много вариантов, когда вы идете в Интернет и сделать ваш компьютер легко получить доступ. Посмотрите на этих точках, вы можете легко получить доступ к Интернету и в полной мере использовать ваш опыт Xcode. Вы сможете продолжить с прошивкой и другими системами Apple, на компьютере с ОС Windows, что очень полезно, если вы хотите улучшить свою способность.
Источник
How to Install Xcode on Windows 10/8/7 PC
Xcode is an IDE that is used to develop apps for different operating systems. As we know, we have a lot of different software tools and systems that can be used to develop apps for operating systems like Windows and Linux. On the very another hand, when it comes to developing Mac apps, it is not an easy job. We can easily install any software tool on an operating system like Windows to develop apps on it. But, Mac requires SDK that is Xcode. This is a platform that can be used to develop apps on Mac or iOS. In this post, we will show you how to install Xcode on Windows 10, 8, 7 or Vista PC.
How to Install Xcode for Windows 10/8/7 PC
The problem with Xcode is it is challenging and complicated to install. However, here we will tell you an easy way to install this tool on your machine. You will need some stuff in order to install Xcode on Windows 10,8, or 7 PC.
- Mac OS X Virtual machine
- Intel processor with dual core integrity
- Hardware virtualization
- Xcode application install package
- Memory of the system with at least 2GB
Steps to Install Xcode on Windows Computers
Here you will get to know how you can install the package to your virtual machine in order to get the installation of Xcode completed. You can download the latest Xcode application package from the official site of Apple. All you need is going to the Xcode website, putting your Apple ID and downloading the package. Now if you are ready for the installation process, have a look at this process.
Step 1: You will need to download VirtualBox on your Windows OS running machine. You can easily download this tool from the official website of VirtualBox.
Step 2: After downloading VirtualBox on your system, get OSX Mavericks ISO as a virtual machine.
Step 3: Now open the install VirtualBox on your system. On the top left corner, you will see the New option. Click on it.
Step 4: Here you can create a virtual machine on your system. You will have to enter the Name as OSX, Type as Mac OS X and Version as Mac OS X (32 bit).
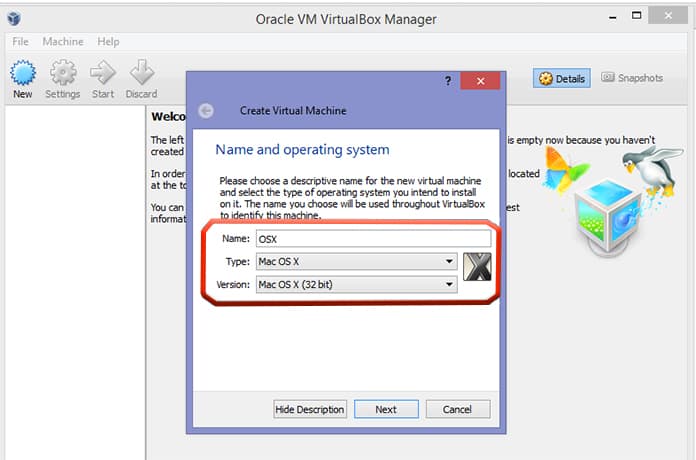
Create Virtual Machine to Install Xcode on Windows 10
Step 5: After putting the necessary information in it, click on next to proceed to the next step.
Step 6: Now you will see Memory Size option. This option allows your system to provide enough Ram to the virtual machine.
Step 7: Select the size as a minimum of 1GB and click Next.
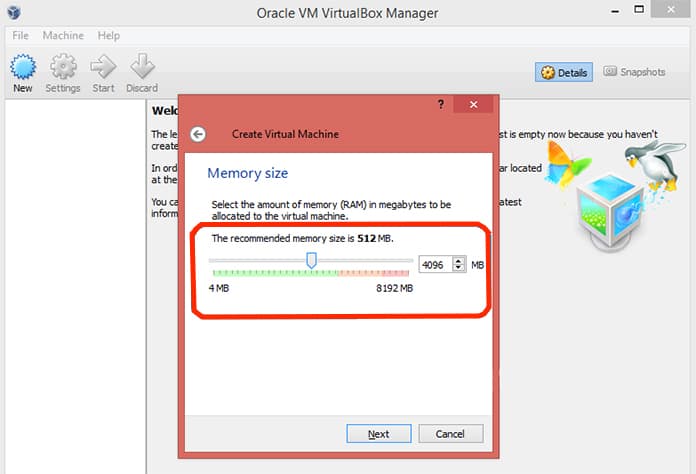
Select the amount of RAM to create virtual machine
Step 8: Now you will see the type of virtual hard drive. Choose the first option named as VDI (VirtualBox Disk Image) and click Next.
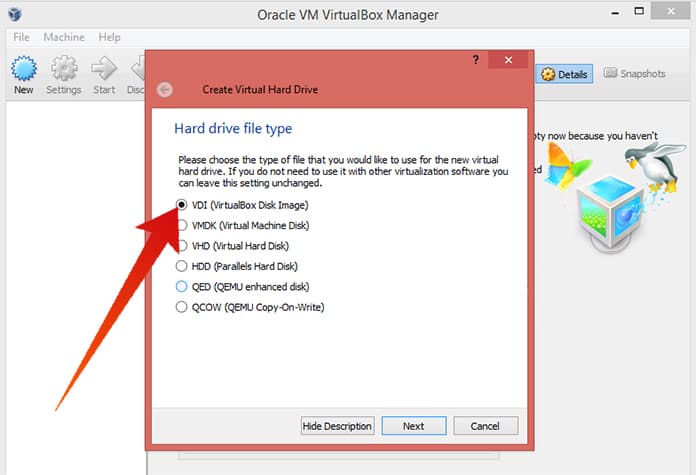
Select VDI to install Mac OS on Windows PC
Step 9: Now select the hard drive space you want to allocate to the virtual machine and click Create.
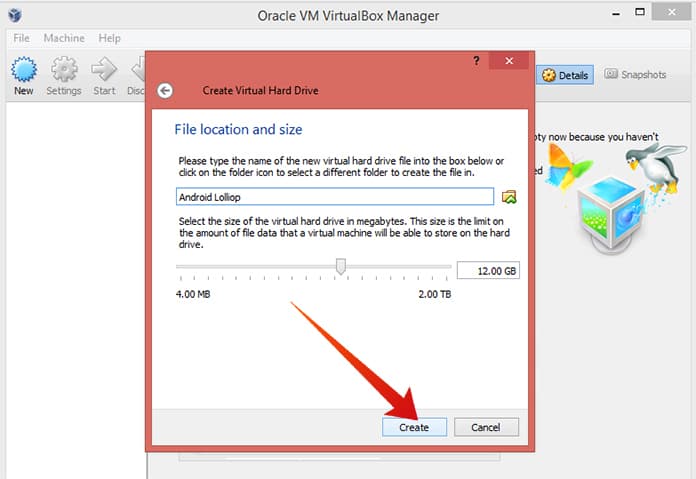
Select HD size to install Xcode on Windows
Step 10: The virtual machine has successfully been created on your VirtualBox.
Step 11: In the head left corner, you will see the Settings icon. Click on it. Now click on Storage then Load iOS File and click OK.
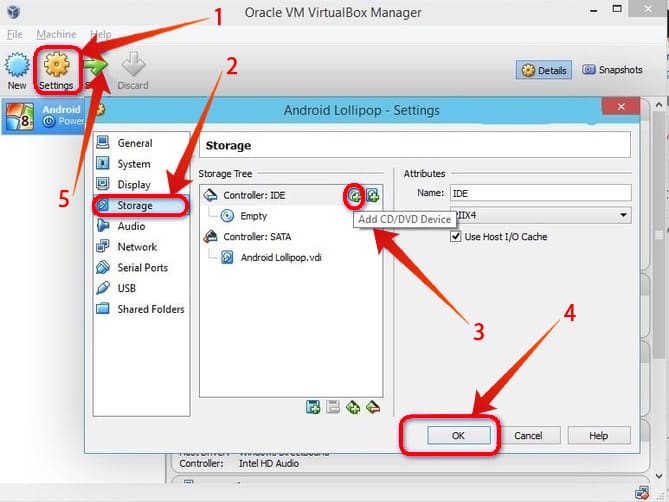
Add storage and Start the MAC OS X Machine
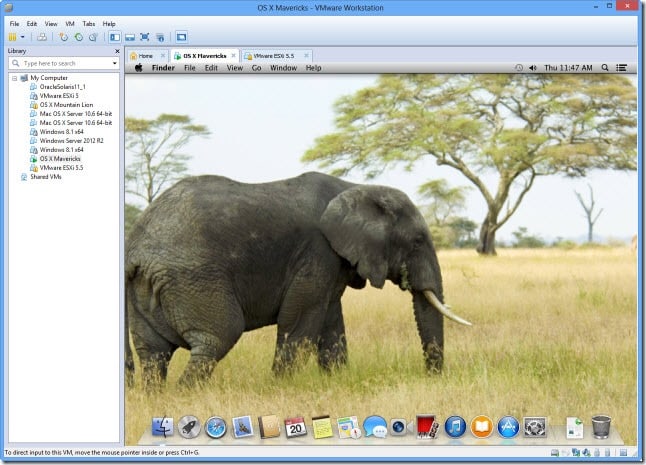
Step 12: After that, you just follow the on-screen steps of OSX boot.
Download and Install Xcode on Windows 10,8 or 7 PC
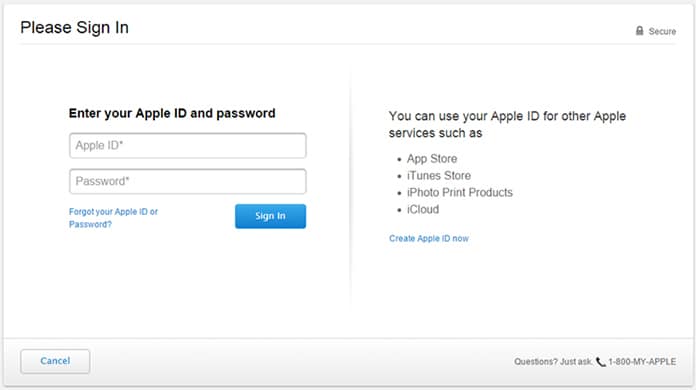
Step 13: Now open the Safari browser in your VirtualBox and log in with your Apple ID.
Download Xcode for PC running Windows 10/8/7
Step 14: Type Xcode in the search bar and select the Xcode from the search results.
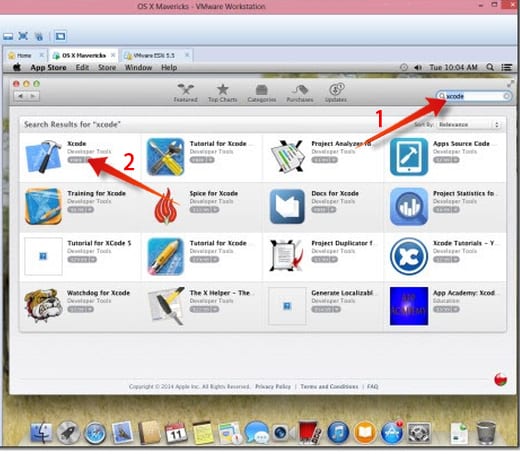
Install Xcode on Windows Computer
Step 15: Provide your name and password there and click OK.
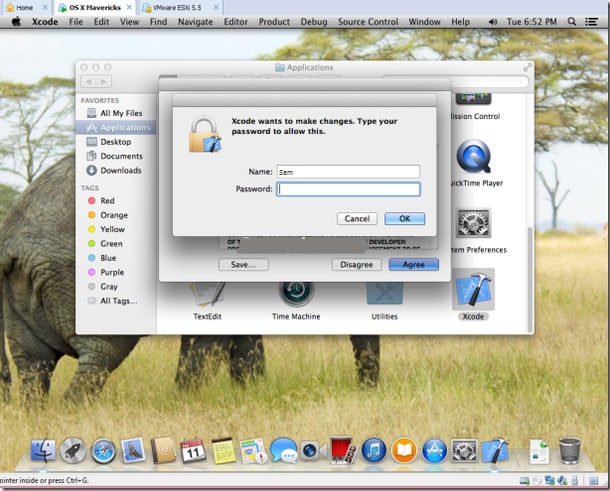
Download and install xcode on PC
Step 16: You are all done! You have successfully installed Xcode on your machine.
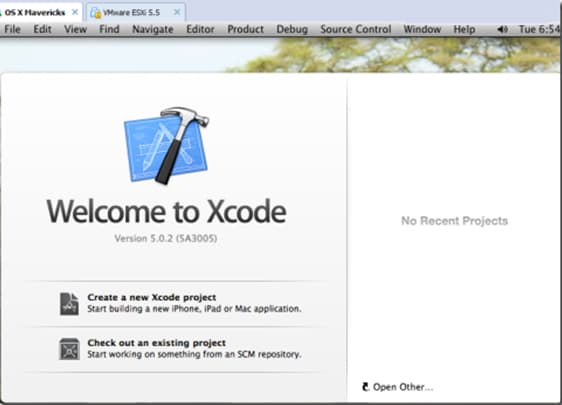
Use Xcode on Windows 7, 8 or 10 PC
You have successfully installed Xcode, app development software on your Windows PC or Laptop. The performance and speed of Xcode won’t be extremely high because you are running this software on Windows, but it can be used for educational purpose. Hope that these steps will help you to install Xcode on Windows 10, 8 and 7 PC.
Источник
Xcode 13
Xcode 13 adds powerful new team development features, perfect for working with Xcode Cloud as well as with GitHub, Bitbucket, and GitLab collaboration features. Initiate, review, comment, and merge pull requests directly within Xcode. See your teammates’ comments right inside your code. And quickly compare any two versions of your code files.
Easy setup
Take advantage of a complete workflow to manage pull requests directly within Xcode. Create new requests, see a queue of pull requests ready for your review, and quickly view, build, and test results generated locally or by Xcode Cloud.
Team comments inline
Comments that your teammates make on code during review display inline within the code editor, along with the name and avatar of the reviewer.
Quick compare
Jump into a comparison view of any two versions of your source code, in any editor, while retaining your current editing context.
Cloud signing
Apps are code-signed using an Apple-hosted service that manages all of your certificates, making App Store submission easier and more reliable. Just sign in to Xcode using your Apple ID, and your Mac is configured for development and deployment based on your membership roles and permissions.
Bottom bar
The always-visible bottom bar shows useful information, such as line and column, and offers direct access to quickly compare different versions of code.
Vim mode
Many common key combinations and editing modes familiar to Vim users are supported directly within the code editor, using the new bottom bar to show mode indicators.
CarPlay simulator
This new simulator for Mac offers complete control over screen size, resolution, and variable input methods, so you can test your CarPlay experience across many different car platforms.
Instant crash reports and feedback
Crash reports from your TestFlight users appear in Xcode Organizer within just a few minutes, complete with user feedback so your testers can tell you exactly what was happening when they experienced the crash. The crash log displays inline and you can jump to the related code with just a click.
Custom documentation
Build documentation for your Swift framework or package directly from your source code’s documentation comments, then view it in Xcode’s Quick Help and dedicated documentation viewer. Extend those comments by adding extension files, articles, and tutorials — all written in Markdown — and choose to share the compiled DocC Archive with other developers or host it on your website.
Xcode Cloud beta
Xcode Cloud is a continuous integration and delivery service built into Xcode and designed expressly for Apple developers. Submit your request to access the beta and we’ll email you when your account can be enabled.
Get started
Download Xcode and use these resources to build apps for all Apple platforms.
Xcode Documentation
Find details and step-by-step instructions on how to use Xcode.
Documentation
Browse the latest documentation, including tutorials, sample code, articles, and API reference.
Session videos
See the latest in Apple technologies presented at WWDC and other events.
Forums
Ask questions and discuss development topics with Apple engineers and other developers.
Источник
How to develop iOS apps on Windows
Want to develop applications for iOS on Windows? Don’t have a Mac at your disposal? If you don’t know where to start, we’ll tell you what you need for iOS development on Windows 10 and how to easily connect your iPhone or iPad to a guest macOS running on a Windows PC.
Table of contents:
How to develop iPhone apps on Windows
When you have an intention to write iOS apps on Windows, you should remember that the only platform that is compatible with the iOS SDK is macOS. This means the main developer tool for macOS, Xcode, can be used only with this operating system.
Below you’ll find a brief tutorial on how to make XCode work on Windows. To achieve your goal, you will need a Windows computer, a copy of macOS, an Apple ID, a dedicated software tool for redirecting iOS devices to a virtual environment (e.g. USB Network Gate), and a stable connection to the Internet.

What is Xcode and why do you need it?
As is mentioned before, the major software tool that can help you build an iOS app is Xcode, an integrated development environment (IDE) for macOS. It allows creating applications not only for iPhone and iPad but also for Mac, Apple TV, and Apple Watch. Among other things, Xcode offers an interface builder, a code editor, an asset management toolkit, and simulators of iOS devices. It gives you the ability to test the application that you are developing with no need to leave Xcode.
Xcode provides graphical tools for analyzing application performance, including those for diagnosing CPU usage and utilization of drives (HDD, SDD) and more.
Running Xcode on macOS in VirtualBox
Given that Xcode works only on macOS, a solution would be to install macOS on a Windows PC by means of a virtualization app such as VMware or VirtualBox.
Choosing between the two, most users opt for VirtualBox, as it is free and open-source, whereas VMware Workstation is proprietary software.
So, let’s imagine that you decided to use VirtualBox. What you should do next is make sure that the Windows computer on which you are going to install it is:
- A relatively powerful PC capable of operating smoothly with a virtual machine installed;
Its hardware is equivalent to that of MacBook, Mac Pro, or iMac;
When you are ready, install VirtualBox on your PC.
After the installation procedure is complete, start the app and select to install Mac OS X Server (x64). Allocate at least 2GB of RAM (4GB+ is recommended) and 30GB+ of hard disk space to your VM.
VirtualBox will make all required OS configurations automatically. You should only go to the Settings menu and change the following:
- Leave unchecked the “Enable EFI” box in the System tab;
Choose two CPUs in the Processor tab;
Then, install macOS and boot your VM
It’s important to remember: when configuring macOS, you should enter a valid Apple ID. This Apple account will be needed for Xcode download later.
At the final stage of macOS configurations, select the desired resolution and settings in the System Preferences. Once done, installing XCode is simple:
- In the Dock, find the App Store application icon and click it. Once the app has started, type Xcode in the search field located at the top-right corner.
- Now, click the Install button below the Xcode icon.
Note: There might be a need to provide your Apple ID (if you didn’t enter it when configuring the macOS virtual machine) or re-enter it (if you did so).
Dedicated software for linking VirtualBox with an iPhone/iPad
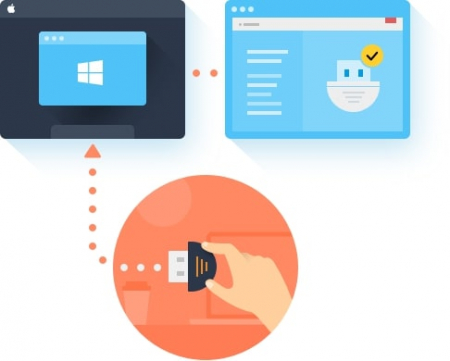
Now that you know how to get a Mac on VirtualBox, we’ll tell you about another challenge you may face. The issue that is common for many virtualization apps is the inability to connect to USB devices attached to the host computer. Although some VMs offer USB passthrough functionality, the problem still persists when it comes to particular USB device types.
If your VirtualBox app does not recognize an iPhone that you want to use for app testing, you can resort to the help of a dedicated software tool called USB Network Gate.
USB Network Gate is a simple yet powerful software application designed to forward USB devices to a virtual environment. It allows redirecting any iOS device to VirtualBox, VMware, Hyper-V, XenDesktop, and many other virtualization programs.
With this solution, you will be able to connect your iPhone or iPad to a macOS virtual machine and make the device visible to Xcode and all other apps running on your Mac.
A big advantage of this software is that it works not only with virtual machines but also with cloud infrastructures. If you decide to rent a Mac in the Cloud, you will have no problem redirecting iOS devices from your Windows PC to the cloud desktop.
Step-by-step guide:
In order to share an iOS device (e.g. an iPhone) with a guest operating system you use on your Windows PC, do as follows:
- Connect the iPhone to your host PC physically.
- Download USB Network Gate and install it.
- In the software interface, share the iPhone by clicking the Share button next to the iPhone’s name in the Local USB devices tab.
- Install the app on the guest OS.
- Connect the iPhone by clicking the Connect button in the Remote devices tab.
That’s it! Now you can work with the iPhone like it was physically attached to your Mac.
As you see, USB Network Gate is a cross-platform solution. Additionally to Windows and Mac, it supports Linux and Android platforms. That means you can share USB devices among these OSes no matter which of them is used as a host and which one is a guest.
Источник


