- If your AirPods won’t connect
- If you can’t connect to your iPhone, iPad, or iPod touch
- If you can’t connect to your Mac
- What you need
- If your iPhone or iPod touch won’t charge
- Plug into power
- Wall power outlet
- Computer
- Power accessory
- If your device charges slowly or won’t charge
- If your device stopped charging at 80 percent
- If an alert says that your accessory isn’t supported or certified
- If you don’t have enough space to update your Apple Watch
- Which Apple Watch do you have?
- Restart your watch
- Remove media and apps
- Unpair and update your Apple Watch
- Restore from backup
- “You Have Won iPhone”
- “You Have Won iPhone” appears on the Calendar
- “You Have Won iPhone” Removal
- About the author
- Brandon Skies
If your AirPods won’t connect
If you need help connecting to your AirPods, learn what to do.
If you can’t connect to your iPhone, iPad, or iPod touch
- Make sure that you have an iPhone or iPod touch with the latest version of iOS, or an iPad with the latest version of iPadOS.
- Put both AirPods in the charging case and make sure that both AirPods are charging.
- To make sure that Bluetooth is on, go to Settings > Bluetooth.
- If your AirPods are connected, make sure that they’re selected as your audio device. If your AirPods appear in the list of devices but they don’t connect, go to the next step.
- Close the lid, wait 15 seconds, then open the lid. Press and hold the setup button on the charging case for up to 10 seconds. The status light should flash white, which means that your AirPods are ready to connect.
- Hold the charging case, with your AirPods inside and the lid open, next to your iPhone, iPad, or iPod touch.
- Follow the steps on the screen of your iPhone, iPad, or iPod touch.
- Test your AirPods. If you still can’t connect, reset your AirPods.

If you can’t connect to your Mac
- Make sure that you have a Mac with the latest version of macOS.
- Put both AirPods in the charging case and make sure that both AirPods are charging.
- To make sure that Bluetooth is on, choose Apple menu > System Preferences, then click Bluetooth.
- If your AirPods are connected, make sure that they’re selected as your audio device. If your AirPods appear in the list of devices but they don’t connect, click the X to the right of your AirPods to remove them from the list.
- Close the lid, wait 15 seconds, then open the lid. Press and hold the setup button on the charging case for up to 10 seconds. The status light should flash white, which means that your AirPods are ready to connect.
- Hold the charging case, with your AirPods inside and the lid open, next to your Mac.
- Follow the steps on the screen of your Mac.
- Test your AirPods. If you still can’t connect, reset your AirPods.
What you need
If you have AirPods (3rd generation), you need an iPhone or iPod touch with iOS 15.1 or later; an iPad with iPadOS 15.1 or later; an Apple Watch with watchOS 8.1 or later; an Apple TV with tvOS 15.1 or later; or a Mac with macOS 12 or later. Update your iPhone, iPad, or iPod touch; update your Apple Watch; update your Apple TV, or update your Mac.
If you have AirPods Pro, you need an iPhone or iPod touch with iOS 13.2 or later; an iPad with iPadOS 13.2 or later; an Apple Watch with watchOS 6.1 or later; an Apple TV with tvOS 13.2 or later; or a Mac with macOS 10.15.1 or later.
If you have AirPods (2nd generation), you need an iPhone, iPad, or iPod touch with iOS 12.2 or later; an Apple Watch with watchOS 5.2 or later; an Apple TV with tvOS 12.2 or later; or a Mac with macOS 10.14.4 or later.
If you have AirPods (1st generation), you need an iPhone, iPad, or iPod touch with iOS 10 or later; an Apple Watch with watchOS 3 or later; an Apple TV with tvOS 11 or later; or a Mac with macOS Sierra or later.
Источник
If your iPhone or iPod touch won’t charge
If your battery won’t charge or charges slowly, or if you see an alert message, learn what to do.
Plug into power
To charge your device, follow these steps:
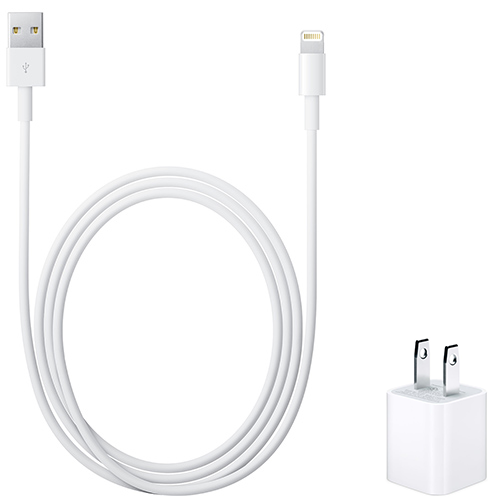
- Connect your device to the USB cable that comes with it.
- Plug into one of these three power sources:
Wall power outlet
Plug your USB charging cable into a USB power adapter, then plug the adapter into the wall.
Computer
Plug your charging cable into a USB 2.0 or 3.0 port on a computer that’s on and not in sleep mode. Don’t use the USB ports on your keyboard.
Power accessory
Plug your cable into a powered USB hub, docking station, or other Apple-certified accessory.
![]()
If you’re trying to charge wirelessly with an iPhone 8 or later, first make sure that you can charge with the USB adapter and cable that came with your device. If that works, then get help with wireless charging. For a third-party accessory, check that it’s Apple certified.
As your device charges, you’ll see a lightning bolt beside the battery icon in the status bar, or a large battery icon on your Lock screen.
![]()
My device charges slowly or won’t charge
My device stopped charging at 80 percent
I see Accessory Not Supported or Certified
If your device charges slowly or won’t charge
Follow these steps and try again after each:
- Check your charging cable and USB adapter for signs of damage, like breakage or bent prongs. Don’t use damaged accessories.

- Use a wall power outlet and check for firm connections between your charging cable, USB wall adapter, and wall outlet or AC power cable, or try a different outlet.
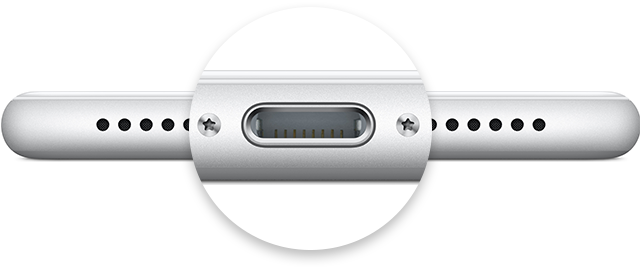
- Remove any debris from the charging port on the bottom of your device, then firmly plug your charging cable into your device. If the charging port is damaged, your device probably needs service.
- Let your device charge for a half hour.
- If your device is still unresponsive, force restart your device:
- iPhone 8 or later and iPhone SE (2nd generation): Press and quickly release the Volume Up button. Press and quickly release the Volume Down button. Press and hold the Side button until you see the Apple logo.
- iPhone 7, iPhone 7 Plus, and iPod touch (7th generation): Press and hold both the Side (or Top) button and the Volume Down button until you see the Apple logo.
- iPhone 6s or earlier, iPhone SE (1st generation), and iPod touch (6th generation) or earlier: Press and hold both the Side (or Top) button and the Home button until you see the Apple logo.
- Let your device charge for another half hour.
- If your device still won’t power on or charge, take your device, charging cable, and charging adapter to an Apple Retail Store or Apple Authorized Service Provider for evaluation. You can also contact Apple Support.
If your device stopped charging at 80 percent
Your iPhone might get slightly warmer while it charges. To extend the lifespan of your battery, if the battery gets too warm, software might limit charging above 80 percent. Your iPhone will charge again when the temperature drops. Try moving your iPhone and charger to a cooler location.
iOS 13 and later uses Optimized Battery Charging to slow the rate of battery aging by reducing the time that your iPhone spends fully charged. Your iPhone uses on-device machine learning to understand your daily charging routine so that it can wait until you need to use your iPhone to finish charging past 80 percent.* Optimized Battery Charging is active only when your iPhone predicts that it will be connected to a charger for a long period of time.
* Information regarding your charging routine is stored only on your iPhone. The information isn’t included in backups and isn’t shared with Apple.
If an alert says that your accessory isn’t supported or certified
These alerts can appear for a few reasons: Your iOS device might have a dirty or damaged charging port, your charging accessory is defective, damaged, or non Apple-certified, or your USB charger isn’t designed to charge devices. Follow these steps:
- Remove any debris from the charging port on the bottom of your device.
- Restart your device:
- iPhone
- iPod touch
- Try a different USB cable or charger.
- Make sure that you have the latest version of iOS.
- Contact Apple Support to set up service.
Источник
If you don’t have enough space to update your Apple Watch
Learn what to do if your Apple Watch says you need more available storage to install a watchOS update.
Which Apple Watch do you have?
If you have Apple Watch Series 4 or later, or Apple Watch SE, try each of the steps below.
If you have Apple Watch Series 3, skip directly to the steps to unpair and update your Apple Watch.
Restart your watch
Restart your Apple Watch, then try updating it again.
If you still see the error, follow the steps in the next section.
Remove media and apps
First, try to free up storage on your Apple Watch by removing any music or photos that you’ve synced to your watch. Then try to install the watchOS update.
If your watch still doesn’t have enough available storage, remove some apps to free up more space, then try to update. You can check how much available storage your watch has by opening its Settings app, then going to General > Usage.
If you can’t update after deleting media and apps, follow the steps in the next section.
Unpair and update your Apple Watch
- Keep your Apple Watch and iPhone close together as you unpair them.
- Open the Watch app on your iPhone.
- Go to the My Watch tab and tap your watch at the top of the screen.
- Tap the info button next to the watch that you want to unpair.
- Tap Unpair Apple Watch.
- For GPS + Cellular models, choose to keep your cellular plan.
- Tap again to confirm. You might need to enter your Apple ID password to disable Activation Lock. Before erasing all content and settings on your Apple Watch, your iPhone creates a new backup of your Apple Watch. You can use the backup to restore a new Apple Watch.
Next, set up your Apple Watch with your iPhone. When asked whether you want to set up as new or restore from a backup, choose to set up as new. Then follow the onscreen instructions to finish setup. If you want to update to the watchOS beta, reinstall the beta profile after setup is complete.
Finally, update your Apple Watch.
Restore from backup
If you want to restore your Apple Watch from its latest backup, follow the steps in the previous section to unpair it again. Then set up your watch once more with your iPhone. This time, choose to restore from backup rather than set up as new.
Источник
“You Have Won iPhone”
Although Apple products are less susceptible to getting invaded by unwanted or hazardous software, this doesn’t mean you cannot get some invasive app such as a browser hijacker on your iPhone or iPad. Common symptoms related to such software annoyances are the generation of random banners on your screen, the replacement of the homepage of your browsers, as well as sudden page-redirects to sites that try to sell you something or get you to play some sham browser game. Of course, this could all lead to frustration and irritation while you are browsing, but this is actually the lesser problem with the hijackers. What’s worse about having a hijacker in your Safari, Chrome or Firefox, is that it may potentially land you on pages with shady content or even on ones used to spread Trojans, Spyware and other insidious viruses.
“You Have Won iPhone” appears on the Calendar
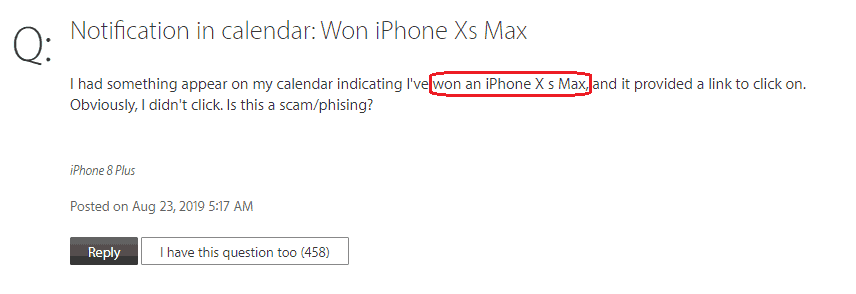
Some users have been complaining that they have been getting spam in their calendars
You Have Won iPhone is one annoying hijacker for iPhone devices that tries to promote the You Have Won iPhone page in the users’ browsers by making it their new homepage or by frequently redirecting them to it. As we already said, you may also start seeing random promotional banners and ads on your screen, especially when you are connected to the Internet. The good news is that it shouldn’t be too difficult to remove this annoyance. Just use the guide below and follow its instructions – by the time you are done, You Have Won iPhone should no longer be there to bother you.
As far as the future safety of your device is concerned, make sure to never download new apps from shady sources or you may easily get another hijacker like You Have Won iPhone inside your iPhone. Also, do not trust every app that tells you it will make your device run faster, as many hijackers are oftentimes disguised as optimization tools for iPhone.
SUMMARY:
| Name | “You Have Won iPhone” |
| Type | Scam |
“You Have Won iPhone” Removal
Search Marquis is a high-profile hijacker – you might want to see if you’re not infected with it as well.
You can find the removal guide here.
If you have an Android virus, please use our Android Malware Removal guide.

About the author
![]()
Brandon Skies
Brandon is a researcher and content creator in the fields of cyber-security and virtual privacy. Years of experience enable him to provide readers with important information and adequate solutions for the latest software and malware problems.
Источник


