- Guide: Installing and Running a GNU/Linux Environment on Any Android Device
- Setting Up GNU/Linux on Android
- Step-by-Step Guide
- Installing Linux Applications
- How to Install and Run a GNU/Linux OS on Your Android Device
- GNU/Linux Setup on Android
- How To Install GNU/Linux on Android Device
- Installing Linux Applications on Android
- Apt get для android
Guide: Installing and Running a GNU/Linux Environment on Any Android Device
As many of you mayВ well be aware, the Android operating system is powered by the Linux kernel underneath. Despite the fact that both Android and GNU/Linux are powered by the same kernel, the two operating systems are vastly different and run completely different types of programs.
Sometimes, however, the applications available on Android can feel a bit limited or underwhelming, especially when compared to their desktop counterparts. Fortunately, you can get a GNU/Linux environment up and running on any Android device, rooted or non-rooted. (The following instructions assume a non-rooted device.)
For those power users on Android tablets, or other Android devices that have largeВ screens (or can plug into a bigger screen), the ability to run desktop Linux software can go a long way towards increasing the potential that an Android device has for productivity.
Setting Up GNU/Linux on Android
To get a GNU/Linux environment set upВ on your Android device, you only need to install two applications from the Google Play store:В GNURoot Debian and XServer XSDL.В After you do that, you will only need to run a small handful of Linux commands to complete the installation.
GNURoot Debian provides a Debian Linux environment that runs within the confines of the Android application sandbox. It accomplishes this by leveraging a piece of software called proot, a userspace re-implementation of Linux’s chroot functionality, which is used to run a guest Linux environment inside of a host environment. Chroot normally requires root access to function, but by using proot you can achieve similar functionality without needing rootВ privileges.
GNURoot comes with a built-in terminal emulator for accessing its Debian Linux environment. This is sufficient for runningВ command-line software, however, running graphical software requires an X server to be available as well. The X Window System was designed to have separate client and server components in order to provide more flexibility (a faster, more powerful UNIX mainframe could act as the client to X server instances running on much less powerful and less sophisticated terminals).
In this case, we will use a separate application, XServer XSDL, that GNURoot applications will connect to as clients. XServer XSDL is a complete X server implementation for Android powered by SDL that has many configurable options such as display resolution, font size, different types of mouse pointer behavior, and more.
Step-by-Step Guide
1. Install GNURoot Debian and XServer XSDL from the Play Store.
2. Run GNURoot Debian. The Debian Linux environment will unpack and initialize itself, which will take a few minutes. Eventually, you will be presented with a “root” shell. Don’t get misled by this – this is actually a fake root account that is still running within the confines of the Android application sandbox.
3. Run apt-get update and apt-get upgrade to ensure you have the most up-to-date packages available on your system. Apt-get is Debian’s package management system that you will use to install software into your Debian Linux environment.
4. Once you are up-to-date, it’s time to install a graphical environment. I recommend installing LXDE as it is simple and light-weight. (Remember, you’re running Debian with all the overhead of the Android operating system in the background, so it’s best to conserve as many resources as you can.) You can either do apt-get install lxde to install the desktop environment along with a full set of tools, or apt-get install lxde-core to only install the desktop environment itself.
5. Now that we have LXDE installed, let’s install a few more things to complete our Linux setup.
• XTerm – this provides access to the terminal while in a graphical environment
• Synaptic Package Manager – a graphical front-end to apt-get
• Pulseaudio – provides drivers for playing back audio
Run apt-get install xterm synaptic pulseaudio to install these utilities.
6. Finally, let’s get the graphical environment up and running. Start XServer XSDL and have it download the additional fonts. Eventually you will get to a blue screen with some white text – this means that the X server is running and waiting for a client to connect. Switch back to GNURoot and run the following two commands:
Then, switch to XServer XSDL and watch the LXDE desktop come up onto your screen.
I recommend putting the above two commands into a shell script so that you can easily restart LXDE if you close the session or if you need to restart your device.
Installing Linux Applications
Congrats! You’ve successfully gotten Debian Linux up and running on your Android device, but what good is running Linux without apps? Fortunately, you’ve got a massive repository of Linux applications at your fingertips just waiting to be downloaded. We’ll use the Synaptic Package Manager, which we installed earlier, to access this repository.
Click the “start” button at the lower-left hand corner, click Run, and then type synaptic . The Synaptic Package Manager will load. From here, simply press the Search button at the top and then type the name of the application you’d like to install. Once you’ve found an application, right click it and select “Mark for Installation”. When you are finished marking packages, click the Apply button at the top to start the installation. Uninstalling packages follows the same procedure, except by right-clicking and selecting “Mark for Removal” instead.
Of course, since this isn’t a real Linux installation but rather a Linux environment running on top of, and within the constraints of, Android, there are a couple of limitations to be aware of. Some applications will refuse to run or will crash, usually due to the fact that some resources that are usually exposed on GNU/Linux systems are kept hidden by Android. Also, if a regular Android app can’t do something, then usually a Linux application running within Android can’t as well, so you won’t be able to perform tasks such as partitioning hard drives. Lastly, games requiring hardware acceleration will not work. Most standard everyday apps, however, will run just fine. Some examples include Firefox, LibreOffice, GIMP, Eclipse, and simple games like PySol.
I hope that you find this tutorial useful. While I personally performed these steps on my Google Pixel C, you can do this on most Android devices. Preferably on a tablet device with access to keyboard and mouse peripherals, of course. If you already run a GNU/Linux distribution on your Android device, let us know what you are using it for below!
Источник
How to Install and Run a GNU/Linux OS on Your Android Device
Installing a GNU/Linux environment on your android device can enhance and increase its productivity. Although the Android OS runs on the same Kernel as GNU/Linux, the two Operating systems run on different programs.
A common caveat of android apps is that they are sometimes more limited when compared to desktop apps for example, and one way to get around that is installing a GNU/Linux environment, which can be applicable on rooted or non-rooted devices. This guide assumes a non-rooted device is being used.
GNU/Linux Setup on Android
To Set up a GNU/Linux environment you will need to download GNURoot Debian and Xserver XSDL followed by applicable Linux commands to complete the process.
GNURoot allows you to create a Linux environment within a host OS. Normally you would need Linux’s “Chroot” functionality to do this however, GNURoot uses “proot” a software that allows you to achieve the same function without proot privileges.
The purpose of Xserver XSDL, is to provide an application that GNURoot connects to. An X server is needed to run software that is heavy on graphics.
Xserver XDSL provides options for customizing things like display resolution.
How To Install GNU/Linux on Android Device
1. Search and Install GNURoot Debian and Xserver XSDL from the Playstore.
2. After the download is completed run GNURoot Debian, however watch-out for a “root” shell, which is a fake root shell running in Andriod application sandbox, so ignore it.
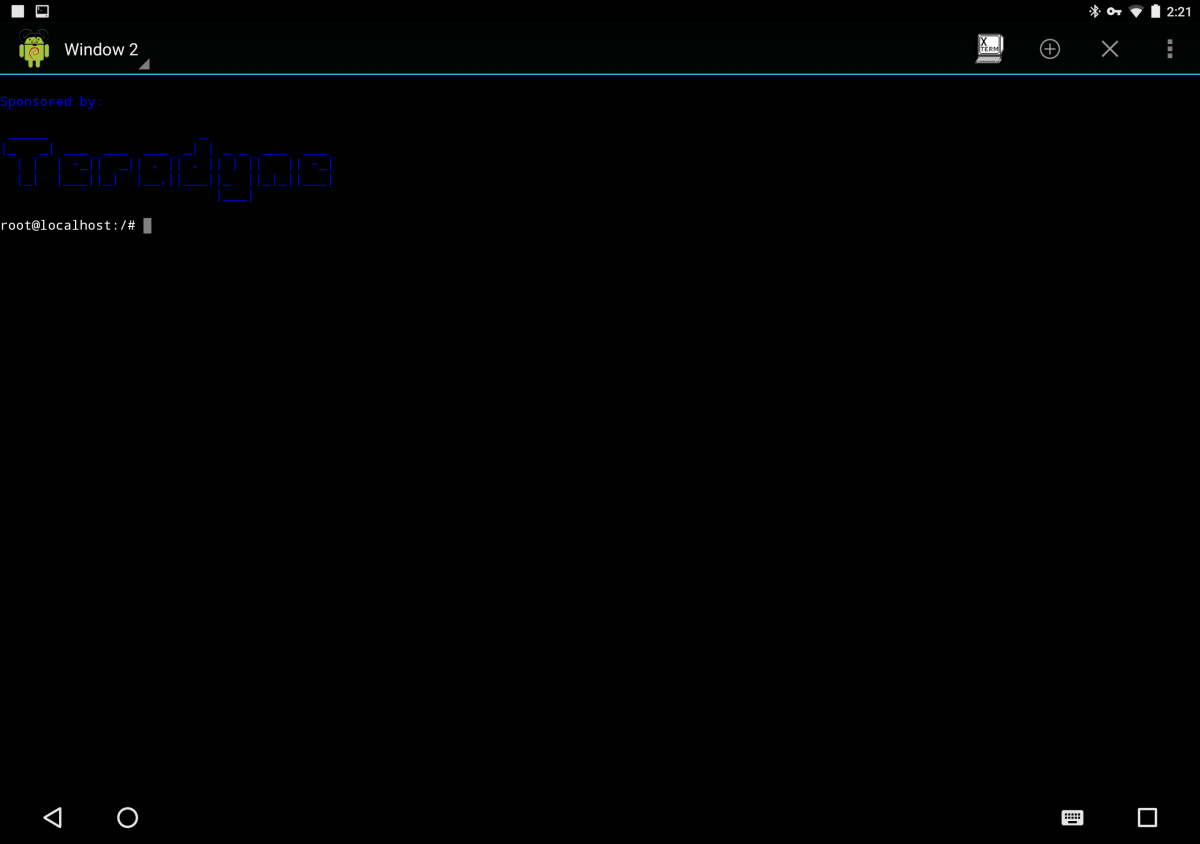
Linux Shell on Android
3. To ensure you have the most recent upgrades run “apt-get update and apt-get upgrade”. You will need Apt-get to install software in a Debian/Ubunu Linux environment.
4. The next step is to install a graphical environment. You can do this by running “apt-get install lxde” for the environment with all the tools, alternatively you can run “apt-get install lxde-core” for just the desktop environment.
5. What is left now is a way to provide access to the terminal when in a graphical environment, a software called XTerm is used for this.
Finally you will need Synaptic Package Manager as a front-end to apt-get drivers for audio play back with Pulseaudio.
6. As a final step start xServer XSDL and download all fonts then go back to GNURoot to run these commands:
After this, revert back to XServer XSDL and wait for the LXDE desktop.
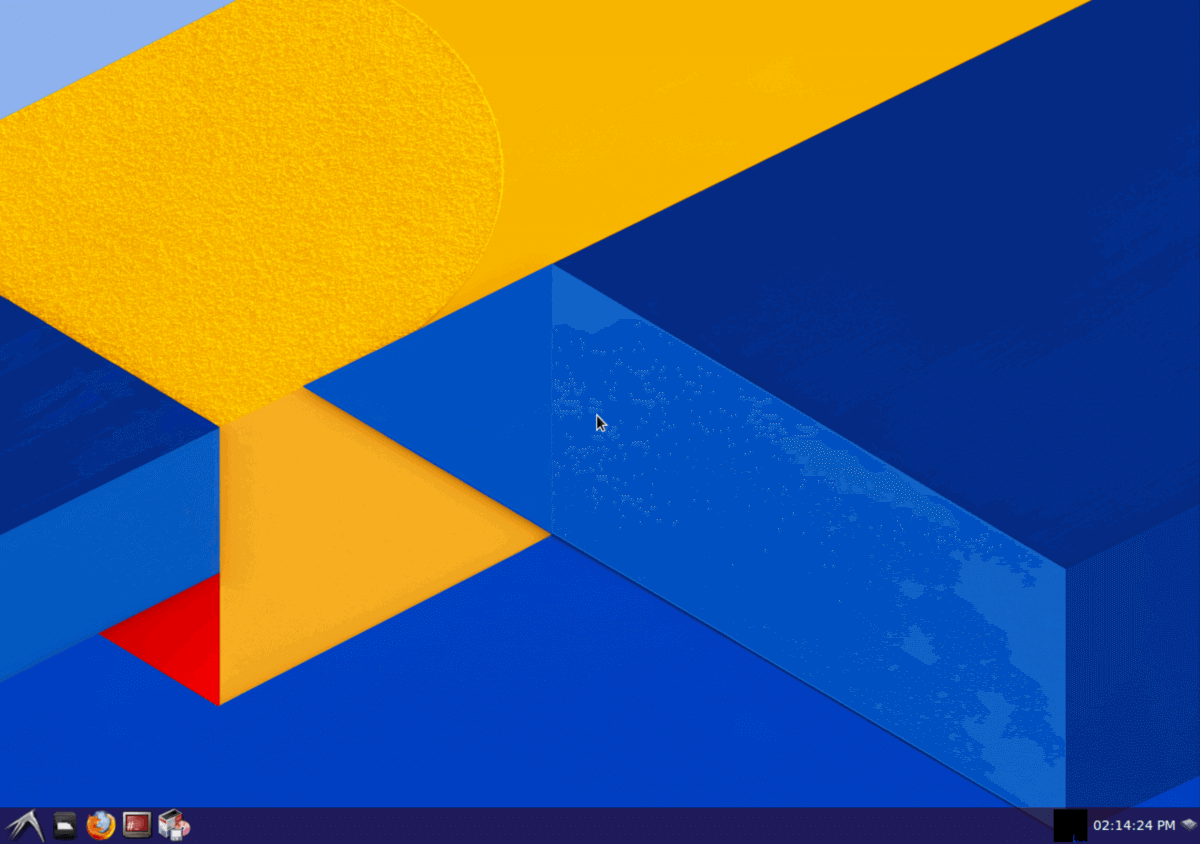
Running LXDE Desktop on Android
Installing Linux Applications on Android
Now that you have Debian Linux on your Android device you will need apps to enjoy it fully. To access the large repository of Linux apps use the Synaptic Package Manager previously installed.
Access Run from the start menu and type in “synaptic”. Press the search button when the Synaptic Package Manager opens and key in the name of the app you are looking for then mark it for installation.
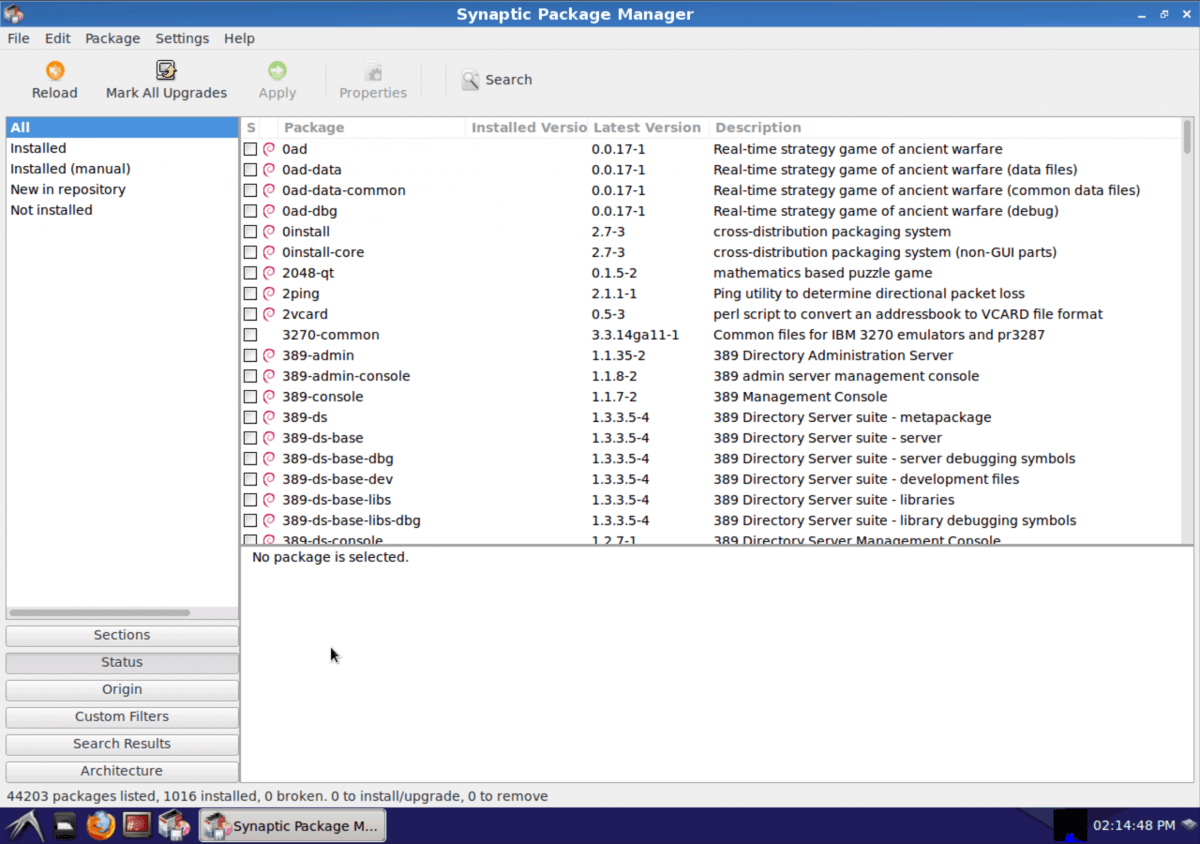
Synaptic Package Manager
With your apps installed, you are finally good to go! Remember however, that because this is a Linux environment running within Android, it will not run as seamlessly as you would expect from the whole Linux package, some apps may not run at all. Also, android apps do not necessarily work differently within a Linux environment so don’t expect more than the usually from your android apps either.
It is also important to remember that some games will not work especially those requiring hardware acceleration But all in all, most apps and simple games will work just fine!
We hope you find this guide easy to follow, let us know if you have any comments, tips or suggestions or simply to let us know you successfully installed Linux on your Android device with these guidelines!
Источник
Apt get для android
Note: the latest Android Gradle plugin has now built in support for annotation processors and warns and/or blocks android-apt , see this wiki page on how to migrate and this blogpost for more info.
The android-apt plugin assists in working with annotation processors in combination with Android Studio. It has two purposes:
- Allow to configure a compile time only annotation processor as a dependency, not including the artifact in the final APK or library
- Set up the source paths so that code that is generated from the annotation processor is correctly picked up by Android Studio.
This plugin requires the android or android-library plugin (version 0.9.x or up) to be configured on your project.
Including and using the plugin in your build script
Add the following to your build script to use the plugin:
Passing processor arguments
Some annotation processor may require to pass custom arguments, you can use apt.arguments for that purpose. For instance for AndroidAnnotations you can use the following configuration:
AndroidAnnotations needs to know where your AndroidManifest.xml is. Retrieving it through the variant allows for different AndroidManfest.xml files for each flavor. However, not all variants (e.g. unit tests) might have the properties required, hence the groovy ?. operator to dereference these properties in a safe way. (Yes, this is a bit of a hack).
The arguments are processed for each variant when the compiler is configured. From this closure you can reference android , project and variant for the current variant. Because this is just a Groovy closure things like setting configuration based on the variant name can also be done:
Configurating a compiler style dependency
Annotation processors generally have a API and a processor that generates code that is used by the API. Depending on the project the processor and the API might be split up in separate dependencies. For example, Dagger uses two artifacts called dagger-compiler and dagger. The compiler artifact is only used during compilation, while the main dagger artifact is required at runtime.
To aid in configuring this dependency, the plugin adds a Gradle configuration named apt that can be used like this:
If your instrumentation test code requires generated code to be visible in Android Studio, you can use the androidTestApt configuration:
For unit tests use testApt Note: requires Android Studio 1.4!
It’s possible to specify the class names of processors that need to be run during compilation and in that case disable the default auto discovery mechanism of javac as well, by specifying the classes in the apt block:
Configuration of other annotation processors
For annotation processors that include the API and processor in one artifact, there’s no special setup. You just add the artifact to the compile configuration like usual and everything will work like normal. Additionally, if code that is generated by the processor is to be referenced in your own code, Android Studio will now correctly reference that code and resolve references to it.
Q: When do I need this plugin?
A: You need this plugin when you include processors that generate sources that you need to import in your code. For example when using Dagger 2 or Android Annotations. Using this plugin Android Studio will be configured to place the generated sources on the build path, preventing errors in the IDE. When using the apt scope, the annotation processor will not be included in your final APK.
Q: What’s the difference in using provided vs using apt for any annotation processor?
A: provided will put the annotation processor classes and it’s dependencies on the IDE class path. This means that you could accidentally reference these classes. For example, if the annotation processor uses Guava, you might mistakenly import that in your Android code. At runtime this would cause a crash. When using apt the processor is not added to your class path; it’s only used for annotation processing. The plugin will also make sure that Android Studio is configured to put any generated source on the IDE build path so that you can reference those in Android Studio, if needed.
This plugin is based on a script that I’ve been using for some time which is the result of this post on Google+ and this post on StackOverflow.com. Variations of the SO post and my gists have been floating around for a while on the interwebs. That, and the fact that including scripts is a bit inconvenient pushed me to create this plugin.
This plugin is created by Hugo Visser and released in the public domain. Feel free to use and adapt as you like. To get in touch, hit me up on Twitter or Google Plus.
Источник


