- How to Enable and Disable automatic App updates on Android
- Part 1: Apps and its excellent applications on Android smartphones.
- Part 2: How to enable the automatic app updates on Android.
- Part 3: How to turn off the automatic app updates on Android.
- Part 4: Tips related to Android apps
- Implement In-app Update In Android
- Make sure every user of your app is on the new version.
- What is In-App Update:
- Flexible Update:
- Benefits:
- How to Update Your Android OS
- Getting the latest Android update can be a simple task or a tedious one
- Updating Your Android OS
- Find Out Which Version of Android You Have
- Finding Your OS Version on a Pixel
- Finding Your OS Version on a Samsung Galaxy Phone
- Updating Other Android Devices
- When Will You Get the Latest Android Version?
- Get an Android Update by Rooting Your Phone
- Как внедрить In-app Updates в Android-приложение на React Native
- Оговорка
- Что будем делать
- Подготовка к тестированию
- Поддержка immediate-обновлений
- Поддержка flexible-обновлений
- Закругляюсь
How to Enable and Disable automatic App updates on Android
Part 1: Apps and its excellent applications on Android smartphones.
In the information technology era at present, smartphones definitely have become a must — have item for every single person in the world. The use of smartphones has not been limited for just calling and responding as well as texting, but they are also capable performing unbelievably wonderful tasks that were just far beyond human’s imaginations in the past.
In order to come up with the huge and impressive demands of the world’s users, a number of companies have tried their best to innovate and introduce the finest brands of smartphones, along with a plenty of compatible operating system. And Android — in the last few years, has proved to be a trust — worthy, reliable and free — risk tool for smartphones’ avid fans to make use of.
A key factor that results in the success of each smartphone and its operating system is the apps that come along. Apps stand for applications — which have the similar functions as softwares in the computer. Plenty of apps are used in the process of using Android smartphones in order to offer their customers the best potential form of information, entertainment, work form as well as any other related things.
Usually, an app is innovated and developed months by months, let alone years after years. It is a matter of fact the Android apps update is definitely a need for all the loyal users who wish to make use of the latest versions. But having Android apps update frequently is something that not all the users know how to tackle.
To the surprise of the majority of Android’s users, there is always a feature that enables Android automatic updates. With a certain knowledge of how to use it, people can easily and automatically updates apps on their Android devices.
Part 2: How to enable the automatic app updates on Android.
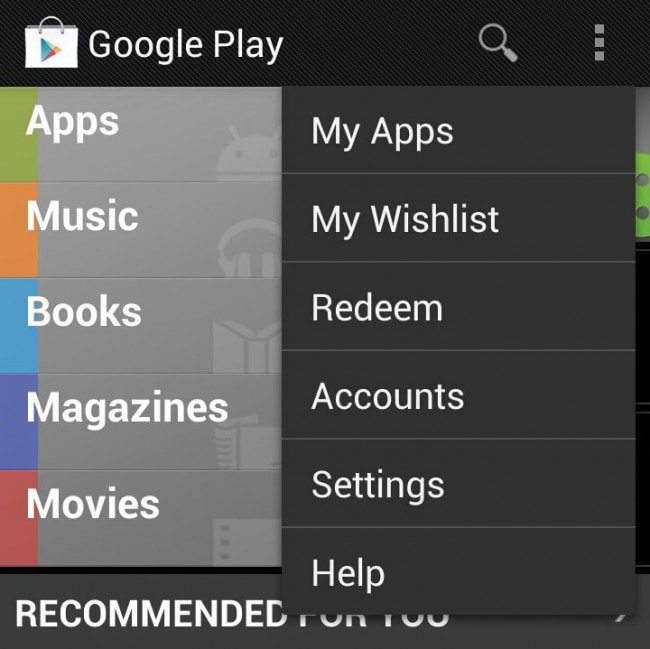
Step 1 From the main screen or menu of your Android smartphones or tablets, swipe or roll through all of the icons to search for the Google Play Store icon. Tap on it to open the feature.
Step 2 Once you have chosen the Google Play Store, a brand new screen will pop up. On the right side of your screen, on the upper part, you will see a three dot option. It is the menu button. Tap on it. A long list of choices will appear, and on the fifth selection, tap on Settings bar to choose it.

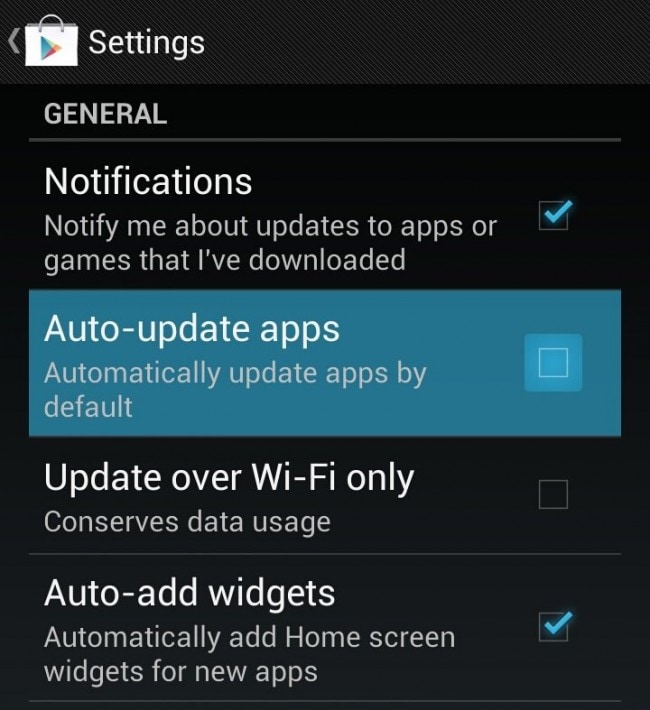
Step 3 The moment you have successfully performed the previous step, you will then see a new window pops up. Under the General headline, just simply put a tick on the box next to the lines: «Auto — update apps».

Step 4 Make sure everything is in your control one last time, and then you will see the difference. Now that every moment there is a new version or update of your Android apps, it will auto update apps for you immediately, or at least, inform you with a message about the updates.
Part 3: How to turn off the automatic app updates on Android.
Step 1 Open the main menu from your home screen of your Android devices. Look through all the menus and icons until you have found the Google Play Store app. Select that choice to begin the work.
Step 2 As soon as you have done with the selection, you will notice a new window’s appearance. On the up, right side of the screen, a three square dot icon will be there for you to tap on. It is also called the Menu option. In the dropdown menu that appears, tap on the Settings option to choose it.
Step 3 Once you have chosen to open the Settings menu, you will see a plenty of new choices. Under the headline that is entitled General, you will see a number of options and spare boxes come along. In the second bar, you shall notice there is a blue check on the box next to the sentence «Auto — update apps». Tap on that box once again to remove it. Save your settings.
Step 4 Once you have done with all these steps above, your settings will be back to original. You will no longer have Android automatically apps updates.
Part 4: Tips related to Android apps
Although the apps on your Android smartphones or tablets are undoubtedly efficient in helping you with a lot of things, the biggest drawback of these apps is absolutely its notifications. These notifications can vary from the useful ones, such as new apps updates, to the rubbish advertisements that really get on your nerves. All you have to do in this situation is to turn off the notification feature. This task will also prevent them from using up your battery for nothing. So below are the steps you have to follow in order to stop this annoying problem. First, wait and grasp the first notification that you can see. Then tap on it and hold the home button for a few seconds. To your surprise, a new box will pop up in the screen. Tap on the option App info, you will then see a list of all the available choices. Uncheck the box next to the line Show notifications. Then confirm OK one last time to finish it.
When you first purchased your Android smartphones or tablets, there will be a number of apps that have been set default. If you want to perform any changes, follow these steps. First, open the Settings menu from your main screen. In the dropdown menu that pops up, swipe down and then tap on the Apps option to open it. Swipe through the right to see the All option. Then in all the apps presented, select the apps that you would like to remove as default ones. Then finally tap on the Clear default blue bar to confirm your choice.
Источник
Implement In-app Update In Android
Make sure every user of your app is on the new version.

Apr 6, 2020 · 8 min read

In this article, we will learn about the In-app update feature in Android what is all about In-app update, what are the benefits of using the In-app update in your android application. Recently I’ve been working on a product in which I need to Implement an In-app update Why we need to Implement this?.
As a Developer we always want our users to have the updated version of their application but there are a lot of people who actually turned off their auto update from google play store and he/she doesn’t know about any update available or not.
To overcome the problem Google Introduced this feature called In-app update from this feature you can easily prompt the user to update the application and with the user permission you can update the application also while updating the app user can be able to interact with the application. Now the user doesn’t need to go to google play store to check there is any update available or not.
What is In-App Update:
An In-app update was Introduced as a part of the Play Core Library, which actually allows you to prompts the user to update the application when there is any update available on the Google Play Store.
There are two modes of an In-app update.
- Flexible Update
- Immediate Update
Flexible Update:
In Flexible update, the dialog will appear and after the update, the user can interact with the application.
This mode is recommended to use when there is no major change In your application like some features that don’t affect the core functionality of your application.
The update of the application is downloading in the background in the flexible update and after the completion of the downloading, the user will see the dialog in which the user needs to restart the application. The dialog will not automatically show, we need to check and show to the user and we will learn how later.
Benefits:
The major benefit of the flexible update is the user can interact with the application.
Источник
How to Update Your Android OS
Getting the latest Android update can be a simple task or a tedious one
:max_bytes(150000):strip_icc()/Lifewire_Molly-McLaughlin_webOG-327b0af1832c48a6b565fb20f3a87090.jpg)
:max_bytes(150000):strip_icc()/WorkBadgePhoto-61c0b98ef5a74e4a85851a8f706dbd65.jpg)
In general, Android updates will come courtesy of your carrier. How you access OS updates will vary, but you should prepare your phone or tablet in a few ways before you start downloading.
The newer your phone is, the sooner you’ll receive OS updates; Google’s Pixel smartphones gets them first. Those with phones running on older OS versions will have to jump through a few hoops first or might not be able to update at all.
Here’s how you can find out which version of the Android OS you’re running, get OS updates, and what to do if you don’t want to wait for your carrier to issue the OS update.
The directions below should generally apply no matter who made your Android phone: Samsung, Google, Huawei, Xiaomi, etc. Each handset may have slightly different names for things, however.
Updating Your Android OS
On a Pixel smartphone, you’ll get OS updates within days of their release. You’ll receive a notification with a prompt to download the update. On most Android smartphones, you can check for system updates in Settings; if one is available, you’ll see information on what the update is with a download prompt.
Whether you got a notification or went into Settings, you can download and install the update right away or schedule it for later. Just follow the on-screen prompts.
Before you proceed, there are a few things should you do:
- Back up your Android phone
- Make sure your battery is at least at 50 percent
- Plug the phone into a power source
- Make sure you have enough space on your phone
- Connect to Wi-Fi unless you have an unlimited data plan.
Google outlines how much space you need to download an update. If you don’t have enough, you can offload some of your apps, pictures, and other files to make room using Android’s file manager.
Find Out Which Version of Android You Have
If no update is available, you should check which version of Android you have, which will help you figure out if and when you’re eligible for an update. On most smartphones, you’ll find this under About phone in Settings.
Finding Your OS Version on a Pixel
Depending on the brand of Android phone you have, the process is a bit different. Here’s how to find your OS version on a Pixel phone. The interface will vary depending on the Android version you have.
Open Settings
Scroll down and tap System > About phone. Towards the bottom of the screen, you’ll see your Android version.
:max_bytes(150000):strip_icc()/AndroidVersion-8d9f6414112847178123bf058d7c902c.jpg)
Finding Your OS Version on a Samsung Galaxy Phone
On Samsung Galaxy phones, the process is similar, though again, the interface might vary.
Open Settings.
Tap About Phone > Software Information. You’ll see both your Android version and One UI version (Samsung’s custom skin).
:max_bytes(150000):strip_icc()/SamsungAndroidVersion-a079af67dce74c5387a06bd4b5849dca.jpg)
Updating Other Android Devices
If you have a phone that’s not from Google or Samsung, the process will be similar; check for your specific device’s instructions from the manufacturer or carrier. The «About phone» section of settings contains your phone’s model number, which can also help you figure out how to update your device (and if you can). Your carrier should also have information about whether you’ll receive an OS update.
When Will You Get the Latest Android Version?
When the latest Android version is available, you’ll receive a notification on an eligible phone; you can check for system updates by going into Settings.
If you own a Pixel, you probably already know that your device receives updates as soon as one is available. In this case, you will be alerted to updates within the first few days of an OS release.
Otherwise, if you own a newer non-Pixel phone, you’ll be first in line when your wireless carrier starts rolling out OS updates. The older your hardware, the longer you’ll have to wait. And if it’s old enough, you might not receive updates at all. The same applies if you have a lower-end device; again, check with your manufacturer and carrier to determine their policy.
Get an Android Update by Rooting Your Phone
If you want the latest OS as soon as it’s available, you can still choose to root your phone, enabling you to access updates when you want them. That’s just one of the many benefits of rooting your Android device. You’ll also be able to access features not yet available to unrooted Android smartphones and tablets.
Источник
Как внедрить In-app Updates в Android-приложение на React Native

В 2019 году Google выпустила In-app Updates — возможность обновлять Android-приложения без перехода в Google Play. Однако до сих пор довольно мало приложений поддерживают этот способ обновления.
Когда я внедрял In-app Updates в приложение Профи для специалистов — без сложностей не обошлось. Пришлось покопаться в документации, статьях и даже пару раз переписать реализацию.
Чтобы меньше людей наступали на мои грабли, я сделал пошаговую инструкцию по интеграции In-app Updates в Android-приложение на React Native. Если следовать ей — сможете внедрить эту опцию за день.
Оговорка
Уже разработали несколько библиотек, инкапсулирующих реализацию In-app Updates. Например, эту или эту. Моя статья для тех, кто хочет добавить интеграцию самостоятельно.
Что будем делать
Разберёмся, как тестировать эту фичу. Ведь она требует взаимодействия с Google Play.
Подготовка к тестированию
Нам придётся неоднократно тестировать код. Поэтому сперва разберёмся, как это делать.
Для проверки In-app обновлений Google разработала специальную тестовую среду, в которую можно загрузить apk-файл или bundle приложения и затем установить на устройство. Через неё же будем имитировать появление обновления.
Готовим устройство.
Устанавливать приложения из тестовой среды можно как на реальные устройства, так и на эмуляторы. В любом случае нужно настроить Google Play (названия кнопок на вашем устройстве могут отличаться, но суть одна):
Заходим в Google Play, кликаем на своё фото, выбираем «Настройки».
В разделе «Сведения» кликаем много раз подряд на «Версию Google Play», пока не станем разработчиком.
Включаем тогл «Внутренний доступ к приложениям» в разделе «Личные» или «Общее».
Собираем apk- или aab-файл приложения.
Для тестирования подойдёт обычная debug-сборка, без каких-либо подписей и js-бандлов. В Android Studio это Build -> Build Bundle(s) / APK(s) -> . Такое приложение после установки будет при запуске подключаться к js-бандлеру и загружать js-код.
Ещё к нему можно подключить дебаггер Android Studio, чтобы отлаживать нативный код. Для этого нужно нажать на «жучка со стрелочкой» в панели инструментов Android Studio (Attach debugger to Android Process) и выбрать запущенное приложение.
Уточню, что устройство должно быть подключено к компьютеру, а тип подключения должен разрешать обмен данными. Чтобы избежать проблем с подключением, советую пользоваться эмулятором.
Загружаем полученный файл в Internal App Sharing и указываем название версии.
Советую добавлять к названию инкрементируемое число, чтобы не путаться. Тестирование вряд ли ограничится двумя-тремя сборками.
Копируем ссылку на приложение, открываем на устройстве и устанавливаем.
Готовим обновление.
Чтобы имитировать обновление, нужно повторить шаги 2–4 со следующими нюансами:
номер сборки (versionCode) должен быть больше номера установленной сборки;
желательно добавить изменения, которые заметны сразу при запуске. Так проще понять, что приложение обновилось;
устанавливать сборку не нужно. Надо перейти по ссылке и попасть на экран с кнопкой «Обновить» или Update.
Если не использовать Internal App Sharing — обновление будет недоступно.
Поддержка immediate-обновлений
Immediate-обновления почти полностью реализует Google. Нужно только запросить проверку на наличие новой версии. Если она есть, Google покажет пользователю полноэкранный баннер, загрузит, установит обновление и перезапустит приложение.
Создадим нативный модуль с методом проверки наличия обновления.
(Здесь и далее код на Kotlin и JavaScript)
Проверяем наличие новой версии. Если она есть, то запускаем обновление. APP_UPDATE_REQUEST_CODE — это числовая константа, определяющая наш запрос. С её помощью мы идентифицируем сигнал, если в процессе обновления произойдёт ошибка.
Чтобы иметь возможность переопределить метод onActivityResult в нативном модуле, нужно реализовать интерфейс ActivityEventListener .
Позже добавим шлюз для передачи событий из натива в JS, чтобы в случае ошибки обновления можно было отправить событие и обрабатывать его в React Native.
Вызываем написанный метод из JS.
И вуаля — всё работает.
Поддержим установку обновления после сворачивания.
В процессе установки пользователь может свернуть приложение. Установка при этом должна продолжиться. А если пользователь вновь развернёт приложение, нужно убедиться, что процесс не остановился. Для этого добавим метод в нативном модуле:
Нужно вызывать его каждый раз, когда приложение становится активным. Для этого в React Native зарегистрируем слушателя изменений AppState :
Поддержка flexible-обновлений
Процесс flexible-обновлений выглядит так:
Google Play предлагает пользователю обновить приложение;
если пользователь соглашается, начинается фоновая загрузка обновления;
после загрузки мы предлагаем установить обновление с полноэкранной заставкой от Google Play и перезапуском приложения в конце;
eсли пользователь отказывается установить обновление в моменте, предлагаем ему повторно. Google рекомендует делать это на каждое разворачивание приложения, но тут воля ваша. Кстати, если приложение будет в фоне на момент завершения загрузки, то установка обновления произойдёт автоматически.
В отличие от immediate-обновлений, здесь придётся написать чуть больше кода.
Модифицируем написанные ранее методы, чтобы при их вызове можно было указать требуемый тип обновления.
Достаточно добавить аргумент для типа обновления в нативные методы checkForAppUpdate и resumeUpdate .
Объявим слушателя для наблюдения за процессом.
Слушатель должен реализовывать интерфейс InstallStateUpdatedListener .
Зарегистрируем его в методе checkForAppUpdate перед вызовом startUpdateFlowForResult :
Добавим трансляцию процесса обновления на уровень JS.
Мы хотим следить за ходом обновления на стороне React Native, чтобы иметь возможность показать пользователю прогресс загрузки или предложить установить обновление, когда оно скачается. Для этого будем транслировать статус из натива, используя EventEmitter .
Добавим в наш модуль:
И вызовем новый метод в слушателе:
bundle.toMap() — extension-функция, конвертирующая Bundle в WritableMap , который можно передавать в React Native
Добавим слушателя событий на стороне JS.
В JS-коде подпишемся на сообщения перед вызовом checkForAppUpdate :
Использованные здесь константы дублируются из нативного кода.
Отлично! Теперь мы запрашиваем обновление из React Native и следим за его статусом. Но после успешной загрузки ничего не произойдёт. Нужно инициировать установку.
Предложим установить обновление.
Для этого добавим сообщение в слушателя событий в JS:
Если пользователь согласится, нужно снова передать управление в натив и запустить установку обновления. Для этого добавляем и вызываем метод нативного модуля:
Обработаем отказ от установки.
Как я писал выше, в случае отказа от установки нужно напоминать пользователю об обновлении. Проще всего это делать при каждом переходе в приложение (будь то запуск или разворачивание). Тем более что в предыдущем разделе мы уже использовали этот триггер для проверки состояния immediate-обновления. Давайте добавим в нативный метод resumeUpdate проверку статуса обновления и, если оно остановится после загрузки, предложим обновиться:
Вот и всё. Обработка события на стороне React Native уже реализована, поэтому при получении статуса InstallStatus.DOWNLOADED пользователь вновь увидит предложение установить загруженное обновление.
Закругляюсь
Мы поддержали In-app обновления приложения двух видов — immediate, когда весь процесс под контролем Google, и flexible, в котором мы сами решаем, как показать пользователю прогресс и показывать ли вообще. Теперь можете решить, какой вид обновления лучше подходит вашему приложению. А может, вы захотите использовать оба варианта. Как бы то ни было, вся конфигурация управляется на стороне React Native, и писать нативный код больше не придётся.
Я рассказал про минимальную функциональность In-app обновлений. Ещё есть возможность управлять частотой показа баннера и приоритетами обновлений. Это легко поддержать на базе написанного нативного модуля. Просто эти опции выходят за рамки статьи.
Если захотите поддержать обязательные обновления в своём приложении, потребуется немного доработать код. Google рекомендует при отказе пользователя в стандартных баннерах показывать ему информационное сообщение, после которого запускать процесс обновления повторно.
Я намеренно не стал усложнять код в статье. Но рекомендую все методы взаимодействия с нативным модулем из React Native вынести в отдельный сервис, чтобы инкапсулировать всю логику в одном месте.
Несмотря на обилие кода, поддержка In-app обновлений реализуется легко. Надеюсь, мне удалось это показать в статье, и вы решитесь добавить такую опцию в ваше приложение. Лично мне она кажется удобной.
Источник


