- ArrayAdapter
- Создание адаптера
- Используем ресурсы
- Динамическое наполнение
- ListAdapter
- SpinnerAdapter
- Переопределяем адаптер
- Несколько советов
- Адаптеры и списки
- ListView и ArrayAdapter
- Android Array Adapters — What most of the tutorials don’t tell you.
- Adapter
- ArrayAdapter
- ArrayAdapter — Constructors
- Custom Array Adapter
- The wrong way
ArrayAdapter
Создание адаптера
ArrayAdapter является простейшим адаптером, который специально предназначен для работы с элементами списка типа ListView, Spinner, GridView и им подобным. Создать адаптер этого вида можно так:
В параметрах используется контекст, XML-разметка для отдельного элемента списка и массив данных. Контекстом может быть сама активность (this), под разметкой подразумевается компонент, в котором выводится текст, например, TextView, а данными является подготовленный массив, все элементы которого по очереди вставляются в указанную разметку.
Разметку можно создать самостоятельно, а можно использовать готовую системную разметку. Если посмотреть на исходники файла simple_list_item_1.xml в документации Android SDK, то увидим, что он содержит TextView. В этом коде мы создали адаптер ArrayAdapter, в котором данные элемента TextView представлены в виде строк.
Чтобы код был более читаемым, можно сделать ещё так:
Мы вынесли массив строк в отдельную переменную.
Используем ресурсы
Если у нас есть готовый файл ресурсов (массив строк), то можно использовать специальный метод createFromResource(), который может создать ArrayAdapter из ресурсов:
Подготовим массив строк:
Теперь мы можем воспользоваться адаптером и применить к Spinner:
В этом примере мы использовали системную разметку android.R.layout.simple_spinner_item, которая тоже содержит TextView.
При использовании этого метода вы можете применять локализованные версии, что очень удобно.
Или можно пойти другим путём. Получить массив из ресурсов и вставить его в адаптер, как в самом первом примере.
Динамическое наполнение
Также мы можем создать массив программно.
ListAdapter
ListAdapter является интерфейсом. По сути ничего не меняется. Заменяем ArrayAdapter adapter на ListAdapter adapter и получаем тот же результат.
Данный интерфейс может пригодиться при создании собственного адаптера, а для стандартных случаев выгоды не вижу.
SpinnerAdapter
SpinnerAdapter также является интерфейсом и может использоваться при создании собственных адаптеров на основе ArrayAdapter. В стандартных ситуациях смысла использования его нет. Вот так будет выглядеть код:
Переопределяем адаптер
По умолчанию ArrayAdapter использует метод toString() из объекта массива, чтобы наполнять данными элемент TextView, размещённый внутри указанной разметки. Если вы используете ArrayAdapter , где в параметре используется ваш собственный класс, а не String, то можно переопределить метод toString() в вашем классе. Пример такого решения есть в конце статьи Android: Простейшая база данных. Часть вторая.
Другой способ. Мы хотим выводить данные не в одно текстовое поле, а в два. Стандартная разметка для списка с одним TextView нам не подойдёт. Придётся самостоятельно создавать нужную разметку и наполнять её данными.
В этому случае нужно наследоваться от класса ArrayAdapter, указывая конкретный тип и переопределяя метод getView(), в котором указать, какие данные должны вставляться в новой разметке.
Метод getView() принимает следующие параметры: позицию элемента, в котором будет выводиться информация, компонент для отображения данных (или null), а также родительский объект ViewGroup, в котором указанный компонент поместится. Вызов метода getItem() вернёт значение из исходного массива по указанному индексу. В результате метод getView() должен вернуть экземпляр компонента, наполненный данными.
Допустим, у нас есть простой класс Cat с двумя полями — имя и пол. Нашему списку понадобится специальная разметка, состоящая из двух текстовых полей. Создадим адаптер, который будет использовать класс Cat вместо String и будем извлекать данные из объекта класса.

Как видите, достаточно просто изменить программу, используя свой класс вместо String.
В методе getView() используется не совсем корректная версия метода inflate(). Подробнее об этом читайте в статье LayoutInflater
Класс ArrayAdapter позволяет динамически изменять данные. Метод add() добавляет в конец массива новое значение. Метод insert() добавляет новое значение в указанную позицию массива. Метод remove() удаляет объект из массива. Метод clear() очистит адаптер. Метод sort() сортирует массив. После него нужно вызвать метод notifyDataSetChanged.
Несколько советов
ArrayAdapter имеет шесть конструкторов.
- ArrayAdapter(Context context, int resource)
- ArrayAdapter(Context context, int resource, int textViewResourceId)
- ArrayAdapter(Context context, int resource, T[] objects)
- ArrayAdapter(Context context, int resource, int textViewResourceId, T[] objects)
- ArrayAdapter(Context context, int resource, List objects)
- ArrayAdapter(Context context, int resource, int textViewResourceId, List objects)
У них у всех первые два параметра — это контекст и идентификатор ресурса для разметки. Если корневой элемент разметки является контейнером вместо TextView, то используйте параметр textViewResourceId, чтобы подсказать методу getView(), какой компонент используется для вывода текста.
Сам адаптер работает с данными, как со списками. Если вы используете стандартный массив, то адаптер переконвертирует его в список. Сами данные необязательно сразу передавать адаптеру, можно сделать это позже через метод addAll().
Другие полезные методы адаптера:
- add() — добавляет объект в коллекцию
- remove() — удаляет объект из коллекции
- getItem(int position) — возвращает объект из позиции position
- getContext() — получает контекст
На последний метод следует обратить внимание при создании собственного адаптер на основе ArrayAdapter. Не нужно в своём классе объявлять контекст таким образом.
Через метод getContext() вы уже можете получить доступ к контексту, не объявляя новой переменной.
Тоже самое применимо и к массивам. Не нужно объявлять массив:
Используйте метод getItem(position), который может получить доступ к массиву.
Если позволяет логика, используйте списки вместо массивов для большей гибкости. Тогда вы можете добавлять и удалять данные через методы add() и remove().
Источник
Адаптеры и списки
ListView и ArrayAdapter
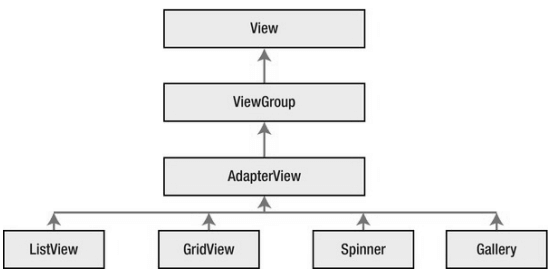
Android представляет широкую палитру элементов,которые представляют списки. Все они является наследниками класса android.widget.AdapterView . Это такие виджеты как ListView, GridView, Spinner. Они могут выступать контейнерами для других элементов управления
При работе со списками мы имеем дело с тремя компонентами. Во-первых, это визуальный элемент или виджет, который на экране представляет список (ListView, GridView) и который отображает данные. Во-вторых, это источник данных — массив, объект ArrayList, база данных и т.д., в котором находятся сами отображаемые данные. И в-третьих, это адаптер — специальный компонент, который связывает источник данных с виджетом списка.
Одним из самых простых и распространенных элементов списка является виджет ListView . Рассмотрим связь элемента ListView с источником данных с помощью одного из таких адаптеров — класса ArrayAdapter .
Класс ArrayAdapter представляет собой простейший адаптер, который связывает массив данных с набором элементов TextView , из которых, к примеру, может состоять ListView . То есть в данном случае источником данных выступает массив объектов. ArrayAdapter вызывает у каждого объекта метод toString() для приведения к строковому виду и полученную строку устанавливает в элемент TextView.
Посмотрим на примере. Итак, разметка приложения может выглядеть так:
Здесь также определен элемент ListView, который будет выводить список объектов. Теперь перейдем к коду activity и свяжем ListView через ArrayAdapter с некоторыми данными:
Здесь вначале получаем по id элемент ListView и затем создаем для него адаптер.
Для создания адаптера использовался следующий конструктор ArrayAdapter (this,android.R.layout.simple_list_item_1, countries) , где
this : текущий объект activity
android.R.layout.simple_list_item_1 : файл разметки списка, который фреймворк представляет по умолчанию. Он находится в папке Android SDK по пути platforms/[android-номер_версии]/data/res/layout. Если нас не удовлетворяет стандартная разметка списка, мы можем создать свою и потом в коде изменить id на id нужной нам разметки
countries : массив данных. Здесь необязательно указывать именно массив, это может быть список ArrayList .
В конце неоходимо установить для ListView адаптер с помощью метода setAdapter() .
Источник
Android Array Adapters — What most of the tutorials don’t tell you.

Mar 30, 2016 · 6 min read
Do a quick google search on the topic array adapter, custom array adapter, implementing array adapter, android custom list view, or extending array adapter. You would find that most of the results are tutorials on how you could extend the ArrayAdapter, that is a part of Android SDK, and implement your own custom array adapters. The thing with most of these tutorials is all of them get some of the basic things wrong.
Adapter
What is an Adapter anyway? A n adapter is an object that provides views for a list view. Whenever list view needs to draw a view at a particular list position, it gets it from the adapter. The adapter makes the view for that position and returns it. Since the adapter creates the views, it is necessary for it to also store the underlying data. So the adapters are all about this. They pack data and the logic for creating views out of the data. The data can be a cursor or a list of objects. To support these different types, we have CursorAdapter and ArrayAdapter in the SDK.
ArrayAdapter
Though it is called ArrayAdapter, it actually stores the data in a list. Well, why use an array when you can use a list.
Here is a snippet from ArrayAdapter.java.
ArrayAdapter class has getView() method that is responsible for creating the views. So behind the scenes, a listview calls this method to get a view for a particular position.
The getView() method can inflate the view from a layout resource or create it programmatically. It expects the inflated view to be a TextView. If it turns out to be a ViewGroup, then it is necessary for the view group to have a text view.
This text view’s id should be passed to the adapter when it is instantiated, so that it can retrieve it by doing findViewById(). After that the data object for given position is retrieved from the list. The data object is converted to a String by running toString on it and the string value is set to the text view.
Here is a snippet of the getView() method in ArrayAdapter.java:

ArrayAdapter — Constructors
Here are the constructor methods in the ArrayAdapter class,
- ArrayAdapter(Context context, int resource)
- ArrayAdapter(Context context, int resource, int textViewResourceId)
- ArrayAdapter(Context context, int resource, T[] objects)
- ArrayAdapter(Context context, int resource, int textViewResourceId, T[] objects)
- ArrayAdapter(Context context, int resource, List objects)
- ArrayAdapter(Context context, int resource, int textViewResourceId, List objects)
All these methods have two parameters in common, context and resource. resource is ID of the layout resource that getView() would inflate to create the view. If the layout’s root is any view group instead of just a text view, the parameter textViewResourceId should also be passed so that getView() can retrieve the text view and set its text.
context refers to the activity where the adapter is created. It is helps you with accessing system services and resources in case you need them.
object is a collection of objects that provide data to the adapter. If it is a list, the adapter stores it as is. If it is an array, the adapter converts it to a list. It is not required to pass this value when instantiating the adapter. It can be set later using addAll() method.
Other useful methods in the ArrayAdapter class:
- add() — add an object to the collection
- remove() — remove an object from the collection
- getItem(int pos) — return the object at position, pos
- getContext() — get the context
That’s all about array adapters. We could see that the limitation here is whatever type of objects we pass, the adapter is going to run toString() on it and set the string to text view. This is ok if the objects are just strings. But the things that are rendered in a list view are more than a list of strings.
Custom Array Adapter
List items in a common list view contain complex layout structure than just a simple text view. To support this complex layouts, we need to customize array adapters through inheritance.
To get started create a new class, say MyArrayAdapter, and have it extend ArrayAdapter. Since ArrayAdapter class has no default constructor, we need to define a constructor that matches one of the six constructors in the superclass.

There is no need to pass resource parameter to super constructor as the super class(ArrayAdapter) uses it only in getView() method which we are going to override anyway.
Now we do the core part of overriding the getView() method. In getView(), inflate a view from layout resource or you can also do it programmatically. Your views can be as complex as you want. Once the view is inflated we need to fill it up with data.
To access the data object call getItem(position), then call methods on the object to get the values. Finally set these values on different UI elements in the layout and return the view.
Here is a sample:

This is the least optimized implementation of getView() as it ignores the convertView that the list view passes. A convert view is a view that is currently not in the screen and hence can be recycled. This results in big performance boost as we reuse an existing view instead of inflating a new view from the xml layout file which is a relatively costly operation.
To get the fastest list view possible, use convert view if it is not null and also use a pattern called view holder pattern that helps you in saving also those findViewById() calls for recycled views.
The wrong way
Lets summarise everything we did to set up a custom array adapter:
- Create a class by extending ArrayAdapter
- Add a constructor to the class
- Override getView method
It seems so simple, right? However most of tutorials I read online have got it wrong. Most of the android beginners do it wrong.
Here is where it is done wrong.

Here super class constructor is passed context and values, i.e. the responsibility of holding references to context and values is delegated to the super class. Hence there is no need for MyArrayAdapter to hold references to these. By calling getContext() and getItem(pos), MyArrayAdapter class can access these values.
ArrayAdapter class does not have any methods to get the layout resource id. Therefore it totally makes sense to have a member variable for that here.
In some examples, the resource id is not the part of the custom adapter class. It is just directly hardcoded into the getView method. It is a bad practice and should be avoided.
View view = inflater.inflate(R.layout.rowlayout, parent, false);
Note that in the code above, the values are stored in a array. This results in loss of dynamic behavior. If the list items are dynamic it is better to store the data in a list.

Even if the values are stored in a list, you need ways to add or remove items from the list. Hence many custom adapters have add() and remove() methods. Again, ArrayAdapter has these methods and they are thread safe too. If you have avoided storing a reference of data in custom adapter in the first place, you wouldn’t have needed these methods.
It is a always a good practice to go through the documentation of a class (or the source code) you are going to customize. There is a good chance it has the methods you need.
Источник


