- Change your Apple ID
- How to change your Apple ID to a different email address
- If you can’t change your Apple ID
- Use Custom Email Domain with iCloud Mail
- Add a custom email domain
- Remove a custom email domain
- Какая почта нужна для Apple ID?
- Какую почту лучше использовать для Apple ID?
- Какую почту лучше НЕ использовать для Apple ID?
- Ошибки почты при создании Apple ID
- About your Apple ID email addresses
- Email addresses you use with your Apple ID
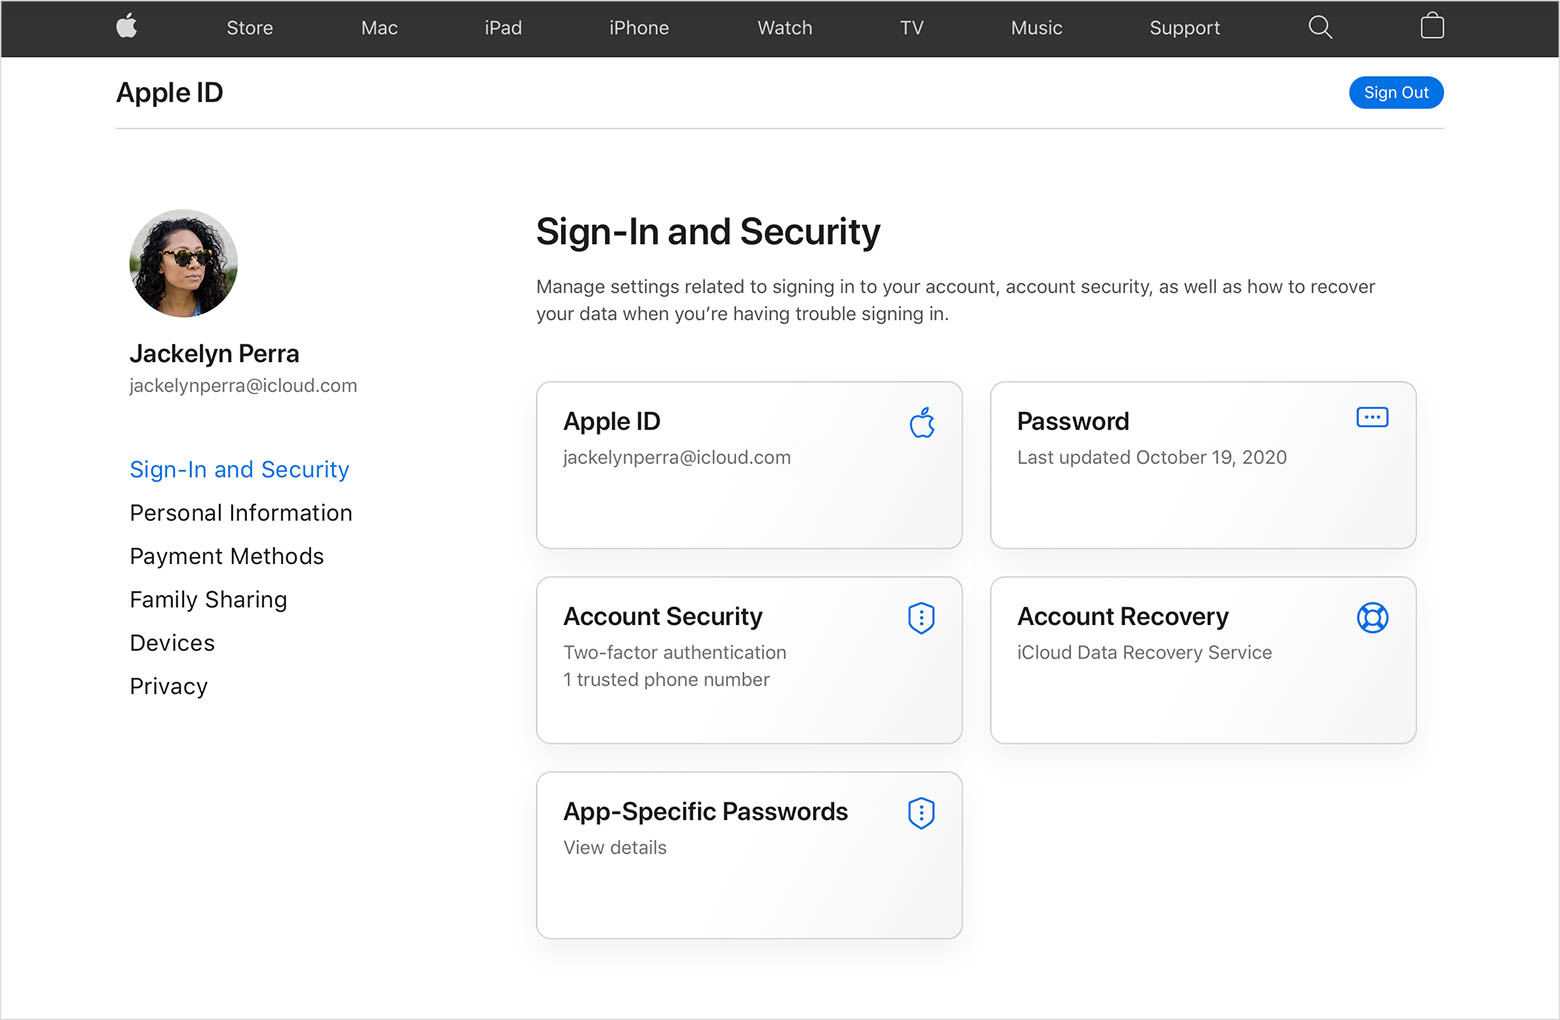
- Apple ID email address
- Change your Apple ID email address
- Reset your Apple ID password
- Get a verification code
- Additional email addresses
- Add an additional email address
- Delete an additional email address
- Rescue email address
- Add or edit a rescue email address
- Delete a rescue email address
- Reset your security questions
- Learn more
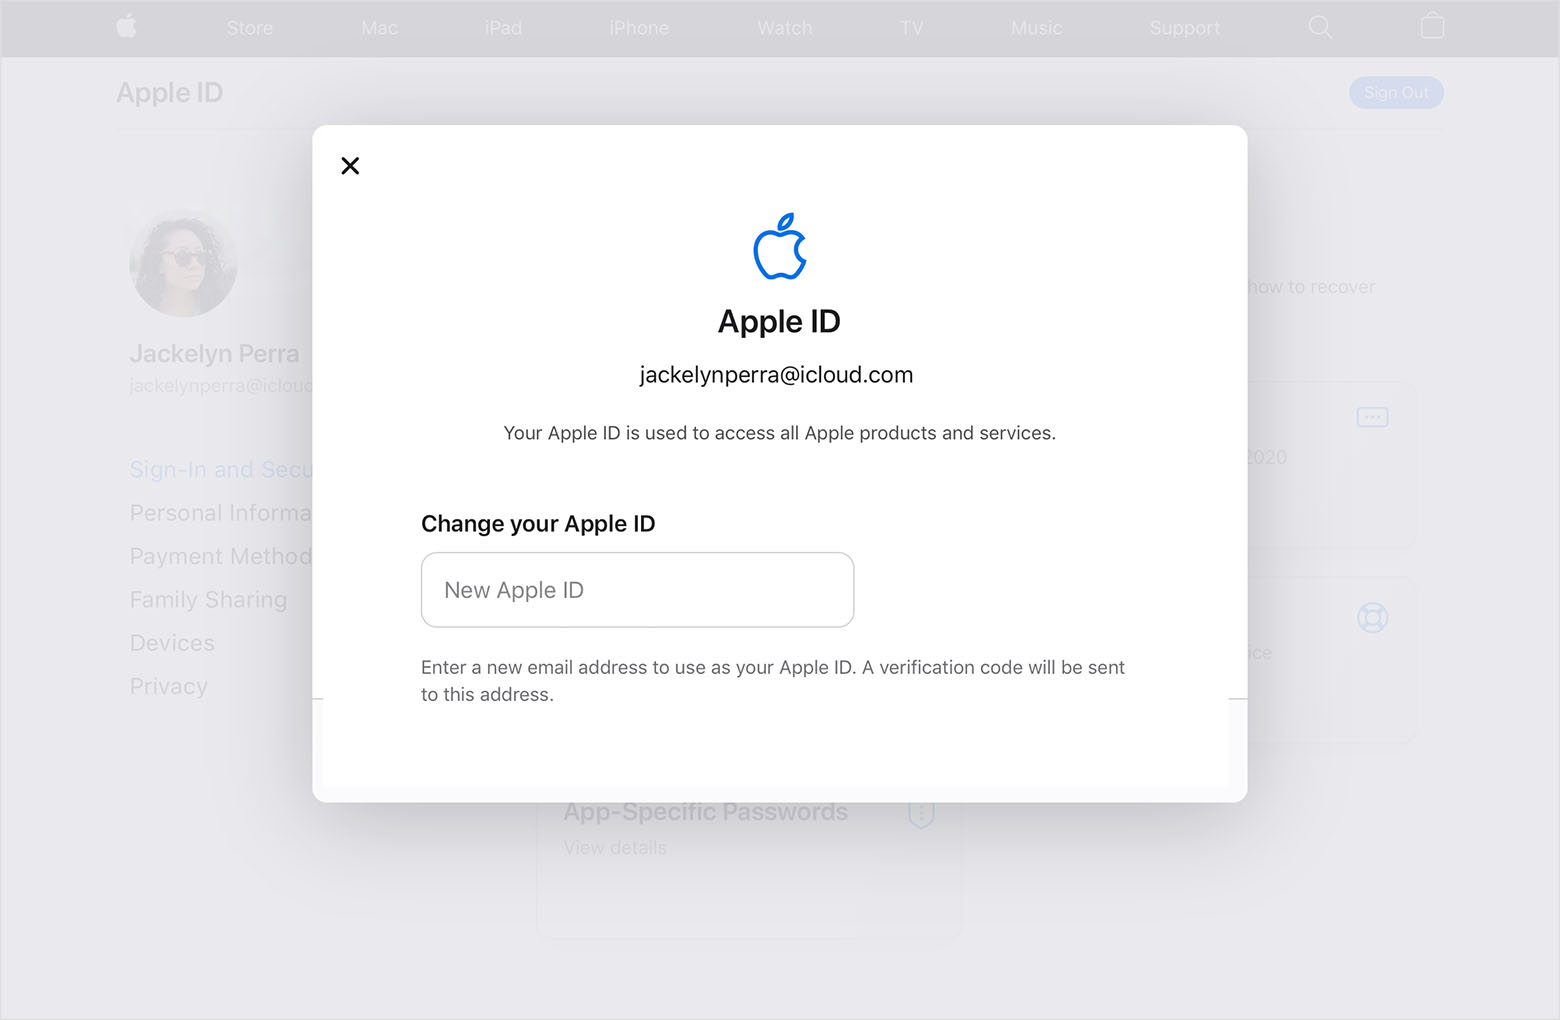
Change your Apple ID
If you no longer use the email address that’s associated with your Apple ID, you can change it. You won’t lose access to your contacts, purchases, or other account information.
How to change your Apple ID to a different email address
- Go to appleid.apple.com and sign in.
- In the Sign-In and Security section, choose Apple ID.

- Enter the email address that you want to use as your Apple ID.
- Choose Change Apple ID.
- If you changed your Apple ID to a third-party email address, check your email for a verification code, then enter the code. Learn what to do if you didn’t get the email.
- If you use services like iCloud or Messages to share with friends and colleagues, sign in to those services with your updated Apple ID.
If you can’t change your Apple ID
If you try to change your Apple ID to an @icloud.com email address that was created within the last 30 days, you will be asked to try again later.
If you see a message that the email address you want to use isn’t available or is already in use, check that you or a family member aren’t already using that email address with a different Apple ID. If a family member is using that email address, remove it from their account then try to use it.
In some countries or regions, you can use your phone number as your Apple ID. But if your Apple ID is an email address, you can’t change it to a phone number.
Источник
Use Custom Email Domain with iCloud Mail
When you subscribe to iCloud+, you can use up to five custom domains to send and receive email with iCloud Mail. Learn how to get started.
If you subscribe to iCloud+ and own a personal domain name, you can set up iCloud Mail to use it when sending or receiving mail so your recipients see mail coming from your personalized email address. After you configure your domain, you can set up any existing email addresses you already own, create new ones, or delete any you don’t need anymore. You can use your custom email address in the Mail app on any device signed in with your Apple ID and iCloud Mail turned on, or on iCloud.com/mail. You can also use it for Messages, FaceTime, Calendar, to sign in to your device, and more. You can use iCloud Mail to send and receive email with up to five personal domains, with up to three email addresses per domain.
If you share iCloud+ with your Family Sharing group, you can also share your email domain with them. Anyone in your Family Sharing group can add a custom domain, choose whether or not to share it, and manage the email addresses that they use with that domain.
To get started with or manage Custom Email Domain, go to iCloud.com/settings/customdomain.
If you use a Managed Apple ID, Custom Email Domain isn’t supported. Learn more about Managed Apple IDs.
Add a custom email domain
To use a custom email domain with iCloud Mail, you need an Apple ID with two-factor authentication turned on. You also need to set up iCloud Mail on your devices.
Remove a custom email domain
If you no longer want to use a custom email domain that you set up for iCloud Mail, you can remove it. After you remove it, you and members of your Family Sharing group can’t send or receive email for any addresses at that domain in iCloud Mail.
Источник
Какая почта нужна для Apple ID?
Привет! Обожаю интернет. Почему? Потому что перед написанием этой короткой заметки я пробежался по выдаче и посмотрел, что пишут на других сайтах (какую почту авторы различных текстов рекомендуют использовать для Apple ID) и, как обычно, немного (извиняюсь за мой французский) обалдел — на одном из ресурсов я увидел инструкцию, которая содержит 29 (двадцать девять!) подзаголовков.
Это прям не инструкция, а какая-то докторская диссертация на тему электронного адреса и его совместимости с учетной записью Apple ID.
А знаете, что самое интересное? Что даже осилив весь текст (это было нелегко) ответа на вопрос «Какая почта нужна для Apple ID?» я так и не получил. Поэтому… придётся разобраться во всём самому. Раз, два, три. Поехали!
Какую почту лучше использовать для Apple ID?
Да практически любую.
Почему «практически»? Об этом чуть ниже.
Например, прекрасно подойдёт:
Главное, у вас (и только у вас!) должен быть полный контроль над почтовым ящиком:
- Вы отлично знаете и не забудете пароль.
- Вы имеете доступ к доверенным устройствам и номерам (при наличии двухфакторной аутентификации).
- Вы помните ответы на контрольные вопросы.
- В почтовом ящике указаны ваши реальные данные.
Всё это нужно и важно по одной причине — почта является основополагающим моментом при создании и управлении Apple ID. И именно почту вы будете использовать в том случае, если с учётной записью что-то «пойдёт не так» (блокировка по соображениям безопасности, недоступность обновления, экстренная смена e-mail и многое-многое другое).
В общем, стоит подготовиться и сделать почтовый ящик максимально «личным» — в дальнейшем будет проще.
Подведём промежуточный итог: кроме вышеописанных рекомендаций, каких-то жёстких ограничений для выбора почтового ящика «под Apple ID» нет — можно использовать практически любой адрес электронной почты.
Кстати, о «практически»…
Какую почту лучше НЕ использовать для Apple ID?
На этот счёт у меня есть несколько простых советов.
Следовать им или нет — решать только вам.
Но я бы крайне рекомендовал не использовать в качестве почтового ящика для Apple ID:
- Почту iCloud. Да, в теории это звучит прикольно (вот у меня вообще «всё в одном» от Apple!), но на практике это самое «всё в одном» может принести боль и страдания. Например, недавно Apple что-то не понравилось и человек в США одним махом получил блокировку всего, что связано с яблочной компанией — карты, почта, учётная запись. Конечно, потом проблема была успешно решена. Но это в США. Как будет у нас… лучше даже не пробовать.
- Одноразовые почтовые ящики. Ну, тут всё понятно. Подобные варианты работают недолго и служат исключительно для каких-то кратковременных ситуаций — их абсолютно точно нельзя использовать для создания Apple ID.
- Почту непонятных и малоизвестных сервисов. Ведь сегодня они работают (все такие защищённые, продвинутые и вообще самые лучшие), а завтра — исчезли. Вам это надо? Мне кажется, нет.
Вывод: не стоит экспериментировать и усложнять себе жизнь — используйте почтовые ящики «от известных производителей» и всё будет «ОК».
Правда, есть ещё один момент…
Ошибки почты при создании Apple ID
Вот вроде бы выбрали почтовый ящик, пытаетесь зарегистрировать Apple ID и тут…
Итак, вот с какими ошибками можно столкнуться при добавлении почтового ящика во время создания Apple ID и что, собственно говоря, с этим делать:
- В данный момент этот e-mail невозможно использовать в качестве Apple ID. Чаще всего появляется при попытке смены (указания) почты @icloud.com в качестве основного адреса электронной почты для Apple ID. В чём причина? Либо какие-то проблемы с самой учётной записью (техническая поддержка должна помочь), либо сбои на серверах Apple (нужно немного подождать), либо… см. пункт №2.
- Этот адрес электронной почты недоступен. Выберите другой e-mail. Почему адрес недоступен? Потому что он ранее уже был зарегистрирован для Apple ID или используется в качестве резервной почты. Здесь уже выбор небольшой — придётся искать другой почтовый ящик.
- Введите действительный адрес электронной почты, который будет использоваться для Apple ID. Возможно, вы пропустили какой-то символ, букву или цифру — будьте внимательны при указании почтового ящика!


Вот вроде бы и всё.
Надеюсь, теперь вы сможете:
- Определиться с тем, какая почта нужна для вашей учётной записи.
- Тщательно её (почту) подготовить.
- Победить все ошибки, возникающие указании почтового ящика во время регистрации Apple ID.
Ну а если что-то не получается, то вы всегда знаете как поступить….
Задавайте вопросы, получайте ответы, расскажите свою историю или поделитесь личным опытом. Добро пожаловать!
Источник
About your Apple ID email addresses
Learn how to add, change, or delete the different types of email addresses that you can use with your Apple ID account.
Email addresses you use with your Apple ID
Your Apple ID uses email addresses to sign you in to your account with Apple. With your Apple ID, you can access services like the App Store, Apple Music, iCloud, iMessage, FaceTime, and more. We use your email addresses to send you information about your account, and to help friends and family communicate and share with you.
Apple ID email address
In most cases, your Apple ID is also the primary email address of your Apple ID account.
Additional email addresses
Add extra email addresses to your account to help people find you on Apple services like FaceTime, iMessage, and Find My.
Rescue email address
Most people have a notification email address instead of a rescue email address. Apple uses this to send you important account and security related information. If you don’t use two-factor authentication or two-step verification (learn how to check what security method you use), you have the option to add a rescue email address to your account for more security. You can see it when you sign in to your Apple ID account page.
Before you can use a new or updated Apple ID, we’ll send you a verification email to make sure that the email address belongs to you.

Apple ID email address
When you create an Apple ID, you enter an email address. This email address is your Apple ID and the username that you use to sign in to Apple services like Apple Music and iCloud. It’s also the contact email address for your account. Be sure to check your email address regularly. We’ll send you email notifications to help you manage your account and make the most of your Apple ID.
Change your Apple ID email address
Reset your Apple ID password
If you know your current Apple ID password and want to change it, follow these steps on your iPhone, iPad, iPod touch, or Mac. If you’ve forgotten your Apple ID password and need to reset it, follow these steps.*
Get a verification code
With two-factor authentication, you’ll need a verification code to sign in with your Apple ID on a new device or browser. Learn how to get and use the code on a trusted device, or get a text or phone call.
* If you use two-factor authentication, in some cases you might be able to speed up the account recovery process or reset your password immediately by verifying a six-digit code sent to your primary email address.
Additional email addresses
Many of us have more than one email address that friends and family use to reach us. Add an email address that you commonly use to your Apple ID account, so people can easily find and communicate with you on Apple services like FaceTime, iMessage, Shared Albums, iWork collaboration, and Find My.
Add an additional email address
- Sign in to your Apple ID account page.
- Click Edit in the Account section.
- Under Reachable at, select Add More.
- Enter your additional email address. Make sure you’re not already using it as an Apple ID.
- We’ll send a verification to that address. Didn’t get the email?
- Enter the verification code and click Verify.
Delete an additional email address
- Sign in to your Apple ID account page.
- Click Edit in the Account section.
- To delete one of your additional email addresses, click next to the address.
Rescue email address
Having a rescue email address is optional but recommended if you do not have two-factor authentication or two-step verification. If you ever forget your security questions, you can use your rescue email address to reset them. We also send any account security-related notifications to your rescue email address. If you have two-factor authentication or two-step verification, you have a notification email address instead of a rescue email address and won’t need to remember security questions.
Add or edit a rescue email address
- Sign in to your Apple ID account page.
- Click Edit in the Security section. You might be asked to answer one or more security questions before you continue.
- To add a rescue email address:
- Under Rescue Email, click Add an Email Address, then enter your rescue email address. We send a verification to that address. Didn’t get the email?
- Enter the verification code and click Verify.
- To edit a rescue email address:
- Select Change Email Address under the address you want to edit, then enter the new address. We send a verification to that address. Didn’t get the email?
- Enter the verification code and click Verify.
If you had a rescue email address on file when you upgraded to two-factor authentication or two-step verification, you can also use these steps to edit your notification email address. If you remove the notification email, you won’t be able to add a new one.
Delete a rescue email address
- Sign in to your Apple ID account page.
- Click Edit in the Security section. You might be asked to answer one or more security questions before you continue.
- To delete a rescue email address, click next to the address.
Reset your security questions
If you’ve forgotten the answers to your security questions, follow these steps to verify your identity and reset your security questions. If you set up two-factor authentication or two-step verification, you won’t need to remember any security questions.
Learn more
If you receive suspicious email, learn how to identify fraudulent email.
FaceTime is not available in all countries or regions.
Источник


