- Android — Audio Capture
- Example
- Audio Capture
- In this document
- Key classes
- See also
- Performing Audio Capture
- Example: Record audio and play the recorded audio
- Android 10 — Audio Capture
- Capturing Audio in Android Q
- In Android Q there’s a new API which allows applications to capture the audio of other applications. It’s called the…
- Recording Audio on Android with Examples
- What is MediaRecorder?
- How to use MediaRecorder
- What is MediaPlayer?
- How to use MediaPlayer
- What is AudioRecord?
- How to use AudioRecord
- What is AudioTrack?
- How to use AudioTrack
- Other options
- What should I use?
Android — Audio Capture
Android has a built in microphone through which you can capture audio and store it , or play it in your phone. There are many ways to do that but the most common way is through MediaRecorder class.
Android provides MediaRecorder class to record audio or video. In order to use MediaRecorder class ,you will first create an instance of MediaRecorder class. Its syntax is given below.
Now you will set the source , output and encoding format and output file. Their syntax is given below.
After specifying the audio source and format and its output file, we can then call the two basic methods prepare and start to start recording the audio.
Apart from these methods , there are other methods listed in the MediaRecorder class that allows you more control over audio and video recording.
| Sr.No | Method & description | ||||||||||||||||||||||||||||||||||||||||||||||||||||
|---|---|---|---|---|---|---|---|---|---|---|---|---|---|---|---|---|---|---|---|---|---|---|---|---|---|---|---|---|---|---|---|---|---|---|---|---|---|---|---|---|---|---|---|---|---|---|---|---|---|---|---|---|---|
| 1 |
| Steps | Description |
|---|---|
| 1 | You will use Android studio IDE to create an Android application and name it as AudioCapture under a package com.example.sairamkrishna.myapplication. |
| 2 | Modify src/MainActivity.java file to add AudioCapture code |
| 3 | Modify layout XML file res/layout/activity_main.xml add any GUI component if required. |
| 4 | Modify AndroidManifest.xml to add necessary permissions. |
| 5 | Run the application and choose a running android device and install the application on it and verify the results. |
Here is the content of src/MainActivity.java
Here is the content of activity_main.xml
In the below code abc indicates the logo of tutorialspoint
Here is the content of Strings.xml
Here is the content of AndroidManifest.xml
Let’s try to run your application. I assume you have connected your actual Android Mobile device with your computer. To run the app from Android studio, open one of your project’s activity files and click Run  icon from the toolbar. Before starting your application, Android studio will display following images.
Now by default you will see stop and play button disable. Just press the Record button and your application will start recording the audio. It will display the following screen.
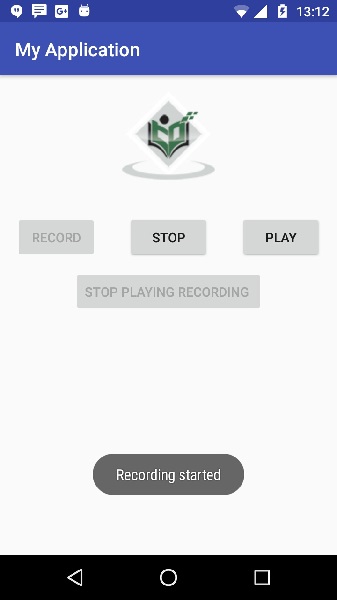
Now just press stop button and it will save the recorded audio to external sd card. When you click on stop button , the following screen would appear.
Now just press the play button and and recorded audio will just start playing on the device. The following message appears when you click on play button.
Источник
Audio Capture
In this document
Key classes
See also
The Android multimedia framework includes support for capturing and encoding a variety of common audio formats, so that you can easily integrate audio into your applications. You can record audio using the MediaRecorder APIs if supported by the device hardware.
This document shows you how to write an application that captures audio from a device microphone, save the audio and play it back.
Note: The Android Emulator does not have the ability to capture audio, but actual devices are likely to provide these capabilities.
Performing Audio Capture
Audio capture from the device is a bit more complicated than audio and video playback, but still fairly simple:
- Create a new instance of android.media.MediaRecorder .
- Set the audio source using MediaRecorder.setAudioSource() . You will probably want to use MediaRecorder.AudioSource.MIC .
- Set output file format using MediaRecorder.setOutputFormat() .
- Set output file name using MediaRecorder.setOutputFile() .
- Set the audio encoder using MediaRecorder.setAudioEncoder() .
- Call MediaRecorder.prepare() on the MediaRecorder instance.
- To start audio capture, call MediaRecorder.start() .
- To stop audio capture, call MediaRecorder.stop() .
- When you are done with the MediaRecorder instance, call MediaRecorder.release() on it. Calling MediaRecorder.release() is always recommended to free the resource immediately.
Example: Record audio and play the recorded audio
The example class below illustrates how to set up, start and stop audio capture, and to play the recorded audio file.
Источник
Android 10 — Audio Capture
Sep 16, 2019 · 2 min read
Android 10 launched with an Audio Capture feature to support Live Captions. This feature is enabled automatically once an app targets Android 10. The recommendation is to disable it for any copyrighted/DRM protected audio content.
Further developer instructions are documented here.
Capturing Audio in Android Q
In Android Q there’s a new API which allows applications to capture the audio of other applications. It’s called the…
At the time of writing there is no app to demonstrate audio capture and Live Captions is not available yet. This post is about developing an app to capture audio.
App needs the following permission. RECORD_AUDIO needs to be requested at runtime.
It needs a foreground service of type (mediaProjection)
App has t o start the foreground service before starting the activity returned from MediaProjectionManager.createScreenCaptureIntent()
This will prompt the user to grant audio capture permission and that is a good place to start capturing Audio.
This setup is similar to usage of AudioRecord to record audio from microphone except that it sets AudioPlaybackCaptureConfig which has reference to granted media projection.From here on, audio data can be fetched from AudioRecord using one of the read() APIs.
With this setup on an app with enabled audio capture (android:allowAudioPlaybackCapture=”true”), the captured raw audio data looks like this in Audacity. As a bonus, this captured audio is free from noise too.

The only downside is that Android shows the Audio Capture app as requesting microphone access. It would have been nice if the permission request was more granular and capture apps could have worked without microphone access.
Источник
Recording Audio on Android with Examples
Knowing how to effectively record audio from a phone is valuable for mobile developers, but is especially essential for apps that use services like Dolby.io to process media. The wide range of hardware in Android devices can make it difficult to develop applications that need to capture and play back audio. However, Android provides several media frameworks to abstract the audio recording process, and others have developed external libraries that make it possible to incorporate high-performance audio into an application. This article will explain how to use the MediaRecorder, MediaPlayer, AudioRecord, and AudioTrack frameworks in Java, touch briefly on other options for audio capture and playback, and lastly will review their respective pros and cons.
Note: You can find a sample application that uses these classes in the dolbyio-samples/blog-android-audio-recording-examples repository.
What is MediaRecorder?
MediaRecorder is Android’s high-level framework for capturing audio and/or video. It records to a file directly, which can then be played back using MediaPlayer (covered later in this post). An application specifies several parameters, namely the encoding and the file location, and MediaRecorder handles the rest. While relatively simple to configure, MediaRecorder offers minimal customizability, and is best for simple use cases when audio is not central to the functionality of the app.
How to use MediaRecorder
The following steps and code samples demonstrate how to use MediaRecorder to record audio to a file in an application’s internal storage. If you need to record video as well, see the official Android guide on the Camera API.
This example, as well as the following examples for other audio classes, will follow a general outline with steps as defined below:
- Declare permissions (only needed once for an application)
- Instantiate/configure the object
- Attempt to start recording/playback
As with all applications that need access to an audio input, declare the permission in the AndroidManifest.xml file. For API level 23 and above, the application should request permission to record audio the first time the user interacts with it.
Next, instantiate MediaRecorder and set the necessary properties. Most commonly, this consists of setting an audio source, an output format, a file path, and an encoder. The order in which these calls are made matters; note that the file path and audio encoders can only be specified after an output format is set. Failure to pay attention to this order may result in IllegalStateExceptions being thrown.
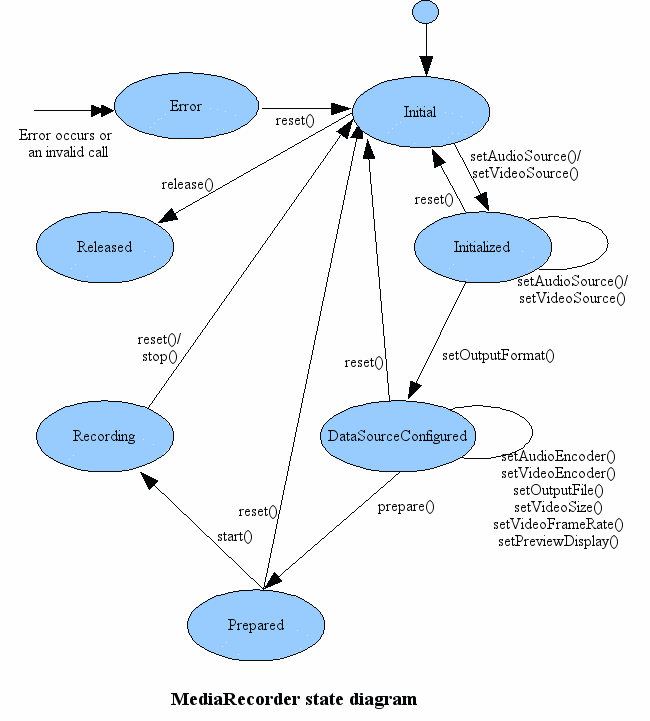
After the above properties are configured, the app should attempt to prepare the MediaRecorder object. If preparation is successful, the MediaRecorder is ready to use and can be started. Once started, the recording can be stopped, paused, and/or subsequently resumed. The following state diagram depicts how the different method calls transition the MediaRecorder between different phases.
Below is an example of how we might use MediaRecorder in a simple application. The startRecording() method can be called inside the onClickListener of a button, and takes as a parameter the location where the recording should be saved – for internal application storage, this can be obtained by calling getFilesDir().getPath() and appending a file name and format.
Note: Many audio sources apply at least minimal processing to the raw stream by default. To record only the unprocessed signal, use the UNPROCESSED source, or VOICE_RECOGNITION for older devices that don’t support the unprocessed property.
When the recording is finished, the application should release resources back to the operating system as soon as possible. The code below demonstrates how to properly end a recording.
The final recording can be found at the storage location specified by the file path. To play back this recording, we can use MediaPlayer.
What is MediaPlayer?
MediaPlayer is MediaRecorder’s counterpart on Android. Given a URI, URL, or reference to a file, it plays audio or video with both minimal setup and minimal customizability. Once initialized, MediaPlayer can be started, paused, and stopped, providing straightforward playback. For a complete list of media formats supported by the Android platform, see the official documentation.
How to use MediaPlayer
An instance of MediaPlayer can be initialized in one of two ways: by instantiating it with the corresponding constructor and configuring the object, or by calling a convenience method create() that takes a data source. If choosing the latter, be aware that the create() method prepares the media synchronously, which may cause the UI thread to freeze. The examples in this section will demonstrate the first method.
As with MediaRecorder, MediaPlayer has a myriad of different possible configurations and states that should be managed carefully to avoid errors. Refer to both the state diagram below and the rest of the official documentation.
After instantiating the MediaPlayer object, the application can set any desired audio attributes, such as specifying the media usage and content. A data source must then be set, which can be a raw resource directly from your application, a path to an audio file in internal storage, or a URL of media to be streamed over the internet. Only after setting a data source can the MediaPlayer be prepared. For local files, this is acceptable to do synchronously, but for streaming purposes, the MediaPlayer should be prepared asynchronously and an O nPreparedListener should be set. The code below continues where our MediaRecorder example left off, showing how to play an audio file saved in an app’s internal storage.
Like with MediaRecorder, it’s good practice to release the resources MediaPlayer uses once finished. When some user action, like a button press, stops playback, playback can be stopped as shown below. Otherwise, set an OnCompletionListener for MediaPlayer to release resources once the player reaches the end of the media source.
What is AudioRecord?
AudioRecord removes a layer of abstraction between the application and a device’s audio hardware, recording uncompressed audio with no way to write directly to a file. These APIs are the lowest level audio framework for Android that can still be used in the Java and Kotlin layer. While MediaRecorder performs its data writing operations inside a black box, AudioRecord requires an application to periodically read the newest audio data from the AudioRecord object’s internal buffer. While this lower-level framework creates more complexity, it also allows applications to build more advanced audio functionality.
How to use AudioRecord
After the application declares and obtains permission to record audio, an AudioRecord object can be initialized by passing several parameters into the constructor. (Alternatively, AudioRecord.Builder can be used, but the process is essentially the same for both). The constructor takes flags indicating the audio source, the sample rate in Hertz, whether the channel configuration is stereo or mono, and the size of the internal buffer for audio data. There are a few settings that are guaranteed to be supported on all Android devices; refer to the documentation to maximize compatibility.
Note: Make use of the getMinBufferSize() method when creating an AudioRecord object to ensure the internal buffer is sufficiently large given the device hardware. Also be sure to check that initialization didn’t fail silently before continuing. Both of these are demonstrated in the code sample below. Also note that we plan to write byte arrays, so we use 8-bit encoding, but be careful – this encoding is not necessary supported across devices. Use short arrays and 16-bit encoding to be fully sure of compatibility.
To actually obtain the audio data, a separate thread should be dedicated to polling the AudioRecord object to avoid freezing the app’s UI. Create a new Thread with a custom implementation of Runnable. Inside the run() method, we continuously read data from AudioRecord into a buffer until an external event (e.g., the press of a button) indicates we should stop. In the code below, after the AudioRecord object has started recording, the writeAudioData() method is called inside the run() method of the thread we just made. While this post won’t go into detail on how to use threading, you can read through this Android guide to learn more.
We take the raw audio bytes and write them to a file. AudioRecord uses PCM encoding, so that’s the kind of data the file will hold. The read() method fills the passed in array with the amount of bytes requested in the third parameter, and returns the amount of bytes successfully read. The thread will block until enough samples have been captured to deliver the requested number, meaning that whatever operations are done with the filled buffer should be completed before the next batch of samples is ready. Here, we perform a file write for the sake of simplicity, but to ensure that no data is missed, we would ideally handle this writing in a separate thread with an independent buffer.
As with all media capture frameworks, don’t forget to release the resources used by AudioRecord when finished.
What is AudioTrack?
Just like MediaRecorder and MediaPlayer, AudioRecord and AudioTrack can be used in tandem. The flow of data is pretty much the opposite of that for AudioRecord – PCM data from a file or other source is periodically pushed by the application to the AudioTrack object, which sends it to the device’s hardware to be consumed and played. AudioTrack can be used to either stream audio continuously or play short sounds that fit in memory (for example, sound effects in a mobile game).
How to use AudioTrack
Construct an instance of AudioTrack by passing the constructor parameters to configure the object, similar to AudioRecord. For API levels less than 21, the constructor takes specifications like the sample rate channel configuration type, and optionally a session ID to control which AudioEffects are applied to specific instances of AudioTrack or other media players. For newer API levels, however, this constructor is deprecated, and an application should use either AudioTrack.Builder (API 23) or an AudioTrack constructor that takes AudioAttributes and AudioFormat objects (API 21).
The example below uses the constructor method to initialize AudioTrack. While the static variables may look identical to the ones declared for AudioRecord, note the differences in the channel configuration ( CHANNEL_OUT_MONO ) and buffer size ( AudioTrack.getMinBufferSize() ) flags that indicate these parameters are used for output, not input.
Note: The same disclaimer above applies – we’re using 8-bit encoding at the risk of losing support on some Android devices, just to simplify the data writing process. One last thing to note in the constructor of AudioTrack: the media being played is from a file, too large to fit in memory, so the streaming mode is more appropriate for this use case.
To push data to the AudioTrack object to be played, we can follow the same pattern as we did for AudioRecord. Inside a dedicated thread, override the run method and make a call to readAudioData() , which does the bulk of the work. In it, we open a file input stream to read bytes of data from a recording, and write that data to the AudioTrack object. The write method is overloaded; see the documentation for other ways to give data to AudioTrack. Lastly, clean up memory and resources after playback has finished.
Other options
While MediaRecorder and AudioRecorder are the only built-in ways to record audio, they are by no means the only ones available to Android developers. Widely used libraries include ExoPlayer as an alternative to MediaPlayer and several C++ libraries for high performance audio.
ExoPlayer is an open source library for media playback, maintained by Google but not distributed as part of the Android SDK. Its structure is easily extendable and has features that are especially useful for streaming media over the internet. An instance of ExoPlayer takes custom MediaSource objects that can be built to correspond to the type and properties of the media, allowing an app to create custom configurations and maximize quality. To explore more capabilities of ExoPlayer, refer to the official developer guides. If your audio flow includes recording using AudioRecord and playing back using ExoPlayer, keep in mind that ExoPlayer doesn’t support PCM-encoded files (an easy fix is to add a WAV header to the raw file).
For applications where low latency and/or high performance is vital to audio features, you could consider using libraries written in C or C++ and incorporating them in your app using the Android NDK toolset. OpenSL ES is an API that operates at a lower level, standardizing audio functionality access across platforms and allowing applications to use hardware acceleration. OpenSL ES is ideal for multimedia creation apps (synthesizers, DJ apps, etc), mobile games, and similar applications. The Android NDK comes with its own OS-specific implementation of OpenSL ES. Also on the C side, AAudio is a relatively new API released by Google with similar use cases as OpenSL ES, designed to be fast and minimalist. Applications read or write data to AAudio streams, which are connected to pieces of audio hardware.
If compatibility across API levels is important for your application, Oboe is a C++ wrapper that switches between the OpenSL ES and AAudio APIs to give the best performance for a specific Android device’s hardware. Google encourages developers to consider using Oboe for real-time audio applications to take advantage of AAudio’s features while maintaining backwards compatibility.
What should I use?
After learning about the multitudes of options for audio recording and playback, the natural question is what to use for your specific application. Picking between frameworks and APIs always comes with tradeoffs, and the decision between audio libraries on Android is no different. For applications where performance isn’t a priority, or audio makes up a small component of the functionality, MediaRecorder and MediaPlayer might be an ideal combination to capture and play back audio without writing much complex code. Keep in mind that only the most common audio formats are supported, and the application won’t have access to the audio data as it’s being recorded. If you’re looking to perform some audio processing or otherwise need real-time audio, consider using AudioRecord and AudioTrack. The process of reading and writing data is more involved than using MediaRecorder, and any compression or transcoding can’t be done using the AudioRecord APIs. Another option is using AudioRecord to capture audio, then integrating ExoPlayer into the app for more extendable playback features. Lastly, C and C++ libraries facilitate the development of high performance audio applications, but require more domain-specific knowledge to use (as well as knowledge of a C-based language). Out of these libraries, Oboe is a good option – well-maintained with an active developer community.
Here’s a table to see at a quick glance which option might be appropriate for your application.
| MediaRecorder / MediaPlayer | AudioRecord / AudioTrack | ExoPlayer | OpenSLES | AAudio | |
|---|---|---|---|---|---|
| What works out of the box | ✅ | ❌ | ✅ | ❌ | ❌ |
| Language | Java/Kotlin | Java/Kotlin | Java/Kotlin | C | C |
| High Performance | ❌ | ✅ | ✅ | ✅ | ✅ |
| Access to Recording Audio Buffer | ❌ | ✅ | ❌ | ✅ | ✅ |
| Video | ✅ | ❌ | ✅ | ❌ | ❌ |
| Backwards-compatible | ✅ | ✅ | ✅ | ✅ | ❌ |
Ultimately, the best audio library to use will vary drastically depending on the scope and features of your application.
This article has outlined how to use several of the most common Android frameworks for audio, but plenty of other guides and resources exist online to help you learn more. Best of luck on your journey to create great audio experiences within your Android application!
Attribution: Portions of this page are reproduced from work created and shared by the Android Open Source Project and used according to terms described in the Creative Commons 3.0 Attribution License.
Источник


