- Visualiser – Part 1
- Audio visualizer android studio
- About
- Android-er
- Monday, February 9, 2015
- Create audio Visualizer for MediaPlayer
- 22 comments:
- Audio visualizer android studio
- Implement Audio Visualizer in Android App
- What is Chibde Audio Visualizer?
- Step 1: Create a new Project
- Step 2: Adding the Chibde Audio Visualizer dependency
- Step 3: Modify AndroidManifest.xml
- Step 4: Modify activity_main.xml
- Step 5: MainActivity.java file
- Build the App:
- Output:
- Conclusion:
Visualiser – Part 1
In this short series we’re going to look at how we can provide a visual representation of the currently playing audio stream. While this is fairly easy to do there are a couple of pain points on the way which, if you don’t know about them, can make the task much harder.
Before we get stuck in to any code, let’s first take a look at what it is we’re looking to achieve:
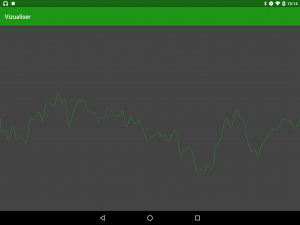
We’re going to implement a simple waveform graph of the currently playing audio. The next thing that’s worth mentioning is that I hail from England and we spell ‘visualiser’ with an ‘s’ whereas the API class we’ll be looking at uses the US spelling of ‘visualizer’ with a ‘z’. Therefore there will be a spelling discrepancy when I refer to the API class as opposed to using the word ‘visualiser’ within a sentence.
So, as you may have guessed, we’re going to be looking at the android.media.audiofx.Visualizer class to do a chunk of the work for us. This was introduced in API 9 (Gingerbread) and a quick look at the Javadocs for this class indicate that it requires the android.permission.RECORD_AUDIO permission. The previous series of articles covers permissions on Marshmallow, so we won’t go in to any detail here – the code to verify and request the permissions is in the source so you can study, if necessary.
However, this does pose us something of a problem in terms of getting the user to accept the permission. While RECORD_AUDIO makes some sense because we are capturing an audio stream, this permission actually gets presented to the user as the “Microphone” permission. Therefore we have a bit of explaining to do to the user to (hopefully!) enable them to understand that while we require the “microphone” permission we won’t actually be capturing anything from the microphone at all.
So let’s take a quick look at our MainActivity:
Источник
Audio visualizer android studio


![]()

Importing the Library
Add to build.gradle:
Library is available in jcenter repository
Refer to the sample project on how to use visualizer or refer to WIKI docs.
Copyright 2017 Gautam Chibde
Licensed under the Apache License, Version 2.0 (the «License»); you may not use this file except in compliance with the License. You may obtain a copy of the License at
Unless required by applicable law or agreed to in writing, software distributed under the License is distributed on an «AS IS» BASIS, WITHOUT WARRANTIES OR CONDITIONS OF ANY KIND, either express or implied. See the License for the specific language governing permissions and limitations under the License.
About
🎼 🎹 🎵 Audio visualisation for android MediaPlayer 🔉
Источник
Android-er
For Android development, from beginner to beginner.
Monday, February 9, 2015
Create audio Visualizer for MediaPlayer
This example create audio Visualizer for MediaPlayer, reference Android demo example: ApiDemos > Media > AudioTx. Permission android.permission.RECORD_AUDIO is needed, to use visualizer.
remark@2016-10-18:
I found that the example code removed from Android Studio examples list, may be it is NOT work now.
Create custom VisualizerView extends View, VisualizerView.java
Add to layout file, activity_main.xml.

22 comments:
Works perfectly. Thanks !!
![]()
Please show me how to use this on voice recorder (Android MediaRecorder) while I’m recording voice.
![]()
Thank you for Share it.
Thank you very much.
![]()
In Android 6.0 I had to ask for this permissions in the code to start working
if( ContextCompat.checkSelfPermission(this, Manifest.permission.MODIFY_AUDIO_SETTINGS) == PackageManager.PERMISSION_GRANTED)<
>else <
ActivityCompat.requestPermissions(this,
new String[]
MY_PERMISSIONS_REQUEST_MODIFY_AUDIO_SETTINGS);
if( ContextCompat.checkSelfPermission(this, Manifest.permission.RECORD_AUDIO) == PackageManager.PERMISSION_GRANTED)<
>else <
ActivityCompat.requestPermissions(this,
new String[]
MY_PERMISSIONS_REQUEST_RECORD_AUDIO);
Can you create a vertical bar style for this ?
Behind that, great tutorial and example +1
Error code -1 when initializing Visualizer
Please show me how to use this on voice recorder (Android MediaRecorder) while I’m recording voice.
Thanks before, because it’s works perfectly!!
but it’s just for one audio, how can make it work for more audio??
![]()
! This a great tutorial and working. Can this be possible for a bar graph?
@ardi nada on MediaPlayer setOnCompletionListener call mVisualizer.setEnabled(false)
@anddev thx !! it’s work!!
but now i get new question, why when i use this visualizer, i cant use audio effect like BassBoost??
I’m on android 6.0, when I try to run the app it just tells me ‘Unfortunately, audioVisualizer has closed». I gave it the mic permission in my settings. The only thing that I think maybe went wrong with inputting the code was the part at the very top that says something about reference Android demo example: ApiDemos > Media > AudioTx. I don’t know what I am supposed to do about that. Any ideas anyone? Thanks!
remark@2016-10-18:
I found that the example code removed from Android Studio examples list, may be it is NOT work now.
Sumit Naharia It’s a permission problem, see here: http://stackoverflow.com/a/28427213
Just add the following to your app manifest xml:
Hi! I get this error on Android 6.0 (LG Spirit):
Cannot initialize Visualizer engine, error: -3
![]()
Thanks for the post works like a charm
android:paddingBottom=»@dimen/activity_vertical_margin»
android:paddingLeft=»@dimen/activity_horizontal_margin»
android:paddingRight=»@dimen/activity_horizontal_margin»
android:paddingTop=»@dimen/activity_vertical_margin»
tools:context=»com.example.androidaudiovisualizer.MainActivity» >
what is this? These things keep ocurring errors. what to do?
You can remove it.
Still its not working.
android.view.InflateException: Binary XML file line #20: Binary XML file line #20: Error inflating class com.example.androidaudiovisualizer.VisualizerView
i am getting this kind of error..
please can anyone help me..
I also won’t able to run.Please anyone can help.How to connect music with visualizer in order to get effect of high note and low note.
Hey,
Thanks for an amazing tutorial. Although while running the application I am facing a run time exception. java.lang.RuntimeException: Cannot initialize Visualizer engine, error: -1 .
After installation, the permission section of the application doesn’t have «Audio» related permissions. Please help me with this.
How to apply that in a «vertical-bars» way?
Источник
Audio visualizer android studio
![]()


![]()
![]()
A light-weight and easy-to-use Audio Visualizer for Android using the Android Canvas.
| CircleLine | Hifi |
|---|---|
 |  |
| Blob | Blast |
|---|---|
 |  |
| Wave | Bar |
|---|---|
 |  |
- BlobVisualizer — Gives blob like effect, good for low bpm audio
- BlastVisualizer — Gives a blast like effect, very random, good for high bpm audio
- WaveVisualizer — Gives a nice wave like effect, good for all kinds of audio
- BarVisualizer — Gives the contemporary bar effect, good for all kinds of audio
- CircleLineVisualizer — Gives the circular bar like effect, good for all kinds of audio
- HifiVisualizer — Gives a unique circular wave like effect, good for all kinds of audio
Note: Use of the visualizer requires the permission android.permission.RECORD_AUDIO so add it to your manifest file. Also for Android 6.0 and above you will need request permission in runtime.
Check out the Sample app, to see how its implemented.
- This library is available on JCenter. To use it, add the following to build.gradle
- Add the com.gauravk.audiovisualizer.visualizer.BlastVisualizer to your XML Layout file:
- Get the reference to this view in you Java Class
Alternatively, you can pass the raw audio bytes to the visualizer
Now, release the visualizer in your onDestroy() or onStop()
If you want to hide the view upon completion of the audio, use
Similarly, include other visualizer
| attr | Description |
|---|---|
| avType | Changes the Visualization type — outline or fill. (N/A for Bar Visualizer) |
| avColor | Defines the color that is used in the visualizer |
| avDensity | Sets the density of the visualization between (0,1) |
| avSpeed | Defines the speed of the animation — slow, medium and fast |
| avGravity | Updates position of the visualizers — top and bottom (N/A for Blob and Blast Visualizers) |
| avWidth | Describes the width of the line if avType is outline , in case of Bar Visualizer, defines width of the bar |
Found a bug or have an idea/feature request or any other help needed. Please suggest or report them here
I am always open to new suggestions and good contributions.
Thanks to @wangfengye for CircleLineVisualizer and HifiVisualizer.
Источник
Implement Audio Visualizer in Android App
LAST UPDATED: AUGUST 23, 2021
We have seen different types of app in which the audio or music is shown in the form of waves, bars, etc such as the Music Player app (when we are playing the music or any other audio in the app), like Audio Recorder App (when we are recording the audio), or some Voice Changer App (when we change the voice), etc.
Such visualization is used to show simple waves of the audio file to the user representing the volume and other properties of the audio being played or recorded. It makes the UI of an Android app more beautiful and interactive and also leaves a good impression on the end-user.
What is Chibde Audio Visualizer?
This is an external library available on Github with the name Chibde Audio Visualizer that can be used to do implement audio visualizer in an Android App. You can learn more about the Chibde Audio Visualizer on GitHub here.
So let’s implement a simple Chibde Audio Visualizer in our android app.
Step 1: Create a new Project
Open Your Android Studio Click on «Start a new Android Studio project«(Learn how to set up Android Studio and create your first Android project)
Choose «Empty Activity» from the project template window and click Next
Enter the App Name, Package name, save location, language(Java/Kotlin, we use Java for this tutorial ), and minimum SDK(we are using API 19: Android 4.4 ( KitKat ))
Next click on the Finish button after filling in the above details
Now, wait for the project to finish building.
Step 2: Adding the Chibde Audio Visualizer dependency
To show the Audio Visualizer in our app we have to implement the Chibde Audio Visualizer in our app, to do so follow the below steps.
Go to Gradle Scripts -> build.gradle (Module: app) section and import below dependencies and click the «sync Now» show at the top:
Step 3: Modify AndroidManifest.xml
Go to app->manifests->AndroidManifest.xml file and add the record audio permission to the Android Manifest file:
Step 4: Modify activity_main.xml
Now go to app -> res -> layout -> activity_main.xml and add a LinearLayout with orientation vertical. and inside LinearLayout we add buttons for showing different types of audio visualizations as shown below:
Next, We add different visualizers inside a RelativeLayout as shown below:
The complete code of activity_main.xml is shown below:
Step 5: MainActivity.java file
Now open the MainActivity.java file and import some basic classes as shown below:
Next, we create the object of MediaPlayer class inside MainActivity class as shown below:
Now inside the onCreate method, we initialize the MediaPlayer and we start the media player:
Now we create different methods for different types of visualizations as shown below:
Line audio visualization
Bar audio visualization
Circle Bar audio visualization
Circle audio visualization
Square Bar audio visualization
Line Bar audio visualization
We have added different colors in the app-> res-> values-> colors.xml as shown below:
The complete code of the MainActivity.java is shown below:
Build the App:
Now our app is ready for build and run, but when you will run the app, the app will close automatically due to some error. So how to solve this error?
Follow these basic steps to resolve the issue:
1. Long press on the app icon and click on App info,

2. Inside App info, click on Permissions,

3. Inside Permissions, you will see that Microphone Permission is DENIED. Now click on the Microphone,

4. Now Click on Allow only while using the app,

5. Now our Microphone Permission is Allowed as shown in the below snapshot:

Now our app is ready, below is the output of the app.
Output:
In the below snapshots, you can see how Chibde Audio Visualizer will look in the android application.
When App is opened for the first time:

When we click on the «Line Visualizer» Button:

When we clicked on the «Bar Visualizer» Button:

When we clicked on the «Circle Bar Visualizer» Button:

When we clicked on the «Circle Visualizer» Button:

When we clicked on the «Square Bar Visualizer» Button:

When we clicked on the «Line Bar Visualizer» Button:

Conclusion:
In just 5 simple steps we have integrated and shown you the basic example for creating an audio visualization using Chibde Audio Visualizer in your android app. If you face any issue while doing this, please share it in the comment section below and we will be happy to help.
Источник


