- Authenticate with Firebase Using Email and Password on Android (Guide)
- Connecting Firebase and Implementing Firebase Auth
- Setting Firebase Console Up
- The App Workflow
- Writing Code for Firebase Auth
- MainActivity
- Check if the user logged in
- Show email if the user logged in
- Logout user
- Authenticate with Firebase Using Email Link in Android
- Before you begin
- Set up your Android project
- Kotlin+KTX
- Enable Email Link sign-in for your Firebase project
- Send an authentication link to the user’s email address
- Kotlin+KTX
- Kotlin+KTX
- Complete sign in with the email link
- Security concerns
- Completing sign-in in an Android App
- Configuring Firebase Dynamic Links
- Verify link and sign in
- Kotlin+KTX
- Linking/re-authentication with email link
- Kotlin+KTX
- Kotlin+KTX
- Differentiating email/password from email link
- Kotlin+KTX
- Next steps
- Kotlin+KTX
Authenticate with Firebase Using Email and Password on Android (Guide)
Do you want to authenticate with Firebase using email and password on Android?
You’ve come to the right place.
The tutorial would be short and sweet.
Are you a visual learner? Watch this video.
Without any further due, let’s get straight into development.
Here is the content table that we are going to follow:
Connecting Firebase and Implementing Firebase Auth
So, first of all, we need to connect our app to Firebase.
There are two methods to do that:
- The Firebase Assistant is just like an Android Studio plugin which assists you in implementing the Firebase products.
- The Manual Method where you’ll do all the stuff yourself like adding the libraries, downloading the JSON file, etc.
We are sticking with the first one, as it is quite simple and hassle-free.
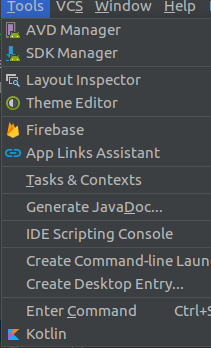
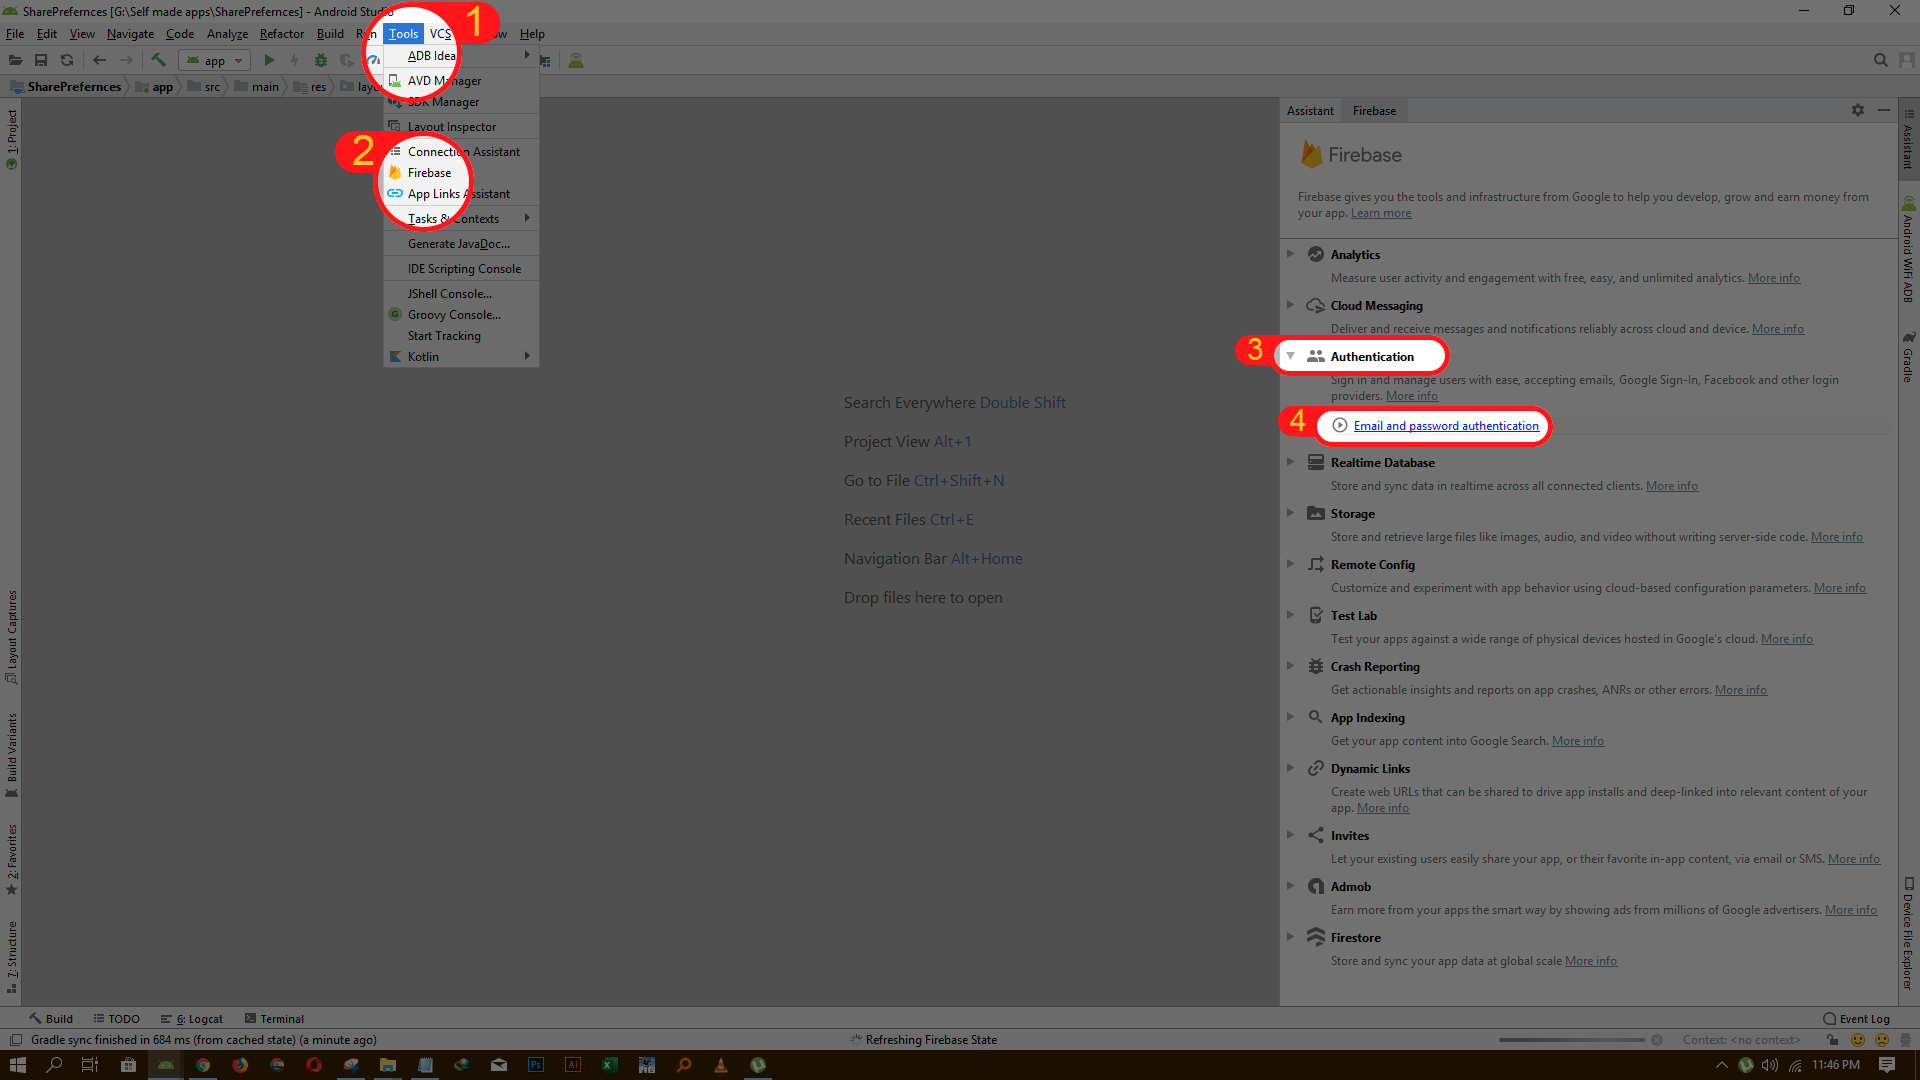
All we need to do is click on Firebase under Tools menu of Android Studio.
Now a pane will appear from the right side, expand the Authentication section, and click on “The email and password authentication.”
NOTE: We’re just going to cover the signup and sign in with email and password only, but you’re interested with other ways, you can read our series on Firebase authentication.
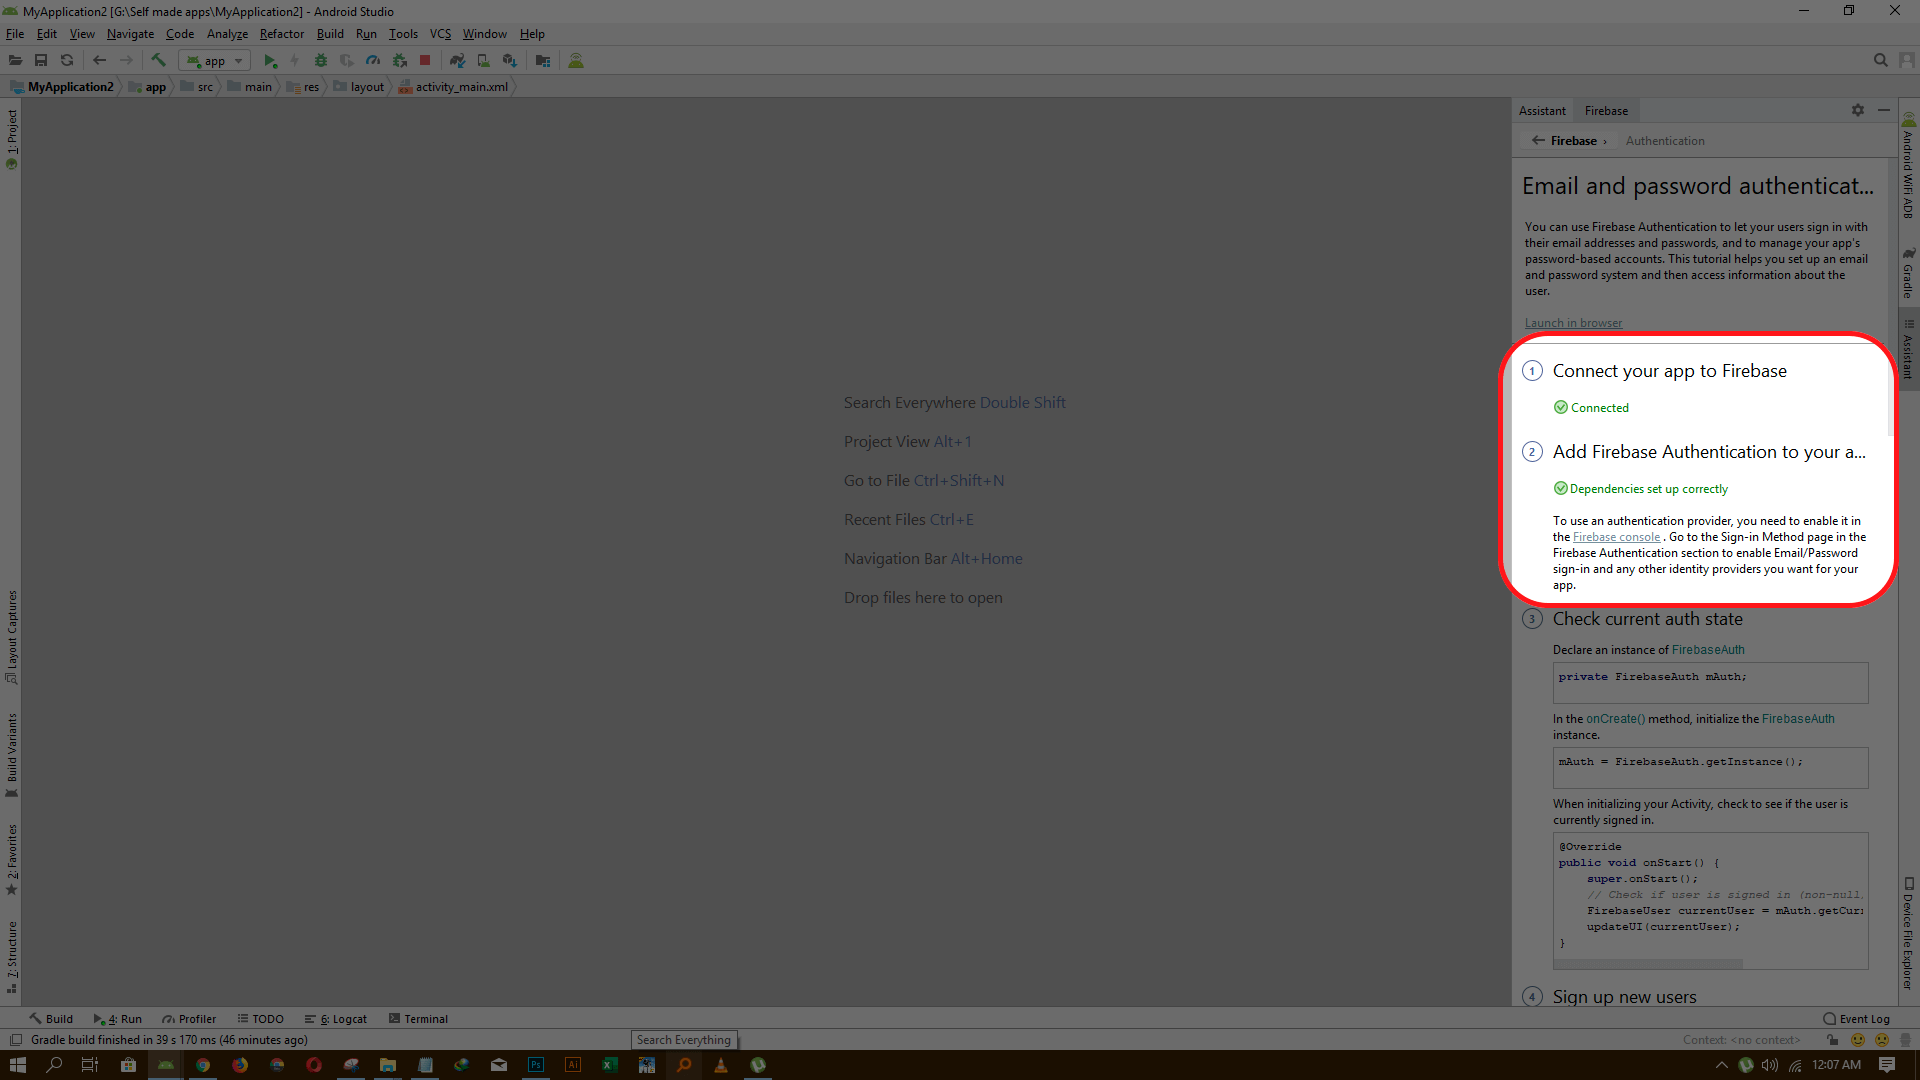
Now you see a bunch of steps in that pane. Just go through the first two to connect the Firebase and implement Firebase Authentication to your app.
- Click “Connect to Firebase“
Make sure you are signed in with your Google account in Android Studio.
If you’re signed in, create a new project if you don’t have any existing projects yet.
I choose the existing project and hit the “Connect to Firebase Button.”
An app, JSON file, and libraries will be added instantly and Gradle will start syncing.
You have to do manually if there is no Firebase Assistant.
Once the Gradle sync is completed, it’s time for the next step.
2. Click “Add Firebase Authentication to your app” button
A dialog will appear prompting that these changes are going to be made. Hit the “Accept Changes” button and let it do its stuff.
Here is the visual representation:
 Connecting Firebase and implementing Firebase Auth in Android App
When everything is completed safely. It should look like this:
 Firebase Auth Implemented
Setting Firebase Console Up
Now the Firebase is connected, and Firebase Authentication is successfully implemented in your app.
As we are going to implement the sign in and sign up with email and password only, so we need to enable it in Firebase Console settings too.
Here are the steps:
Here is the visual presentation:
 Setting up Firebase console for Firebase Auth with email address and password
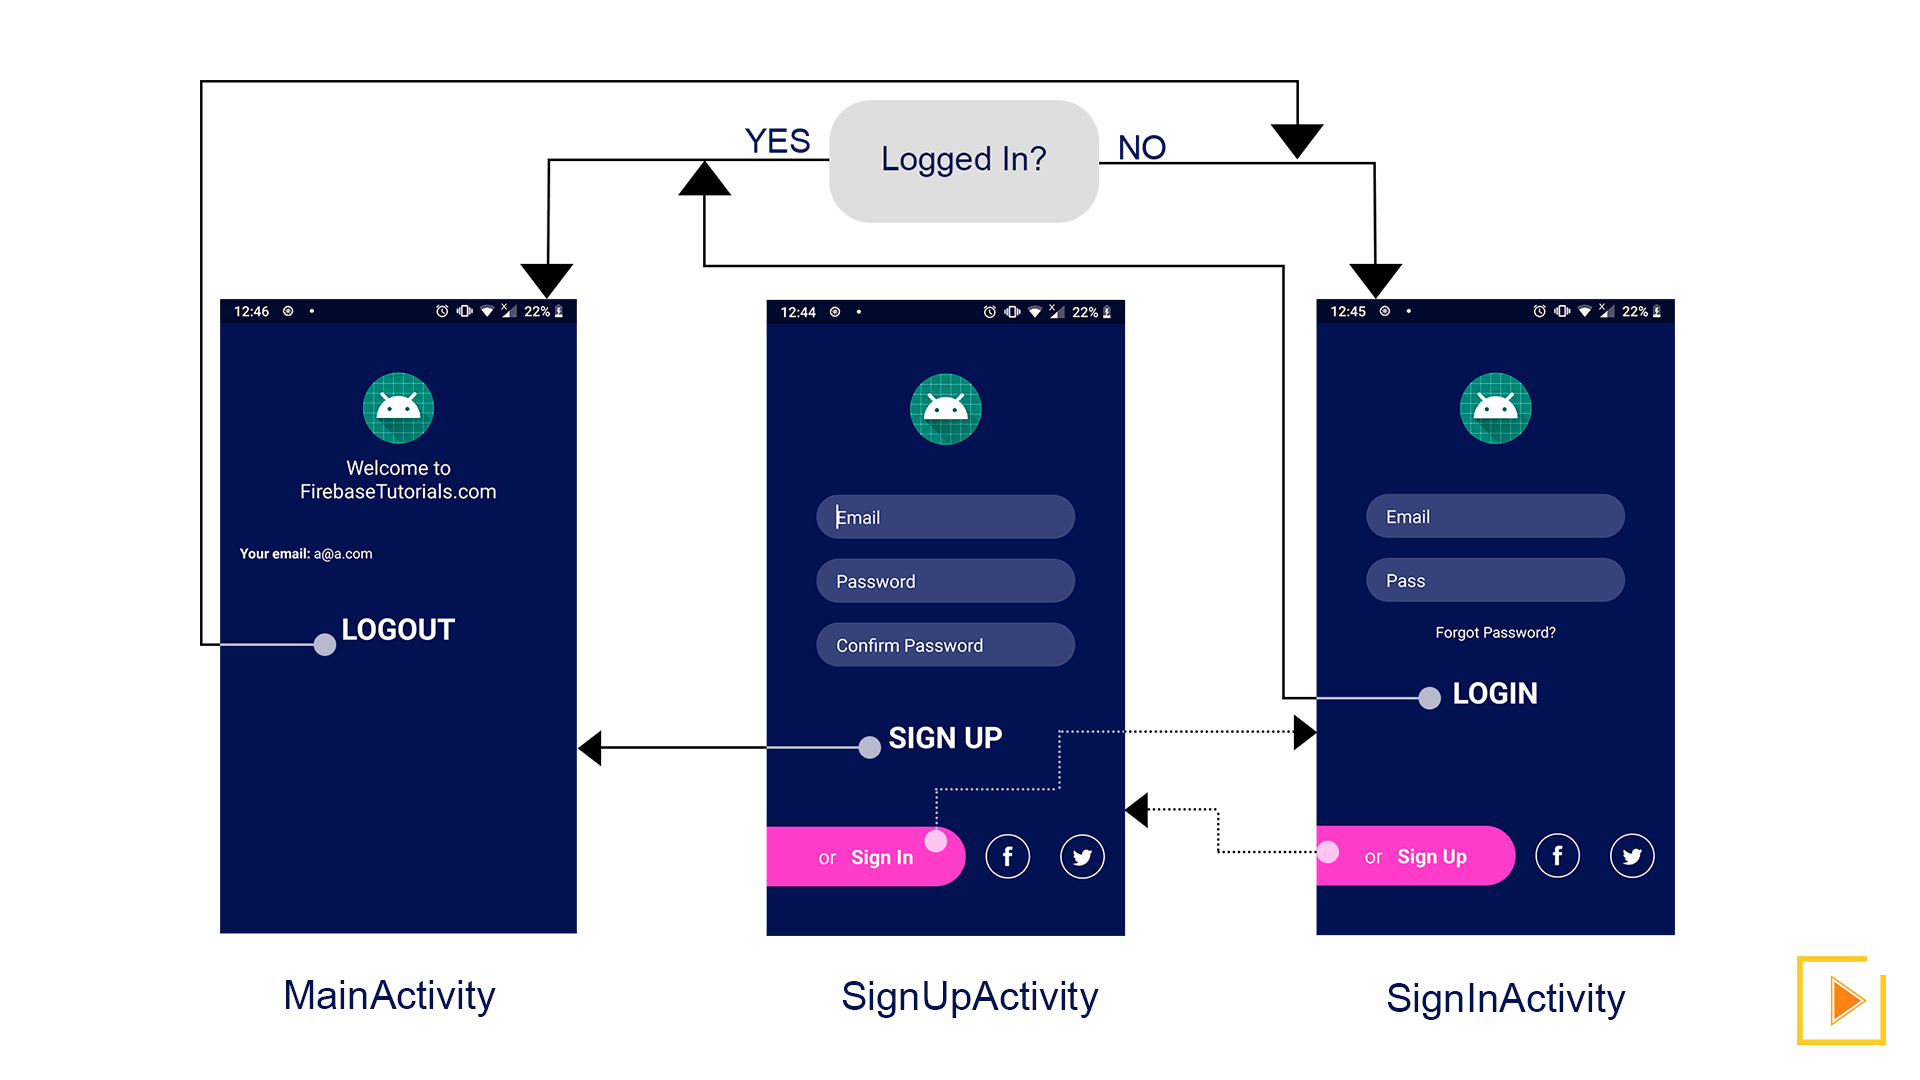
The App Workflow
Before going any further, please understand the workflow of the app:
 Firebase Auth Android App workflow
It may look complicated, but it’s not.
The thing you need to understand is that when the app runs, MainActivity will be launched.
And before it sets any content on the screen, it’ll be checked if the user is logged in or not?
If logged in, then set content to the MainAcitvity and show the user email address.
If not logged in, then start the SignInActivity and finish the MainActivity. That’s all.
Note : I am not going to build the UI, it will make the tutorial a lot longer and boring, If you want then comment below and a new tutorial regarding it will be up soon.
Writing Code for Firebase Auth
MainActivity
Okay, so starting with MainActivity. Here are the objectives:
Check if the user logged in
To perform the first step, we need an instance of FirebaseAuth. We can get it as:
Now through this instance, we can check if the user logged in or not.
We will get the current user and check if it null or not. Null means no user logged in and we need to start the SignInActivity.
Show email if the user logged in
Otherwise, we will just get the email address of the current user and show it. The Firebase Auth provides a function getEmail(), that we can call on currentUser object to get the email address!
Logout user
User stays logged in until someone performs the log out manually, clears the app data or the user account is disabled/deleted in Firebase Console.
We need to show a button to log out of the user. When pressed, it needs to call signOut() method on FirebaseAuth instance variable. This method/function will perform the signOut mechanism.
After calling the signOut() method, we need to start the SignInActivity so that the new user can perform the sign in. And finish the MainAcivity so that when the back is pressed from SignInActivity, the app should exit instead of showing the MainActivity again and causing some problems.
Источник
Authenticate with Firebase Using Email Link in Android
You can use Firebase Authentication to sign in a user by sending them an email containing a link, which they can click to sign in. In the process, the user’s email address is also verified.
There are numerous benefits to signing in by email:
- Low friction sign-up and sign-in.
- Lower risk of password reuse across applications, which can undermine security of even well-selected passwords.
- The ability to authenticate a user while also verifying that the user is the legitimate owner of an email address.
- A user only needs an accessible email account to sign in. No ownership of a phone number or social media account is required.
- A user can sign in securely without the need to provide (or remember) a password, which can be cumbersome on a mobile device.
- An existing user who previously signed in with an email identifier (password or federated) can be upgraded to sign in with just the email. For example, a user who has forgotten their password can still sign in without needing to reset their password.
Before you begin
Set up your Android project
Using the Firebase Android BoM, declare the dependency for the Firebase Authentication Android library in your module (app-level) Gradle file (usually app/build.gradle ).
Also, as part of setting up Firebase Authentication, you need to add the Google Play services SDK to your app.
By using the Firebase Android BoM, your app will always use compatible versions of the Firebase Android libraries.
(Alternative) Declare Firebase library dependencies without using the BoM
If you choose not to use the Firebase BoM, you must specify each Firebase library version in its dependency line.
Note that if you use multiple Firebase libraries in your app, we highly recommend using the BoM to manage library versions, which ensures that all versions are compatible.
Kotlin+KTX
By using the Firebase Android BoM, your app will always use compatible versions of the Firebase Android libraries.
(Alternative) Declare Firebase library dependencies without using the BoM
If you choose not to use the Firebase BoM, you must specify each Firebase library version in its dependency line.
Note that if you use multiple Firebase libraries in your app, we highly recommend using the BoM to manage library versions, which ensures that all versions are compatible.
Enable Email Link sign-in for your Firebase project
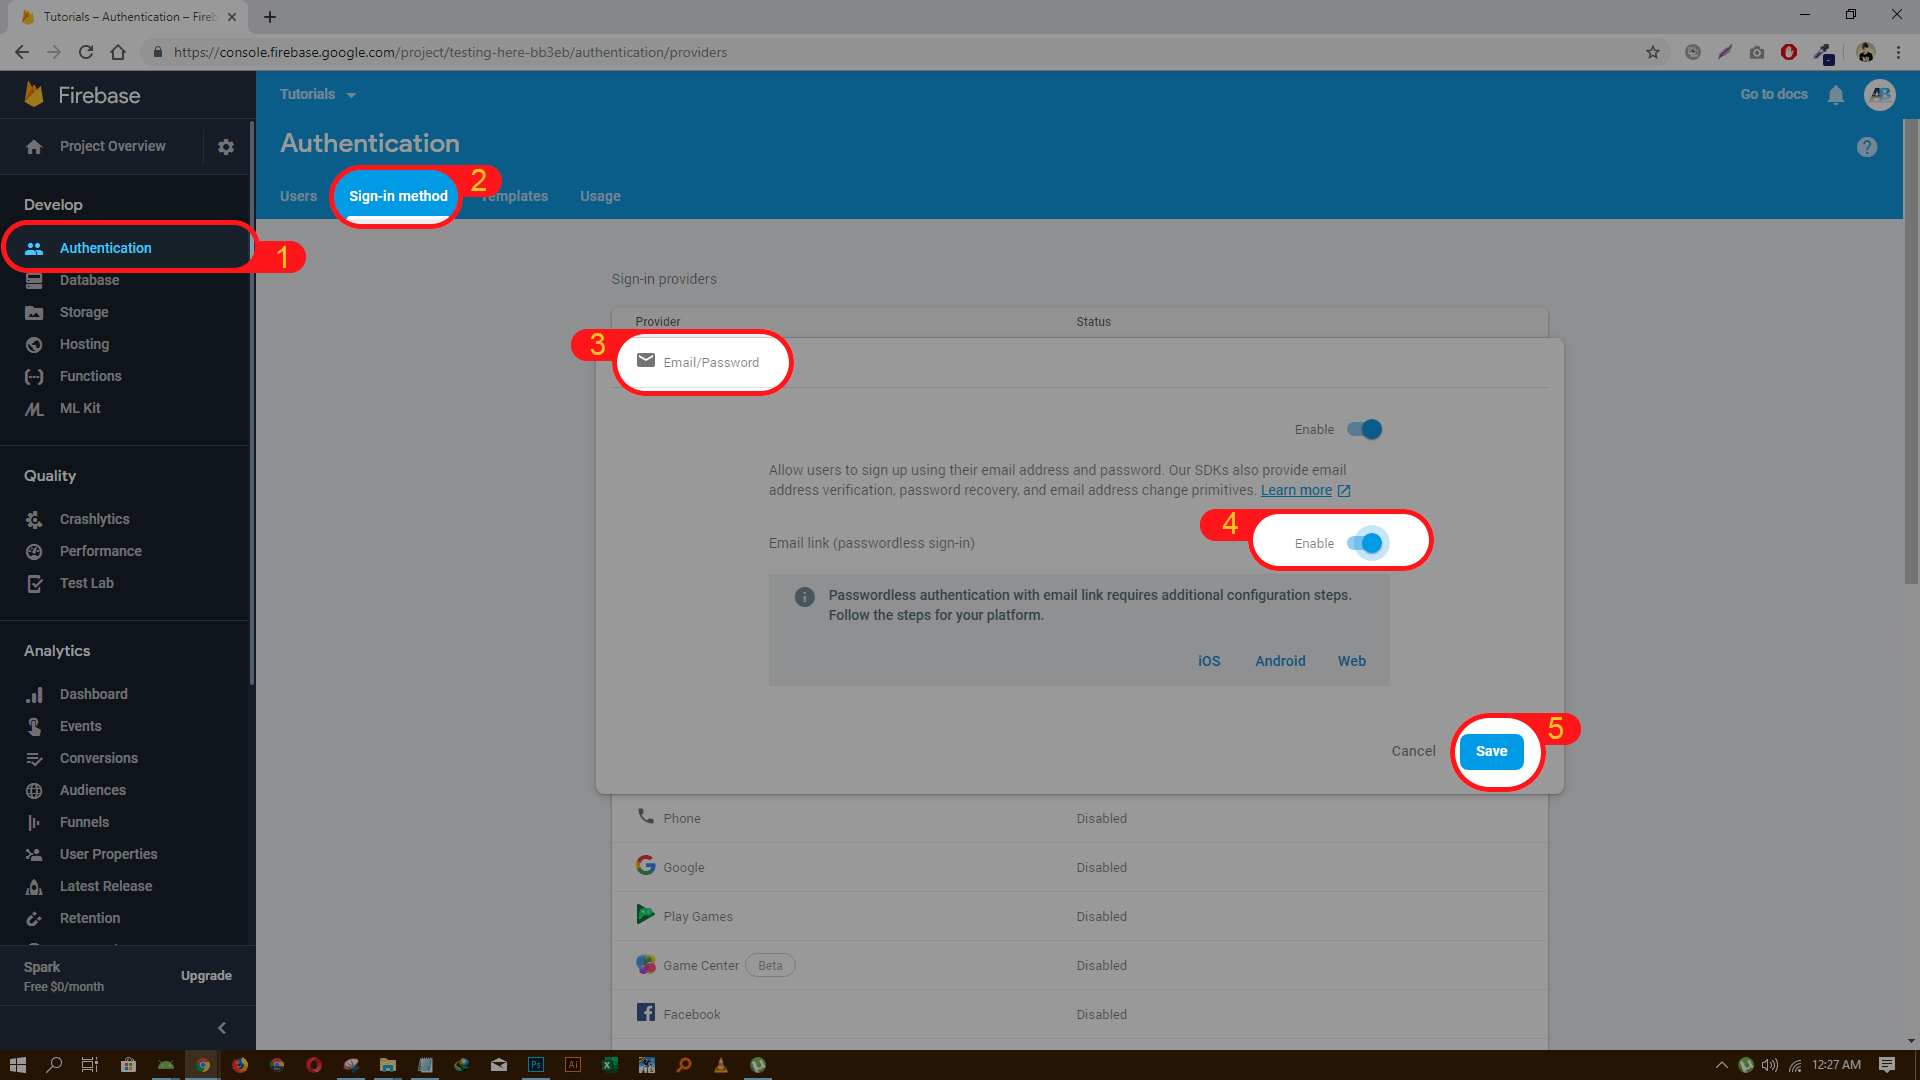
To sign in users by email link, you must first enable the Email provider and Email link sign-in method for your Firebase project:
- In the Firebase console, open the Auth section.
- On the Sign in method tab, enable the Email/Password provider. Note that email/password sign-in must be enabled to use email link sign-in.
- In the same section, enable Email link (passwordless sign-in) sign-in method.
- Click Save.
Send an authentication link to the user’s email address
To initiate the authentication flow, present the user with an interface that prompts the user to provide their email address and then call sendSignInLinkToEmail to request that Firebase send the authentication link to the user’s email.
Construct the ActionCodeSettings object, which provides Firebase with instructions on how to construct the email link. Set the following fields:
- url : The deep link to embed and any additional state to be passed along. The link’s domain has to be whitelisted in the Firebase Console list of authorized domains, which can be found by going to the Sign-in method tab (Authentication -> Sign-in method). The link will redirect the user to this URL if the app is not installed on their device and the app was not able to be installed.
- androidPackageName and IOSBundleId : The apps to use when the sign-in link is opened on an Android or Apple device. Learn more on how to configure Firebase Dynamic Links to open email action links via mobile apps.
- handleCodeInApp : Set to true. The sign-in operation has to always be completed in the app unlike other out of band email actions (password reset and email verifications). This is because, at the end of the flow, the user is expected to be signed in and their Auth state persisted within the app.
- dynamicLinkDomain : When multiple custom dynamic link domains are defined for a project, specify which one to use when the link is to be opened via a specified mobile app (for example, example.page.link ). Otherwise the first domain is automatically selected.
Kotlin+KTX
To learn more on ActionCodeSettings, refer to the Passing State in Email Actions section.
Ask the user for their email.
Send the authentication link to the user’s email, and save the user’s email in case the user completes the email sign-in on the same device.
Kotlin+KTX
Complete sign in with the email link
Security concerns
To prevent a sign-in link from being used to sign in as an unintended user or on an unintended device, Firebase Auth requires the user’s email address to be provided when completing the sign-in flow. For sign-in to succeed, this email address must match the address to which the sign-in link was originally sent.
You can streamline this flow for users who open the sign-in link on the same device they request the link, by storing their email address locally — for instance using SharedPreferences — when you send the sign-in email. Then, use this address to complete the flow. Do not pass the user’s email in the redirect URL parameters and re-use it as this may enable session injections.
After sign-in completion, any previous unverified mechanism of sign-in will be removed from the user and any existing sessions will be invalidated. For example, if someone previously created an unverified account with the same email and password, the user’s password will be removed to prevent the impersonator who claimed ownership and created that unverified account from signing in again with the unverified email and password.
Also make sure you use an HTTPS URL in production to avoid your link being potentially intercepted by intermediary servers.
Completing sign-in in an Android App
Firebase Authentication uses Firebase Dynamic Links to send the email link to a mobile device. For sign-in completion via mobile application, the application has to be configured to detect the incoming application link, parse the underlying deep link and then complete the sign-in.
Configuring Firebase Dynamic Links
Firebase Auth uses Firebase Dynamic Links when sending a link that is meant to be opened in a mobile application. In order to use this feature, Dynamic Links must be configured in the Firebase Console.
Enable Firebase Dynamic Links:
- In the Firebase console, open the Dynamic Links section.
If you have not yet accepted the Dynamic Links terms and created a Dynamic Links domain, do so now.
If you already created a Dynamic Links domain, take note of it. A Dynamic Links domain typically looks like the following example:
You will need this value when you configure your Apple or Android app to intercept the incoming link.
Configuring Android applications:
- In order to handle these links from your Android application, the Android package name needs to be specified in the Firebase Console project settings. In addition, the SHA-1 and SHA-256 of the application certificate need to be provided.
- Now that you have added a dynamic link domain and ensured that your Android app is configured correctly, the dynamic link will redirect to your application, starting from the launcher activity.
- If you want the dynamic link to redirect to a specific activity, you will need to configure an intent filter in your AndroidManifest.xml file. This can be done by either specifying your dynamic link domain or the email action handler in the intent filter. By default, the email action handler is hosted on a domain like the following example:
- Caveats:
- Do not specify the URL you set on the actionCodeSettings in your intent filter.
- When creating your dynamic link domain you may have also created a short URL link. This short URL will not be passed; do not configure your intent filter to catch it with an android:pathPrefix attribute. This means that you will not be able to catch different dynamic links in different parts of your application. However, you can check the mode query parameter in the link to see what operation is attempting to be performed, or use SDK methods such as isSignInWithEmailLink to see if a link that your app has received does what you want.
- For more on receiving dynamic links, refer to Receiving Android Dynamic Links instructions.
Verify link and sign in
After you receive the link as described above, verify that it is meant for email link authentication and complete the sign in.
Kotlin+KTX
To learn more on how to handle sign-in with email link in an Apple application, refer to the Apple platforms guide.
To learn about how to handle sign-in with email link in a web application, refer to the Web guide.
Linking/re-authentication with email link
You can also link this method of authentication to an existing user. For example a user previously authenticated with another provider, such as a phone number, can add this method of sign-in to their existing account.
The difference would be in the second half of the operation:
Kotlin+KTX
This can also be used to re-authenticate an email link user before running a sensitive operation.
Kotlin+KTX
However, as the flow could end up on a different device where the original user was not logged in, this flow might not be completed. In that case, an error can be shown to the user to force them to open the link on the same device. Some state can be passed in the link to provide information on the type of operation and the user uid.
Differentiating email/password from email link
In case you support both password and link-based sign in with email, to differentiate the method of sign in for a password/link user, use fetchSignInMethodsForEmail . This is useful for identifier-first flows where the user is first asked to provide their email and then presented with the method of sign-in:
Kotlin+KTX
As described above email/password and email/link are considered the same EmailAuthProvider (same PROVIDER_ID ) with different methods of sign-in.
Next steps
After a user signs in for the first time, a new user account is created and linked to the credentials—that is, the user name and password, phone number, or auth provider information—the user signed in with. This new account is stored as part of your Firebase project, and can be used to identify a user across every app in your project, regardless of how the user signs in.
In your apps, you can get the user’s basic profile information from the FirebaseUser object. See Manage Users.
In your Firebase Realtime Database and Cloud Storage Security Rules, you can get the signed-in user’s unique user ID from the auth variable, and use it to control what data a user can access.
You can allow users to sign in to your app using multiple authentication providers by linking auth provider credentials to an existing user account.
To sign out a user, call signOut :
Kotlin+KTX
Except as otherwise noted, the content of this page is licensed under the Creative Commons Attribution 4.0 License, and code samples are licensed under the Apache 2.0 License. For details, see the Google Developers Site Policies. Java is a registered trademark of Oracle and/or its affiliates.
Источник


