- Backing up Media from Android to Synology NAS using BitTorrent Sync
- Rough Guide
- Synchronising multiple devices to the Synology
- How to Backup Android Using Synology
- Android Backup
- Part 1: How to Backup Android Using Synology
- Part 2: The Best Way to Backup Android
- dr.fone — Phone Backup (Android)
- Tips on Backup Android Using Synology
- Part 1: How to Backup Android Using Synology
- Part 2: Better Alternative Way to Backup Android
- Part 3: One-Click Way to Backup Android Phone
- Synoguide
- The unofficial guide to your Synology
- How to backup photos and videos from smartphone to your Synology -easily 🙂
- How to back up your photos
- Delete the photos from your smartphone
- Share this:
- Like this:
- Share this:
- Like this:
- 11 thoughts on “ How to backup photos and videos from smartphone to your Synology -easily 🙂 ”
Backing up Media from Android to Synology NAS using BitTorrent Sync
BitTorrent Sync is an application based around the peer-to-peer protocol. You can use it to share files between friends and family or simply use it as an efficient way to transfer files within a LAN.
In this article I will briefly go over the steps I went through to Sync my camera photos and WhatsApp media folders from my Android smartphone to my Synology DS215j NAS.
The below guide should also help to get it working on an iOS device. I believe iOS also supports auto syncing just as the Android app does (i.e., you don’t need to have the app open for it to sync).
Rough Guide
- Firstly, don’t bother using the Synocommunity source to download the BitTorrent Sync package as it is out of date and just won’t work when trying to pair devices – I spent a good 15-30 minutes trying to figure out why the app wasn’t working before I realised it was very out of date.
- Download the latest BitTorrent Sync package for your Synology device by following these instructions
- Download the Sync app on your phone. Android users click here.
- Link the device to the BT Sync app running on the Synology – you’ll need to scan the QR code (or you can manually enter the key if you’re bored)
- Set up a ‘New backup’ on the mobile app – select ‘custom location’ and pick the folders you want to backup. I chose the following:
DCIM, Pictures and WhatsApp media foldersObviously you can choose any folder you like but in my case I just wanted to backup my media.
That’s pretty much all there is to it. It’s very straight forward.
You probably want to check out the Sync app settings on your mobile device to make sure everything is as you like it – for example the notification and auto-sync settings.
Synchronising multiple devices to the Synology
If you want to backup the same folders on two different devices (for example the DCIM folders on your tablet and smartphone) AND you want to save them in different directories on the NAS (for example \\nas\photos\tablet and \\nas\photos\smartphone) then you need to do the following:
- Launch the Sync app admin GUI on the Synology NAS.
- Click Settings –> Preferences and change the ‘Default folder location’ when you want to backup the new device.
The reason you have to do this is because the Sync app on the NAS does not prompt you for a location for the folder. It will take whatever location is in the setting above which means your DCIM on your smart phone and tablet will save to the same place which may not be what you wanted.
That’s all for today – if you have any comments, feel free to leave them below.
Источник
How to Backup Android Using Synology
In this article we are going to look at Synology Android backup as well as offer you a more practical alternative to Synology.
Android Backup
• Filed to: Backup Android • Proven solutions
Synology is a highly advanced cloud service that allows you to backup the data on your PC and Mac. It comes full of advanced features that are ideal for users who want to secure their data on an option that offers high security and advanced technology for cloud storage. In this article we are going to look at Synology Android backup as well as offer you a more practical alternative to Synology.
Part 1: How to Backup Android Using Synology
Although Synology does have an Android app, there is no cleat way to back up your Android device using Synology. You can only backup the device first on your Google or Dropbox accounts and then back up the data on thee drives to Synology.
You will also have to make sure that the Synology DiskStation is running DSM 6.0 and that you have installed and are running Cloud Sync. You then need to login to your Google account o Dropbox account and authorize Synology before you can proceed with the backup.
Considering that you cannot create a full backup of all the data on your Android on either the Google drive of Dropbox, this is not an ideal solution to back up your device.
Part 2: The Best Way to Backup Android
The best way to back up your Android device should ideally be uncomplicated in its make up without having to compromise on features. That ideal solution comes in the form of dr.fone — Phone Backup (Android).
dr.fone — Phone Backup (Android)
Best way to back up all data on your Android
- It can also be used to restore the backup you create or any other backup file in any other location such as iTunes, iCloud.
- You can view the files in the device and select only the files you want included in the backup. The same is also true for the restore feature that also allows you to view the files in the backup file and select only the files you want to restore.
- It is also a phone transfer tool that can be used to transfer all types of data between devices.
Step-by-Step Guide to Backup Android Using dr.fone — Phone Backup (Android)
Step 1. Begin by downloading and installing the program to your computer. Once the installation is complete, launch the application by double clicking on it. In the primary window, you will see a number of tabs with a number of options. To begin the backup process, click on «Backup&Restore» tab. This will open the backup window.
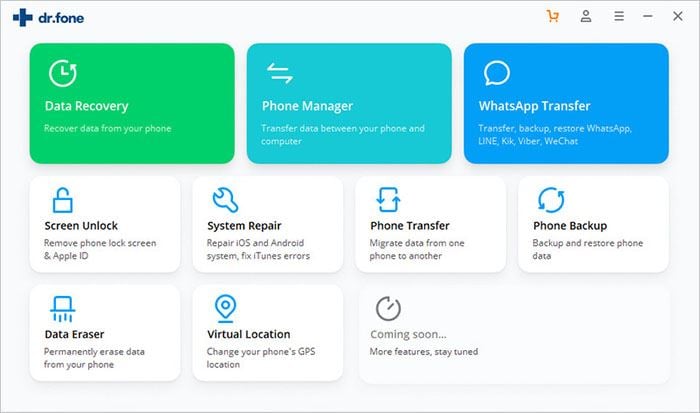
Step 2. Next, you need to connect the Android device you want to back up to PC using USB cables and click «Backup». Once the program detects the device, you will see all the data on your device in the middle panel of the resultant window.
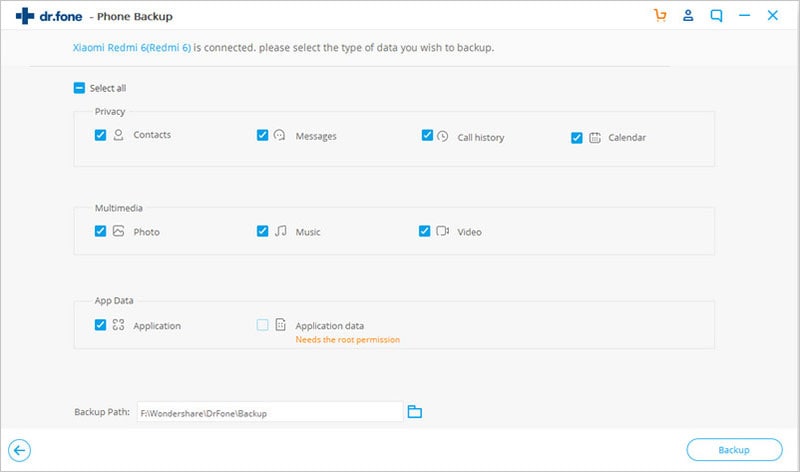
Step 3. Now all you have to do is select the data you want to be included in the backup and then click «Backup». The application will immediately begin backing up the selected data to your computer. Depending on the amount of data you have on your device, this process may take a few minutes.
Источник
Tips on Backup Android Using Synology

As a popular and advanced cloud service, Synology allows you to backup everything from your Android to your PC or Mac computer. It features with many powerful functionalities that you can backup your Android data and secure the data on an option that provided by Synology, which comes with advanced technology for cloud storage. Here in this post, we will give you with detailed tips on backing up Android using Synology. We also recommend the best alternative to Synology for you choice.
Part 1: How to Backup Android Using Synology
Synology is regraded as an Android app, but it is not a real Android backup app. That’s because you have to backup your Android data on your Google or Dropbox accounts. After that, you can then backup Android data on Synology.
Before you use Synology to backup Android device, you firstly need to make sure that the Synology DiskStation is running DSM 6.0 and you have the Cloud Sync installed. Launch the Cloud Sync and then login to your Google account or Dropbox account. After that, authorize Synology and then you can start the backup process.
You should know that either Google Drive or Dropbox can make full backup of your Android data, therefore, using Synology is not an ideal way to back up your Android device. In the following part of this article, we will tell you how to backup Android with a better alternative tool to Synology.
Part 2: Better Alternative Way to Backup Android
Here is a better and more effcient way to back up your Android device. That ideal solution comes in the form of Coolmuster Android Assistant or Coolmuster Android Assistant for Mac. It offers uncomplicated operations to back up your whole Android data to computer without any data loss. It features with powerful ability to backup and manage Android data on computer.


Key Features of Coolmuster Android Assistant:
* You just need to install the app on your computer and connect your Android device to your computer. Then, let the program do the rest jobs.
* As long as you want to, you can backup all data types on your Android device, including contacts, text messages, call logs, apps and other file types on your computer.
* It can also be used to restore the backup completely or selectively to your Android device.
* You can view the files in the device and choose the ones that you really want to backup.
* It supports all Android based devices, including Samsung, HTC, LG, Motorola, HUAWEI, ZTE, etc.
* As the name implies, this program is a professional Android managing tool that allows you to transfer, manage, edit and delete Android data on computer.
Step by Step Guide to Backup Android with Android Assistant
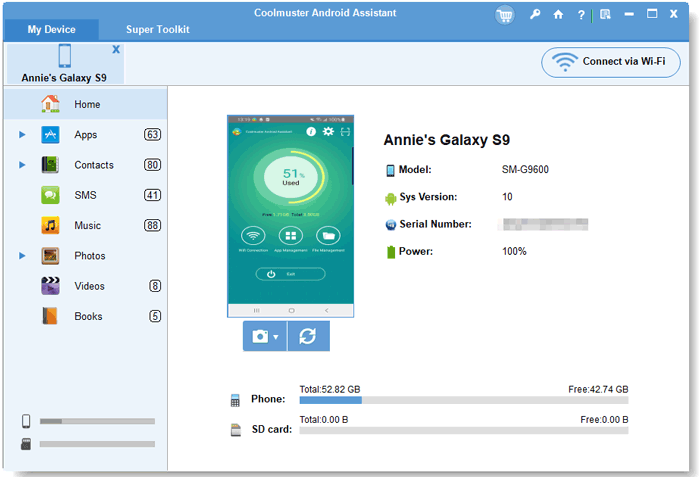
1. Start by downloading and installing the Coolmuster Android Assistant software on your computer. After that, launch the program by double clicking on it. Then, connect your Android phone with the computer via a USB cable.
Note: You may need to enable USB debugging on your Android phone firstly. After that, you will see the Android phone is detected by the program like the following picture shows.
Step 2: Preview and select your wanted data
All the Android data types are displayed on the left side menu. You can go to choose the file types that you want to backup and Android Assistant will scan your Android device automatically and display all the scanned out files on the right side window.
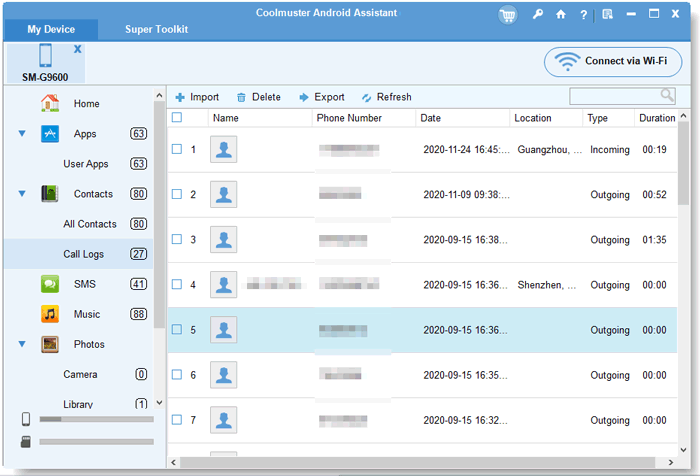
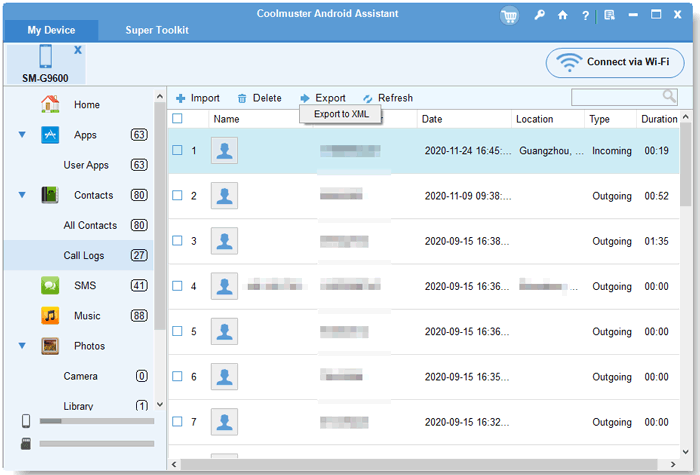
Step 3: Backup Android data to computer
Now all you have to do is selecting the data you want to backup and then click the «Export» button from the top menu. You can decide a location on your computer to save the exported files. The backup process will be complete within a matter of minutes.
Part 3: One-Click Way to Backup Android Phone
Android Assistant also provides you with 1-click operation to backup your whole Android phone. It allows you to backup all your data from Android to computer with 1 simple click. And also enables you to restore these backup files to any Android devices with 1 click.
To achieve it, you only need to do the following jobs:
1. Launch Android Assistant and connect Android phone to the computer.
2. Go to «Super Toolkit» from top menu and choose the option of «Backup». Then you’ll see an interface like below:
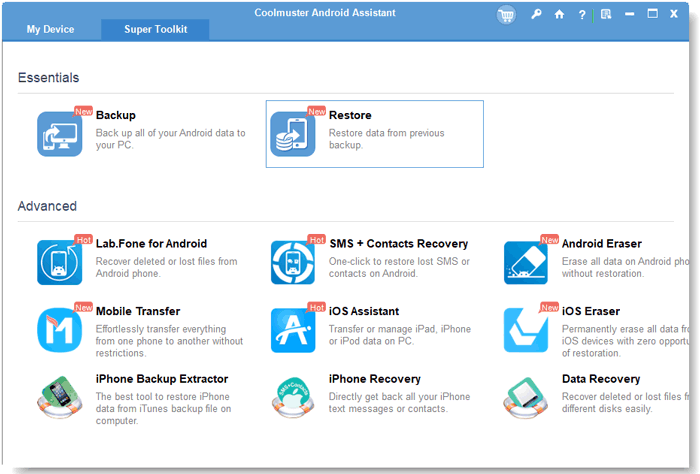
3. Select the contents you want to backup and choose an output location on your PC to save these backups. Then click on «Back Up» button to save them to the destination.
Источник
Synoguide
The unofficial guide to your Synology
How to backup photos and videos from smartphone to your Synology -easily 🙂
I just discovered this past Christmas by accident, the easiest way to back up your photos and videos with a simple click. And how to remove them from your phone as easily!
I have previously shown you how to do this with the DS Photo app, but I just discovered a better way!
Ok, here it is how to do it. You will need:
- DS file app installed on the phone
So, how do I do it then?
How to back up your photos
Here are the steps:
Open the DS app:

Click on the three bars to get to the menu and then click “Photo backup”:

Now you need to login your diskstation (1) and
2. Choose a folder in your server where you would like to load your videos and photos
3. Select if you want this to be done on wifi connections only
3. Upload photos and/or videos
4. Keep the original file name
5. Convert the image

Ok, so now you backed up your photos and you want to remove them from your phone? Here is how:
Delete the photos from your smartphone
Scroll down on the configuration pane, until you find the “Free Up Space” and click on it:

The app will tell you how many photos are backed up and if you want to clear them you just click on “Clear”. Easy right?

Share this:
Like this:
Share this:
Like this:
11 thoughts on “ How to backup photos and videos from smartphone to your Synology -easily 🙂 ”
I think this is a very useful tip and curious to know if you’ve tested the following – If I’m currently using DS Photo to do backups and I switch to DS File (and select the same photo backup folder on my NAS) will DS File recognize photos already backed up to the folder or will it simply backup all the photos on my mobile device again?
DS Photo does the exact same thing? Why use file instead?
I use the file app, so by backing up the photos there, I don’t need the photo app.
/Ruth
It’s true that both apps have overlaps in function but as the author pointed out the DS File app has an option to delete from your phone all the recently backed up photos, while DS Photo does not have this function (you would have to select and delete the photos manually). It’s handy if you’re concerned about saving storage on your phone. I’ve found that but DS Photos has features to create and manage photo Albums but DS File does not have any of the Album management functions. Although both apps let you view and backup photos there are small differences in capability for handling photos.
Thanks for sharing 🙂
Sorry – can you please edit my comment as I revised the sentence but left some words that should be deleted: “I’ve found that but DS Photos has features…” please remove “I’ve found that but “. Thanks!
Hmm.. Backup from phone works great… but how to restore back to my phone? It has no option to restore..
DS Photo can restore one photo at a time…
Moment doesn’t really works… also cant selectively upload anyway so useless…
DS Photo would be really nice if it can restore All Selected photos…
Connect the phone to your computer and drag and drop from there.
/Ruth
Источник


