- Transfer photos and videos from your iPhone, iPad, or iPod touch
- Use iCloud Photos
- Import to your Mac
- Import to your Windows PC
- How to back up an iPhone — three simple ways
- What is a backup?
- Do I really need to backup my iPhone?
- Beware of overwriting previous backups
- How to backup your iPhone without iTunes
- How to backup your iPhone with iTunes or Finder
- Apple Configurator?
- How to enable wireless iPhone backups
- How to get automatic iPhone backups
- How to backup your iPhone with iCloud
- Option A. Here’s how to create an iCloud backup directly from your iPhone or iPad:
- Option B. Here’s how to create an iCloud backup using iTunes:
- Which backup method should I choose?
- How to restore an iPhone from iTunes
Transfer photos and videos from your iPhone, iPad, or iPod touch
Learn how to transfer photos and videos from your iPhone, iPad, or iPod touch to your Mac or PC. You can also make your photos available on all your devices with iCloud Photos.
Use iCloud Photos
iCloud Photos keeps your photos and videos safe, up to date, and available automatically on all of your Apple devices, on iCloud.com, and even your PC. When you use iCloud Photos, you don’t need to import photos from one iCloud device to another. iCloud Photos always uploads and stores your original, full-resolution photos. You can keep full-resolution originals on each of your devices, or save space with device-optimized versions instead. Either way, you can download your originals whenever you need them. Any organizational changes or edits you make are always kept up to date across all your Apple devices. Learn how to set up and use iCloud Photos.
The photos and videos that you keep in iCloud Photos use your iCloud storage. Before you turn on iCloud Photos, make sure that you have enough space in iCloud to store your entire collection. You can see how much space you need and then upgrade your storage plan if necessary.
Import to your Mac
You can use the Photos app to import photos from your iPhone, iPad, or iPod touch to your Mac.
- Connect your iPhone, iPad, or iPod touch to your Mac with a USB cable.
- Open the Photos app on your computer.
- The Photos app shows an Import screen with all the photos and videos that are on your connected device. If the Import screen doesn’t automatically appear, click the device’s name in the Photos sidebar.
- If asked, unlock your iOS or iPadOS device using your passcode. If you see a prompt on your iOS or iPadOS device asking you to Trust This Computer, tap Trust to continue.
- Choose where you want to import your photos. Next to «Import to,» you can choose an existing album or create a new one.
- Select the photos you want to import and click Import Selected, or click Import All New Photos.

- Wait for the process to finish, then disconnect your device from your Mac.
Import to your Windows PC
You can import photos to your PC by connecting your device to your computer and using the Windows Photos app:
- Make sure that you have the latest version of iTunes on your PC. Importing photos to your PC requires iTunes 12.5.1 or later.
- Connect your iPhone, iPad, or iPod touch to your PC with a USB cable.
- If asked, unlock your iOS or iPadOS device using your passcode.
- If you see a prompt on your iOS or iPadOS device asking you to Trust This Computer, tap Trust or Allow to continue.
If you have iCloud Photos turned on, you need to download the original, full resolution versions of your photos to your iPhone before you import to your PC. Find out how.
When you import videos from your iOS or iPadOS device to your PC, some might be rotated incorrectly in the Windows Photos app. You can add these videos to iTunes to play them in the correct orientation.
If you’re having trouble importing photos from your iOS or iPadOS device to Windows 10, try these steps:
- On your iOS or iPadOS device, open the Settings app. Tap Camera, then tap Formats.
- Tap Most Compatible. From now on, your camera will create photos and videos in JPEG and H.264 formats.
Источник
How to back up an iPhone — three simple ways
What is a backup?
A backup is a direct copy of all of the important data on your iPhone (read more: What is stored in an iPhone or iCloud backup?). You can use a backup to safeguard your data in the event that you lose or break your iPhone.
Do I really need to backup my iPhone?
If you store important data on your iPhone, then you need to keep a backup of your data. If you lose or break an iPhone without a backup, you can also lose your photos, contacts and message history. Backing up your phone prevents this data from being permanently lost.
Backing up your iPhone is simple, and there are three methods you can use to backup your device. This article walks you through using iTunes, Finder and iPhone Backup Extractor to create iPhone or iCloud backups. The functionality is free in all of these applications.
Beware of overwriting previous backups
Before we look at each of these methods in detail, bear in mind that making a new backup overwrites a pre-existing one. So, if you’re looking to recover data from your device, don’t rush to create a new backup until you have examined the existing one.
How to backup your iPhone without iTunes
iPhone Backup Extractor can create backups of your iPhone on Windows or macOS over WiFi or a USB connection — without needing to have iTunes installed. You can also use this method to access the information inside your backup.
To create a backup using iPhone Backup Extractor, follow these steps:
- Download, install and run iPhone Backup Extractor.
- Connect your iPhone or iPad to your computer via USB.
- Select your device from the left-hand menu.
Choose Utilities or click Backup .
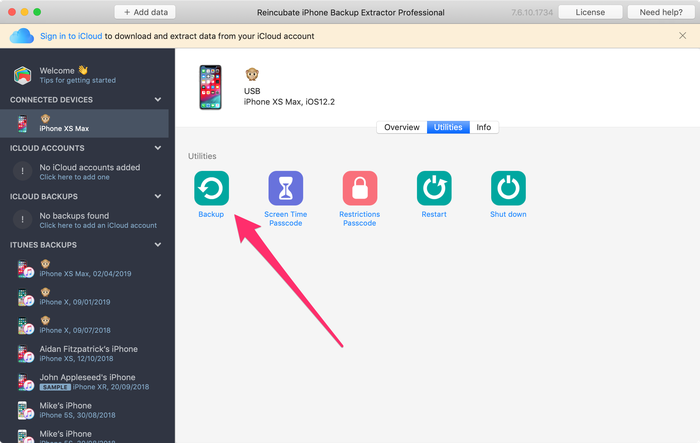
The «Backup» button in iPhone Backup Extractor
Click Start . iPhone Backup Extractor will prompt you to set a password on your backup in order to keep your data safe and secure.
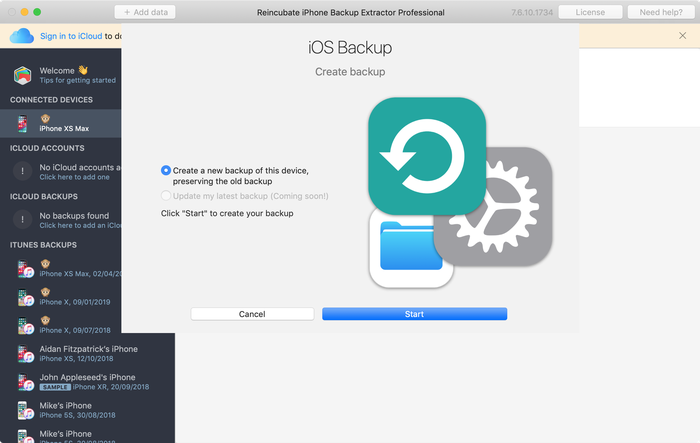
iPhone Backup Extractor’s backup creation wizard
Summary: Using iPhone Backup Extractor to backup your iPhone is fast and free, and allows you to access the data within your backup, but you’ll need to have access to a Mac or PC.
How to backup your iPhone with iTunes or Finder
You’ll need to use a computer to backup your phone to iTunes or Finder, but you can use as much storage space as you have free on your computer.
Apple removed iTunes from macOS 10.15, with its backup functionality now available directly in Finder. Therefore, if you have a Mac running macOS 10.15 or later, you should use Finder to backup your iPhone, while if you have a Windows PC or a Mac running an earlier version of macOS, use the most up to date version of iTunes.
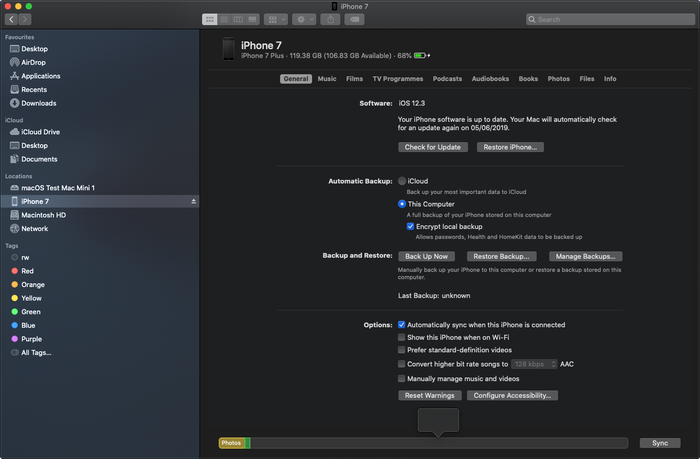
macOS Finder’s iOS backup interface
Here’s how to get backups working with iTunes or Finder in three steps:
Connect your iPhone or iPad to the computer with a USB and find and select your iPhone in iTunes or Finder.
Ensure This computer is the backup location, not iCloud .
If you want to encrypt your data, select the encryption checkbox and choose a password for the backup. We recommend doing this, as it provides better protection for your information. Without setting a password, anyone who has access to your computer can access any information stored in your iPhone backup.
As an added bonus, if your backups are encrypted, Apple will include even more data in them than they otherwise would: such as Health information and the saved passwords in your Keychain.
Click the “Back Up Now” button in iTunes or Finder, and a backup should be taken over Wi-Fi. (It’s not necessary to hit “Sync” first.)
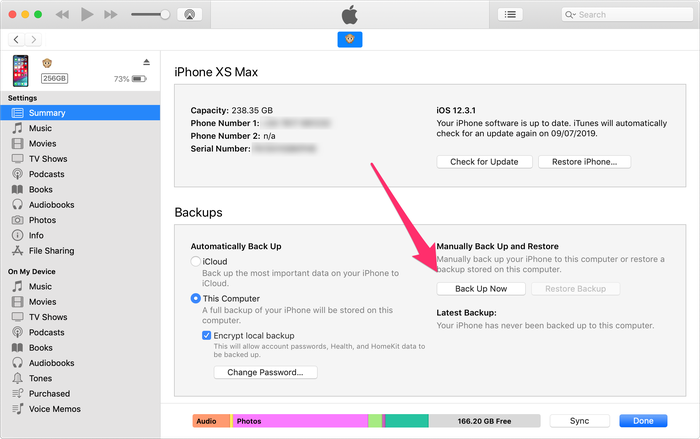
Creating a fresh backup in iTunes
Wait until the backup is finished, and don’t disconnect the USB cable until then. The first time a backup is taken it can take quite a while, particularly for iPhones with a lot of data on them. Subsequent backups will be faster, as only the newer files need to be added to the backup each time. Keep reading to find out how to backup your iPhone overnight.
Apple Configurator?
If you’re using Apple Configurator, it’s possible to create and restore backups directly within its interface. Simply right-click on the device and choose «Backup».
Summary: Using iTunes to backup your iPhone might provide you with more free storage space than iCloud, but running iTunes can slow down your computer.
How to enable wireless iPhone backups
To configure your iPhone or iPad to back up over Wi-Fi, you should run through the following steps:
- Connect your iPhone or iPad to the computer with a USB and open the iPhone section on iTunes or Finder.
- Tick Sync with this iPhone over Wi-Fi
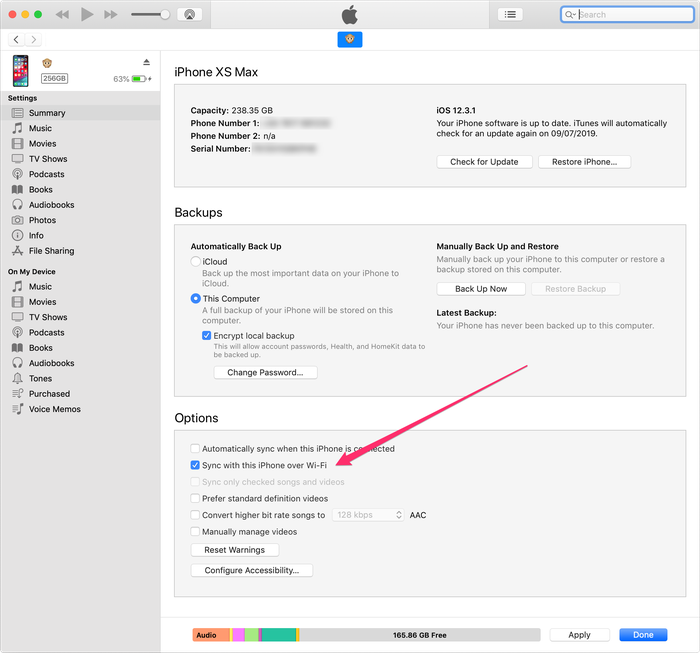
iTunes’ backup options for Wi-Fi backups
Creating a fresh backup in iTunes
How to get automatic iPhone backups
Your iPhone is able to back up automatically each night to iCloud or iTunes if you satisfy the criteria for automatic backups. These are:
- The device must be locked
- The device must be powered
- The device must be connected to a Wi-Fi network
If your phone is set to back up to iTunes over Wi-Fi, then your PC or Mac must be left powered on and connected to the same Wi-Fi network.
How to backup your iPhone with iCloud
Many people choose to use iCloud, Apple’s default option, to backup their iPhone data, because data can be backed up directly from your phone, though you can also create an iCloud backup on a PC, using iTunes, or a Mac, using Finder
Option A. Here’s how to create an iCloud backup directly from your iPhone or iPad:
- On your iPhone, go into Settings
- Select [your name] (at the very top of the screen)
- Select iCloud
Choose iCloud Backup . You can also manage your iCloud storage from the same menu.
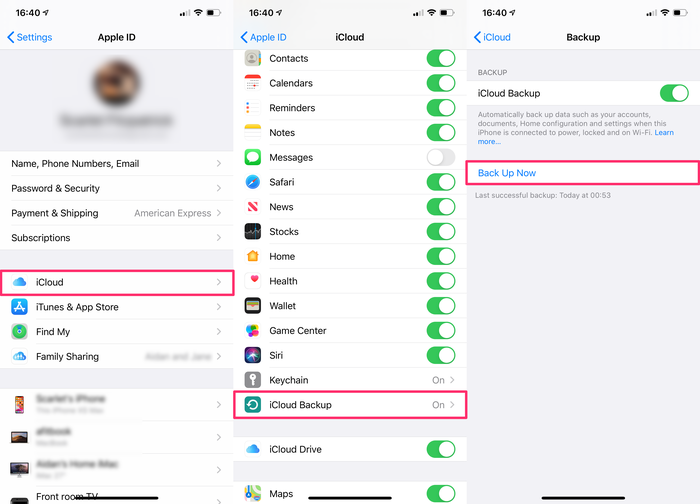
Backup now on iCloud
Option B. Here’s how to create an iCloud backup using iTunes:
If you don’t want to create an iCloud backup wirelessly, you can also use iTunes to create and save your backup in iCloud.
Connect your iPhone or iPad to your PC or Mac via USB and open the latest version of iTunes.
Select your iPhone in the top left of iTunes, and scroll to the backup section.
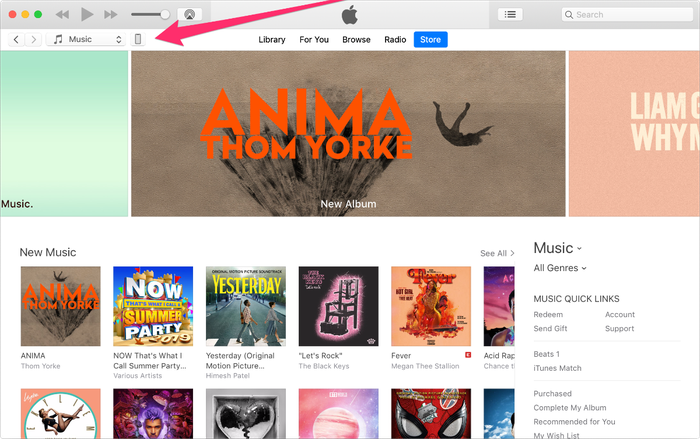
Choose your device in iTunes
Select iCloud and click on the button reading «Back Up Now» — it will take a few minutes to generate and store your iCloud backup.
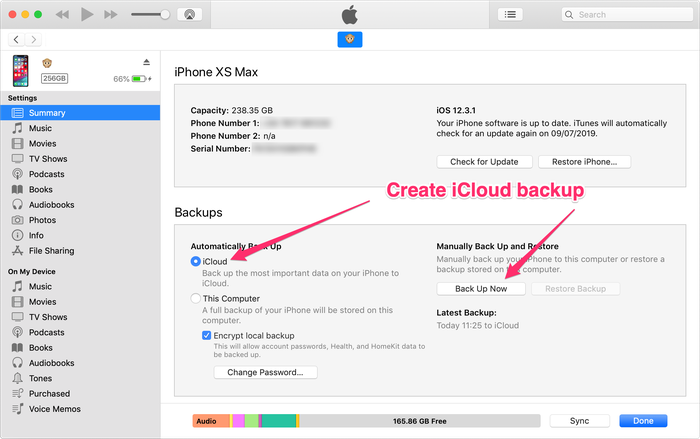
Create an iCloud backup with iTunes
Unfortunately, iCloud only provides 5 GB of free storage space, so you’ll need to pay a monthly fee if you need to backup more data.
Wondering how much space you’ll need? Apple’s latest iPhones provide up to 512 GB of storage, or 100 times more storage space than iCloud will backup for free. The amount of storage you need for a backup will depend on your device and how you use it, but the things that tend to take up the most space are:
- Your iCloud Photo Library. This can grow to be larger than the storage on your phone, as it doesn’t all have to be fitted onto the phone at any one time.
- All of your app’s data, and any files you store on the device. Apps that include a lot of images, videos or sound files (such as Pinterest, Netflix and Spotify) will use large amounts of storage space.
Summary: you can use iCloud to backup your data directly from your phone, but you’ll have to pay to protect more than 5 GB of data, and backups tend to be slow.
One neat thing to note with iCloud storage space is that it can be shared between family members configured on iCloud. If you have your partner or kids connected, you can pool the space between you. So, if you upgrade your account, it’s possible that they won’t need to.
(iCloud iPhone backup failed? Find out how to fix it)
Which backup method should I choose?
Unfortunately, you can’t choose to backup to both iTunes and iCloud at the same time, but you can switch between the two without older backups being deleted.
Here are some of the things to weigh up when choosing between iTunes and iCloud backups:
| Feature | iTunes backups | iCloud backups |
|---|---|---|
| Lifetime | Forever on your computer | Apple delete iCloud backups after 180 days |
| Storage space | As large as the hard disk on your computer. | Limited to 5 GB without paid storage upgrade. |
| Storage required | No larger than the capacity of your iOS device. | The size of your iCloud Photo Library, with additional content potentially close to the size of your device. As backup snapshots are stored with potentially duplicate data, it is possible for a device backup to consume more space than the total capacity of the device. |
| Security | Robust, so long as a secure backup password is chosen. | Robust, so long as a secure iCloud account password is chosen. |
| Speed | Very rapid as no cloud access is required. Extremely fast when accessed over USB 3. | Speed varies according to the performance of your Wi-Fi, your Internet connection, and the performance of iCloud servers at the time. |
Given the advantage that iTunes backups have in speed of access, we recommend taking an iTunes backup to your local computer before any iOS upgrade. You don’t want to end up waiting hours for an iCloud backup restore!
How to restore an iPhone from iTunes
Once you’ve created your backup you can use it to restore your data in the event that your iPhone is lost or damaged, or if you want to add the data to a second iPhone.
Here’s how to switch iPhones using an iTunes backup:
- Connect your computer to the iPhone you want to switch to using.
- Open iTunes (or Finder if you’re using macOS Catalina 10.15)
- Select your iPhone from the list on the left-hand side.
Click Restore Backup… (Be careful not to click Restore iPhone )
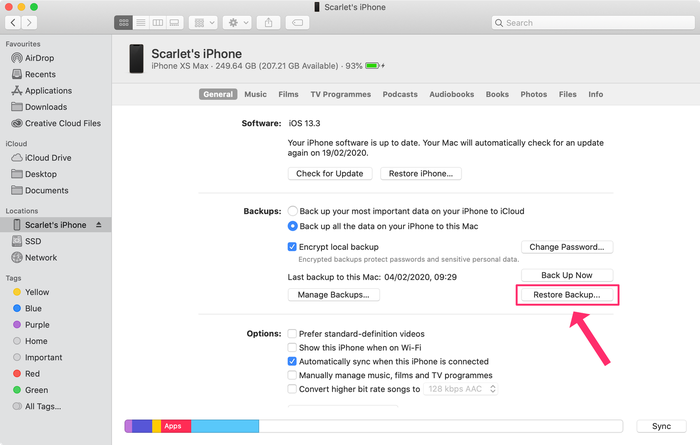
Restore an iPhone backup
Select the backup you want from the drop down list.
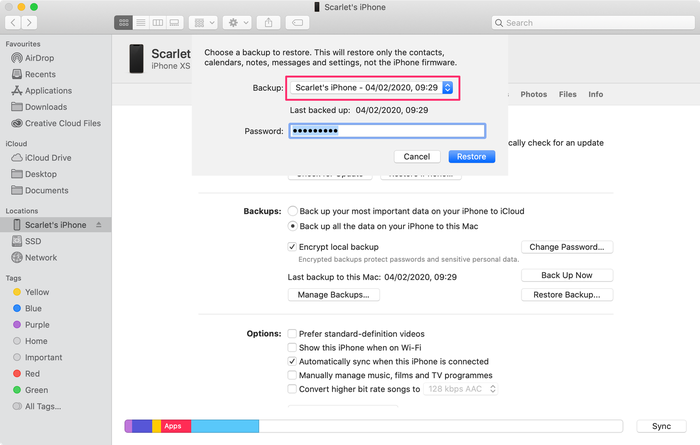
Select the correct backup
Enter your backup password if your backup is encrypted, and click Restore .
Источник


