- Barcode reader для android
- Распознавание Barcode Android
- Создание нового проекта
- Интегрируем ZXing
- Сканируем
- Обработка результатов сканирования
- Barcode reader для android
- About
- Сканер QR 2.7.4-L
- Android SDK: Create a Barcode Reader
- Premium Option: QR-Code & Barcode Reader
- 1. Create a New Android Project
- Step 1
- Step 2
- 2. Add ZXing to Your Project
- Step 1
- Step 2
- 3. Do Some Scanning
- Step 1
- Step 2
- 4. Retrieve Scanning Results
- Step 1
- Step 2
- Step 3
- Conclusion
Barcode reader для android

Краткое описание:
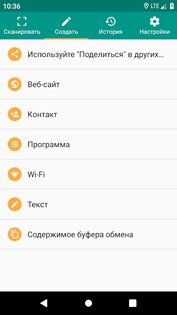
Сканирование QR и считывания штрих-кодов
Описание:
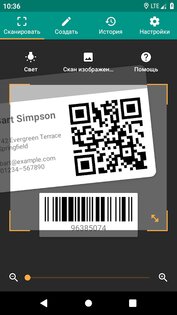
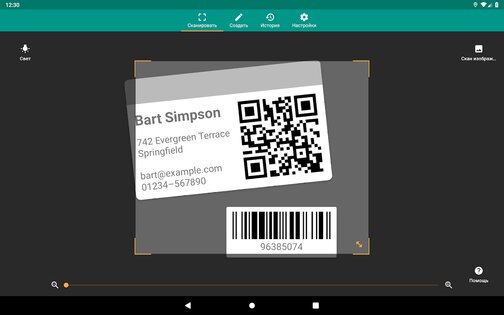
Сканирование является самым быстрым и самым удобным для пользователя QR-ридера и сканера штрих-кода. КАК Приложение работает:
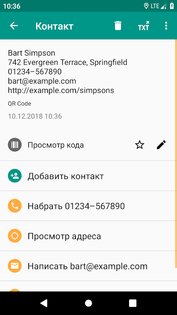
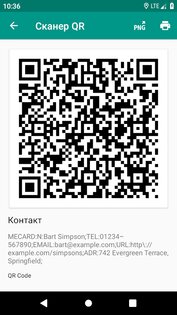
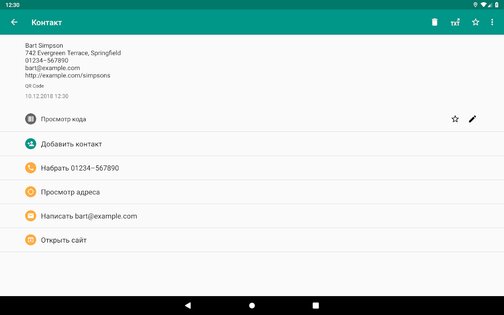
Для сканирования QR-кода или штрих-кода просто открыть приложение, навести камеру на код, и все готово! Там нет необходимости, чтобы сделать снимок или нажмать кнопки. Сканирование автоматически распознает коды. При сканировании QR-кода, если код содержит адрес веб-сайта, вы автоматически попадете на сайт. Если код содержит только текст, вы сразу же увидите его (в том числе на русском!). Для других форматов, таких как номера телефонов, адреса электронной почты, или контактной информацией, вам будет предложено принять соответствующие меры. Штрих-коды ТОВАРОВ: Сканирование признает все популярные типы штрих-кодов (СКП, EAN, и ISBN) и показывает вам, ценообразование, отзывы, и больше информации о любых продуктах при сканировании. Сканирование штрих требуется более новая устройство для того, чтобы надежно работать. Камеры на старых устройствах не обеспечивают разрешение или фокус, необходимое для сканирования штрих-кодов.
Требуется Android: 2.3.3+
Русский интерфейс: Нет
2.2.1
— Enhancements to the in-app browser
— Fixes to minor issues and enhancements
2.2
— Fixes to minor issues and enhancements
2.1.5
— Fixes issues with moving the app to a SD card
— Updates to the scan map
— Fixes for various bugs experienced by some users
— Enhancements to application stability
версия: 2.2.4 Scan — QR and Barcode Reader (Пост Alex0047 #38598532)
версия: 2.2.3  Scan+-+QR+and+Barcode+Reader+v2.2.3.apk ( 3.25 МБ )
версия: 2.2.2 //4pda.to/forum/d…code+Reader+v2.2.2.apk
версия: 2.2.1 Scan_QR_and_Barcode_Reader_v2.2.1 .apk ( 3.13 МБ )
Сообщение отредактировал iMiKED — 25.08.19, 18:03
Источник
Распознавание Barcode Android
В данной статье мы будем использовать ZXing (Zebra Crossing), чтобы расшифровать штрихкод в нашем Android приложении.
Используя ZXing, нам не нужно думать о том, что у пользователя нет сканера barcode, так как классы, предоставляемые библиотекой позаботятся об этом. Интегрируя ZXing в наше приложение мы можем предоставить пользователю более простую возможность сканировать шрихкоды, также это позволит нам сфокусироваться на разработке основной части приложения.
Создание нового проекта
Шаг 1
В Eclipse создайте новый Android проект. Введите имя приложения, проекта и название пакета. 
Шаг 2
Откройте основной шаблон. Eclipse должен был создать стандартный шаблон. Внутри него замените существующий контент на кнопку
После кнопки добавим два текстовых поля, которые будут отображать результаты отсканированной информации.
Добавьте к кнопке текст. Откройте файл res/values/strings
Чтобы просканировать пользователь должен будет нажать на кнопку. Когда приложение получает результат распознавания, оно отобразит его в текстовых полях.
Интегрируем ZXing
Шаг 1
ZXing — библиотека с открытым исходным кодом, предоставляющая возможность распознавания штрихкодов на Android. Некоторые пользователи уже имеют установленное приложение ZXing, поэтому достаточно передать ему код и дождаться результатов. В данном приложении мы рассмотрим способ, вызывающий соответствующую функцию другого приложения. Если данное приложение отсутствует у пользователя, то будет выведено предложение скачать его.
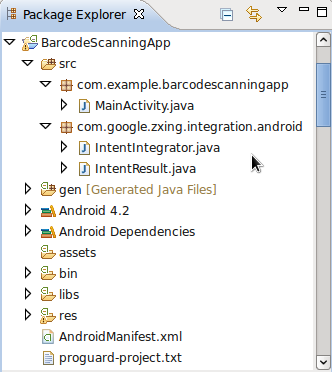
В Eclipse добавим новый пакет в Ваш проект. Для этого кликнем правой кнопкой мыши по папке src и выберем «New»->«Package», а затем введем com.google.zxing.integration.android в качестве имени пакета.
Шаг 2
Eclipse предлагает несколько способов импортирования существующего кода в проект. В данной статье самым простым методом будет создание двух классов, содержащий код из ZXing. Кликните правой кнопкой мыши по Вашему проекту, выберете «New»->«Class» и введите «IntentIntegrator» в качестве названия класса. Остальные параметры Вы можете не изменять. Как только Вы создали класс, проделайте тоже самое, но назовите класс «IntentResult».
Скопируйте код из обоих классов библиотеки, а затем вставьте его в созданные классы.
Теперь Вы можете подключить файлы в основной класс
Вернемся на минутку и также подключим следующие файлы. Обратите внимание, что Eclipse мог уже их подключить за Вас
Изучите содержание двух классов. Изучив их Вы обнаружите, что они не считывают код. Эти два класса являются просто интерфейсами, предоставляющими доступ к функционалу сканирования.
Сканируем
Шаг 1
Давайте реализуем сканирование, когда пользователь нажимает на нашу кнопку. В главном файле приложения существует метод onCreate, который должен выглядеть примерно так
Перед данной функцией создайте следующие переменные, которые будут хранить нашу кнопку и два текстовых поля, созданных в шаблоне
После существующего кода в onCreate добавьте строки, которые будут инициализировать переменные
Теперь, добавим обработчик нажатия
Расширим класс, чтобы объявить интерфейс OnClickListener
Шаг 2
Теперь, мы можем реагировать на нажатие кнопки началом процесса сканирования. Добавим метод onClick
Проверяем, была ли нажата именно кнопка сканирования
Внутри блока с условием создадим экземпляр класса IntentIntegrator, который мы импортировали
Сейчас, давайте вызовем процедуру, которая начнет сканирование
В данный момент должно начаться распознавание, но только, если у пользователя установлено необходимое приложение. Если его нет, то будет предложено начать загрузку. Результат сканирования будет возвращен приложению.
Обработка результатов сканирования
Шаг 1
Сканер будет запущен, когда нажата кнопка. Затем будет возвращен результат сканирования в метод onActivityResult. Добавим его в наш код
Внутри функции постараемся обработать результат
Шаг 2
Как и любые другие данные, полученные от другого приложения, было бы не плохо проверить, что результат не пуст. Продолжим мы только, если у нас есть правильный результат
Если мы не получили результат сканирования (например, пользователь отменил сканирование), то мы просто выведем сообщение
Вернемся в блок с условием, давайте разберемся с тем, что нам вернула библиотека. Объект Intent Result имеет метод, обеспечивающий получение результата сканирования. Получим результат сканирования, как строку
Также, получим вид barcode
Шаг 3
Теперь, наше приложение имеет всю необходимую для отображения информацию. В нашей статье мы просто отобразим ее пользователю.
Запустите наше приложение на реальном устройстве вместо эмулятора, чтобы увидеть, как работает функционал распознавания штрихкодов. Попробуйте просканировать штрихкод с какой-нибудь книги или любого другого товара.
Результаты сканирования
Источник
Barcode reader для android
Barcode Reader — Google Mobile Vision
Android Barcode Reader library using Google Mobile Vision. This library is built on top of google mobile vision sample adding improvements and fixing few bugs.

![]()

- Include the barcode reader dependency in app’s build.gradle
- Add the barcode reader fragment to your activity
- Implement your activity from BarcodeReader.BarcodeReaderListener and override the necessary methods.
Adding Barcode Reader in Fragment
In fragment the barcode reader can be added easily but the scanner listener barcodeReader.setListener() has to be set manually.
Check the example fragment code in BarcodeFragment.java and BarcodeFragmentTestActivity.java
Adding Scanner Overlay Scanning Indicator
The overlay animation indicator displays a horizontal line animating from top to bottom. This will be useful to to show some cool animation to indicate scanning progress.
To use it, add the info.androidhive.barcode.ScannerOverlay on top of barcode reader fragment using Relative or Frame layout.
XML attribute for Barcode Reader
auto_focus — boolean, turn on/off auto focus. Default is true
use_flash — boolean, turn on/off flash. Default is false
XML attribute for Scanner Overlay Indicator
square_width — Width of transparent square
square_height — Height of transparent square
line_color — Horizontal line color
line_speed — Horizontal line animation speed
- Play beep sound
You can play the beep sound when the barcode is scanned. This code is usually called in onScanned() callback.
- Change beep sound
You can change the default beep sound by passing the file name. You beep file should be in project’s assets folder.
The scanning can be paused by calling pauseScanning() method.
The scanning can be resumed by calling resumeScanning() method.
- Camera stream is not smooth. It’s because of camera resolution.
- Sometimes screen turns black after Camera permission is granted.
About
Android barcode reader using google vision library
Источник
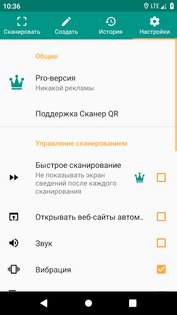
Сканер QR 2.7.4-L
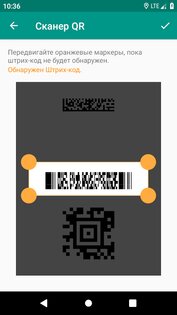
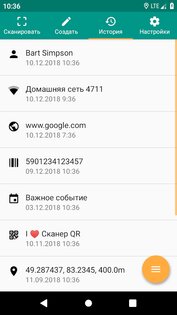
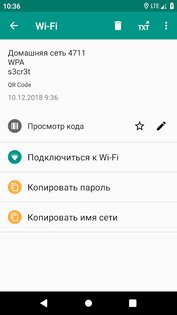
Сканер QR – удобная многофункциональная программа для сканирования QR- и штрих-кодов.
С помощью данного приложения вы сможете просканировать любой QR-код или штрих-код, получение информации из самых известных онлайн-сервисов, Amazon, eBay и Google. Программа абсолютно бесплатная. Сканер поддерживает все формы штрих-кодов. Вы сможете быстро открывать URL-адреса и с лёгкостью подключайтесь к точкам доступа Wi-Fi, считывайте VCards, находите информацию об интересующих вас товарах.
Особенности приложения Сканер QR:
- Полная безопасность и высокая эффективность;
- Быстрое время загрузки;
- Работает при минимальных разрешениях;
- Поддерживает все форматы штрих-кодов;
- Удобный поиск кодов в файлах;
- Оперативное сканирование посредством камеры;
- Наличие генератора QR-кодов;
- Простое и удобное в использовании приложение.
Источник
Android SDK: Create a Barcode Reader
In this tutorial, we’ll use the ZXing (Zebra Crossing) library to carry out barcode scanning within an Android app. We’ll call on the resources in this open source library within our app, retrieving and processing the returned results.
Since we’re using the ZXing library, we don’t need to worry about users without the barcode scanner installed, because the integration classes provided will take care of this for us. By importing the ZXing integration classes into our app, we can make user scans easier and focus our development efforts on handling the scan results. In a follow-up series coming soon, we’ll develop a book scanning app where we’ll build on the app we created in this tutorial. We’ll also add support for Google Books API so that we can display information about scanned books.
Premium Option: QR-Code & Barcode Reader
If you’re looking for a shortcut, you can find some ready-made QR code and barcode readers for Android apps at Envato Market.
For example, QR-Code & Barcode Reader uses the camera of a mobile device to read barcodes and QR codes.
The program automatically recognises the type of encoded data, providing a nice preview and various sharing options. It will add a new contact if the QR code is a business card, or it will send an SMS or call someone depending on the encoded data. Search engine selection is ideal for online product search, price and review comparison.
Automation features like bulk scan mode or auto action open wide opportunities for enterprise integration. The project compilation requires the zBar open-source barcode scanning library, which claims to be the fastest among others available on market and is included here.

 QR-Code & Barcode Reader on Envato Market
You can search Envato Market for other options to help you, or get an Android app developed on Envato Studio. Otherwise, read on for the full step-by-step instructions for creating a barcode reader yourself.
1. Create a New Android Project
Step 1
In Eclipse, create a new Android project. Enter your chosen application, project, and package names. Let Eclipse create a blank activity for you, with the name of your choice for both the activity and its layout.


Step 2
Open your main layout file. With the default settings, Eclipse starts your layout with a Relative Layout object, which you can leave as is. Inside of it, replace the existing content (typically a Text View) with a button.
After the button, add two Text Views in which we will output scanning information.
Add the button text string to your «res/values/strings» XML file.
The user will press the button to scan. When the app receives a result from the barcode scanning operation, it will display the scan content data and format name in the two Text Views.
2. Add ZXing to Your Project
Step 1
ZXing is an open source library that provides access to tested and functional barcode scanning on Android. Many users will already have the app installed on their devices, so you can simply launch the scanning Intents and retrieve the results. In this tutorial we are going to use the Scanning via Intent method to make scanning easier. This method involves importing a couple of classes into your app and lets ZXing take care of instances where the user does not have the scanner installed. If the user doesn’t have the barcode scanner installed, they’ll be prompted to download it.
Tip: Since ZXing is open source, you can import the source code into your projects in its entirety. However, this is really only advisable if you need to make changes to its functionality. You can also compile the project and include its JAR file in your own apps if you prefer. For most purposes, using Scanning via Intent is a reliable and easy to implement options, plus your users will have access to the most recent version of the ZXing app.
In Eclipse, add a new package to your project by right-clicking the «src» folder and choosing «New«, then «Package«, and entering «com.google.zxing.integration.android» as the package name.


Step 2
Eclipse offers several ways to import existing code into your projects. For the purposes of this tutorial, you’ll probably find it easiest to simply create the two required classes and copy the code from ZXing. Right-click your new package, choose «New» then «Class» and enter «IntentIntegrator» as the class name. You can leave the other default settings the way they are. Once you’ve created this class, do the same for the other class we’ll be importing, giving it «IntentResult» as its class name.


Copy the code from both classes in the ZXing library and paste it into the class files you created. These are IntentIntegrator and IntentResult. Refer to the source code download if you’re in any doubt about where the various files and folders should be or what should be in them.
You can now import the ZXing classes into your main Activity class.
Go ahead and add the other import statements we’ll use for this tutorial. Bear in mind that Eclipse may have already added some for you.
Feel free to have a look at the content of the two ZXing classes. It’s fairly straightforward, but the details of the barcode scanning processing are carried out elsewhere in the library. These two classes really act as an interface to the scanning functionality.
3. Do Some Scanning
Step 1
Let’s implement scanning when the user clicks the button we added. In your app’s main activity class, the default onCreate method entered by Eclipse should look something like this.
Above this method, add the following instance variables to represent the button and two Text Views we created in the layout file.
In onCreate, after the existing code, instantiate these variables using the ID values we specified in the XML.
Next, add a listener to the button so that we can handle presses.
Extend the opening line of the class declaration to implement the OnClickListener interface.
Step 2
Now we can respond to button clicks by starting the scanning process. Add an onClick method to your activity class.
Check whether the scanning button has been pressed inside this method.
Inside this conditional block, create an instance of the Intent Integrator class we imported.
Now we can call on the Intent Integrator method to start scanning.
At this point, the scanner will start if it’s installed on the user’s device. If not, they’ll be prompted to download it. The results of the scan will be returned to the main activity where scanning was initiated, so we’ll be able to retrieve it in the onActivityResult method.
Tip: When you call the initiateScan method, you can choose to pass a collection of the barcode types you want to scan. By default, the method will scan for all supported types. These include UPC-A, UPC-E, EAN-8, EAN-13, QR Code, RSS-14, RSS Expanded, Data Matrix, Aztec, PDF 417, Codabar, ITF, Codes 39, 93, and 128. The ZXing library also includes barcode scanning options that we’re not going to cover in this tutorial. You can check the project out at Google Code for more info.
4. Retrieve Scanning Results
Step 1
When the user clicks the scan button, the barcode scanner will launch. When they scan a barcode, it will return the scanned data to the onActivityResult method of the calling activity. Add the method to your main activity class.
Inside the method, try to parse the result into an instance of the ZXing Intent Result class we imported.
Step 2
As with any data being retrieved from another app, it’s vital to check for null values. Only proceed if we have a valid result.
If scan data is not received (for example, if the user cancels the scan by pressing the back button), we can simply output a message.
Back in the if block, let’s find out what data the scan returned. The Intent Result object provides methods to retrieve the content of the scan and the format of the data returned from it. Retrieve the content as a string value.
Retrieve the format name, also as a string.
Step 3
Now your program has the format and content of the scanned data, so you can do whatever you want with it. For the purpose of this tutorial, we’ll just write the values to the Text Views in our layout.
Run your app on a device instead of an emulator so that you can see the scan functioning. Try scanning a book or any other barcode you might have.


When the scan is initiated, the user is taken to the ZXing app to scan a barcode. 

The scan results are returned to the app.
Conclusion
In this tutorial, we’ve run through the process of facilitating barcode scanning within Android apps using the ZXing library. In your own apps, you might want to carry out further processing on the retrieved scan results, such as loading URLs or looking the data up in a third party data source. In the follow-up to this tutorial, we’ll use the barcode scanning functionality to create a book scanning app that will allow us to retrieve data about scanned books from the Google Books API.
Don’t forget that if you’re having trouble creating the barcode reader yourself, you can find some ready-made options on Envato Market to help you.
Источник


