- Barcode scanner keyboard android
- Barcode/NFC Scanner Keyboard
- (Клавиатура сканера штрих-кода / NFC)
- com.tecit.android.barcodekbd.demo 3.5.0
- Скачать
- com.tecit.android.barcodekbd.demo 3.5.0
- Скачать
- Scanner Keyboard 3.6.0
- Скачать
- Creating a Barcode Scanner using Android Studio
- What is this article about
- Prerequisite
- Let’s write some code
- Scan Barcodes with ML Kit on Android
- Before you begin
- Input image guidelines
- 1. Configure the barcode scanner
- Kotlin
- 2. Prepare the input image
- Using a media.Image
- Kotlin
- Kotlin
- Kotlin
- Using a file URI
- Kotlin
- Using a ByteBuffer or ByteArray
- Kotlin
- Using a Bitmap
- Kotlin
- 3. Get an instance of BarcodeScanner
- Kotlin
- 4. Process the image
- Kotlin
- 5. Get information from barcodes
- Kotlin
- Tips to improve real-time performance
Barcode scanner keyboard android
Новые темы необходимо создавать только в корневом разделе! В дальнейшем они будут обработаны модераторами.
Если Вы выложили новую версию программы, пожалуйста, сообщите об этом модератору нажав на вашем сообщении кнопку «Жалоба».
Barcodescanner Keyboard
версия: 2.5.0
Последнее обновление программы в шапке: 02.05.2017


Краткое описание:
Программная клавиатура с интегрированным сканером штрихкодов.
Описание:
Печатайте или сканируйте! Программная клавиатура с интегрированным сканером штрихкодов.
Эта программная клавиатура сканирует и вводит данные штрихкодов прямо в поля ввода необходимых приложений. Поддерживается режим серийного сканирования. Программа уменьшает необходимость ручного ввода, а также копирования и вставки данных. Специальная клавиша запускает либо встроенный, либо сторонний сканер штрихкодов. Мастер установки облегчает инсталляцию приложения.
Данные отсканированных штрихкодов автоматически вводятся в текущие текстовые поля целевых приложений. Доступны английская, немецкая, французская, испанская, шведская и русская раскладки клавиатур. Раскладка клавиатуры настраивается автоматически в соответствии с языком Вашей Android системы.
Приложение может быть настроено для использования специальных управляющих клавиш целевых приложений для передвижения курсора или для изменения режима симуляции нажатия на клавиши (полезно для использования в браузере или в приложениях удалённых рабочих столов / RDP).
БЕЗОПАСНОСТЬ: Данному приложению не нужно соединения с Интернетом или доступ к SMS. Ваши данные находятся в безопасности — шпионаж/фишинг/кейлоггинг невозможен.
Русский интерфейс: Да
Сообщение отредактировал Slav_nsk — 02.05.17, 18:37
Источник
Barcode/NFC Scanner Keyboard
(Клавиатура сканера штрих-кода / NFC)
com.tecit.android.barcodekbd.demo 3.5.0
Скачать
com.tecit.android.barcodekbd.demo 3.5.0
Скачать
Scanner Keyboard 3.6.0
Скачать
Тут вы можете скачать АПK-файл «Scanner Keyboard» для Андроид бесплатно, апк файл версии — 3.6.0 для загрузки на ваш андроид просто нажмите эту кнопку. Это просто и безопасно. Мы предоставляем только оригинальные апк файлы. Если какой-либо из материалов на этом сайте нарушает ваши права, сообщите нам

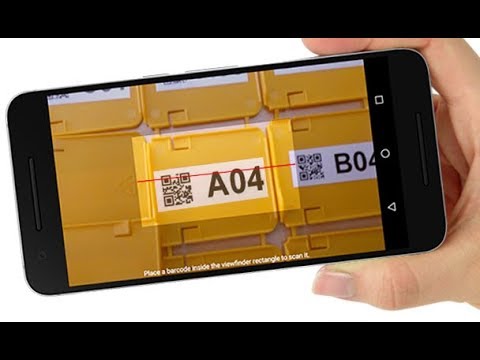
Используйте эту инновационную программную клавиатуру для сканирования штрих-кодов, QR-кодов, текста (OCR) и тегов NFC в любое приложение . Вызовите встроенные сканеры одним касанием, отсканированные данные немедленно появятся в целевом приложении, как если бы они были введены вручную на клавиатуре . Это отлично работает практически с любым целевым приложением без изменений.
СОХРАНЕНИЕ ВРЕМЕНИ
Эта клавиатура — удобная экономия времени! Это сокращает усилия при вводе текста и позволяет избежать ошибок при вводе. Больше не требуется утомительное копирование / вставка; штрих-коды и QR-коды, тексты и теги NFC сканируются без переключения приложений. Раскладка клавиатуры напоминает раскладку стандартной клавиатуры Android — вы сразу с ней ознакомитесь.
УНИВЕРСАЛЬНОСТЬ
Эта клавиатура сканера очень гибкая, готова к корпоративному лицензированию, оптимизирована для массового развертывания и может быть настроена для удовлетворения практически всех требований. Он отвечает требованиям коммерческих, промышленных, логистических и логистических приложений.
СКАНИРОВАНИЕ ШТРИХ-КОДОВ
Выбирайте между двумя встроенными сканерами штрих-кода камеры. Традиционный сканер штрих-кода идеально подходит для старых моделей телефонов, недавно представленный усовершенствованный сканер штрих-кода обеспечивает выборочное сканирование штрих-кода — очень ценная функция, если в режиме сканирования видны несколько штрих-кодов.
РАСПОЗНАВАНИЕ ТЕКСТА (OCR)
Встроенный сканер текста (OCR) преобразует изображения с камеры в текст за секунды. Текст на латинском языке в изображениях произвольных документов определяется автоматически и вставляется в целевое приложение.
ОСОБЕННОСТИ
◾ Клавиатура с современной раскладкой, распознаванием голоса, вариантами написания и многоязычной поддержкой
◾ Два механизма сканера штрих-кода на выбор
◾ Выборочное сканирование штрих-кода (нажмите на интересующий штрих-код)
◾ Сканер текста OCR преобразует изображения в текст на основе латиницы
◾ Встроенный считыватель тегов NFC
◾ Быстрое переключение передней / задней камеры и поддержка фонарика
◾ Поддержка автофокуса
◾ Работает практически с любым целевым приложением
◾ Проведите пальцем, чтобы изменить раскладку клавиатуры
◾ Настраиваемое автоматическое сканирование (вызвать сканер автоматически)
◾ Настраиваемые клавиши сканера
◾ По одному / в пакетном режиме сканирования
◾ Поддержка макросов / Quicktext
◾ Несколько вариантов лицензирования
◾ Готовность к массовому развертыванию
◾ И многое другое .
СОВМЕСТИМОСТЬ / ОГРАНИЧЕНИЯ
Сканер-клавиатура доступна для Android 4.0 (Ice Cream Sandwich) и выше. Расширенный сканер штрих-кода и сканер текста OCR поддерживаются начиная с Android 5.0 (Lollipop) и требуют установленных сервисов Google Play. Клавиатура поддерживает общие языки ввода и раскладки клавиатуры, раскладка клавиатуры автоматически соответствует системным настройкам вашего устройства Android.
МАКСИМАЛЬНОЕ / ПРЕДПРИНИМАТЕЛЬСКОЕ ЛИЦЕНЗИРОВАНИЕ, OEM-ВЕРСИИ
Для пользователей, которым требуется корпоративная лицензия, TEC-IT предлагает версию приложения с массовой лицензией (учетная запись Google не требуется). Индивидуальные версии или OEM-версии (например, с полной интеграцией аппаратных сканеров) доступны по запросу. Пожалуйста, свяжитесь с sales@tec-it.com.
БЕСПЛАТНАЯ ДЕМО
Бесплатная пробная версия показывает демонстрационные подсказки через нерегулярные промежутки времени. Пожалуйста, обновите (покупка в приложении) до неограниченной версии, чтобы снять это ограничение.
Источник
Creating a Barcode Scanner using Android Studio

Step by step guide to building a barcode scanning application using Android Studio.
What is this article about
This article will guide you through creating an android application using which you can make use of your mobile camera to scan a barcode and read the data in them.
Prerequisite
- The latest version of Android Studio installed. ( download from here )
- A mobile device to test the application. (you can make use of the inbuild android emulator but in some pc, it may cause some issues.)
- Knowledge of java or any object-oriented programing language.
Let’s write some code
- Create a new application in android studio and name it Barcode Scanner.
- Open up your app-level Gradle file and add the below dependency there.
3. Now hit on Sync now button and wait for the build to complete. Once the build is complete open up your manifest file and add the necessary permissions.
also, add the metadata field in your manifest file, inside the application tag and above the activity tag.
here’s a full view of my manifest file
4. Now you have set up all the dependency needed for the barcode scanner to work and all the permission necessary. Let’s build the UI for the app.
5. Open your activity_main.xml file and write the below code inside.
Now your view should look something like this

here we have something called a sufaceview in android and a textview field to display the text scanned by the barcode.
SurfaceView: It provides a dedicated drawing surface embedded inside the view hierarchy.
You have completed the UI code for the Barcode App, now let’s write the java code to make wonders happen.
6. Open MainActivity.java file and you will see the following code.
let’s add some code of our own
7. First, we need to bind the views.
8. Now we will write the method to scan the image for a barcode.
this method will help us scan and display the text in the textview we created in the XML file.
9. The complete java code will look something like this.
Now try scanning this barcode and you will see the value that is embedded in the barcode in the textview.

The final screen should something like this.
Источник
Scan Barcodes with ML Kit on Android
You can use ML Kit to recognize and decode barcodes.
There are two ways to integrate barcode scanning: by bundling the model as part of your app, or by using an unbundled model that depends on Google Play Services. If you select the unbundled model, your app will be smaller, however the bundled model has performance advantages over the unbundled model. See the table below for details.
| Feature | Unbundled | Bundled |
|---|---|---|
| Implementation | Model is dynamically downloaded via Google Play Services. | Model is statically linked to your app at build time. |
| App size | About 600 KB size increase. | About 3.2 MB size increase. |
| Initialization time | Might have to wait for model to download before first use. | Model is available immediately. |
| Performance | V1 model. | V3 model is faster and more accurate. V3 model detects more correct results from bad-quality inputs and have more stable bounding boxes in streaming mode. Recall is improved by 17.1%. |
- Play around with the sample app to see an example usage of this API.
- See the Material Design showcase app for an end-to-end implementation of this API.
Before you begin
- In your project-level build.gradle file, make sure to include Google’s Maven repository in both your buildscript and allprojects sections.
- Add the dependencies for the ML Kit Android libraries to your module’s app-level gradle file, which is usually app/build.gradle . Choose one of the following dependencies based on your needs:
For bundling the model with your app:
For using the model in Google Play Services:
If you choose to use the model in Google Play Services, you can configure your app to automatically download the model to the device after your app is installed from the Play Store. To do so, add the following declaration to your app’s AndroidManifest.xml file:
If you don’t enable install-time model downloads, the model is downloaded the first time you run the scanner. Requests you make before the download has completed produce no results.
Input image guidelines
For ML Kit to accurately read barcodes, input images must contain barcodes that are represented by sufficient pixel data.
The specific pixel data requirements are dependent on both the type of barcode and the amount of data that’s encoded in it, since many barcodes support a variable size payload. In general, the smallest meaningful unit of the barcode should be at least 2 pixels wide, and for 2-dimensional codes, 2 pixels tall.
For example, EAN-13 barcodes are made up of bars and spaces that are 1, 2, 3, or 4 units wide, so an EAN-13 barcode image ideally has bars and spaces that are at least 2, 4, 6, and 8 pixels wide. Because an EAN-13 barcode is 95 units wide in total, the barcode should be at least 190 pixels wide.
Denser formats, such as PDF417, need greater pixel dimensions for ML Kit to reliably read them. For example, a PDF417 code can have up to 34 17-unit wide «words» in a single row, which would ideally be at least 1156 pixels wide.
Poor image focus can impact scanning accuracy. If your app isn’t getting acceptable results, ask the user to recapture the image.
For typical applications, it’s recommended to provide a higher resolution image, such as 1280×720 or 1920×1080, which makes barcodes scannable from a larger distance away from the camera.
However, in applications where latency is critical, you can improve performance by capturing images at a lower resolution, but requiring that the barcode make up the majority of the input image. Also see Tips to improve real-time performance.
1. Configure the barcode scanner
For example, to detect only Aztec code and QR codes, build a BarcodeScannerOptions object as in the following example:
Kotlin
The following formats are supported:
- Code 128 ( FORMAT_CODE_128 )
- Code 39 ( FORMAT_CODE_39 )
- Code 93 ( FORMAT_CODE_93 )
- Codabar ( FORMAT_CODABAR )
- EAN-13 ( FORMAT_EAN_13 )
- EAN-8 ( FORMAT_EAN_8 )
- ITF ( FORMAT_ITF )
- UPC-A ( FORMAT_UPC_A )
- UPC-E ( FORMAT_UPC_E )
- QR Code ( FORMAT_QR_CODE )
- PDF417 ( FORMAT_PDF417 )
- Aztec ( FORMAT_AZTEC )
- Data Matrix ( FORMAT_DATA_MATRIX )
Note: For a Data Matrix code to be recognized, the code must intersect the center point of the input image. Consequently, only one Data Matrix code can be recognized in an image.
2. Prepare the input image
You can create an InputImage object from different sources, each is explained below.
Using a media.Image
To create an InputImage object from a media.Image object, such as when you capture an image from a device’s camera, pass the media.Image object and the image’s rotation to InputImage.fromMediaImage() .
If you use the CameraX library, the OnImageCapturedListener and ImageAnalysis.Analyzer classes calculate the rotation value for you.
Kotlin
If you don’t use a camera library that gives you the image’s rotation degree, you can calculate it from the device’s rotation degree and the orientation of camera sensor in the device:
Kotlin
Then, pass the media.Image object and the rotation degree value to InputImage.fromMediaImage() :
Kotlin
Using a file URI
To create an InputImage object from a file URI, pass the app context and file URI to InputImage.fromFilePath() . This is useful when you use an ACTION_GET_CONTENT intent to prompt the user to select an image from their gallery app.
Kotlin
Using a ByteBuffer or ByteArray
To create an InputImage object from a ByteBuffer or a ByteArray , first calculate the image rotation degree as previously described for media.Image input. Then, create the InputImage object with the buffer or array, together with image’s height, width, color encoding format, and rotation degree:
Kotlin
Using a Bitmap
To create an InputImage object from a Bitmap object, make the following declaration:
Kotlin
The image is represented by a Bitmap object together with rotation degrees.
3. Get an instance of BarcodeScanner
Kotlin
4. Process the image
Kotlin
5. Get information from barcodes
Kotlin
Tips to improve real-time performance
If you want to scan barcodes in a real-time application, follow these guidelines to achieve the best framerates:
Don’t capture input at the camera’s native resolution. On some devices, capturing input at the native resolution produces extremely large (10+ megapixels) images, which results in very poor latency with no benefit to accuracy. Instead, only request the size from the camera that’s required for barcode detection, which is usually no more than 2 megapixels.
If scanning speed is important, you can further lower the image capture resolution. However, bear in mind the minimum barcode size requirements outlined above.
If you are trying to recognize barcodes from a sequence of streaming video frames, the recognizer might produce different results from frame to frame. You should wait until you get a consecutive series of the same value to be confident you are returning a good result.
The Checksum digit is not supported for ITF and CODE-39.
Except as otherwise noted, the content of this page is licensed under the Creative Commons Attribution 4.0 License, and code samples are licensed under the Apache 2.0 License. For details, see the Google Developers Site Policies. Java is a registered trademark of Oracle and/or its affiliates.
Источник


