Bound Service Example in Android
What is a bound service?
A bound service is like a server in a client-server interface. A bound server allows components, such as activities, to bind to the service, send requests, receive responses and even perform IPC or Inter-Process Communication.
There are three ways of creating bound services:
- First is by extending the binder class
- Second is by using a messenger
- Third, is by using AIDL or Android Interface Definition Language.
In this tutorial, we are going to create bind service or a bound service by extending a binder class.
Please follow the steps below for creating a bound service by extending the binder class:
Step 1) First of all in a blank bare born project we will create a service as we always do for creating a service.
So right click your package->create new->go to services->click service.
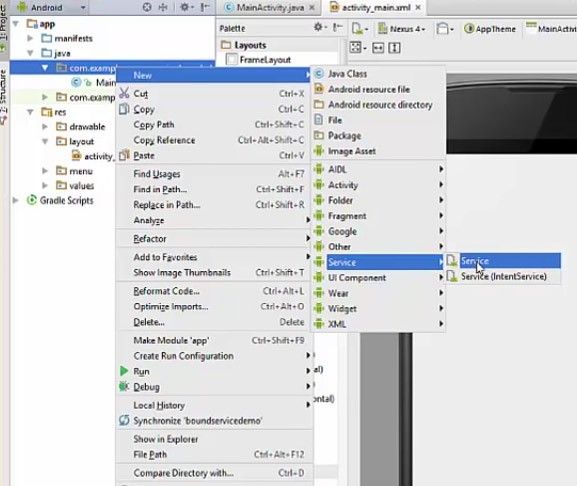
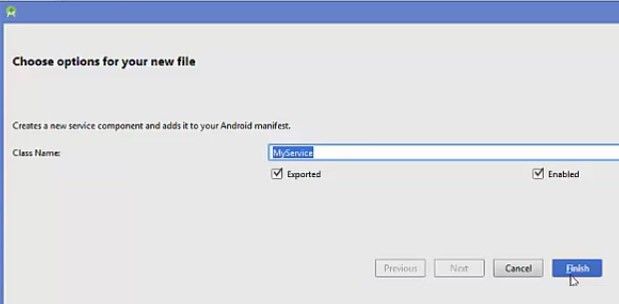
Now please name the service class finish it.
Step 2) Now it will create a class which extends from service class. As we know if you want to create a service we need to extend from service class.
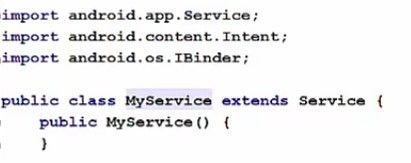
And this is the onBind method which we implement when we create our bound service.

Now in which scenarios we want to create a bound service by extending the Binder class. And why or how we can do it lets see.
So if your service is private to your own application and runs in the same process as the client (which is the most common case) then should create your interface by extending the Binder class and returning an instance of it from ‘onBind‘ method which will be automatically generated for us.
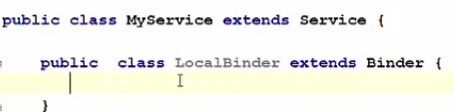
Step 3) Now let’s create the bound service by extending the binder class.
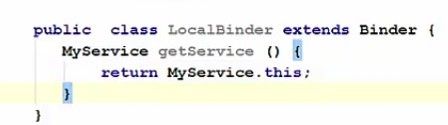
So, first of all, we will create a class inside our my service class which will be a public class and I will name it as LocalBinder. And this class will extend from the binder class.
Step 4) Now inside the ‘LocalBinder‘class which we created what we want to do is to create a method which returns MyService and the method name is GetService. And what this is going to do is it is going to return an instance of MyService.this.
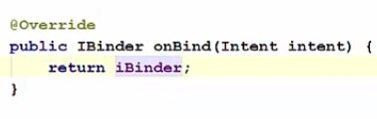
Step 5) Now as the definition says that «We need to create our interface by extending from the binder class and returning an instance of it from onBind method». So we are going to do the same.
Therefore, first of all, we are going to create our binder interface, give any name to your binder class for example ‘IBinder’ and initialize this using our local binder class.

And as it says that we need to return this instance from onBind method. So just take this instance of interface and just return it from here.
Step 6) Now, for example, we want to create a random number generator for our bound service.
So what we can do is we can create a variable called ‘mGenerator’ and which uses the class called ‘Random’ which is used to generate the random numbers and we are going to initialize it by new Random.

Step 7) Now we have to create a method which is going to return an integer value. And in here we want to return the generated random number. So just write ‘mGenerator .nextInt’ and in the argument of nextInt just give the range in which you want to create the random number. For example, under 200 you want to create this random number then you just need to give 200.
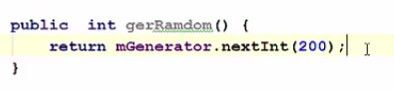
So it’s going to create the random number between 0 to 200.
This is how we can create a bound service using the extension or which extends from the binder class.
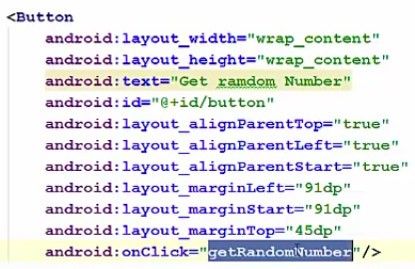
Step 8) Now in our interface or in our activity what we are going to do is we are going to take a button and a large text on which we are going to display the number.
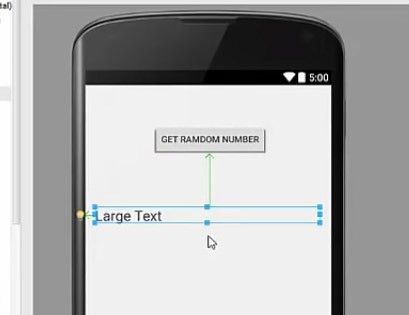
Now go to your activity and go to your text and in the button here add an element called ‘onClick‘ and we can give any method name. for example GetRandomNumber and this is the method which we are going to implement
Step 9) Now go to your main activity.java file and in here, first of all create this method, and inside this we are going through return this random number.

Now at the top we are going to define two variables. One is the object or instance of my service class, so MyService object and second is a variable for checking our services bound or not. So this will be our Boolean variable and we are going to name it as isBound. And we are going to initialize it as false.

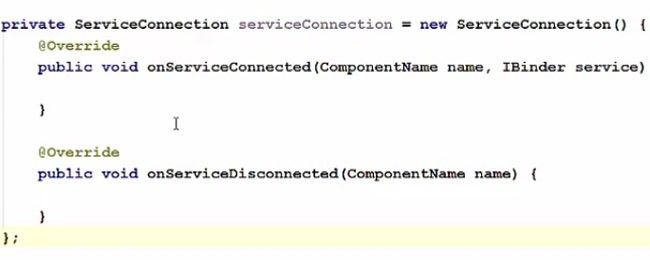
Step 10) Now we need to create an object of a class called service connection at the bottom. So inside the class go at the bottom and in here create an instance of a class called service connection and we will name it as service connection and we will press alt+enter to import service connection class and when you press enter for the first method here it will create two methods automatically.
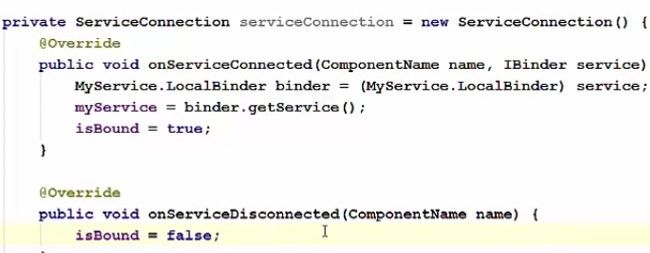
Now in these methods you need to write some code and in the first line you need to create our lower binder object and cast it lower binder with the service instance. And in the ‘onservice disconnected’ method we want to make our isbounder variable as false.
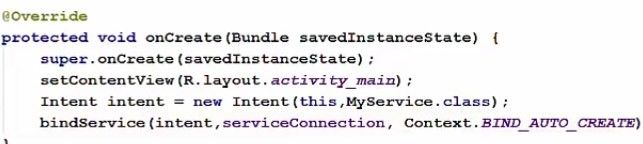
Step 11) Now as we always do we need to create intent for creating our service. So go to on create method here and create an intent oject.
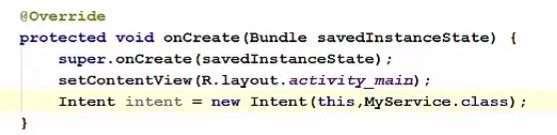
And now we are going to create a bound service and the first argument of it will be your intent, second will your instance of your service connection instance and the third argument will be context.BIND_AUTO_CREATE.
Step 12) Now one thing, which is remaining now, is to display our random number in our added text view. So we will create an object of a text view and we are going to cast it with (textview)findViewById(R.Id.textView).

And then you just need to take your textView.setText and inside this use object of my service class and using this we can call our getRandom function here.
.jpg)
This will not work as this to returning an integer because we need to pass the ‘setText’ to string variable. So what we can do is we can cast this cast this integer to string.

Now everything is done. So let’s run our program.
Now our app is running now and when we click this get random number button it gives me a random number which is 142.So in this way you can create a bound service in Android.
Источник
Be-Bound®: Stay Connected
Описание
This is an ideal application for those that want data access in dead zones and hate spending big bucks on roaming charges while abroad.
«As well as being cheaper the app also dramatically increases internet coverage abroad too.” (Huffington Post)
“Be-Bound® can be useful when you have an internet connection, too.” (Quartz)
“With Be-Bound®, you barely need a data connection at all to still access things online that are now like second nature to us.” (Android Headlines)
“While it might sound like magic, it is in fact a bit more simple than that.” (The Next Web)
Be-Bound® is the ultimate way to ensure that you get your data when you need it — without costing you a fortune on data and roaming charges.
Get your data in data dead zones!
Stop paying international data roaming charges!
Great for traveling!
Great app to have on your handset in case of emergency!
— Add your Email and Twitter accounts
— Get your News, Weather, Sports
— Find local points of interest
— And access most of your favorite apps: real-time stock exchange, currency converter, translator, flight tracker, GPS navigation…all built in.
Using our proprietary compression technology, Be-Bound® allows you to get your data while only paying text message charges (in many cases free) and inexpensive Be-Miles. We are offering you free Be-Miles to get you started.
As long as you can still give a call or send a text message, Be-Bound® will switch to its proprietary data mode to send requests to our servers to get the information you need. Each request will cost you standard text message rates and Be-Miles (prepaid credits), which are inexpensive and controllable.
Using Be-Bound® in your data plan on 3G or Wi-Fi is free. Using Be-Bound® on 2G networks internationally could generate international SMS costs. Check your plan for SMS and International SMS costs.Purchasing Be-Miles will give you access to multiple Be-Bound® services. The number of Be-Miles charged depends on the service. For example, consulting the weather or stock service will cost 1 Be-Mile but reading an email may cost several Be-Miles, depending on its size. Be-Bound® is compatible with most Android handsets.
Please verify you have sufficient and available Be-Miles Credit on your account before using Be-Bound®.
Источник
Полный список
— используем биндинг для подключения к сервису
В прошлых уроках мы общались с сервисом асинхронно. Т.е. мы отправляли запрос через startService, а ответ нам приходил когда-нибудь потом посредством PendingIntent или BroadcastReceiver.
Но есть и синхронный способ взаимодействия с сервисом. Он достигается с помощью биндинга (binding, я также буду использовать слово «подключение»). Мы подключаемся к сервису и можем взаимодействовать с ним путем обычного вызова методов с передачей данных и получением результатов. В этом уроке передавать данные не будем. Пока что разберемся, как подключаться и отключаться.
Как вы помните, для запуска и остановки сервиса мы использовали методы startService и stopService. Для биндинга используются методы bindService и unbindService.
Создадим два Application. В одном будет приложение, в другом сервис.
Создадим первый проект:
Project name: P0971_ServiceBindClient
Build Target: Android 2.3.3
Application name: ServiceBindClient
Package name: ru.startandroid.develop.p0971servicebindclient
Create Activity: MainActivity
Добавим в strings.xml строки:
4 кнопки: для запуска, остановки и биндинга сервиса
В onCreate мы создаем Intent, который позволит нам добраться до сервиса.
Объект ServiceConnection позволит нам определить, когда мы подключились к сервису и когда связь с сервисом потеряна (если сервис был убит системой при нехватке памяти). При подключении к сервису сработает метод onServiceConnected. На вход он получает имя компонента-сервиса и объект Binder для взаимодействия с сервисом. В этом уроке мы этим Binder пока не пользуемся. При потере связи сработает метод onServiceDisconnected.
Переменную bound мы используем для того, чтобы знать – подключены мы в данный момент к сервису или нет. Соответственно при подключении мы переводим ее в true, а при потере связи в false.
Далее идут обработчики кнопок. В onClickStart мы стартуем сервис, в onClickStop – останавливаем.
В onClickBind – соединяемся с сервисом, используя метод bindService. На вход передаем Intent, ServiceConnection и флаг BIND_AUTO_CREATE, означающий, что, если сервис, к которому мы пытаемся подключиться, не работает, то он будет запущен.
В onClickUnBind с помощью bound проверяем, что соединение уже установлено. Далее отсоединяемся методом unbindService, на вход передавая ему ServiceConnection. И в bound пишем false, т.к. мы сами разорвали соединение. Метод onServiceDisconnected не сработает при явном отключении.
Создадим второй проект, без Activity:
Project name: P0972_ServiceBindServer
Build Target: Android 2.3.3
Application name: ServiceBindServer
Package name: ru.startandroid.develop.p0972servicebindserver
Создаем сервис MyService.java:
Методы onCreate и onDestroy нам знакомы – они вызываются при создании и уничтожении сервиса. А onBind, onRebind и onUnbind используются при биндинге и мы далее будем смотреть как именно. Метод onStartCommand не используем.
В методе onBind возвращаем пока объект-заглушку Binder. В этом уроке он не будет использован.
Прописываем сервис в манифесте и настраиваем для него IntentFilter с Action = ru.startandroid.develop.p0972servicebindserver.MyService.
Все сохраняем, инсталлим сервис и запускаем приложение.

На самом экране ничего происходить не будет. Все внимание на логи.
Попробуем подключиться к неработающему сервису. Жмем Bind. В логах:
MyService onCreate
MyService onBind
MainActivity onServiceConnected
Сервис создался и сработал его метод onBind. Также сработал метод onServiceConnected в ServiceConnection, т.е. Activity теперь знает, что подключение к сервису установлено.
Попробуем отключиться. Жмем Unbind.
MyService onUnbind
MyService onDestroy
Сработал метод Unbind в сервисе и сервис закрылся. Т.е. если мы биндингом запустили сервис, он будет жить, пока живет соединение. Как только мы отключаемся, сервис останавливается. onServiceDisconnected не сработал, т.к. мы сами отключились.
Теперь попробуем соединиться с сервисом и убить его. Посмотрим, что станет с соединением. Жмем Bind.
MyService onCreate
MyService onBind
MainActivity onServiceConnected
Теперь в процессах убиваем процесс сервиса

Сработал метод onServiceDisconnected объекта ServiceConnection. Тем самым Activity уведомлено, что соединение разорвано.
Теперь немного подождем (у меня это заняло 5 секунд) и в логах появляются строки:
MyService onCreate
MyService onBind
MainActivity onServiceConnected
Сервис запустился и соединение восстановилось. Очень удобно.
Жмем Unbind и отключаемся.
Попробуем снова подключиться к незапущенному сервису, но уже без флага BIND_AUTO_CREATE. Перепишем onClickBind в MainActivity.java:
Вместо флага BIND_AUTO_CREATE мы написали 0.
Сохраняем, запускаем. Жмем Bind. В логах ничего. Мы убрали флаг, сервис сам не создается при подключении.
Давайте запустим его методом startService. Жмем Start. В логах:
MyService onCreate
MyService onBind
MainActivity onServiceConnected
Сервис создался и приложение подключилось к нему. Т.е. попыткой биндинга мы оставили некую «заявку» на подключение, и когда сервис был запущен методом startService, он эту заявку увидел и принял подключение.
Отключились от сервиса. Но сервис продолжает жить, потому что он был запущен не биндингом, а методом startService. А там уже свои правила закрытия сервиса. Это мы проходили в прошлых уроках.
Сервис завершил работу.
Попробуем запустить сервис методом startService и, пока он работает, несколько раз подключимся и отключимся. Жмем Start.
Подключаемся и отключаемся, т.е. жмем Bind
MyService onBind
MainActivity onServiceConnected
Сработали методы onBind и onUnbind в сервисе, и onServiceConnected в ServiceConnection.
Еще раз подключаемся и отключаемся — жмем Bind, а затем Unbind
При повторном подключении к сервису методы onBind и onUnbind не сработали. Только onServiceConnected.
И далее, сколько бы мы не подключались, так и будет.
Остановим сервис – нажмем Stop.
Это поведение можно скорректировать. Для этого необходимо возвращать true в методе onUnbind. Сейчас мы там вызываем метод супер-класса, а он возвращает false.
Перепишем метод Unbind в MyService.java:
Сохраним и инсталлим сервис. Жмем Start, а затем жмем поочередно Bind и Unbind, т.е. подключаемся и отключаемся. Смотрим логи:
MyService onCreate
MyService onBind
MainActivity onServiceConnected
MyService onUnbind
Сервис создан, подключились и отключились. Продолжаем подключаться и отключаться.
MyService onRebind
MainActivity onServiceConnected
MyService onUnbind
MyService onRebind
MainActivity onServiceConnected
MyService onUnbind
Последующие подключения и отключения сопровождаются вызовами методов onRebind и onUnbind. Таким образом, у нас есть возможность обработать в сервисе каждое повторное подключение/отключение.
Вот примерно такой Lifecycle имеет биндинг сервиса. Разумеется, я рассмотрел не все возможные комбинации запуска методов startService, stopService, bindService и unbindService. Оставляю это вам, если есть интерес. Я рассмотрел только типичные случаи.
Также я не рассматривал возможность одновременного подключения нескольких приложений или сервисов к одному сервису. А такая возможность существует. В этом случае, если сервис запущен биндингом, то он будет жить, пока не отключатся все подключившиеся.
Насколько я понял по хелпу, не рекомендуется оставлять незавершенные подключения к сервисам по окончании работы приложения. В хелповских примерах подключение к сервису производится в методе onStart, а отключение — в onStop. Но, разумеется, если вам надо, чтобы подключение оставалось при временном уходе Activity в background, то используйте onCreate и onDestroy. Также есть четкая рекомендация от гугла — не использовать для этих целей onResume и onPause.
На следующем уроке:
— обмен данными в биндинге
Присоединяйтесь к нам в Telegram:
— в канале StartAndroid публикуются ссылки на новые статьи с сайта startandroid.ru и интересные материалы с хабра, medium.com и т.п.
— в чатах решаем возникающие вопросы и проблемы по различным темам: Android, Kotlin, RxJava, Dagger, Тестирование
— ну и если просто хочется поговорить с коллегами по разработке, то есть чат Флудильня
— новый чат Performance для обсуждения проблем производительности и для ваших пожеланий по содержанию курса по этой теме
Источник


