- Create Bootable USB from Android without PC: How to Guide
- How to Create Bootable USB from Android without using PC
- What is ISO 2 USB [No Root]?
- 1. Install ISO 2 USB App
- 2. Connect USB to Android
- 3. Open ISO 2 USB App
- 4. Pick USB Drive & ISO File
- 5. Create a bootable USB using Android
- How to boot from USB?
- Conclusion
- How to Boot Android Phone into Recovery Mode
- Part 1. Boot into Recovery Mode on your Android Device
- Part 2. Fix Recovery Mode and Get Back Files
- Related Articles
- Android Booting
- Contents
- Key bootup components
- Bootloader
- ‘init’ resources
- Sequence of boot steps on ADP1
- firmware
- kernel
- user space
- Tools for analyzing Android Bootup
Create Bootable USB from Android without PC: How to Guide
Want to create a bootable USB from an android device?
If yes, then this post is definitely for you.
But what if your PC is not working & you don’t have another machine.
Then it sounds a little difficult to create it. But don’t worry I have a solution.
Last week, my windows 10 got crashed/corrupted.
And to do a clean install, I badly need a bootable USB stick.
But for that, I need to create it first without using my PC.
And then I realized that creating a bootable USB drive using an android phone can be a good option.
Let’s see how it works…
Table of Contents
How to Create Bootable USB from Android without using PC
But before we begin.
Please make sure that you have all the things mentioned in the given below list.
- An android smartphone. (Of course, you already have it)
- A 4/8Gb Pendrive. (To create bootable USB disks)
- An OTG Cable Connector (For connecting USB to your android device)
- ISO image file of your desired Operating system. (Like Windows 10,7 etc.)
- And the most important thing ISO 2 USB android app.
And to download the Windows 10 ISO file you can click on the given link.
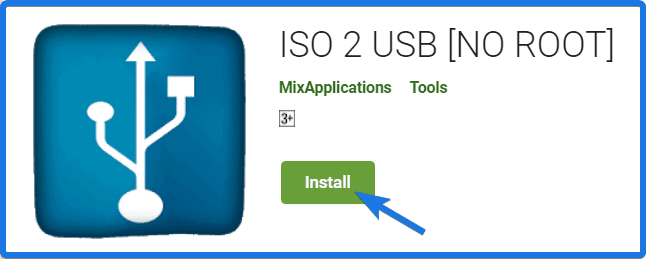
What is ISO 2 USB [No Root]?
ISO 2 USB is an android app which allows you to convert ISO to USB using your android phone. It can also be called as Rufus for Android, using which you can easily create your bootable USB for Windows & Linux OS without using PC. And the best part of this app is that it also works with the No Root / Non-Rooted Android devices.
Now I hope you have all the above-mentioned things with you.
So, Let’s get started with this step by step guide.
1. Install ISO 2 USB App
Now open your Android phone, then Go to Play Store and search for ISO 2 USB [No Root]. Otherwise, you can simply click on this link and install it properly.
2. Connect USB to Android
Once the ISO 2 USB app is installed, then connect your USB flash drive to your Android phone using OTG Cable Connector.
Note:- Please make sure that your Android mobile phone or your Android Operating System supports OTG Cable Connection properly.
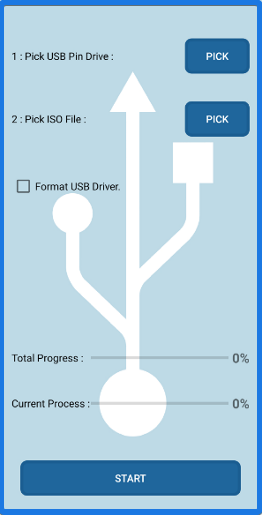
3. Open ISO 2 USB App
Now open ISO 2 USB application to make your bootable USB and check the USB is connected properly or not. For that, you can check your File manager where you can see your USB device connected.
Now comes the major part of creating a bootable USB from an android device.
4. Pick USB Drive & ISO File
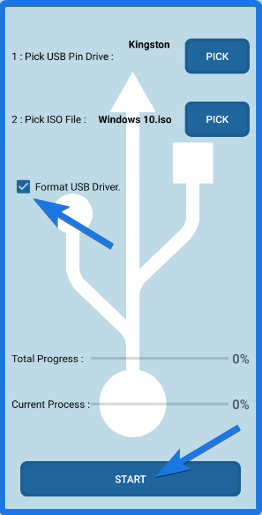
Now you can see that there are two options available there. The first one is “Pick USB Pin Drive” and the other one “Pick ISO File”. So first select the USB drive by clicking on the “Pick” button and then tap on the USB drive which you have connected earlier.
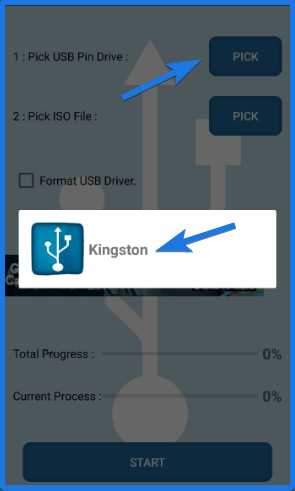
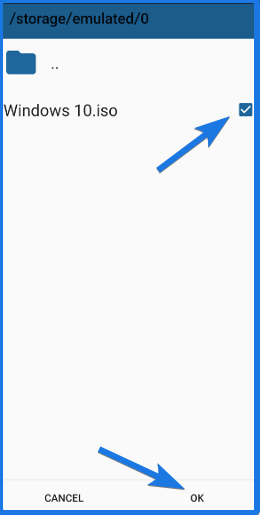
After selecting the USB drive, now select the Windows 10 ISO file by clicking on the “Pick” button in front of the “Pick ISO File” option. Then browse to the mobile storage where you have downloaded the ISO file earlier and then select or enable the checkbox & Click OK.
5. Create a bootable USB using Android
Now the ISO file and USB drive have been selected. But before converting ISO to bootable USB, you first need to create a clean partition and format the USB drive. So, Enable the USB “Format USB Driver” checkbox and then at last Click on the “START” button.
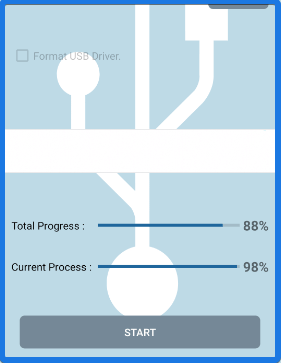
Once the bootable creation has started, now wait for 10-15 minutes and your bootable device will be ready. At this time of the process, you may see multiple ads on the screen which you have to close them and keep continuing the process.
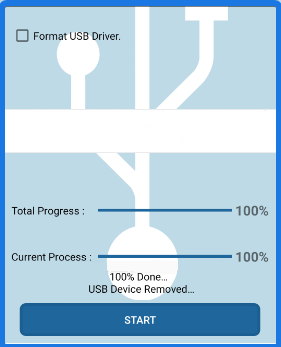
Finally, when the burning ISO file is done successfully, it will show a message 100% Done and the USB Device Removed. Which means you have successfully created a bootable USB drive.
And your windows 10 installer is ready to install on your PC.
Note:- Before starting this process, please make sure your Phone is 70-80% is charged and you are connected to the internet till the end of the process.
And here one question arises “how to boot from this USB-stick?“. So let’s move to the next section of this post.
How to boot from USB?
Booting from bootable USB drives is pretty easy if you know the correct steps to follow. The only thing you have to do is to, Go to the BIOS settings and then in the boot menu select the USB drive as 1st priority and DVD drive or the hard-drive as the 2nd priority.
After that save the settings and Reboot your PC. And Done!
For more info, you can also visit our post on Windows 7 USB where I have shown a more detailed guide on booting from USB.
That’s it for now…
Conclusion
So, that’s how you can easily create a bootable USB without PC by using your Android phone. And can use this bootable Pendrive to do a clean install on your computer machine. You can also follow the same method for windows 7, 8, XP, Ubuntu and Linux ISO files using balenaETCHER.
Stay tuned for the next post on how to use android as bootable USB.
Feel free to share your thoughts and also tell us if you know any better way to Create Bootable USB from Android without PC [No Root].
If you liked this post, Don’t forget to share this with your friends on your favorite social media platform.
Источник
How to Boot Android Phone into Recovery Mode
We sometimes may need to put our Android into Recovery mode for some tasks. For instance, rooting Android phones so that you are allowed to deeply customize your smartphone such as installing new custom ROMs, updating Android system, resetting your phone, etc.
People also read:
So, how to get into Android recovery mode? For new Android users, it may be a troublesome problem facing them. Don’t panic, here we provide an easy guide showing you how to make it without any difficulty.
- Part 1. Boot into Recovery Mode on your Android Device
- Part 2. Fix Recovery Mode and Get Back Files
Part 1. Boot into Recovery Mode on your Android Device
Getting into Recovery Mode on Android smartphones from different brands might be slightly different. In the following article, we will take several popular brands of Android devices and show you how to enter the Recovery Mode in detail.
Section 1 Boot Samsung Galaxy into Recovery Mode
a For Galaxy S8/S7/S6/S5 or other Samsung devices, you should firstly turn the phone off by holding down the Power key and select «Power off» option.
Then keep pressing and holding Power Key, Volume+ and Home button at the same time until you see the Samsung logo. Now, you can select the recovery mode option by using the Volume keys to highlight and the Power key to confirm.

Section 2 Get into Recovery Mode on LG
For the LG G6, G5, G4, V10, V20 and other LG phones, you can get it into recovery mode by following the guide below:
1. To start with, get your LG power off.
2. Press and hold the Power key and Volume- button simultaneously.
3. When the LG logo appears, release the keys. Then, immediately press the Power and Volume- button again until the Hard Reset menu displays.
4. Once the menu showed, use Volume keys to highlight an option and press Power button to confirm hard reset. Now, your LG is in the Recovery Mode.
Section 3 Enter Recovery Mode on HTC
1. Go to «Settings > Battery» on your HTC and uncheck the option that says FASTBOOT.
2. Power off the smartphone and wait for about 5 seconds until it completely switches off.
3. Then, press and hold Volume- button and press the Power key.
4. When you can see the new menu appears on the screen, release the keys. Use the Volume down button to navigate to the options in Bootloader Mode, and confirm «Recovery» option with Power button. In this way, you can get into Recovery Mode.

Section 4 Enter Recovery Mode on Google Nexus
1. If your smartphone is on, turn it off.
2. Press and hold the Volume- and Power key buttons, and you’ll see the word «Start» at the top of the screen.
3. Press the Volume- button twice to highlight «Recovery». Press the Power button to start Recovery mode.
4. The white Google logo will pop up. Please continue to press and hold the Power key and the Volume up key for around three seconds, and then let go of the Volume up key, but keep pressing Power.
5. Use the Volume keys to highlight the options and the Power key to select the one you want.
Note: Different Android devices have different key combines to enter bootloader or fastboot mode. Generally, holding «Volume down» key/»Volume up» key and «Power» key together works for most Android phones. If it doesn’t help, you may need to search for other methods in Google.

Part 2. Fix Recovery Mode and Get Back Files
As the guide presents above, you can get your Android phone into recovery mode or download mode manually. However, would this mode steal your phone data? It may not be certain but if you cannot gain your files on device, it is possible to retrieve them even though you meet with Recovery Mode or Download Mode with Android Photo Recovery.

Step 1 Launch this program on the computer and run it. Select «Broken Android Data Extraction» option in the left column. Then, connect your phone to computer via the USB cable to move on.

Step 2 Confirm the situation and please click on the «Start» button on the interface. Now you need to choose device name and model of your phone.

Note: If you have no ideas where to find the device name and model and you are not allowed to access your phone for the info, you can open the battery to view the model.

Step 3 As the computer can successfully recognize the device, the program would help you analyze your cellphone and recover the device with recovery package until it goes to the end.

Step 4 You are permitted to check the scanned results one by one and select some files to recover if you press «Recover» button and save them in certain folder. After that, this program would offer hands to exit this mode practically.

Hope this helps you in booting your Android device into recovery mode. You will find it is pretty convenient to back up or reset your system in this way. Surely, if you still have some problems in doing this, please send us emails or comment in the box below. We appreciate your suggestions as well.
Related Articles
 Ivy Bruce
Ivy Bruce is the Founder and Editorial Director at Recovery-Android Studio. You can also find her on Google+ and Twitter.

How to Transfer Videos from Computer to iPhone
![]()
User Guide of Phone to Phone Transfer Software

How to Recover Deleted File from Motorola Atrix

How to Transfer Music from Computer to Nexus
Источник
Android Booting
The bootup of an Android system consists of several phases, which are outlined here.
Contents
Key bootup components
Bootloader
The first program which runs on any Android system is the bootloader. Technically, the bootloader is outside the realm of Android itself, and is used to do very low-level system initialization, before loading the Linux kernel. The kernel then does the bulk of hardware, driver and file system initialization, before starting up the user-space programs and applications that make up Android.
Often, the first-stage bootloader will provide support for loading recovery images to the system flash, or performing other recovery, update, or debugging tasks.
The bootloader on the ADP1 detects certain keypresses, which can be used to make it load a ‘recovery’ image (second instance of the kernel and system), or put the phone into a mode where the developer can perform development tasks (‘fastboot’ mode), such as re-writing flash images, directly downloading and executing an alternate kernel image, etc.
A key component of the Android bootup sequence is the program ‘init’, which is a specialized program for initializing elements of the Android system. Unlike other Linux systems (embedded or otherwise), Android uses its own initialization program. (Linux desktop systems have historically used some combination of /etc/inittab and sysV init levels — e.g. /etc/rc.d/init.d with symlinks in /etc/rc.d/rc.[2345]). Some embedded Linux systems use simplified forms of these — such as the init program included in busybox, which processes a limited form of /etc/inittab, or a direct invocation of a shell script or small program to do fixed initialization steps.
The Android ‘init’ program processes two files, executing the commands it finds in them, called ‘init.rc’ and ‘init. .rc’, where is the name of the hardware that Android is running on. (Usually, this is a code word. The name of the HTC1 hardware for the ADP1 is ‘trout’, and the name of the emulator is ‘goldfish’.
The ‘init.rc’ file is intended to provide the generic initialization instructions, while the ‘init. .rc’ file is intended to provide the machine-specific initialization instructions.
‘init’ resources
The syntax for these .rc files is documented in a readme file in the source tree. See the Android init language reference
- Note that the old PDK has been retracted from where it used to found below http://source.android.com/porting
- You may be able to reconstruct it though:
- You need a local copy of the AOSP sourcetree, and run the usual build/envsetup.sh preparation
- Use repo init -b to check out the AOSP sourcetree with a tag around 2.3, then make sdk sdk_all
- This worked for me, though I used some tag around 4.0.4. Some links had to be fixed in the resulting html output
- You may be able to reconstruct it though:
Sequence of boot steps on ADP1
firmware
- first-stage bootloader runs
- it detects if a special key is held, and can launch the recovery image, or the ‘fastboot’ bootloader
- eventually, a kernel is loaded into RAM (usually with an initrd)
- normally, this will be the kernel from the ‘boot’ flash partition.
kernel
- the kernel boots
- core kernel initialization
- memory and I/O areas are initialized
- interrupts are started, and the process table is initialized
- driver initialization
- kernel daemons (threads) are started
- root file system is mounted
- the first user-space process is started
- usually /init (note that other Linux systems usually start /sbin/init)
- core kernel initialization
user space
- the kernel runs /init
- /init processes /init.rc and /init. .rc
- dalvik VM is started (zygote). See Android Zygote Startup
- several daemons are started:
- rild — radio interface link daemon
- vold — volume daemon (media volumes, as in file systems — nothing to do with audio volume)
- the system_server starts, and initializes several core services
- See http://www.androidenea.com/2009/07/system-server-in-android.html
- initalization is done in 2 steps:
- 1) a library is loaded to initialize interfaces to native services, then
- 2) java-based core services are initialized in ServerThread::run() in SystemServer.java
- the activity manager starts core applications (which are themselves dalvik applications)
- com.android.phone — phone application
- android.process.acore — home (desktop) and a few core apps.
- other processes are also started by /init, somewhere in there:
- adb
- mediaserver
- dbus-daemon
- akmd
Tools for analyzing Android Bootup
- logcat — see Android Logging System
- try this command: ‘adb logcat -d -b events | grep «boot»
-
- or this: ‘adb logcat -d | grep preload’
- Bootchart — see Using Bootchart on Android
- strace is pretty handy also, to see the timings for system calls from a process as it runs
- You can use strace as a wrapper for a program in init.rc, and save the results to a file
- Use -f to follow sub-processes
- Use -tt to get detailed timestamps for syscalls
- Use -o to output the data to a file
Here is an example of using strace to follow the startup of zygote, and the apps that are forked from it.
Here is some sample data:
Please note that writing the strace data takes extra time. For long sequences of very fast syscalls (such as when the timezone file is being read) the overhead of strace itself exaggerates the timings in the trace. Use the timing information with caution.
Источник


