- Android Border – Draw Android Textview Border
- Tek Eye
- Drawable Folder
- Creating the Border Drawable
- Add the Border to a Layout
- Archived Comments
- Do you have a question or comment about this article?
- Как поставить рамку вокруг текстового представления Android?
- Использование формы для рисования
- Использование 9-патча
- Что если я просто хочу верхнюю границу?
- Используя Drawable
Android Border – Draw Android Textview Border
Hi and welcome to another tutorial from Codingdemos, in this tutorial you will learn how to draw Android border around a TextView.
By the end of this tutorial, you will have an app that looks like this. (Large preview)
In this tutorial we will be using the following:
- – Android studio version 3.0.1
– Android emulator Nexus 5X with API 26
– Minimum SDK API 16
1- Open up Android Studio and open any project that you have in your computer.
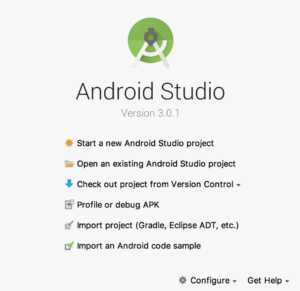
Create new Android Studio project or open existing project. (Large preview)
2- Next open up colors.xml file to change the main colors of the app.
3- Now you can build and run the app to see the new colors.
4- Create a new Drawable resource file under drawable folder and name it textview_border.
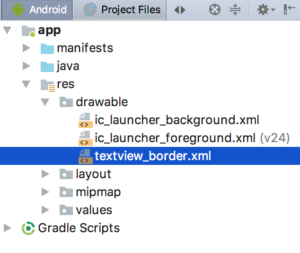
textview_border.xml file created under drawable folder. (Large preview)
5- Open up textview_border.xml file and add the following code.
This is the file that you will use it later to draw Android Textview border. Here you specify the shape you want to draw as Rectangle, then you specify the thickness of Android border and color by using Stroke.
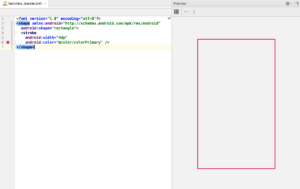
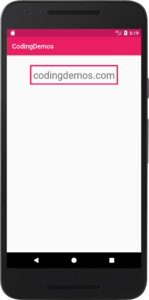
Preview of Android Textview border. (Large preview)
6- Now open up activity_main.xml file and add Android TextView.
This Android TextView is positioned in the top-center of the screen with margin from the top (30dp), increased text size to (30sp) and set the label of the text to (codingdemos.com).
7- Next you can apply the rectangle shape on this TextView by referencing textview_border.xml and using it as a background.
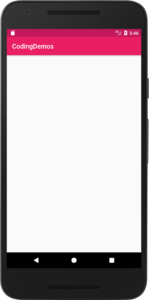
8- Now build and run the app to see the result.

9- You can see from the output above that the text is very close to the sides of the rectangle shape, you can fix that by adding some padding around Android TextView.
10- Now build and run the app to see the progress.
Android border around TextView. (Large preview)
11- I hope you find this tutorial helpful and if you have any question please post them in the comment below.
Источник
Tek Eye
The User Interface (UI) for an Android Application (App) must be easy to use, intuitive and pleasing to the eye. With Android Studio and the Software Development Kit (SDK) it is easy to generate screens, but the developer should add a little extra to make the interface attractive. Fortunately the SDK allows for enhancements to the UI using attributes on layouts and views. These attributes affect the UI appearence when a screen is displayed. The background attribute is one of the most versatile, it can be used to set colors, images, nine patch files and shapes. In this example project a simple Android shape is used to add a rectangular border with rounded corners to a layout file.
(This Android border tutorial assumes that Android Studio is installed; a basic App can be created and run; and code can be correctly copied into Studio. For this test App the Application name is called Layout Border and an Empty Activity is used. You are free to change this example for your own requirements. When entering code in Studio add import statements when prompted by pressing Alt-Enter.)
Drawable Folder
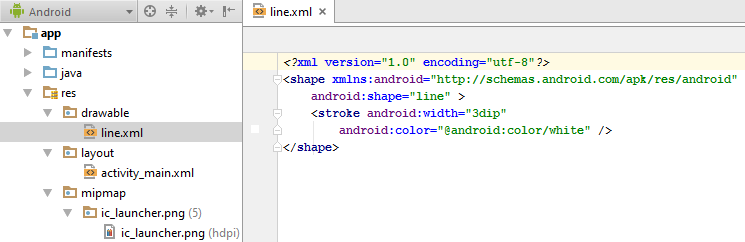
In an Android App project the drawable folder holds graphical resources (part of a wide range of Android resources that a project can have). Different types of drawables include image bitmaps (e.g. PNG or JPG) and XML definitions of shapes, colours and animations. Any drawable can be referenced from any screen. (In earlier versions of Android the res/drawable folder also stored an App’s launcher icon. Now launcher icons are located in the mipmap folders.) This screenshot example shows a drawable defining a horizontal line:
Creating the Border Drawable
Add a file called customborder.xml to the drawable folder. (In the Project explorer highlight the res/drawable folder. Use the context menu, normally right-click, or the File menu and select New then Drawable resource file. In the New Drawable Resource File dialog enter a File name of customborder. Set the Root element to shape. Click OK.. Click OK.) Code is added to define a rectangle that has rounded corners, some padding and a solid color:
- On the root shape element the attribute android:shape is set to rectangle (shape files also support oval, line and ring). Rectangle is the default value so this attribute could be left out if a rectangle is being defined. See the Android documentation on shapes for detailed information on a shape file.
- The element corners sets the rectangle corners to be rounded, it is possible to set a different radius on each corner (see the Android reference).
- The padding attributes are used to move the contents of the View to which the shape is applied, to prevent the contents overlapping the border.
- The border color here is set to a light gray (CCCCCC hexadecimal RGB value).
Shapes also support gradients but that is not being used here, again see the Android documentation to see how a gradient is defined. To use the shape reference the drawable from a layout or view using the android:background attribute, in this case it would be used with android:background=»@drawable/customborder».
Add the Border to a Layout
This shape border is added, for a panel effect, to a layout, to which other views can be added as normal. Here the root RelativeLayout background is set to black (#000000, a hexadecimal alpha RGB value) and padding set to 10dp to help the border stand out. Drag and drop a LinearLayout onto the screen and set the border background (android:background=»@drawable/customborder»). In this example the existing single TextView is moved onto the LinearLayout. Tip: If required use the Component Tree to move Views and Widgets around. The TextView’s background is set to blue, plus some transparency to reduce the brightness (#A00000FF). The TextVew text is set white (#FFFFFF), enlarged (android:textSize=»40sp») and centered (android:gravity=»center_vertical|center_horizontal»). The layout code in activity_main.xml in the res/layout folder should be similar to this:
Play around with values and attributes to see what effect they have on the layout. Use the Android documentation to understand what the attributes do. Try adding other layouts and controls to experiment with different looks. Getting an App to look good adds to it’s appeal.

Download the code for this article ready for importing into Studio. The code can also be accessed via the Android Example Projects page. A version of this article appears in the Android Cookbook.
Archived Comments
2012/02/15 at 12:13 pm — Daniel — I found it very useful. Thanks.
But I have a little question. Can I have a white background and give a color only to the border of the button?
2012/02/15 at 8:15 pm — Tek Eye — In reply to Daniel.
Buttons need three drawables to be fully supported; for the normal, focus and pressed states. By default 9-patch files are used for button backgrounds. XML shape files can be used as well, to get what you require stack two shapes with different colors using a layer-list:
Save it in the drawables folder, use it like other drawables. To support button states you’ll need three different versions referenced from a selector drawable.
2012/08/13 at 2:22 pm — Erez — Thanks, very helpful and clear!
Author: Daniel S. Fowler Published: 2012-02-08 Updated: 2016-07-03


Do you have a question or comment about this article?
(Alternatively, use the email address at the bottom of the web page.)
↓markdown↓ CMS is fast and simple. Build websites quickly and publish easily. For beginner to expert.
Free Android Projects and Samples:
Источник
Как поставить рамку вокруг текстового представления Android?
Можно ли нарисовать границу вокруг текстового представления?
Вы можете установить форму для рисования (прямоугольник) в качестве фона для вида.
И прямоугольник drawable back.xml (положить в папку res / drawable):
Вы можете использовать @android:color/transparent для сплошного цвета, чтобы иметь прозрачный фон. Вы также можете использовать отступы, чтобы отделить текст от границы. Для получения дополнительной информации см .: http://developer.android.com/guide/topics/resources/drawable-resource.html
Позвольте мне обобщить несколько различных (непрограммных) методов.
Использование формы для рисования
Сохраните следующее в виде XML-файла в папке для рисования (например, my_border.xml):
Затем просто установите его в качестве фона для вашего TextView:
Использование 9-патча
9-патч растягивается фоновое изображение. Если вы создадите изображение с рамкой, тогда оно даст вашему TextView рамку. Все, что вам нужно сделать, это сделать изображение, а затем установить его в качестве фона в вашем TextView.
Вот несколько ссылок, которые покажут, как сделать изображение из 9 патчей:
Что если я просто хочу верхнюю границу?
Использование списка слоев
Вы можете использовать список слоев, чтобы сложить два прямоугольника друг на друга. Сделав второй прямоугольник чуть меньше первого, вы можете создать эффект границы. Первый (нижний) прямоугольник — это цвет границы, а второй прямоугольник — это цвет фона.
Установка android:top=»2dp» смещает верх (делает его меньше) на 2dp. Это позволяет первому (нижнему) прямоугольнику просвечивать, создавая эффект границы. Вы можете применить это к фону TextView так же, как shape рисование было сделано выше.
Вот еще несколько ссылок о списках слоев:
Использование 9-патча
Вы можете просто сделать изображение из 9 патчей с одной рамкой. Все остальное так же, как обсуждалось выше.
Использование представления
Это своего рода хитрость, но она хорошо работает, если вам нужно добавить разделитель между двумя представлениями или границу для одного TextView.
Вот еще несколько ссылок:
Простой способ — добавить представление для вашего TextView. Пример для нижней границы:
Для других границ направления, пожалуйста, отрегулируйте расположение вида разделителя.
Я решил эту проблему, расширив текстовое представление и нарисовав границу вручную. Я даже добавил, чтобы вы могли выбрать, если граница пунктирная или пунктирная.
И пограничный класс:
Надеюсь, это поможет кому-то 🙂
Я просто смотрел на аналогичный ответ — это можно сделать с помощью Stroke и следующего переопределения:
Вы можете установить границу двумя способами. Один отрисовывается, а второй — программный.
Используя Drawable
Самое простое решение, которое я нашел (и которое действительно работает):
Я нашел лучший способ поместить границу вокруг TextView.
Используйте изображение из девяти пятен для фона. Это довольно просто, SDK поставляется с инструментом для создания изображения из 9 патчей и абсолютно не требует кодирования.
Вы можете добавить что-то вроде этого в свой код:
Папка Drawable в разделе res в проекте Android не ограничивается растровыми изображениями (файлы PNG или JPG), но также может содержать формы, определенные в файлах XML.
Эти формы затем могут быть повторно использованы в проекте. Форма может быть использована для наложения границы вокруг макета. В этом примере показана прямоугольная граница с изогнутыми углами. В папке drawable создается новый файл customborder.xml (в Eclipse используйте меню «Файл» и выберите «Создать», затем «Файл», в выбранной папке для рисования введите имя файла и нажмите «Готово»).
XML, определяющий форму границы, вводится:
Атрибут android:shape установлен на прямоугольник (файлы формы также поддерживают овал, линию и кольцо). Прямоугольник является значением по умолчанию, поэтому этот атрибут можно было бы опустить, если он является определяемым прямоугольником. Обратитесь к документации Android по фигурам по адресу http://developer.android.com/guide/topics/resources/drawable-resource.html#Shape для получения подробной информации о файле фигур .
Углы элемента задают скругленные углы прямоугольника. Можно установить разные радиусы на каждом углу (см. Ссылку на Android).
Атрибуты заполнения используются для перемещения содержимого представления, к которому применяется форма, для предотвращения перекрытия границы содержимым.
Цвет границы здесь светло-серый (шестнадцатеричное значение RGB).
Фигуры также поддерживают градиенты, но здесь они не используются. Снова, посмотрите ресурсы Android, чтобы увидеть, как определяется градиент. Форма применяется к макету с помощью android:background=»@drawable/customborder» .
В макете другие виды могут быть добавлены как обычно. В этом примере был добавлен один TextView, а текст белый (шестнадцатеричный RGB FFFFFF). Фон установлен в синий цвет, плюс некоторая прозрачность для уменьшения яркости (шестнадцатеричное альфа-RGB-значение A00000FF). Наконец, макет смещается от края экрана, помещая его в другой макет с небольшим количеством отступов. Полный файл макета, таким образом:
Источник


