- 🚀 Beginner’s Guide to Bottom Navigation with Android Jetpack
- A step-by-step guide for beginners on how to create Bottom Navigation using Android Jetpack Navigation
- 👌 Jetpack Navigation
- 🎯 The Demo App & Code
- wajahatkarim3/BottomNavArchDemo
- github.com
- 💻 Let’s Get Started
- wajahatkarim3/BottomNavArchDemo start-here branch
- github.com
- 🔧 Including Jetpack Navigation in Your Apps
- 🚀 Simple Bottom Navigation with Jetpack Navigation
- 🎨 Adjusting AppBar/Toolbar for Top Level Destinations
- 🎯 Conclusion & What’s Next
- 🕐 Revisited — 📚 A Guide on Splash Screen in Android in 2020
- December 25, 2019
- Add Push Notifications to Your Android Chat App Using Kotlin
- November 24, 2019
- Android Navigation Components — Part 3
- Passing data around in a safe way — The safe args plugin
- Set the arguments
- Retrieve the arguments
- Setup the Navigation Component to work with different Views.
- Setup the navigation controller with the Bottom Navigation View
- Setup the Navigation Controller with a Custom View
- Navigating between Activities
- Navigating Up from an Activity destination
- Deep linking to a destination
🚀 Beginner’s Guide to Bottom Navigation with Android Jetpack
A step-by-step guide for beginners on how to create Bottom Navigation using Android Jetpack Navigation
After introduction of Fragments in Android Honeycomb, it became obvious to use more Fragments in preference to Activities to make apps lighter and faster. Google also started recommending single activity architecture. But implementing it has been a real pain-point for developers. The major cause of this is the Fragments and its transactions overhead. Its very hard to learn, debug, and deal with whole mess of IllegalStateException of Fragments.
Finally Google heard its developers and introduced Android Jetpack. Its a suite of libraries and tools to help developers in making high-quality scalable apps easier and faster. It provides solutions to lots of problems such as architecture guidelines, background tasks scheduling, and of course the Navigation.
👌 Jetpack Navigation
Jetpack Navigation, or Android navigation component, is a part of Android Jetpack components and provides developers tools to create single activity apps with a visual drag-drop representation and easy interface. It manages the whole Fragment transactions overhead itself and gives a simple API to deal with the navigation in intuitive and readable way.
Using Jetpack Navigation, you can separate navigation flow from the other parts of code like business logic, database operations etc. This way navigation flow can be easily modified without having to make many changes in the code. It also eliminates the need to write boilerplate code to link fragments or activities in applications.
In this tutorial, we will discuss on how we can create Bottom Navigation using the awesome Jetpack Navigation component and see how easy and fun it is to work with it.
🎯 The Demo App & Code
We will create a simple app using Material Component’s BottomNavigationView and Jetpack Navigation component to switch between screens or technically Fragments . Here’s the demo GIF of the app:
This demo covers the following 5 use-cases of the Bottom Navigation.
🚀 Simple Bottom Navigation with Jetpack Navigation
🎨 Adjusting AppBar/Toolbar for Top Level Destinations
☑️ Adding Menu Options in Some Screens
🗒 Creating Detail Screens for Some Screens
🛑 Quitting app on Double Back-Press Tap
This article covers the first two use-cases and others are covered in the second part of the article. It will be published soon.
The code of this app is available on my Github profile at following repository.
wajahatkarim3/BottomNavArchDemo
The demo project for Bottom Navigation with Navigation Architecture Components article — wajahatkari.
github.com
💻 Let’s Get Started
To make things easier, I have created a separate branch of the app as the starting point of the application. This branch contains basic structure of app with Bottom Navigation, colors resources, and empty Fragment classes with their layout files already. Go ahead, and clone the start-here branch from this link: https://github.com/wajahatkarim3/BottomNavArchDemo/tree/start-here
wajahatkarim3/BottomNavArchDemo start-here branch
The demo project for Bottom Navigation with Navigation Architecture Components article — wajahatkari.
github.com
Here’s a quick explanation of the code:
**MainActivity.kt**: The main launcher Activity class. This will be the only single Activity of the application. This contains the BottomNavigationView and a FrameLayout as a placeholder for other screens of the app.
The empty fragments, *HomeFragment*, SearchFragment, NotificationsFragment, NotificationDetailsFragment, and ProfileFragment: All these classes are just simple empty Fragment showing a simple centered text message with the title of the fragment.
menu/bottom_navigation_menu.xml: This file contains the menu items of the bottom navigation: Home, Search, Notification, and Profile with their menu item IDs, titles, and icons.
🔧 Including Jetpack Navigation in Your Apps
Let’s start by including the Jetpack Navigation library in your apps by adding these lines in app’s build.gradle file:
We will use the Material Components BottomNavigationView for our bottom navigation. So, you need to add that too in case you haven’t already. You can use other bottom navigation views such as of the Android X or some third party library etc. It will work in same way as this tutorial do. Check the Material Components documentation for more details on this.
🚀 Simple Bottom Navigation with Jetpack Navigation
We start by creating a simple bottom navigation flow first. For that, you need to do first add NavHostFragment in your single activity layout file. Add this in the activity_main.xml file inside the FrameLayout tag.
You will see an error saying “Cannot resolve symbol @navigation/bottom_nav_graph .”
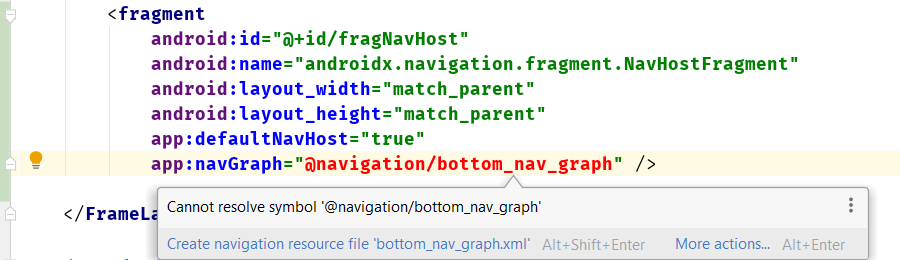
The NavHostFragment as described by the android:name attribute in the above code behaves as place holder for all the other fragments (also known as destinations ) of the app.
With Jetpack Navigation, all the destinations are defined in the XML, which includes the definition for linking of destinations. And you have to trigger these screens in responses to events on a UI widget of any screen from the code. These triggers are called as navigation actions.
The XML which contains navigation info is created in navigation resource folder. To define destinations, you can directly add corresponding elements to it in XML code or it can be created using the navigation editor which can be accessed by opening this navigation XML file.
Now, create **res/naviation/bottom_nav_graph.xml ** file. After opening the file, you will see something like this:
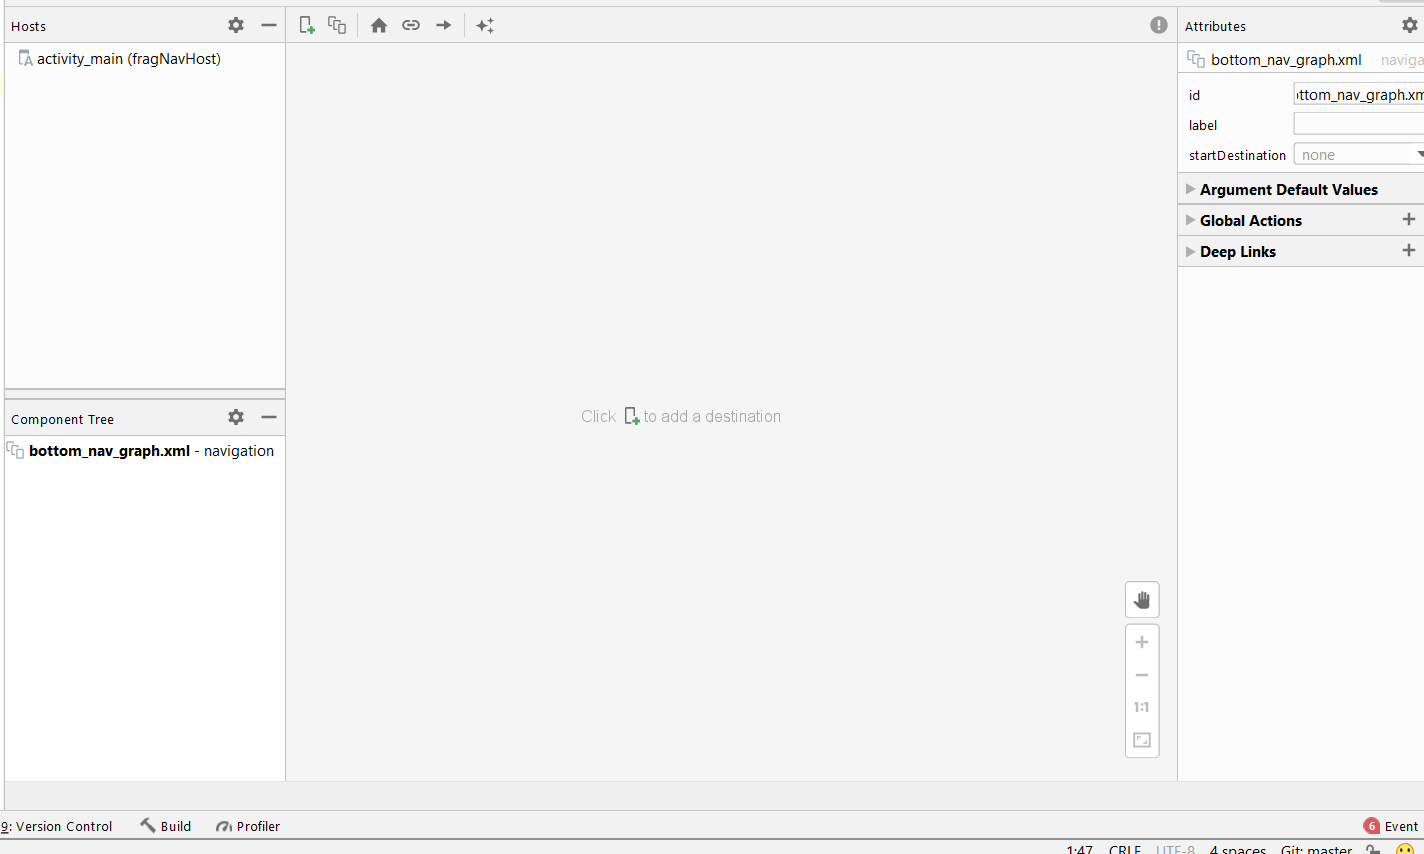
We don’t have any screens or destinations added yet. The code of this file will be this:
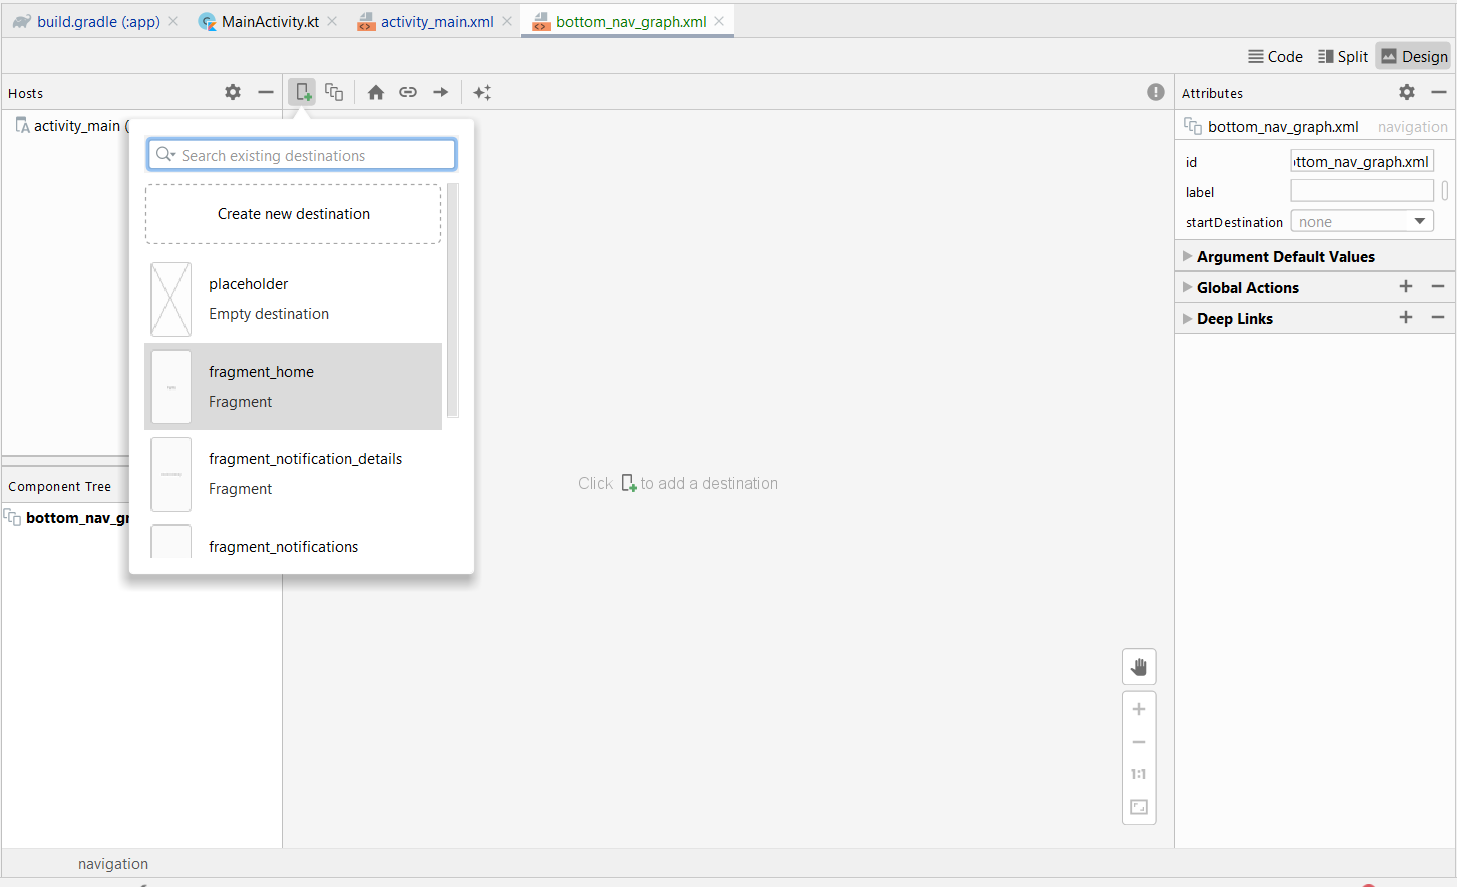
Now, add your first destination “Home” by clicking on the Plus (+) button as shown in the image below and select the fragment_home from the list.
Repeat this process for the Search , Notifications , and Profile fragments as well, and these all fragments will look like screens like the image below.
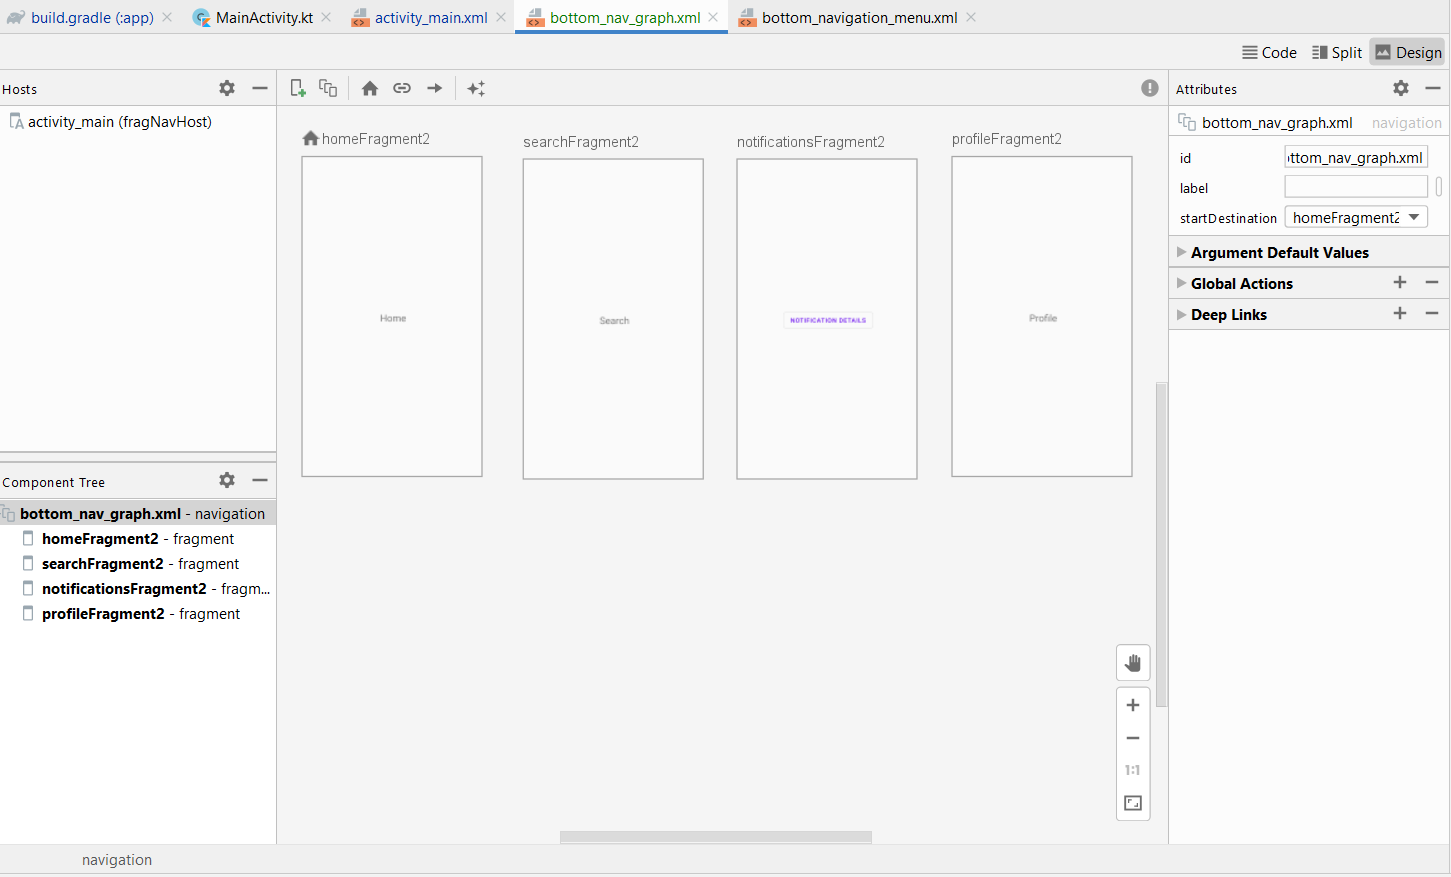
You can drag these screens around to arrange on your convenience. The Home icon before the Home screen’s ID homeFragment2 indicates that this the starting destination of the whole app. This means that when you run the app, you will automatically see “Home” screen first.
Here’s the code in this file:
You might be wondering why the IDs of these destinations have “2” term. For example, homeFragment2 instead of homeFragment . This is because the original IDs are already declared in the menu/bottom_navigation_menu.xml file. As discussed earlier, this file provides the menu options to bottom navigation view, their icons, and titles etc.
If you want to connect BottomNavigationView and navigation destinations, then you need to declare same IDs in both menu and navigation files. So, just remove the “2” suffix from all IDs of navigation file and the final IDs of all destinations will be homeFragment , searchFragment , navigationsFragment , and profileFragment . You can change these IDs either directly from the XML code or through the Attributes panel on the right side in navigation design view.
Its time for add some code in our activity class. Open MainActivity.kt file, and create a method setupViews() in it. Call this in onCreate() of the activity. Add these lines in the setupVeiws() method.
At the lines 3-4, we are calling the method findNavController and passing the ID of our NavHost fragment from the activity_main.xml layout file. This will give us the Navigation Controller. With this controller, we can trigger the screens and control the navigation from the code.
At lines 6-7, we are connecting the navigation controller object ( navController ) with our bottomNavigationView . This is it.
Remember, you have to keep the same IDs of the destinations in the navigation graph file and menu items in the menu of BottomNavigationView file. And now run the application and you will see all sections of bottom navigation will work and show the respective fragments. Here’s the GIF of the running app.
As show in the demo GIF above, all sections are showing their respective screens. And pressing back moves back to Home screen, and then pressing back again exits the application.
🎨 Adjusting AppBar/Toolbar for Top Level Destinations
But there’s one issue. The Toolbar/Appbar label is not changing at all. You can do it very easily by calling the method setupActionBarWithNavController() in the setupViews() method like the code below.
Now, run the application. You will see the label of each screen such as fragment_home , or fragment_search etc. in the ActionBar . You can change these labels in your Navigation file either through XML code with android:label or directly from the Attributes panel as in the image below.
Set these to Home, Search, Notifications, and Profile for all your destinations. And your app will look the GIF below.
You can see that your ActionBar is applying the right label. But there’s a back arrow in the other 3 sections except Home. This is behaving like Home is the parent section and others are the children sections.
You can easily fix this by using the AppBarConfiguration class. You need to declare the top-level destinations in its constructor and pass this in setupActionBarWithNavController() method. Here’s the modified setupViews() method.
You can see that we have passed main 4 sections’ IDs in the topLevelDestinationIds paremter. Now, run the app and you won’t see any back arrow on any main section. Here’s the final demo GIF.
🎯 Conclusion & What’s Next
We learned on how to create a simple top-level sections navigation of BottomNavigationView with Jetpack Navigation component in Android. We also saw how we can customize the Toolbar behavior with Jetpack Navigation. The code of this basic demo is available on the “basic-bottom-nav-toolbar” branch of the BottomNavArchDemo repository here.
In the next article, we will discuss about the following use-cases in Bottom Navigation with Jetpack Navigation component.
☑️ Adding Menu Options in Some Screens
🗒 Creating Detail Screens for Some Screens
🛑 Quitting app on Double Back-Press Tap
Subscribe to my newsletter DroidUp to learn learn about the latest things, tips, and skills in Android development manually handcrafted and curated by Wajahat Karim.
If you liked this article, you can read my new articles below:
🕐 Revisited — 📚 A Guide on Splash Screen in Android in 2020
👀 A fresh look on the splash screen in Android in Kotlin and Coroutines Splash screens of some popular apps on Android Splash screen is a very popular methodology in Android app development.
December 25, 2019
Add Push Notifications to Your Android Chat App Using Kotlin
This story was originally published with collaboration with CometChat Pro, and Alex Booker on their tutorials blog. For any kind of chat apps, notifications are the driver behind whole chat concept.
November 24, 2019


7 years experience. 💻 Creator of various Open Source libraries on Android . 📝 Author of two technical books and 100+ articles on Android. 🎤 A passionate Public Speaker giving talks all over the world.
Источник
Android Navigation Components — Part 3

Two weeks ago, I started writing about the Android Navigation Components.
The Android Navigation Components library is part of the Android JetPack set of libraries announced and released during Google I/O 2018.
I started these series of posts talking about the importance of (re) understanding your app structure before using the library.
Then, I wrote a second post to show you how to implement the Navigation Components and how effortless it is to do so after you have a good understanding of your app structure.
If you haven’t had the chance to check out the two previous posts, you can find them here and here.
This post will cover things beyond the simple case of going from one destination to another shown in the previous post.
The topics in this post are separated into independent sections and you can jump straight to the topic that is most relevant to you.
I will try to keep this as a Live post and update it as I start to encounter more interesting stuff worth sharing here.
By the end of this post, you will be able to:
- Use the safe args Gradle plugin to pass data between destinations.
- Setup the Navigation Component to work with different Views.
- Handling Navigation between two Activity destinations.
- Add deep linking support to a destination.
Passing data around in a safe way — The safe args plugin
On the previous part of this series, I talked about how to pass data from one destination to another using a bundle as you might have been doing all this time.
This solution is fine but it does not prevent the developer to pass a random Bundle or use the wrong key when extracting the arguments from it.
To prevent this small mistakes from happening, the Navigation Components library comes with a Gradle plugin called safe args.
Safe args let you define your destinations arguments from the editor and it will generate code to help you bundle and unbundle these arguments.
To use the safe args plugin, you need to first add the classpath to the Gradle plugin on your project build.gradle file:
then apply the plugin to the app module Gradle build file.
After doing the project sync with Gradle, you can start adding safe args for the destinations in your app using the Navigation Editor.
To do this you have to click on top of the destination in the Navigation Graph, go to the attributes panel and start adding all the arguments the destination can receive.

The editor will allow you to define, the argument name, type(Int, String, Reference) and the default value.
After adding all the arguments, the project needs to be rebuilt and the Gradle plugin will generate two files, one to allow to help set the arguments and another to help retrieve the arguments from the bundle.
Set the arguments
The safe args plugin will generate a Directions class. The generated class implements the NavDirections interface and this interface describes the Navigation operation.
A Navigation operation as I mentioned in a previous article is mainly composed by an action and it’s arguments.
The generated class will provide setters to define all the arguments defined.
After defining the arguments, an instance of this class can be passed to the NavController navigate function.
For the Events Finder App that has been used as an example for these series of posts, setting the eventId argument and navigate to the event details destination would be as shown below:
Retrieve the arguments
On the destination side, the safe args plugin will generate a class that has the defined arguments as variables and a static method that takes in a bundle and retrieves the values for all the arguments.
For this posts app example, retrieving arguments using the generated class by the safe args plugin looks like this:
Setup the Navigation Component to work with different Views.
Up until now, the examples showing how to do the actual Navigation did it so “manually”.
By “manually” I mean going through the process of implementing listeners for the UI components and in the implementation of this listeners get the Nav Controller and call the navigate method.
All that is correct and it is okay to do, but in the case where we have things such a Navigation Drawer, going through that process would be boring and add a lot of unnecessary boiler plate code.
To help reduce the boilerplate, Google has created a set of static functions that helps with the setup of the Navigation component with some common UI components such as Toolbars and the Bottom Navigation View.
These functions are inside the NavigationUI class.
This class contains functions for binding with an ActionBar, NavigationView and Bottom Navigation View.
If you have noticed in the diagrams shown in the previous posts, the Event Finder App principal destinations have no arrows(Actions) connecting them.
This is because the top level destinations will be connected by a specific navigation component.
The example in this post has only 3 top level destinations and according to the Material design specs, the Bottom Navigation View is the suitable navigation components to use.
Setup the navigation controller with the Bottom Navigation View
As I mentioned, the setup of the Navigation Controller with the Bottom Navigation component is easy and it is done by calling the following static function of the NavigationUI class:
When this setup is done, the click events, and the selection state of the Bottom Navigation items will all be handled for you by the Nav Controller.
The only thing required to have this function working is to ensure that the id’s in the Bottom Navigation menu items are the same id’s as the navigation graph destinations.
Setup the Navigation Controller with a Custom View
As I mentioned earlier, the NavigationUi class only contains functions to support a small set of UI components in the NavigationUI. If you have a custom View, you will have to create your functions.
To create your own function you will need to follow these two steps in order:
- Handle the click events for your custom UI component and use the Nav controller to navigate to the desired destination.
- Listen to the completion of the Navigation inside the addOnNavigatedListener and do the work required after the navigation done. (Example: Check the currently selected item).
These are the exact same steps followed by the existing functions in the NavigationUtils class and you can see below the implementation for the function that sets up the Bottom Navigation View:
Navigating between Activities
While Google is recommending and pushing for the single Activity application model, this is not the model currently used by most of the apps out there.
If this is the case with the app you are working on, this should not be a problem.
There is a good way to start using the Navigation Components and move(or not) to the Single Activity application model without having to break everything.
This consists of identifying which destinations are currently at the same level and group them together in the same navigation graph hosted in an Activity.
If you look at the use case diagram for the Event Finder app, we can set up things so that:
- The top three destinations in the same level are in the main_nav_graph.xml hosted in the MainActivity.
- The event details destinations and a fictional checkout flow are in the same navigation graph ( checkout_flow_nav_graph. xml)hosted in the CheckoutFlowActivity.
- The CheckoutFlowActivity will be a destination inside the main_nav_graph.xml and we can navigate to it from any of the destinations in that graph the same way as any other destinations in the same graph as shown in the previous posts and below:
The Navigation controller will know that the action you are calling is for an Activity destination and it will make all the calls needed to start an Activity and pass the arguments it requires.
Navigating Up from an Activity destination
To navigate up, for example from the CheckoutFlowActivity to the MainActivity , you will have to do it the same way it has been recommended to do this even before the Navigation Components library existence.
As shown in the docs provided on this page, you will have to:
- Define a meta-data tag specifying that the MainActivity is the parent of the CheckoutFlowActivity in the CheckoutActivity manifest declaration.
2. Use the NavUtils class to navigateUp. Using this class to navigate up to the parent activity, in most of the cases only requires that we call navigateUpFromSameTask function.
However, if this activity is accessible through a deep link, navigating up will take the user out of the app.
To correct that behavior, the documentation advises doing the necessary check and recreate the task with a parent and navigate up if needed.
Deep linking to a destination
Deep linking is one of those things that I always thought was very painful especially before the release of Firebase Dynamic links.
If you don’t know what are deep links, according to the docs in the developer.android.com website:
Deep links are URLs that take users directly to specific content in your app. In Android, you can set up deep links by adding intent filters and extracting data from incoming intents to drive users to the right activity.
When a user receives and opens a deep link, two things can happen:
- If the user does not have the app installed she will be taken to the playstore to download the app and when the download is complete opening the app will take her to a specific content in the app.
- If the user does have the app installed, opening the deep link will take her to the specific content.
As I wrote above, handling the different scenarios was a very complicated thing to do, and thanks to the Firebase Dynamic Link and now the Navigation Components, implementing Deep linking in an app is an easy and pleasant thing to do.
On this post, I will not go into details about Firebase Dynamic links but I STRONGLY RECOMMEND you read more about the topic on this amazing post by Joe Birch.
To implement deep linking on the Event App Finder that takes the user straight to an event details screen you should:
- Click on the event details fragment destination in the main_nav_graph.xml and on the attributes panel, click the plus sign where it says deep link.
- On the little dialog that it is opened, Insert the Uri to be used to identify the destination and when you are done click the “add” button.
As you can see on the image below the Uri ends with the “event_id” word inside the curly brackets. This is defining a placeholder that you can replace with the actual arguments you will specify at run time.
Example: A deep link to take the user to an event details with the id number 2334456 would be something like this: https://eventfinder.app/event/2334456

3. Specify the navigation graph in the CheckoutActivity manifest definition. You can do this by copying and pasting the following line :
During the manifest merge step, this line will be expanded and the new manifest will have all the required configurations required to handle deep links.
To test that everything is working, there is an ADB command that allow you to start an Activity given a URI and the application package name.
As I mentioned in the beginning of this post, It was not intended to be read from top to bottom and I intend to keep updating it as the Navigation Library becomes more mature and I encounter more interesting things to share.
This is the last post of this “intro” series about the Navigation Components and I hope that you were able to learn something new by reading them.
If you have any questions, suggestions or simply want to share your experience working with the Navigation Components, please don’t hesitate to drop a comment on the section below or send me a tweet:
Источник


