- Как установить ADB на Windows, MacOS, Linux и Chrome OS
- Настройте устройство Android для ADB
- Установить ADB в Windows
- Установите ADB на macOS
- Установить ADB в Linux
- Установите ADB на Chrome OS
- Как использовать ADB в Windows, MacOS, Linux и Chrome OS
- Установите ADB на Windows, MacOS, Linux и Chrome OS с легкостью
- No easy way to get android-platform-tools after installing android-sdk #41702
- Comments
- AlexTrotsenko commented Jul 14, 2015
- How to Setup ADB on Mac and install TWRP on Android (Apple user’s manual)
- RELATED POSTS
- Google Camera port (ZGcam) for Samsung Galaxy phones (Exynos models)
- How to properly install YouTube Vanced on rooted devices (using SAI + Lucky Patcher)
- How do SMM Panels work?
- How to flash stock firmware on Tecno smartphones using Tecno Flash Tool
- Guide: How to Spy my wife for free without her knowing?
- How to Boot Realme X2 Pro into Fastboot and Recovery modes
- Why ADB and TWRP on macOS?
- Step #1: Download Android File Transfer DMG for macOS
- How to install Android File Transfer on macOS?
- Step #2: Install Homebrew on macOS
- Step #3: How to setup ADB using Homebrew on macOS
- Step #4: Install TWRP on Android using Mac
- Prerequisites #1
- Prerequisites #2
- Download TWRP Recovery Image
- How to install TWRP on Android using macOS (Tutorial)
- Conclusion
Как установить ADB на Windows, MacOS, Linux и Chrome OS
Android Debugging Bridge (ADB), как следует из названия, — это утилита командной строки, которая позволяет разработчикам отлаживать различные части своих приложений. Однако это не ограничивается только разработчиками. Если вы хотите получить доступ к определенным функциям платформы Android, которые иначе недоступны, вы также можете использовать команды ADB, установив ADB на свой компьютер, будь то Windows, macOS, Linux или Chrome OS. После того, как вы установите его, вы сможете делать множество интересных вещей с помощью ADB на вашем Android-устройстве. Кроме того, существуют различные приложения, для работы которых требуются разрешения ADB. Итак, если вы не понимаете, как установить и использовать ADB в Windows, MacOS, Linux или Chrome OS, мы вам поможем.
Настройте устройство Android для ADB
Даже если вы устанавливаете ADB на свой компьютер, он бесполезен, если вы сначала не настроили свое устройство Android для работы с ADB. Так что, если вы не уверены, как это сделать, выполните следующие действия, чтобы узнать.
- Откройте «Настройки» на вашем Android-устройстве и перейдите к «О телефоне». Вот, нажмите на «Номер сборки» 7 раз последовательно. Имейте в виду, что поскольку устройства Android имеют разный скин, страница «Build Numer» может быть сохранена под некоторыми другими страницами.
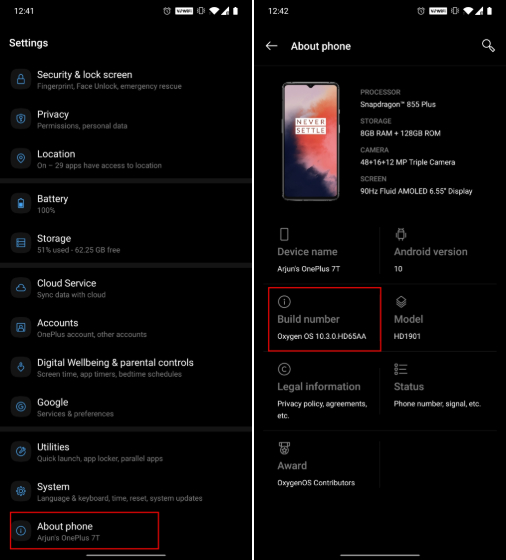
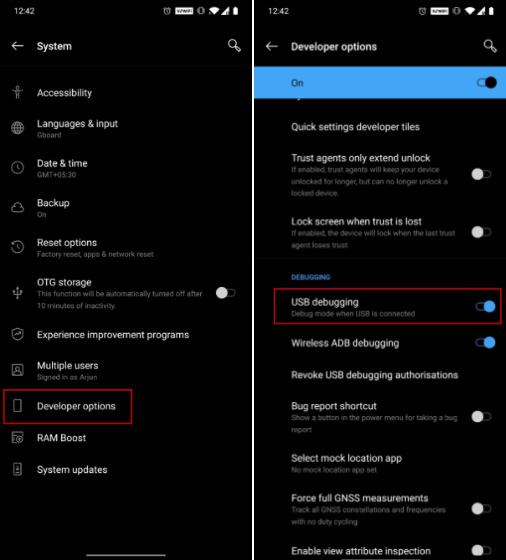
- Это включит «Опции разработчика» на вашем Android-устройстве. Перейдите в «Система», а затем откройте «Параметры разработчика» и включить «отладку по USB», Теперь при каждом подключении устройства Android к компьютеру выберите режим «Передача файлов (MTP)». Вы сделали на передней панели устройства. Теперь следующий шаг — настроить ADB на вашем компьютере.
Установить ADB в Windows

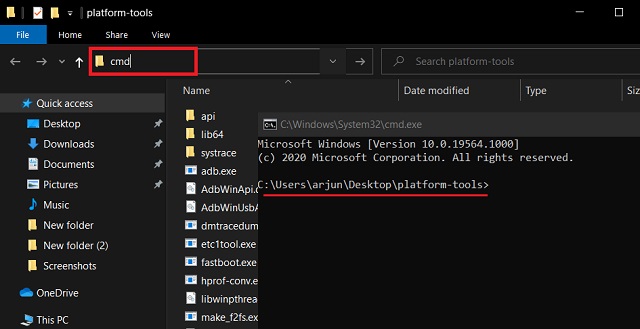
- Теперь перейдите к извлеченной папке и нажмите на адресную строку. Теперь введите «cmd» и нажмите Enter. Мгновенно в командной строке ADB откроется окно командной строки.
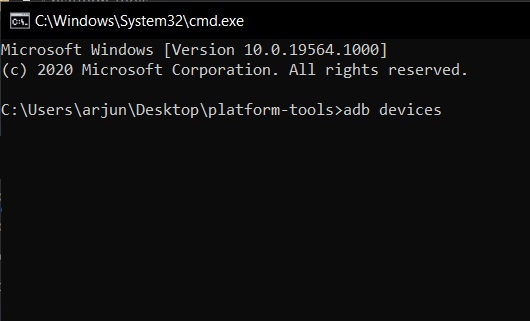
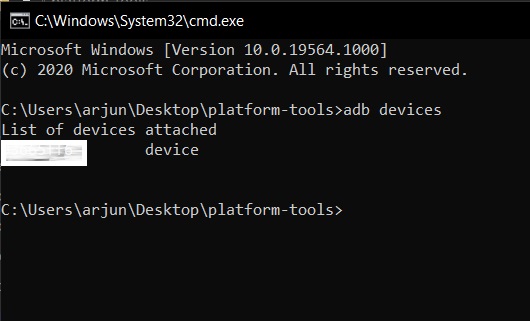
- После этого подключите устройство Android к ПК с Windows и выполните adb devices команда.
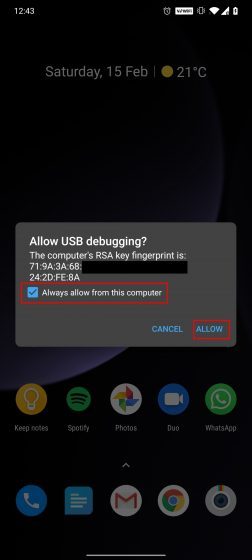
- На вашем смартфоне появится запрос «Отладка по USB». Установите флажок «Всегда разрешать», а затем нажмите «Разрешить».

- Теперь вы должны увидеть серийный номер вашего устройства в окне командной строки. Если он не обнаружит ваше устройство, запустите adb devices снова и на этот раз, он определенно обнаружит ваше устройство. Поздравляем! ADB теперь успешно установлен на вашем ПК с Windows.
Установите ADB на macOS
Здесь мы возьмем немного другой путь для установки ADB на macOS. Сначала мы должны установить Homebrew на macOS, а затем легко установить инструменты для платформы Android. Homebrew — менеджер пакетов с открытым исходным кодом, который устанавливает недостающие пакеты. Итак, со всем, что сказано, здесь мы начинаем.
- Прежде всего, откройте терминал на вашем Mac и выполните приведенную ниже команду. Он установит Homebrew на ваш Mac. Во время установки может потребоваться ваш пароль. Вся установка займет около 10 минут.

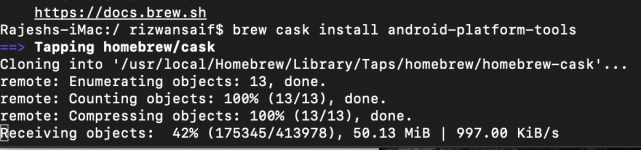
- После этого установите ADB platform-tools из приведенной ниже команды.
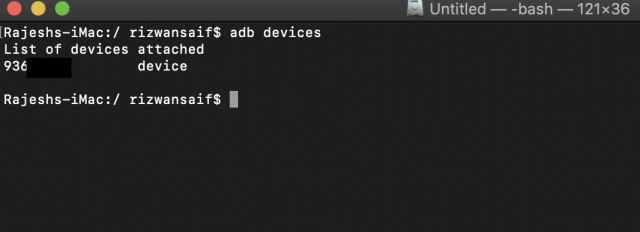
- Теперь подключите устройство Android к вашему Mac и выполните adb devices команда. На вашем Android-устройстве вы получите приглашение разрешить отладку по USB. Итак, просто включите флажок и нажмите «Разрешить».
- Теперь вы должны увидеть серийный номер вашего устройства на Mac. Это означает, что ADB успешно установлен на вашем Mac.
Установить ADB в Linux
- Скачать Инструменты платформы ADB для Linux с официальной страницы Google и разархивируйте файл в подходящее место, например, в свой домашний каталог.
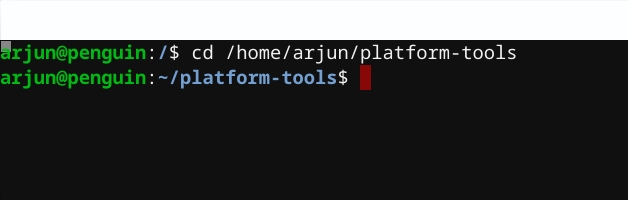
- После этого откройте терминал Linux и перейдите в расположение извлеченной папки. Выполните приведенную ниже команду, чтобы перейти к определенной папке. Обязательно измените имя пользователя на ваше фактическое имя пользователя Linux.
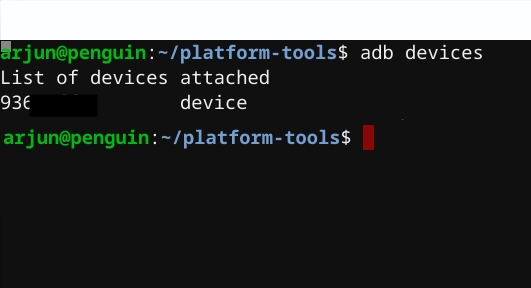
- Подключите устройство Android и запустите adb devices команда на терминале Linux. На вашем Android-устройстве установите флажок «Всегда разрешать», а затем нажмите кнопку «ОК».
- Наконец, ваше устройство Android появится в терминале Linux с серийным номером. Вот как вы можете установить и настроить ADB в системах Linux.
Установите ADB на Chrome OS
Прежде чем двигаться дальше, позвольте мне уточнить, что ваш Chromebook должен иметь поддержку Play Store; Chrome OS должна быть на канале разработчика и иметь Linux на вашем компьютере. Чтобы перейти на канал разработчика, откройте «Настройки» -> «О Chrome OS» -> «Дополнительные сведения» -> «Изменить канал на Dev». Сказав все это, давайте узнаем, как установить ADB на Chrome OS.
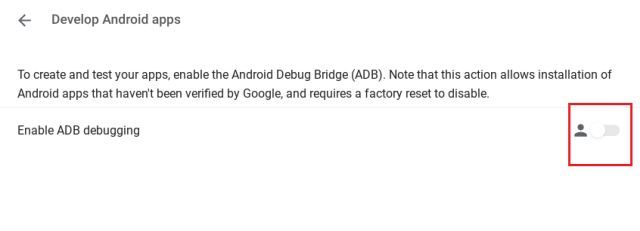
- Прежде всего, откройте «Настройки» и перейдите в Linux -> Разработка приложений для Android ->Включить переключатель для отладки ADB, Теперь перезапустите Chromebook, и после перезагрузки появится приглашение ADB. Нажмите «Разрешить» и перейдите к следующему шагу.
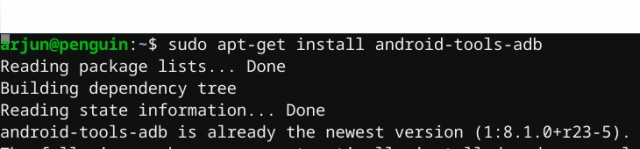
- Теперь откройте терминал Linux из панели приложений и выполните приведенную ниже команду, чтобы установить инструменты платформы ADB, Далее нажмите «Y», чтобы разрешить установку.
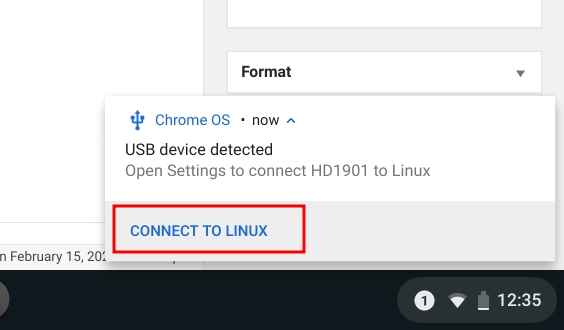
- После установки подключите устройство Android к Chromebook. Вы получите подсказку на вашем Chromebook об обнаружении USB-устройства. Теперь нажмите «Подключиться к Linux».
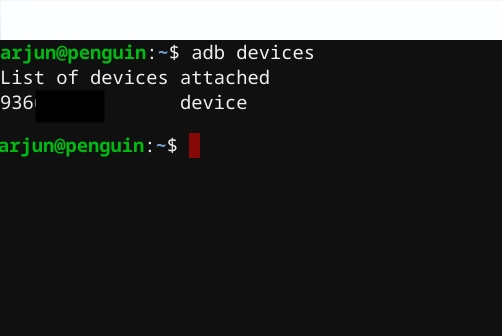
- Вернуться в Linux Terminal, выполнить adb devices команда и приглашение появится на вашем устройстве Android. Установите флажок «Всегда разрешать», а затем нажмите кнопку «ОК». Поздравляем, вы успешно настроили ADB на Chrome OS.
- Если терминал показывает «Отказано в доступе» или «Команда не найдена», затем запустите adb start-server команда, а затем попробуйте снова с adb devices команда.
Как использовать ADB в Windows, MacOS, Linux и Chrome OS
После того, как вы успешно установили ADB на ПК с Windows, Mac, Linux или Chromebook, его использование — это только вопрос выполнение различных команд ADB в Терминале. Просто убедитесь, что вы подключили устройство Android к компьютеру, пока включена отладка по USB. После этого вы можете попробовать разные команды и по-разному воспринимать Android. Чтобы помочь вам начать, ниже приведены некоторые из наиболее часто используемых команд ADB,
Установите ADB на Windows, MacOS, Linux и Chrome OS с легкостью
ADB — очень полезная утилита для всех программистов Android. Даже если вы не являетесь самим собой, теперь вы знаете, как настроить ADB на вашем ПК или Mac и использовать его с вашим устройством Android. И если вы новичок в этом, я уже перечислил некоторые из общих команд ADB выше. Это позволяет вам испытать Android, как никогда раньше. Говоря о командах АБР, какие из них ваши любимые? Я хотел бы услышать от вас в разделе комментариев ниже.
Источник
No easy way to get android-platform-tools after installing android-sdk #41702
Comments
AlexTrotsenko commented Jul 14, 2015
android-sdk could be easily installed with brew, but not android-platform-tools .
- $ brew install android-sdk
- $ brew install android-platform-tools
Error: Cannot install android-platform-tools because conflicting formulae are installed.
android-sdk: because the Android Platform-tools are part of the Android SDK - $ adb
It appears you do not have ‘Android SDK Platform-tools’ installed.
Use the ‘android’ tool to install them:
android update sdk —no-ui —filter ‘platform-tools’ - $ android update sdk —no-ui —filter ‘platform-tools’
Refresh Sources:
Fetching https://dl-ssl.google.com/android/repository/addons_list-2.xml
.
Error: Ignoring unknown package filter ‘platform-tools’
Warning: The package filter removed all packages. There is nothing to install.
Please consider trying to update again without a package filter.
The only way to install platform-tools for now is:
- Get the list of available packages with indexes:
$ android list sdk
.
Packages available for installation or update: 52
1- Android SDK Platform-tools, revision 22
2- Android SDK Build-tools, revision 23 rc2
3- Documentation for Android ‘MNC’ Preview SDK, revision 2
4- SDK Platform Android 5.1.1, API 22, revision 2
. - Install Get Android SDK Platform-tools by providing proper index
$ android update sdk —no-ui —filter 1
Then you are also prompted to accept license agreement.
This does not looks like easy common brew solutions.
The text was updated successfully, but these errors were encountered:
Источник
How to Setup ADB on Mac and install TWRP on Android (Apple user’s manual)
In this post, I will guide you to properly install ADB binaries on your MacBook with a straightforward method. And then, you will learn to install TWRP Custom Recovery on your Android phone using a macOS Terminal. If you are a MacBook user and at the same time, using an Android phone, this guide is for you. You might have been sticking somewhere to connect your Android phone to macOS in the Fastboot Mode. I, too, tried to unlock the bootloader of my Android phone using my MacBook but failed several times. Finally, I got a simple solution for everyone who uses MacBook and Android. Read ahead; I will use the easiest way and will provide automatic updates using Homebrew.
RELATED POSTS

Google Camera port (ZGcam) for Samsung Galaxy phones (Exynos models)

How to properly install YouTube Vanced on rooted devices (using SAI + Lucky Patcher)
How do SMM Panels work?

How to flash stock firmware on Tecno smartphones using Tecno Flash Tool

Guide: How to Spy my wife for free without her knowing?

How to Boot Realme X2 Pro into Fastboot and Recovery modes
You might have tried the manual installation of ADB binaries on your macOS. The manual installation is quite tricky and is not friendly for novice users. So, the first time users will find my guide easy as this is an excellent solid tutorial on how to setup ADB for Mac.
Why ADB and TWRP on macOS?
If you are an Android enthusiast and want to unlock the bootloader of your Android phone, install TWRP and root, this guide is for you. ADB means Android Debug Bridge, which is a link between your Android phone and PC. ADB files are required when your phone is in Fastboot Mode, and you want to flash something on your device using Fastboot command.
Using ADB binaries, you can put some command on your macOS terminal and install TWRP Custom Recovery using the tutorial below. After that, with TWRP, you can flash anything compatible with your phone.
In Windows operating system, it’s very easy to install ADB as it only requires to copy the files to C Drive. But in Mac, you might find it difficult. So, here, I am making the thing easy for you. Read ahead; there are some tools to download. I have provided the official download links for each tool. This post has a tutorial with all of the required installation steps to get ADB on macOS.
Step #1: Download Android File Transfer DMG for macOS
![]()
The first thing you need to install on your macOS is the Android File Transfer application. It is an official software by Google for the Apple users to browse and transfer files between your Mac computer and your Android device.
Unlike Windows, macOS doesn’t require a separate Android USB Driver for each device. For example, if you are using a Xiaomi phone and want to install a custom recovery on Fastboot, you need to have a Mi Flash tool or Mi PC Suite installed on your Windows PC. But in macOS, the Android File Transfer act as a USB Driver for any Android device. You can say it a universal USB Driver for Android in macOS.
Therefore, download the Android File Transfer DMG file from the link given below and install it on your MacBook or Mac PC.
(Supports macOS 10.7 and higher.)
How to install Android File Transfer on macOS?
- Download the Android File Transfer app.
- Open AndroidFileTransfer.dmg.
- Drag Android File Transfer to Applications.
- Use the USB cable that came with your smartphone box and connect it to your MacBook or Mac PC.
- Double click Android File Transfer.
- That’s it. You can now see all the files and folders of your Android device on your Mac.
Step #2: Install Homebrew on macOS
Homebrew for Mac is the missing package manager for macOS. It installs the stuff you need that Apple didn’t. Homebrew installs packages to their own directory and then symlinks their files into /usr/local.

In our case, Homebrew will install the Android platform-tools most easily on your Mac and will provide automatic updates. Follow the tutorial:
(Make sure your Mac is connected to the internet.)
- Open the Terminal app on your Mac.
- Paste the following command in macOS Terminal prompt:
- Check the screenshot below!
- Hit Enter button, and your Homebrew installation should start now!
- You should see the following screen on your Mac:


You will see an Updates Available notification on the top right corner of your Mac. Click on Install , as shown in the screenshot above. 
The system will automatically install Homebrew. Just wait for 2-4 minutes till you see installation is successful!
Step #3: How to setup ADB using Homebrew on macOS
(Make sure your Mac is connected to the internet.)
Once you are done with installing Homebrew, you can follow the step below to setup ADB binaries on your macOS using the same Terminal.
- Open the Terminal again.
- Enter the following command to install ADB on macOS:
- Homebrew will download and install the Android platform-tools automatically from Google’s server.

Please wait for some time until you see the successfully installed message in the Terminal, as shown below:

Step #4: Install TWRP on Android using Mac
TWRP (TeamWin Recovery Project) is actually a third-party and the first touch-enabled custom recovery for the Android devices which allows the users to install the third-party software including the custom ROMs, kernels, and mods. Also, it enables a user to wipe/flash the device partitions as well as to backup/restore the software.

Dee’s Troy is now leading the project along with other developers responsible for maintaining the individual device support. Presently, TeamWin officially supports over 100 Android devices from various manufacturers. Individual developers are handling the unofficial ports/development for the specific Android devices.
Prerequisites #1
You must be having the following requirements to be fulfilled before you head down to install the TWRP recovery on Android using Mac.
- It’s highly recommended that you must have a full backup of your device before flashing TWRP. You can do the backup on Android phones following our guide.
- Be sure that your phone is charged at least 50-60% so that you can avoid sudden shutdowns during the process.
- You need to download and install Android File Transfer DMG on your Mac.
- Check out:Table of all ADB & Fastboot Commands for Android (Windows / Mac / Linux)
Prerequisites #2
- You need to enable USB Debugging mode to connect your Android phone to computer.
→ (Settings > About Phone > Build number > Tap it 7 times to become developer; Settings > Developer Options > USB Debugging).


(Click to enlarge the images)
- Now, open the Terminal app on your Mac.
- Connect your device to PC using official USB cable (provided by device brand). You should change the USB mode to “file transfer (MTP)” mode. Some device may or may not required this, but for compatibility, it’s always good to select MTP mode.
- In Terminal, type “adb devices” and hit enter to launch the ADB daemon.
- On your device screen, you will see a prompt to allow or cancel USB Debugging access.Tap on “OK” to allow USB debugging. You may check the “Always Allow for this computer” option if you never want to see this pop-up again.
- Exit!
 Tap on “OK” to allow USB debugging. You may check the “Always Allow for this computer” option if you never want to see this pop-up again.
Note: Initially, you must enable OEM unlocking and then unblock the bootloader of your device. Please do research the community forum about how to unlock your phone, in case your smartphone comes with a factory locked bootloader. After that, get back to this TWRP tutorial.
Download TWRP Recovery Image
In order to make your effort easy, we have attached the links to all the supported Android manufacturers. You may just need to click on your device’s manufacturer name and then download the TWRP recovery for your device.
Once you are done with the downloading of the TWRP recovery for your respective Android device, you need to follow the instructions to install the recovery using macOS.
How to install TWRP on Android using macOS (Tutorial)
- Download the TWRP recovery image (*.img) for your Android device on your Mac.
- Copy the image file to the Desktop of your macOS.
- Now Boot your Android phone into the bootloader/fastboot mode.
- Connect it to the PC with the help of the USB cable (preferably the one provided by the company).
- Open the Terminal application on your Mac.
- Make sure that your device is being detected properly using the following command:
- The command will return a unique device ID right with the ‘ fastboot ’ message, as shown below:
- Type the following command and do not HIT enter or return button.
- After writing “ fastboot flash recovery ,” drag the TWRP image file from the desktop and drop it to the Terminal . Check the screenshot below for better understanding:
- After dropping the IMG file, it should appear like the screenshot below:


Finally, hit the enter/return button to install TWRP on your Android device. You should see the following message on your Terminal:

Android Devices with A/B partition system , such as the Google Pixel/Pixel 2, Moto Z2 Force, Mi A1, and Mi 9T Pro, will not be supporting direct flashing. So you will need to boot TWRP for such devices using the following command:

So this is how you can install TWRP recovery using Fastboot on Mac, which will be working for the majority of Android devices.
Conclusion
It’s done with the installing of the TWRP recovery on your Android devices on macOS, and now you can go ahead as well as flash the Custom ROM such as LineageOS and Pixel Experience. You are now able to use it to root your Android phone by flashing Magisk or SuperSU.
We hope you now have explicit knowledge about how to download and install TWRP recovery on Android devices using Mac. If you have any further queries, kindly leave them down in the comment box.
Источник


