- Как установить и использовать Homebrew на M1 Mac
- Дубликат терминала и запуск через Rosetta
- Установка HomeBrew через Rosetta Terminal
- Использование HomeBrew
- How to Run Homebrew & x86 Terminal Apps on M1 Macs
- How to Run x86 Homebrew & Terminal Apps on Apple Silicon Macs
- How to install homebrew on M1 mac
- 8 Answers 8
- Как установить Homebrew в macOS Catalina или M1 Mac
- Требования для установки Homebrew на Mac
- Как установить Homebrew на macOS Catalina или M1 Mac
- Проверьте установку Homebrew в macOS
- Как использовать Homebrew для установки пакета на Mac
- Как обновить или удалить Homebrew с вашего Mac
- Любить легкость и простоту Homebrew!
- How to run the Homebrew installer under Rosetta 2 on M1 Macbook
- 8 Answers 8
Как установить и использовать Homebrew на M1 Mac
Если вы уже купили себе Mac с процессором M1 и хотите использовать на нём менеджер пакетов HomeBrew, мы вам поможем. Ниже мы расскажем, как установить и использовать HomeBrew на M1 Mac.

Дубликат терминала и запуск через Rosetta
Откройте папку с программами и найдите свою любимую программу-терминал. В инструкции мы используем iTerm2. Нажмите на неё правой кнопкой мыши и выберите «Дублировать».
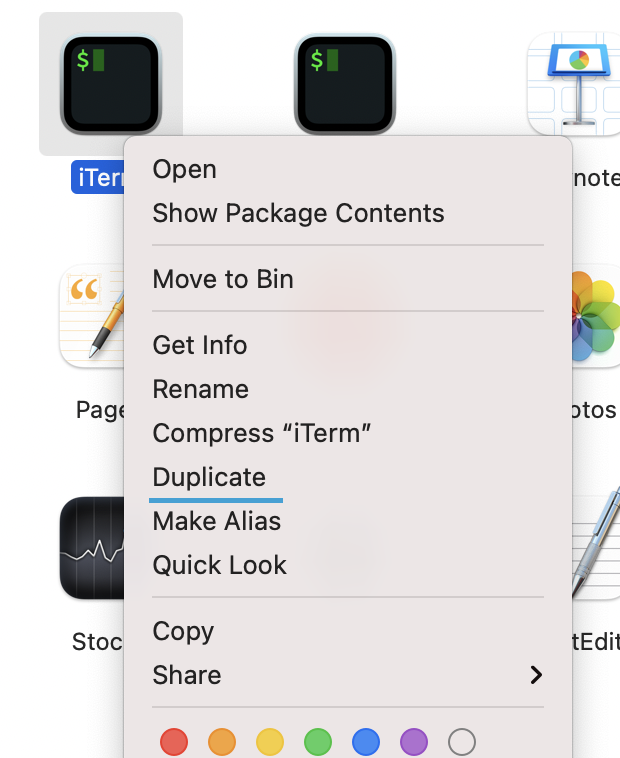
В папке с программами появится копия программы. Переименуйте её, добавив в название «Rosetta». К примеру, у нас это «iTerm2 Rosetta».
Нажмите на копию правой кнопкой мыши и выберите Свойства. Поставьте галочку рядом с Открывать через Rosetta.
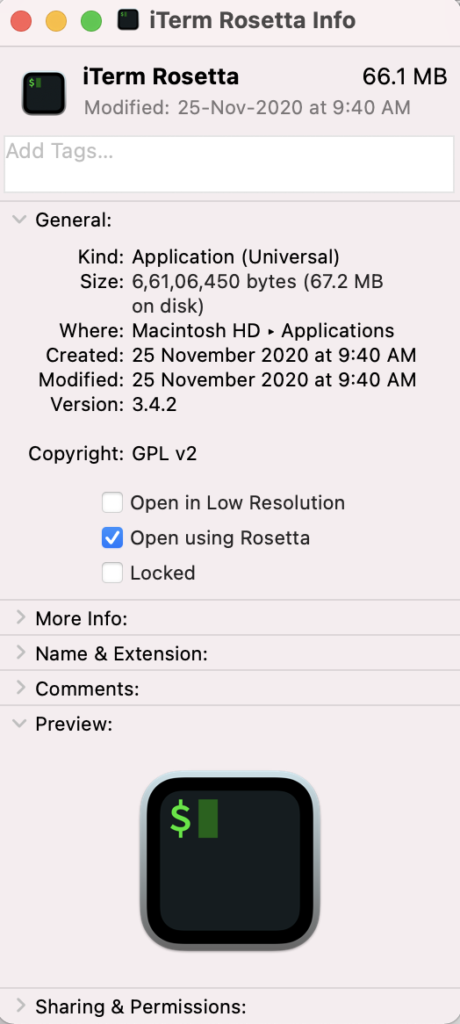
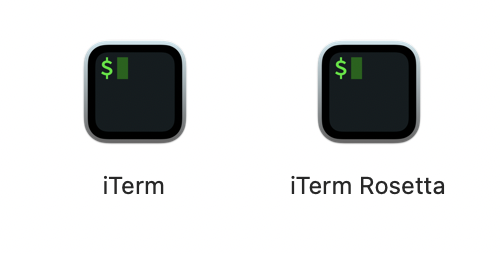
Теперь у нас есть две программы iTerm2. Одна открывается как обычно, а вторая – через систему Rosetta.
Установка HomeBrew через Rosetta Terminal
Чтобы установить HomeBrew, откройте Rosetta Terminal и используйте следующую команду:
Вам нужно будет ввести пароль, а затем вы увидите информацию об установке.
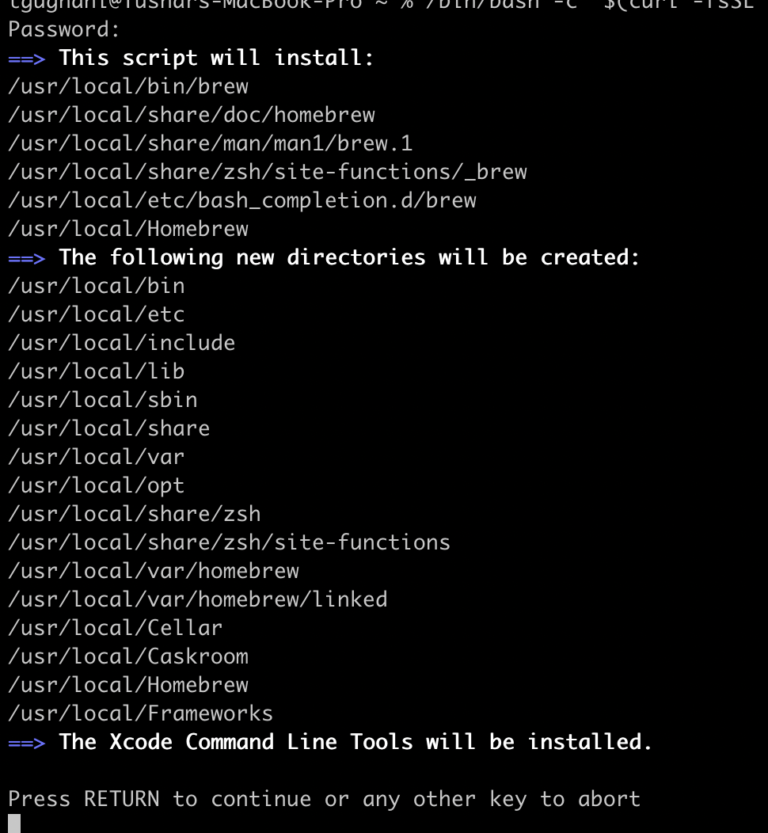
Когда вы нажмёте Enter, начнётся процесс установки.
Использование HomeBrew
Когда HomeBrew установится, вы можете начать использовать его для установки разных пакетов.
Инструкцию вы можете просмотреть с помощью следующей команды:
Чтобы установить файл, используйте такую команду:
Это всё! Теперь вы знаете, как установить и использовать Homebrew на Apple M1 Mac.
Источник
How to Run Homebrew & x86 Terminal Apps on M1 Macs

If you’re one of the early adopters who acquired an M1 Apple Silicon Mac and find that Homebrew and many other x86 terminal apps don’t yet have support for the new Arm architecture, you’ll be happy to know there’s a fairly simple workaround.
The trick is to run a parallel Terminal application through Rosetta. And yes that means you’ll need to install Rosetta on the Apple Silicon Mac first, if you haven’t done so already.
How to Run x86 Homebrew & Terminal Apps on Apple Silicon Macs
Here’s the workaround until native support arrives:
- Locate the Terminal application within the Utilities folder (Finder > Go menu > Utilities)
- Select Terminal.app and right-click on it, then choose “Duplicate”
- Rename the duplicated Terminal app something obvious and distinct, like ‘Rosetta Terminal’
- Now select the freshly renamed ‘Rosetta Terminal’ app and right-click and choose “Get Info” (or hit Command+i)
- Check the box for “Open using Rosetta”, then close the Get Info window
- Run the “Rosetta Terminal” as usual, which will fully support Homebrew and other x86 command line apps
You’ll want to do this even if you’re installing Homebrew onto the M1 Mac, at least until a native version of Homebrew is available.
Homebrew is a fantastic utility with a variety of great packages for more advanced Mac users and those accustomed to the command line.
Presumably in the not distant future, Homebrew will be updated to support ARM and Apple Silicon natively, but for the time being, use this workaround to get your x86 and Homebrew terminal apps working just fine on your new M1 Apple Silicon Mac, be it a MacBook Pro, MacBook Air, or Mac mini.
This handy workaround was detailed by Notion.so, so thanks to them for the discovery.
Do you know of another approach to get x86 terminal apps running on a new Apple Silicon Mac? Share with us in the comments below!
Источник
How to install homebrew on M1 mac
I just got a new Mac, the M1 Macbook pro and I am trying to install homebrew, but every time I finish installing it, it tells me that it was not written to the path, and then when I try the advised whatever to add to the path, nothing happens and the terminal or whatever does not recognize the command at all, as if it isn’t installed.
This worked perfectly fine on my old Intel mac, and there is some step or whatever — I don’t know anything, and I am tired and I don’t understand how to install this at all, but hte path is supposed to be different for Apple silicon macs but nothing i read helps at all.
8 Answers 8
Homebrew installation on apple silicon, step by step:
- Open a terminal window (it should be zsh)
- Run this command:
In my case, installation show me errors, I just installed again, and then show: Installation successful!, and warning: /opt/homebrew/bin is not in your PATH
- Then create .zshrc on home directory (If it was not created yet). Just run on terminal:
Then open it to edit with TextEdit (Is a hidden file. You can show hidden files with shift + command + . )
Add this line at the end of .zshrc
- Run this command in terminal to make this available:
- Now just run this command to be sure that everything is working:
This works for me to path homebrew permanently.
open the terminal and copy below command
create new empty file with touch
now open the file with vim editor
now enter i to start edit mode and write
then press esc and type :wq
now we setup brew successfully for permanently to test enter
brew or brew help
Go To the home brew webpage
copy the script provided under Install Homebrew
Open Terminal via spotlight search
Then open the terminal in the using the spotlight search by pressing the command + spacebar
now in the terminal paste the script which was copied from the homebrew site
it will ask to click return button after some time so don’t worry after successful installation the brew won’t work as for M1 Chip MacBook air.
It will show some warning for the path i.e. warning: /opt/homebrew/bin is not in your PATH
==>Now on the same terminal we will create the file .zshrc in the home directory
So Run the command to create this directory i.e.
Now we will open the home directory
To open home directory we will open the finder from the dock and make sure its the active application
now in the finder app we will press button to open the home directory i.e. command+shift+H
After this finder will open the home directory
Now since the .zshrc is a hidden file as we created it using the terminal above
Now to access the hidden file press the button i.e. shift + command + .
After this locate the .zshrc file and click to edit with Text Editor option
Set the path in .zshrc file
Now at the end of the line paste this —
Now we will make this file available
So type paste this code in the terminal
After this command run one more command on the terminal to check if the howebrew is working fine
On typing this you will get to know that home brew is now working!!
Now do what ever you want to do using brew either install git or any other things which you want.
Источник
Как установить Homebrew в macOS Catalina или M1 Mac
Homebrew — это менеджер пакетов с открытым исходным кодом для macOS, который предлагает простой способ установки программного обеспечения и платные услуги через командную строку. Если вы программист, разработчик, любитель терминалов или более разбираетесь в технологиях, чем средний пользователь Mac, вы можете использовать Homebrew для упрощения установки программного обеспечения на свой Mac.
Homebrew позволяет использовать команды для загрузки и установки Python, Ruby, MongoDB, PHP, Git, Node.js, cask, colordiff, Nmap и других утилит командной строки Unix. В этом руководстве я покажу вам, как установить Homebrew в macOS Catalina или M1 Mac.
Требования для установки Homebrew на Mac
- 64-битный процессор Intel или Apple Silicon M1
- macOS Mojave (10.14) или новее
- Инструменты командной строки (CLT) для Xcode (шаги 1 и 2 ниже)
Примечание. Для некоторых формул требуется полная Xcode установка. - Оболочка, совместимая с Bourne для установки (например, bash или zsh)
- Доступ администратора на Mac
- Подключение к Интернету
Для получения более подробной информации о требованиях см. официальная страница.
Как только вы выполните указанные выше требования, узнайте, как установить Homebrew на macOS.
Как установить Homebrew на macOS Catalina или M1 Mac
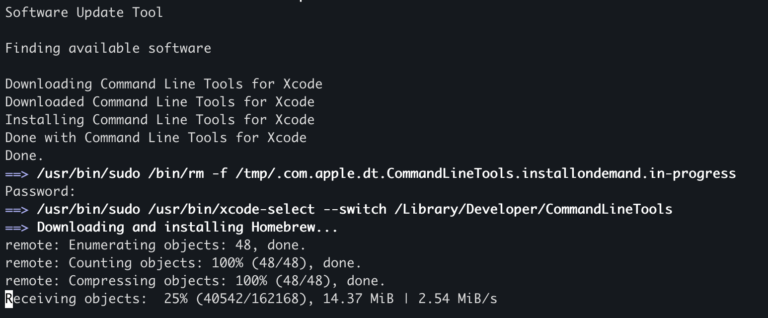
- Откройте Терминал и введите эту команду xcode-select —install
- Щелкните Установить во всплывающем окне. Просмотрите Условия и нажмите Согласен, если вы это сделаете. Дождитесь завершения загрузки.

- Чтобы установить Homebrew, введите следующую команду в Терминале. / usr / bin / ruby -e «$ (curl -fsSL https://raw.githubusercontent.com/Homebrew/install/master/install)»
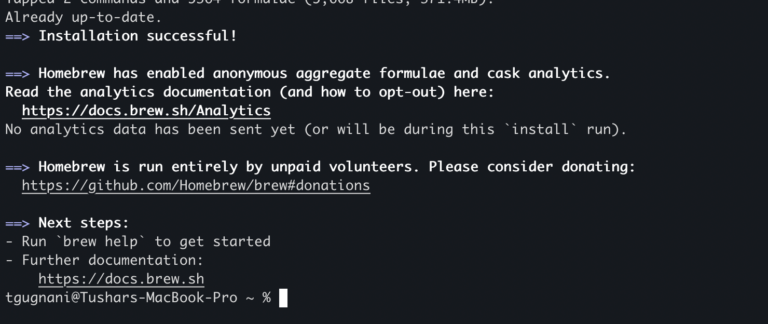
- Вам нужно будет один раз ввести пароль вашего Mac. После этого начнется загрузка и установка. Общий размер загрузки составляет около 400 МБ. Это займет некоторое время.


Проверьте установку Homebrew в macOS
- Откройте терминал и введите brew -v
- Вы увидите версию Homebrew, установленную на вашем Mac.

Кончик: brew doctor сообщает о статусе Homebrew, проблемах и обновлениях, если они доступны или требуются.
Теперь, когда вы установили Homebrew, давайте посмотрим, как им пользоваться.
Как использовать Homebrew для установки пакета на Mac
- Чтобы увидеть полный список пакетов: формулы заваривания
- Для поиска программного пакета: brew search packagename
- Получить информацию о пакете: brew info packagename
- Для загрузки и установки: brew install packagename
Например, если мне нужно установить speedtest-cli, вот как выглядит команда: brew install speedtest-cli
После установки введите speedtest-cli в Терминале, чтобы запустить эту команду. - Совет: вы можете устанавливать не только приложения командной строки, но и приложения с графическим интерфейсом пользователя (GUI) через Homebrew. Для этого используйте brew install —cask app-name. Например, brew install —cask firefox или brew install —cask google-chrome. Вы можете см. полный список здесь.
- Чтобы увидеть все приложения, установленные Homebrew на вашем Mac, выполните следующие действия.
Совет: пакеты обычно устанавливаются в эту папку: / usr / local / Cellar
Если вы не нашли эту папку, введите brew —prefix в Терминале, чтобы увидеть расположение папки. - Чтобы обновить пакет: brew update packagename
- Для удаления установленного пакета: brew remove packagename
- Чтобы узнать, что еще можно сделать: мужское пиво


Как обновить или удалить Homebrew с вашего Mac
Иногда Homebrew обновляется автоматически при запуске команд. Но вы также можете обновить его вручную, введя brew update в Терминале.
Если вам больше не нужен Homebrew, выполните следующую команду, чтобы удалить Homebrew и все установленные пакеты.
ruby -e «$ (curl -fsSL https://raw.githubusercontent.com/Homebrew/install/master/uninstall)»
Любить легкость и простоту Homebrew!
Я надеюсь, что приведенное выше руководство помогло вам загрузить, установить и использовать Homebrew. Как только вы начнете им пользоваться, пути назад уже не будет. Наконец, я хотел бы рассказать вам о четырех удобных программах командной строки, которые мне нравятся.
- Youtube-dl: это позволяет мне загружать видео с YouTube и других мест. Больше информации.
- speedtest-cli: я могу видеть мою скорость загрузки и выгрузки через это. Больше информации.
- imagemagick: Позволяет преобразовать изображение в другой формат и внести простые изменения. Больше информации.
- wifi-password: эта замечательная, но простая команда показывает мне пароль Wi-Fi подключенной в данный момент сети. Супер удобно!
Источник
How to run the Homebrew installer under Rosetta 2 on M1 Macbook
I’m on the M1 MacBook. This is the error when I try to install Homebrew:
So how do I «Rerun the Homebrew installer under Rosetta 2.»?
8 Answers 8
Got an answer from a developer in the Homebrew github https://github.com/Homebrew/brew/issues/9173
Use this to install packages:
If you have not yet installed Rosetta 2 to emulate Intel CPUs on ARM Macs, you will get the error arch: posix_spawnp: /bin/bash: Bad CPU type in executable . Prompt a Rosetta 2 installation with:
Another option is by going into your applications in Finder, select Terminal and press cmd(⌘)+I and check the «Open using Rosetta» option.
Sorry if the formatting is off, first time posting a solution.

I have two instances of brew installed, the Intel version that runs using Rosetta2 and which installs to /usr/local/bin and the Arm version that runs natively and installs to /opt/homebrew/bin. Now it is all working, I do not have to start iTerm using Rosetta.
I have these aliases to reach the two versions.
I have the native version in my path first:
Now I can try mbrew search and mbrew install . If they work, I am good to go with a native program. For example:
If brew fails I try building from source, with verbose output, e.g.
Be warned, this takes a while and may still fail.
If it still fails, (and mbrew install -sv go results in a segmentation fault for me) I have two choices. Use ibrew search and ibrew install to get the Intel build instead, or examine the verbose output and look for problem dependencies. In some cases an install -s on the dependencies is enough to get the native brew to work.
I must stress that native brew always prints this warning
So proceed at your own discretion.
For completeness, and assuming you have iTerm2, Rosetta2 and the Xcode command line tools installed, I did this to install brew under Rosetta (with credit to all those who have posted on this page before me):
- Copy the installed iTerm2.app application to iRosetta2.app
- Press command+I to Get Info for iRosetta.app, click Open Using Rosetta2
- Run iRosetta2 and use this command from https://brew.sh
And I did this to install native brew, taken from other contributors to Stack Overflow and the Homebrew alternative installation site, using iTerm2 without Open Using Rosetta2
Edit
Time has passed and I have changed the architecture to arm64e following Fernando García Redondo observation. Now the warning about Arm architecture not supported has gone and Rust and Go install with problems and without compiling from source. I assume the good people at Homebrew have been working hard over Christmas. Thanks!
Edit Feb 21
The Homebrew team have announced that they support Apple silicon. So I wondered if I could delete my aliases and just use brew to install for Apple silicon. The short answer is no! if you run brew from /usr/local without the arch -x86_64, it complains that /usr/local is reserved as the Intel default prefix and using /opt/homebrew is required. So I will retain my two aliases and try mbrew first and only use ibrew if the native brew fails.
Источник


