- Create Xamarin.Forms Android App Bundle (aab) and release it to Google Play Store with DevOps
- Mikolaj Kieres
- Mikolaj Kieres
- Build Pipeline
- Release Pipeline
- Google Play Service Account
- Summary
- My First App: How to Create Your First Android App Step by Step
- Prerequisites
- 1. Create a New Project
- 2. Create an Activity
- 3. Create a Layout
- 4. Implement Event Handlers
- Conclusion
- Android App Templates and UI Kits From CodeCanyon
Create Xamarin.Forms Android App Bundle (aab) and release it to Google Play Store with DevOps
I’ve decided to update my DevOps CD pipeline for one of my applications to produce the aab package instead of the apk. Why you might ask? Mainly because I wanted to decrease the size of my app package, which in turn should potentially result in more downloads and/or less uninstalls.
Mikolaj Kieres
Mobile development adventurer
More posts by Mikolaj Kieres.
Mikolaj Kieres

Update: Here’s my other blog post where I share the YAML code for the below build and release pipeline
I’ve decided to update my DevOps CD pipeline for one of my applications to produce the aab package instead of the apk. Why you might ask? Mainly because I wanted to decrease the size of my app package, which in turn should potentially result in more downloads and/or less uninstalls.
Don’t take my word for it though and watch this video by Google to learn about all the reasons behind switching to aab. If that’s not enough for you, there’s a great blog post by Jon Douglas, from Xamarin team, which also lists perks of switching to aab package format. Jon also walks the reader through the basics of setting up your project to work with this «new» package format.
At the time of writing this blog post I believe that there’s no official guideline of how to create the aab package with DevOps, therefore I’ve decided to write a guide myself. There is however a great article by Dan Siegel, which I took my inspiration from.
Let’s get started!
NOTE: I started writing this blog post around 10th of Jan but haven’t fully finished it because of my laziness/lack of time. In the meantime James Montemagno beat me to it and published (15th of Jan) a really nice blog post about DevOps and aab packages. I apologise in advance for the repetition of some of the content.
Build Pipeline
Assuming that you already have a working apk build pipeline, we will need to make few changes in it, in order to generate the signed aab file (instead of the singed apk) and then make it available to our release pipeline.
Firstly, we disable the Signing and aligning APK task because it doesn’t support signing aab packages yet. We do however need to provide signed version of the aab package when uploading to Google Play Store. In order to sign the aab package we will need to update the Xamarin.Android build step with some extra msbuild arguments.
 Xamarin.Android DevOps build task Xamarin.Android DevOps msbuild arguments
Significance of the above arguments can be found in the documentation, therefore I won’t be explaining them in here. Nevertheless, I think it’s worth mentioning what are the $(. ) values for these arguments and where do we get them from.
- $(KeystorePassword) — this is one of the secret variables defined in your pipeline (see below screen), which contains the *.keystore password.
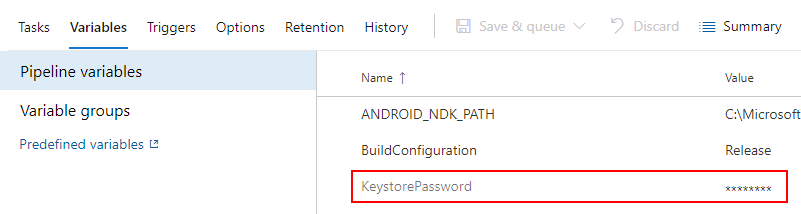 KeystorePassword secret variable
- $(KeyStore.secureFilePath) — this is the *.keystore file path that is the result of the Download Secure File task (NOTE: I assume that you have already stored your *.keystore file in the Library -> Secure Files).
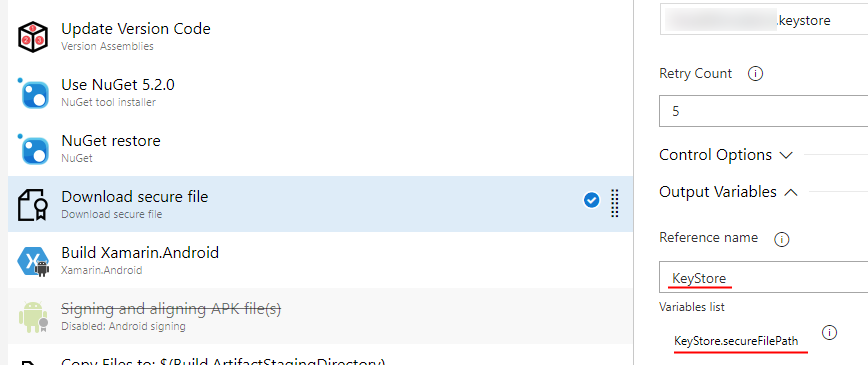 Download Secure File DevOps task
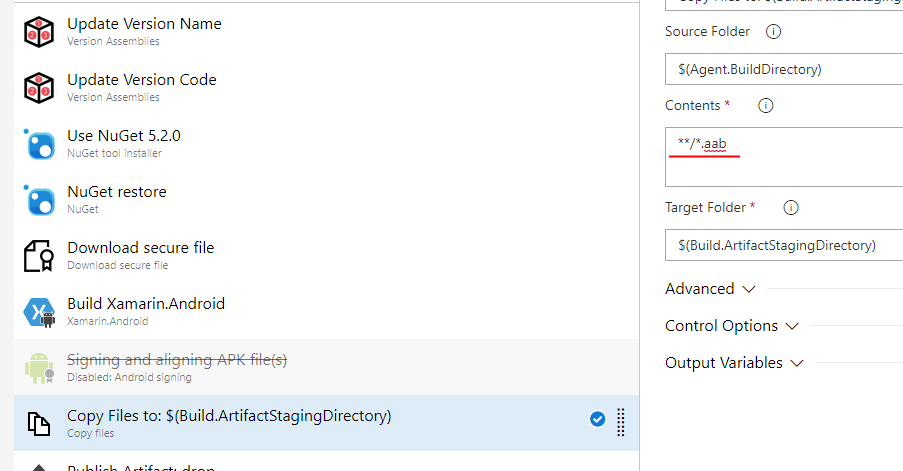
Lastly, we will need to update the Copy Files task to copy the aab file instead of the apk to the be used later by the release pipeline. This is as simple as changing your Contents part of the task to a wildcard expression that will match any file with the aab extension: **/*.aab .
 Copy Files DevOps task
You should now have the build pipeline producing signed aab package.
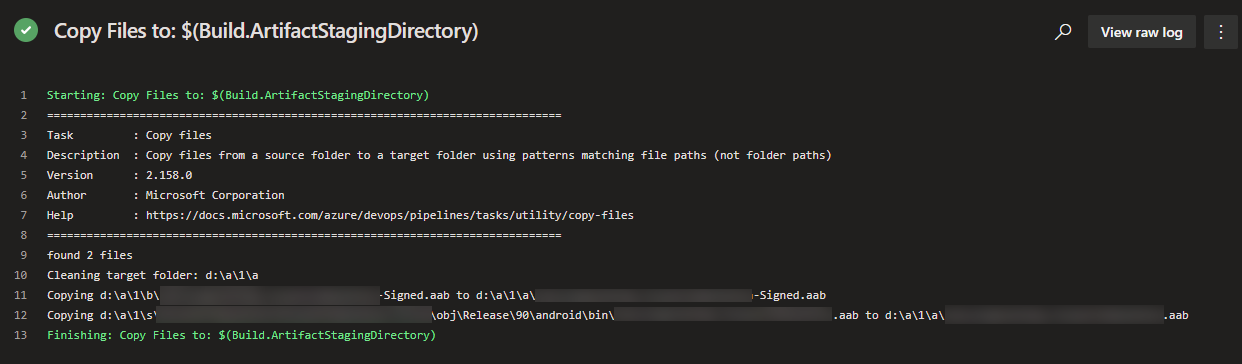 Copying aab packages to the drop folder
Release Pipeline
The below instructions are written under the assumption that you either already have a release pipeline or you can create one by yourself.
Fastlane is your friend. That’s what I’ve learned when trying to upload/publish the aab package to Google Play Store using DevOps release pipeline. We will use the supply command, which is very well documented. These docs will provide you with basic examples and get you started in no time.
As you can imagine our command won’t be as simple as in the samples found in the documentation. Nevertheless, we won’t add too many parameters to it. The final result will look like this:
Fastlane supply command to publish aab to Google Play Store
Some of the parameters in the above command are self explanatory but let’s go through all of them anyway:
- —aab — it’s the path to the package file that was copied to the drop location from the build pipeline
- —json_key — the path to a JSON file containing auth information of the Google Play Service Account. More details about this parameter later in the blog post.
- —track — the release track that your package will be uploaded to. By default it’s production , therefore it is vital to provide this argument ( beta or alpha ), to avoid pushing untested builds straight to the end users.
- —rollout — it’s a value between 0 — 1, which indicates the percentage of users that the new build will be rolled out to. In my case, I’m rolling out to 100% of my beta users.
- —package_name — Your app package name.
- —skip_upload_apk — We won’t be uploading an apk file, therefore we’re skipping this step.
In the DevOps the above command can be executed with the Bash task. In my case it looks like this:
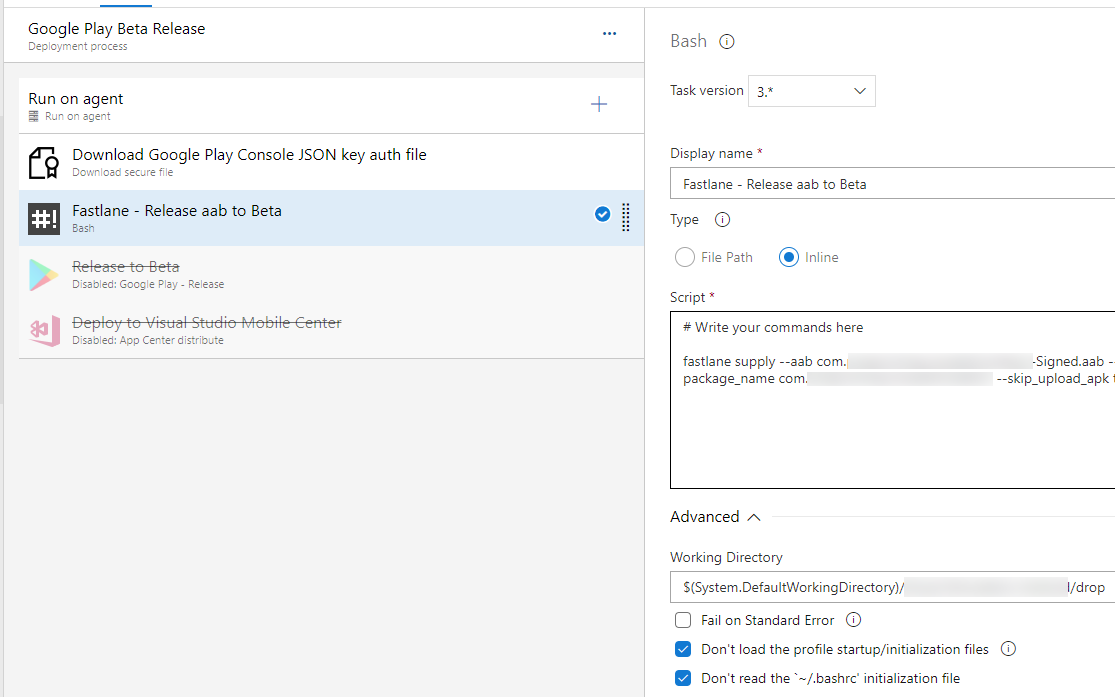 DevOps Bash task executing Fastlane supply command
Google Play Service Account
Let’s talk about the —json_key parameter in the supply Fastlane command and its value $(serviceAccountAuth.secureFilePath) . In order to upload application package to Google Play Console we need to authenticate and have sufficient permissions to do so. Google handles this authentication/authorisation process with Service Accounts.
Fastlane docs to the rescue again! After completing the steps in this document you will create yourself a Service Account, which we will be used with our Fastlane supply command. Ensure that you save the JSON key file generated with one of the steps listed in that documentation. You will need to upload that file to Library -> Secure Files in DevOps. Below are the screenshots of my service account in google dev dashboards.
If you’re done with creating your Service Account you should see similar in your dashboards:
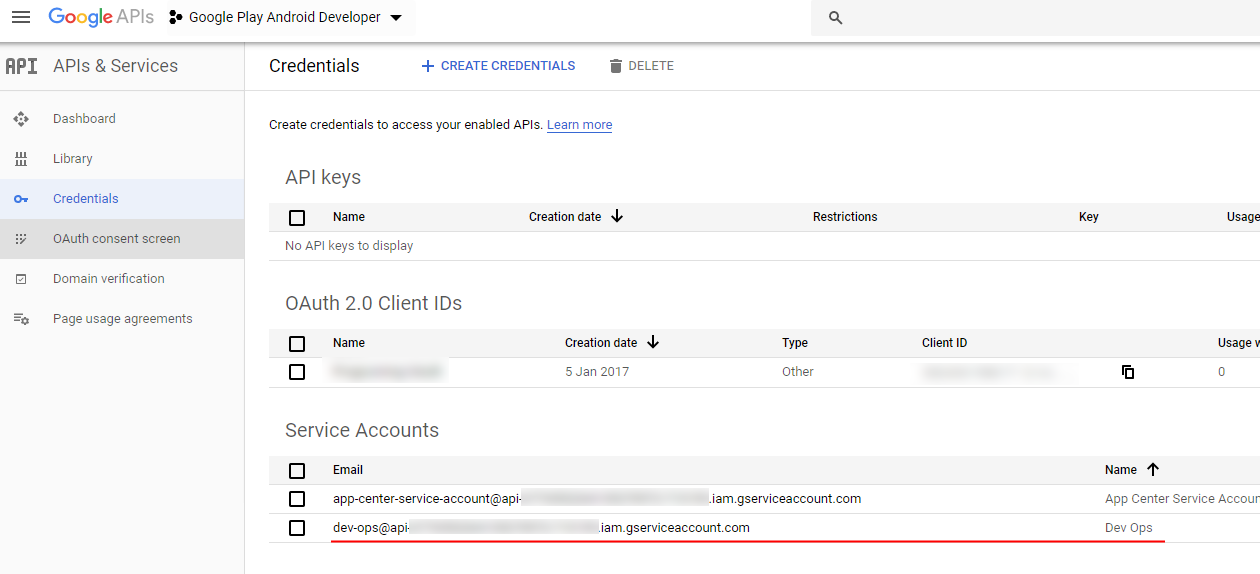 Service Account in Google Developers Console APIs
 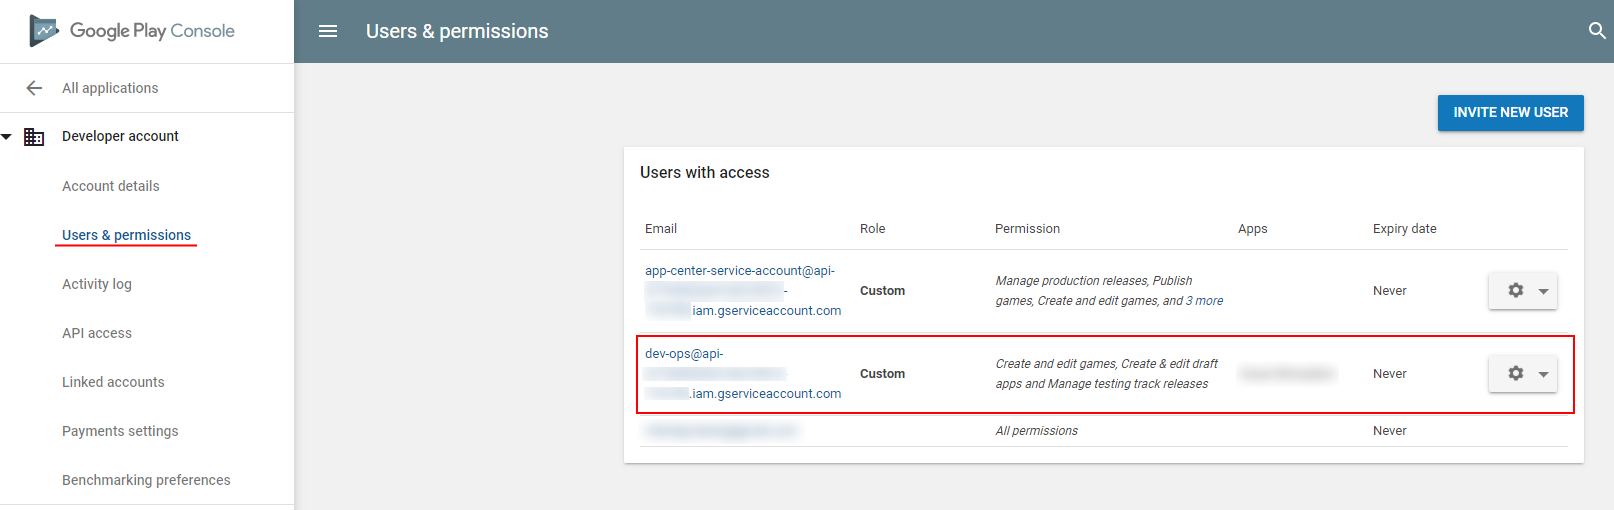 Service Account in Google Play Console
When editing permissions for the service account, make sure that you select the correct ones. Always aim to select the minimal required permissions for a specific account. For instance, if you will only deploy apps to Beta track from DevOps, then this account doesn’t need to have permissions to production releases. See my permissions configuration, for reference:
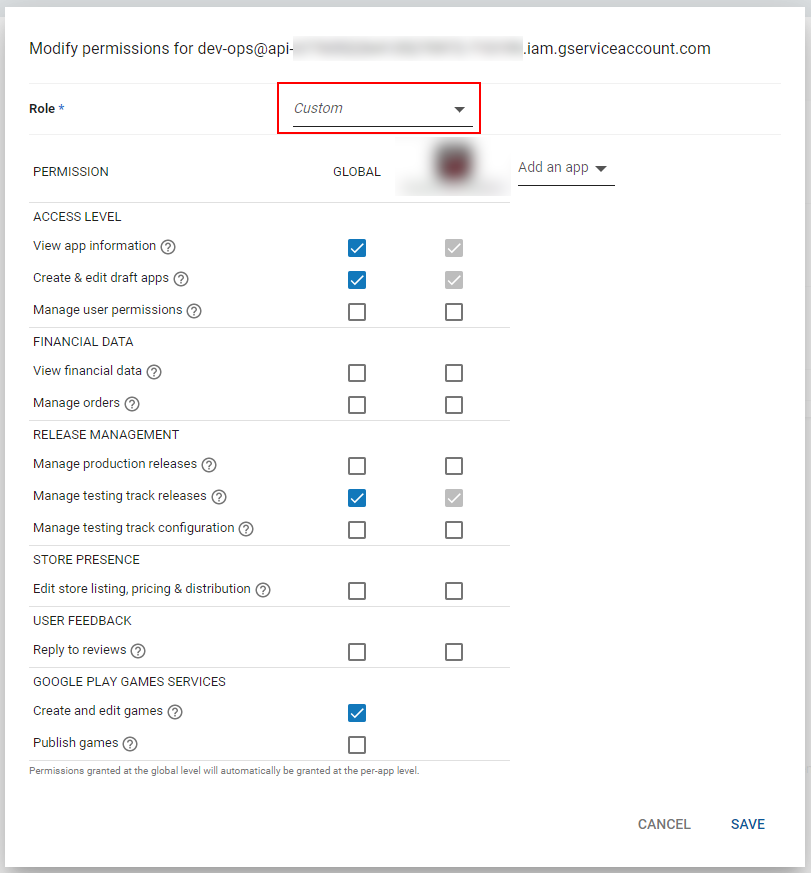 Custom Service Account permissions
Once you’re done with setting up the Service Account, you will need to upload the generated along the way JSON key file to the Secure Files in the DevOps. Afterwards, in your release pipeline, create a Download Secure File task which will reference that newly uploaded secure file.
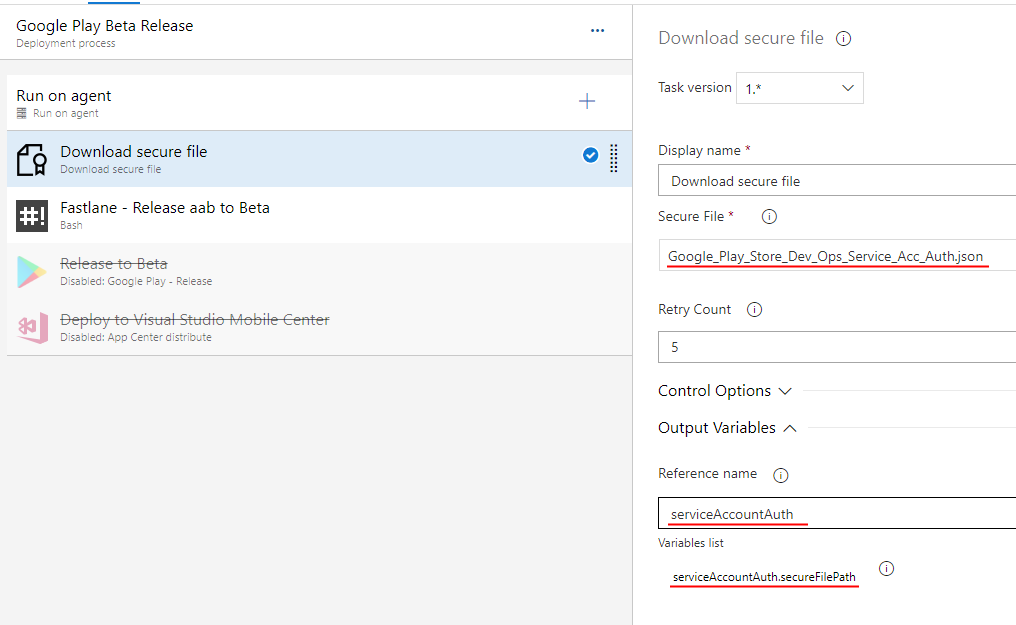 Download Google Play Service Account JSON auth file
The important thing to note from the above screenshot is the output variable serviceAccountAuth.secureFilePath , which will contain the path to the JSON key file, which will be used as a parameter in the supply command.
Congratulations! You should now have a Continues Delivery (i.e. CD) pipeline for you app.
Summary
It’s been a bit of a hassle to work out all of the above by myself, without any proper documentation. Nevertheless, the feeling of accomplishment once it all comes together compensates for the frustrations on the way.
I’m really glad to see that at least a blog post from James Montemagno showed up, to guide Xamarin devs on how to deal with aab packages in DevOps. It feels though as there’s still quite a bit to do in terms of documentation around this subject.
Источник
My First App: How to Create Your First Android App Step by Step
To create a native Android app, one that can directly use all the features and functionality available on an Android phone or tablet, you need to use the Android platform’s Java API framework. This is the API that allows you to perform common tasks such as drawing text, shapes, and colors on the screen, playing sounds or videos, and interacting with a device’s hardware sensors. Over the years, the Android API framework has evolved to become more stable, intuitive, and concise. As a result, being an Android developer today is easier than ever—even more so if you use Android Studio, the official tool for working with the framework.
In this tutorial, I’ll show you how to create your first Android app. While doing so, I’ll also introduce you to important Android-specific concepts such as views, layouts, and activities.
We’ll be starting from scratch to create a very simple app in this tutorial. If you prefer writing less code or need to develop your app as quickly as possible, however, consider using one of the native Android app templates available on CodeCanyon.


Using an app template, you can have a polished, ready-to-publish app in just a matter of hours. You can learn how to use an Android app template by referring to the following tutorial:


Prerequisites
To be able to follow along, you’ll need:
- the latest version of Android Studio
- a device or emulator running Android Marshmallow or higher
If you don’t have Android Studio, do refer to the following tutorial to learn how to install and configure it:


1. Create a New Project
You’ll need an Android Studio project to design, develop, and build your app. So launch Android Studio and click on the Start a new Android Studio project button.
On the next screen, choose Add No Activity because we don’t want to use any of the templates offered by Android Studio. Then press Next to proceed.


You’ll now see a form where you can enter important details about your app, such as its name and package name. The name is, of course, the name your users will see on their phones when they install your app.
The package name, on the other hand, is a unique identifier for your app on Google Play. You must follow the Java package naming conventions while specifying it. For example, if your app’s name is MyFirstApp and you work for an organization whose website address is example.com, the package name would ideally be «com.example.myfirstapp».
Next, you must decide the programming language you want to use while coding the app. For now, select Java and press Finish.


Android Studio will now take a minute or two to generate and configure the project.
2. Create an Activity
An activity is one of the most important components of an Android app. It is what allows you to create and display a user interface to your users. An app can have one or more activities, each allowing the user to perform an action. For example, an email client app can have three activities: one for the user to sign up, one to sign in, and one to compose an email.
To keep this tutorial simple, we’ll be creating an app with just one activity. To create the activity, in the Project panel of Android Studio, right-click on app and select New > Activity > Empty Activity.
In the dialog that pops up, type in MainActivity as the name of the activity, check the Launcher Activity option, and press Finish.
Checking the Launcher Activity option is important because it is what allows your users to open the activity using an Android launcher. As such, a launcher activity serves as an entry point to your app.


3. Create a Layout
Each activity usually has at least one layout associated with it. When you created your activity in the previous step, you also generated an empty layout for it. To take a look at it, open the activity_main.xml file.
An activity’s layout primarily consists of views and view groups. A view, sometimes referred to as a widget, is an individual component of your user interface. Buttons, text fields, labels, and progress bars are common examples of views. A view group is a component that can serve as a container for views. Usually, view groups also help you position and set the dimensions of your views.
ConstraintLayout is one of the most powerful and flexible view groups available today. By default, it is the root node of your activity’s layout XML file. It looks like this:
We’ll be creating a simple clock app in this tutorial. In addition to the local time, it will be able to show the current time in two different countries: India and Germany.
To allow the user to choose the country they’re interested in, our layout will have two Button views, one for Germany, and one for India. And to actually show the time, our layout will have a TextClock view.
Accordingly, add the following code inside the ConstraintLayout :
Note that each view must have the layout_width and layout_height properties. They decide how large the view is. Other properties such as layout_constraintBottom_toBottomOf and layout_constraintLeft_toLeftOf are necessary to position the view. With the above code, the TextClock view will be placed at the center of the screen, and both the Button views towards the bottom of the screen.
By default, the TextClock view only shows the hours and minutes. The format12Hour property, however, allows you to change that. In the above code, its value is set to h:mm:ss a . This tells the TextClock view that it should display the hours, minutes, seconds, and also an AM/PM suffix.
Also note that each Button view has an onClick property. This property is used to assign click event handlers to the buttons.
The handlers don’t exist yet, but you can ask Android Studio to generate them for you. To do so, hover over the name of the handler until you see a red light bulb appear beside it. Then click on the light bulb and select the second option, the one with the yellow light bulb.


At this point, you can try pressing Shift-F10 to run the app. If there are no errors in your XML code, you should see something like this on your phone or emulator:


Although the buttons don’t work yet, the TextClock view should show the local time, updating itself every second.
4. Implement Event Handlers
When you generated event handlers for the two buttons, Android Studio added two methods to your activity’s Java file, MainActivity.java. If you open it, you should find the following code in it:
Inside the event handlers, all we need to do is change the time zone of the TextClock view. But how do you reference a view that’s in your layout XML file from inside your Java file? Well, you just use the findViewById() method.
Once you have a reference to the TextClock view, you can call its setTimeZone() method to change its time zone. So add the following code inside the onClickGermany() method:
Similarly, add the following code inside the onClickIndia() method:
If you’re wondering what R is, it’s an auto-generated class that contains, among other things, the IDs of all the views you have in your layouts. The findViewById() method expects you to use this class while passing an ID to it.
At this point, you can press Shift-F10 again to re-run the app. You should now be able to click on the buttons to change the clock’s time zone.
Conclusion
You just created your first fully functional, native app for Android! I encourage you to make a few changes to it. For instance, you could try using other time formats or time zones. You could also try changing the positions of the buttons and the clock view.
There are dozens of views and view groups you can use to create your apps. Do refer to the official documentation to learn about them.
Android App Templates and UI Kits From CodeCanyon
You may have noticed that our app looks very plain and simple. That’s because we’re using the default theme, without applying any styles to our views. CodeCanyon is full of Android UI kits that offer beautiful, hand-crafted styles you can apply to your views.
The kits generally also have several custom views and layouts. You can refer to the following articles to learn more about them:
Источник


