- Creating an Android Emulator
- Installing an Android System Image (Required)
- Creating an Android Emulator Using the Android Virtual Device Manager
- Creating an Android Emulator Using the Command Line
- Starting an Android Emulator
- Welcome to the Android Emulator
- Just get me started with development!
- About the Emulator
- Recommended Reading
- Building the Emulator
- Contributing code
- Code Reviews
- Merging downstream Qemu
- Creating an Android Emulator
- Minimum Requirements for an Android Emulator
- Android Emulators Require a Separate GPU
- Creating an Android Emulator Is Optional
- Installing an Android System Image (Required)
- Creating an Android Emulator Using the Android Virtual Device Manager
- Creating an Android Emulator Using the Command Line
- Starting an Android Emulator
Creating an Android Emulator
An Android emulator is an Android Virtual Device (AVD) that represents a specific Android device. You can use an Android emulator as a target platform to run and test your Android applications on your PC.
- Using Android emulators is optional.
- An Android emulator is installed by default during the RAD Studio installation.
- We recommend that you install this emulator during product installation.
- This emulator is used as the default target for an Android application, so you can easily create and run an Android application on your development system.
- If you create your own Android emulator, consider creating an emulator for each Android device you want to support.
- RAD Studio supports the following targets:
- Android emulators that are version 4.0 or newer
- Android devices that are ARM version 7 or newer
- You cannot use an Android emulator on a Virtual Machine (VM). Although an emulator might run on a VM, the emulator will not run an application.
- It is a well-known performance issue that Android emulators are extremely slow.
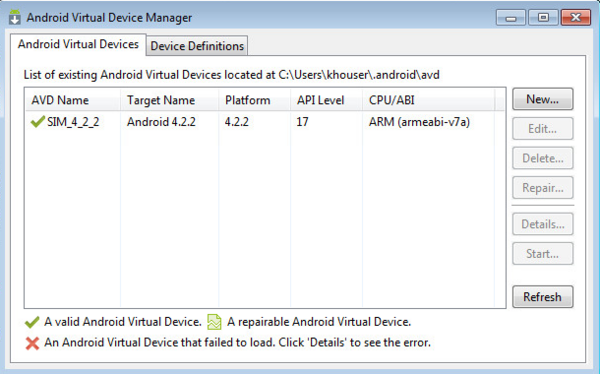
The installed Android emulator is named rsxe5_android, which uses the WVGA800 skin and Android 4.2.2.
Installing an Android System Image (Required)
Before you create an Android emulator, you need to install an Android system image that your emulators can use.
Note: If you installed the Android SDK and NDK during RAD Studio installation, a valid Android system image (such as Android 4.2.2 API 17) should already be shown as Installed in the Android SDK Manager. In this case, you do not need to install another Android system image.
Follow these steps:
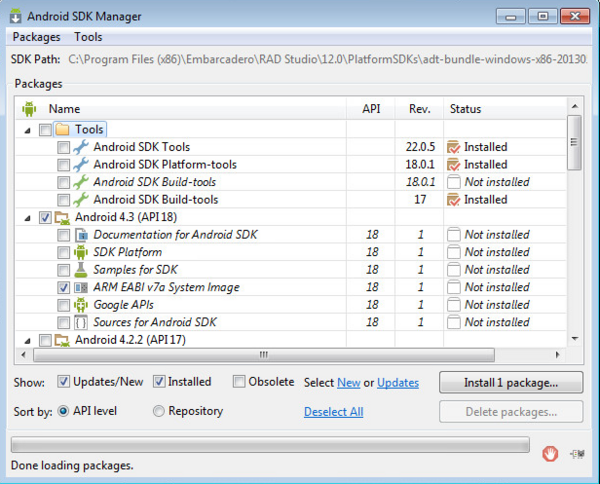
- Start the Android SDK Manager (select Start | All Programs | Embarcadero RAD Studio | Android Tools ).
- In the packages tree, locate and check the ARM EABI v7a System Image node within the first Android node in the list. For example: Android 4.2.2 (API 17) or Android 4.3 (API 18)

- Click Install 1 package. (Clear any checkboxes that were auto-selected.)
- In the Choose Packages to Install page, click Accept License, and then click Install to install the system image.

Creating an Android Emulator Using the Android Virtual Device Manager
To create an Android emulator on your system, follow these steps:
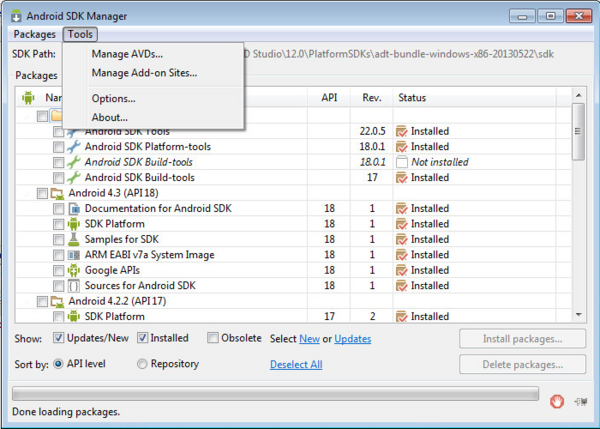
- Start the Android SDK Manager (select Start | All Programs | Embarcadero RAD Studio | Android Tools).
- In the Android SDK Manager, select Tools | Manage AVDs.
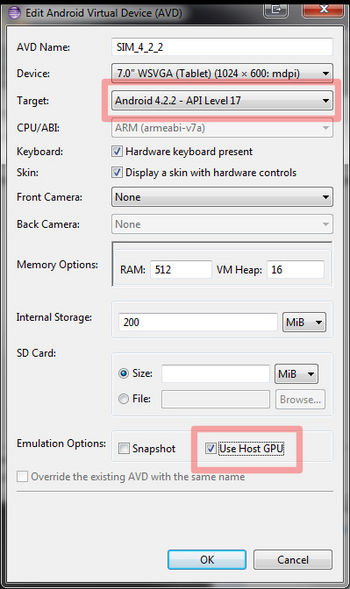
In the Android Virtual Device Manager, click the New button to create a new virtual device. 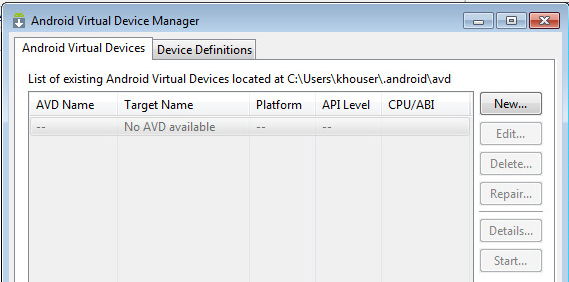
- In Target, select an Android SDK with an API level that is 17 or higher. The drop-down list contains your installed versions of the Android SDK.
- Under Emulation Options, check Use Host GPU.
- In Device, select the Android device to emulate.
Tip: Emulating an older Android device like the Nexus S might be faster than emulating a newer, larger device like the Nexus 10.
RAD Studio lists your Android emulators in the Project Manager, within the Target node of the Android target platform node. See Using the Target Node.
Creating an Android Emulator Using the Command Line
You can create an Android emulator in the command window by entering a command such as this:
For the skin, you might want to add this option:
Starting an Android Emulator
When the emulator is the current target platform, you do not have to start the emulator before running your Android app on the emulator. However, we recommend that you start your Android emulator separately, perhaps before you start RAD Studio. Emulators are notoriously slow to start and to run, so starting the emulator beforehand means that your app can get to the emulator more quickly.
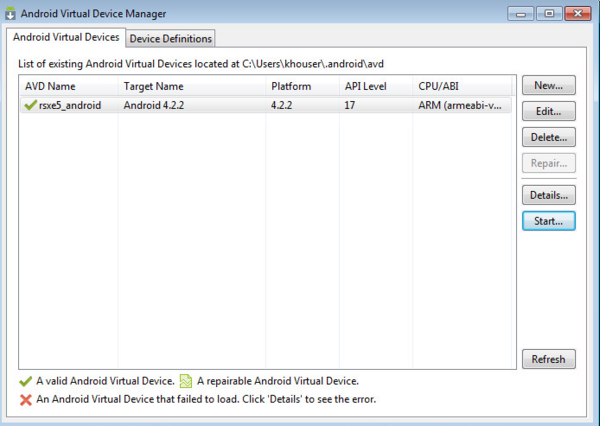
The recommended way to start an Android emulator is by using the Android Virtual Device Manager, which can be started from the Android SDK Manager.
To start an Android emulator such as the default emulator installed in RAD Studio:
- Start the Android SDK Manager (select Start | All Programs | Embarcadero RAD Studio | Android Tools).
- In the Android SDK Manager, click the Tools menu and select Manage AVDs.
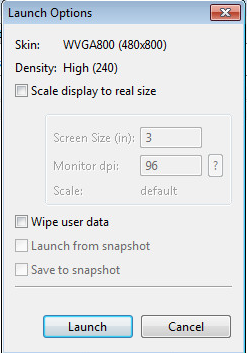
- In the Android Virtual Device Manager, select the emulator and click Start.
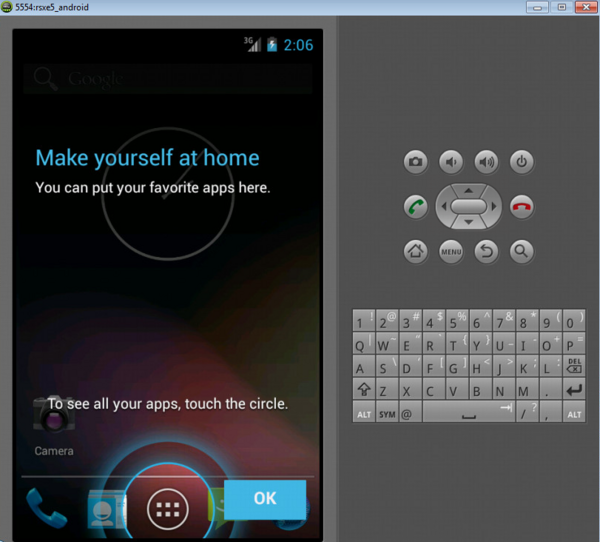
In the Project Manager, your emulator should appear in the Target node of the Android target platform: 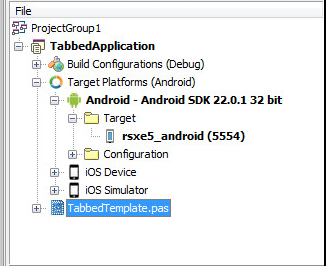
Tip: If the Project Manager does not show your running Android emulator as running, with the same icon as in the screenshot above, see Using the Target Node.
Your next step is to run an Android app on your emulator. In the Project Manager, ensure that the emulator’s name is in boldface and the port number is indicated in parentheses (such as (5554)), indicating that the emulator is running and is the current selected target platform.
Источник
Welcome to the Android Emulator
This document gives you some background on the emulator and outlines how you can start hacking and contributing to the emulator!
Just get me started with development!
Make sure to install Android Studio and the associated SDKs. Do not forget to install the official emulator and create a few android virtual devices. Next follow the instructions for the platform you would like to work on:
We use the Repo tool to manage working accross multiple branches.
About the Emulator
The Android Emulator simulates Android devices on your computer so that you can test your application on a variety of devices and Android API levels without needing to have each physical device.
The emulator provides almost all of the capabilities of a real Android device. You can simulate incoming phone calls and text messages, specify the location of the device, simulate different network speeds, simulate rotation and other hardware sensors, access the Google Play Store, and much more.
Testing your app on the emulator is in some ways faster and easier than doing so on a physical device. For example, you can transfer data faster to the emulator than to a device connected over USB.
The emulator comes with predefined configurations for various Android phone, tablet, Wear OS, and Android TV devices.
Recommended Reading
The following is a list of concepts that are important. Please read these links and any other links you can find. If you find a link that you think does a better job at explaining the concept, please add it here:
QEMU is an open source competitor to VMware Workstation, VirtualBox, HyperV. It is focused on Linux server virtualization on Linux servers. While QEMU does support booting other OS’s, we don’t use that functionality since Android is Linux.
The Android Emulator is downstream from the QEMU emulator. It adds support for booting Android devices, emulates typical Android hardware (OpenGL, GPS, GSM, Sensors) and a GUI interface. The android emulator extends qemu in various ways.
For an overview of Qemu see:
The QEMU emulator leverages technologies like hardware Hypervisors KVM (Linux) and HAXM (Windows/Mac)
The QEMU emulator supports both guest images that require full virtualization and guest images that require paravirtualization technologies like virtio
The emulator passes a device tree blob to a guest kernel to describe the guest hardware
When running a non-x86 image on an x86 host, QEMU will JIT the non-x86 code into x86 code. See this lectutre for more. The MMU (page table hardware) is emulated in software, which is unfortunately slow.
You will need to build Android kernels and system images that the emulator will run. The easiest way to obtain these is to make use of the publicly released images. You can find more details here.
Building the Emulator
The emulator uses Cmake as a meta build generator, and all the necessary compilers and toolchains are included in the repository. Make sure you have read the section above as the requirements to succesfully build vary slightly from platform to platform.
In general you can run the following script:
For incremental builds you can use ninja . For example
Contributing code
The emulator uses a coding style derived from the Chromium style. We use the repo tool to submit pathces. The usual workflow is roughly as follows:
This will create a git branch called my_awesome_feature . You can now work on your patch.
Once you have written a patch you can send it out for code review. We use gerrit for code reviews.
Use the repo tool to upload or update a CL:
- “—cbr” means “upload the current branch”,
- “—re” supplies the initial reviewers list
Add “-t” switch to use the current git branch as a review topic (topic groups CLs together and only allows them to be submitted when all got +2/+verified)
The repo tool will provide you with a url where you can find your change.
Code Reviews
Make sure to check the CL against our coding style: coding style. Coding style isn’t frozen: just edit it in our repository and create a code review to propose a change.
Some good articles on code reviewing, especially when it comes to google:
- The CL Author’s Guide, which gives detailed guidance to developers whose CLs are undergoing review.
- How to Do a Code Review, which gives detailed guidance for code reviewers.
Below are some short notes relevant to the emulator.
Keep in mind that all of the code reviews are open source and visible to everyone!. In other words, be nice and and provide actionable constructive feedback.
C++ over C for all new code. Always.
After uploading a CL for review, author should “+1” it when they think it’s ready for reviewing. A CL without author’s “+1” is a “work in progress” and other reviewers may ignore it..
Prefer not to send a WIP CL to reviewers and only add them when it’s in a reviewable state. If you realized that you added reviewers too soon, just remove them — “x” button in the browser UI for each reviewer actually works.
Avoid large CLs. There are always exceptions, use your best judgement to improve code clarity and to help other maintainers in the future.
Split the changes into smaller isolated chunks and submit those as a single topic If you touch multiple components, that’s a good way to split the CL.
Changes into any QEMU files must be in their own CL — otherwise rebasing into the new version becomes 10x more painful.
“-2” is sticky, it remains there until the very same reviewer removes it. If you “-2”-ed someone, it’s always a good thing to communicate to them about the follow-up
Abandon the CLs you don’t need anymore
Tests: when reviewing the code, make sure there’s a test or a really good reason for its absence
Merging downstream Qemu
Merging changes from the qemu branch should be done on the emu-master-qemu branch. You will need to this on a linux machine as qemu development happens in a linux environment. Once you have obtained this branch you can add the remote qemu repository as follows:
Now you can start merging in changes:
Be smart, merge only a few commits at a time
Next you should try to build qemu standalone:
Now you are ready for building, testing, and merging the next set. You could have a look at this script to automate this slightly.
Источник
Creating an Android Emulator
An Android emulator is an Android Virtual Device (AVD) that represents a specific Android device. You can use an Android emulator as a target platform to run and test your Android applications on your PC.
 Caution: Android emulators are extremely slow and do not support the same feature set as real devices.
We do not recommend that you attempt to use an Android emulator:
- If you have an Android device, use your Android device instead.
- You can also use Mobile Preview to do initial debugging of an Android app.
Minimum Requirements for an Android Emulator
To create an Android emulator (made available by Google as part of the Android SDK), we recommend using at least the following:
- Intel Core i5 CPU
- 4GB of RAM
- GPU emulation must be listed in the hardware list of the emulator image, as explained in Running Your Android Application on an Android Emulator.
We do not recommend using an Android emulator on a virtual machine (VM), because GPU support for the emulator is generally not available on VMs. However, if you are running Delphi on a VM on a Mac OS X computer, you can consider using a remote emulator on the Mac, given that the emulator does not work on VMs. For more information, see http://delphi.org/2013/09/debugging-against-a-remote-android-emulator/.
RAD Studio supports the emulator for Android versions 4.x.
We do not support emulators for the 2.x version (Gingerbread) because emulators for Android versions 2.x target an ARMv6 CPU, which Delphi does not support.
Android Emulators Require a Separate GPU
Android emulators are heavily hardware-dependent, and this includes the hardware being emulated as well as the hardware on which the emulator runs.
For this reason, we recommend that you verify the presence of a suitable graphics card on your development system.
- Open Control Panel\Appearance and Personalization\Display\Screen Resolution.
- Click Advanced Settings.
- Take a look at the displayed properties of your graphics card.
- If you do not have a suitable GPU, it is probably not worth your time to create and attempt to run an Android emulator. Find another development system that does have a suitable GPU.
- We do not recommend Intel GPUs.
- If you receive error messages about OpenGL ES when you try to run your Android emulator, this means that your GPU is probably not suitable.
Creating an Android Emulator Is Optional
If you decide to create your own Android emulator, consider creating an emulator for each Android device you want to support. Keep in mind that Android emulators often run so slow that some people consider them unusable.
RAD Studio supports the following targets:
- Android emulators that are version 4.0 or newer
- Android devices that are ARM version 7 or newer
Android emulators cannot be run on a Virtual Machine (VM). Although an emulator might run on a VM, the emulator will not actually run an application.
Note: It is a well-known performance issue that Android emulators are extremely slow.
Installing an Android System Image (Required)
Before you create an Android emulator, you need to install an Android system image that your emulators can use.
Note: If you installed the Android SDK and NDK during RAD Studio installation, a valid Android system image (such as Android 4.2.2 API 17) should already be shown as Installed in the Android SDK Manager. In this case, you do not need to install another Android system image.
Follow these steps:
- Start the Android Virtual Device Manager (select Start > All Programs > Embarcadero RAD Studio XE6 > Android SDKs > Android AVD Manager ).
- In the packages tree, locate and check the ARM EABI v7a System Image node within the first Android node in the list. For example: Android 4.2.2 (API 17) or Android 4.3 (API 18)
- Click Install 1 package. (Clear any checkboxes that were auto-selected.)
- In the Choose Packages to Install page, click Accept License, and then click Install to install the system image.


Creating an Android Emulator Using the Android Virtual Device Manager
To create an Android emulator on your system, follow these steps:
- Start the Android SDK Manager (select Start > All Programs > Embarcadero RAD Studio XE6 > Android SDKs > Android AVD Manager ).

In the Android Virtual Device Manager, click the New button to create a new virtual device. 
- In Target, select an Android SDK with an API level that is 17 or higher. The drop-down list contains your installed versions of the Android SDK.
- Under Emulation Options, check Use Host GPU.
- In Device, select the Android device to emulate.
Tip: Emulating an older Android device like the Nexus S might be faster than emulating a newer, larger device like the Nexus 10.

RAD Studio lists your Android emulators in the Project Manager, within the Target node of the Android target platform node. See Using the Target Node.
Note: As reference, here are the default installed locations of the Android development tools as installed by the RAD Studio installer:
- If you need to start the Android SDK Manager directly, here is its location:
C:\Users\Public\Documents\Embarcadero\Studio\14.0\PlatformSDKs\adt-bundle-windows-x86-20131030
- If SDK Manager.exe does not start, use Android.bat, which is located here:
C:\Users\Public\Documents\Embarcadero\Studio\14.0\PlatformSDKs\adt-bundle-windows-x86-20131030\sdk
Creating an Android Emulator Using the Command Line
You can create an Android emulator in the command window by entering a command such as this:
For the skin, you might want to add this option:
Starting an Android Emulator
When the emulator is the current target platform, you do not have to start the emulator before running your Android app on the emulator. However, we recommend that you start your Android emulator separately, perhaps before you start RAD Studio. Emulators are notoriously slow to start and to run, so starting the emulator beforehand means that your app can get to the emulator more quickly.
The recommended way to start an Android emulator is by using the Android Virtual Device Manager, which can be started from the Android SDK Manager.
To start an Android emulator such as the default emulator installed in RAD Studio:
- Start the Android Virtual Device Manager (select Start > All Programs > Embarcadero RAD Studio XE6 > Android SDKs > Android AVD Manager ).
- Select the emulator and click Start.


In the Project Manager, your emulator should appear in the Target node of the Android target platform, with its assigned port (such as (5554)): 
Tip: If the Project Manager does not show your running Android emulator as running, with the same icon as in the screenshot above, see Using the Target Node.
Your next step is to run an Android app on your emulator. In the Project Manager, ensure that the emulator’s name is in boldface and the port number is indicated in parentheses (such as (5554)), indicating that the emulator is running and is the current selected target platform.
Источник


