- Build.VERSION
- Class Overview
- Summary
- Fields
- public static final String BASE_OS
- public static final String CODENAME
- public static final String INCREMENTAL
- public static final int PREVIEW_SDK_INT
- Build and release an Android app
- Adding a launcher icon
- Enabling Material Components
- Signing the app
- Create an upload keystore
- Reference the keystore from the app
- Configure signing in gradle
- Shrinking your code with R8
- Enabling multidex support
- Reviewing the app manifest
- Reviewing the build configuration
- Building the app for release
- Build an app bundle
- Test the app bundle
- Offline using the bundle tool
- Online using Google Play
- Build an APK
- Install an APK on a device
- Publishing to the Google Play Store
- Updating the app’s version number
- Android release FAQ
- When should I build app bundles versus APKs?
- What is a fat APK?
- What are the supported target architectures?
- How do I sign the app bundle created by flutter build appbundle ?
- How do I build a release from within Android Studio?
Build.VERSION
Class Overview
Various version strings.
Summary
| Fields | |||||||||||
|---|---|---|---|---|---|---|---|---|---|---|---|
| BASE_OS | The base OS build the product is based on. | ||||||||||
| CODENAME | The current development codename, or the string «REL» if this is a release build. | ||||||||||
| INCREMENTAL | The internal value used by the underlying source control to represent this build. | ||||||||||
| PREVIEW_SDK_INT | The developer preview revision of a prerelease SDK. | ||||||||||
| RELEASE | The user-visible version string. | ||||||||||
| SDK | This field was deprecated in API level 4. Use SDK_INT to easily get this as an integer. | ||||||||||
| SDK_INT | The user-visible SDK version of the framework; its possible values are defined in Build.VERSION_CODES . | ||||||||||
| SECURITY_PATCH | The user-visible security patch level. | ||||||||||
| Public Constructors |
|---|
[Expand] Fieldspublic static final String BASE_OSThe base OS build the product is based on. public static final String CODENAMEThe current development codename, or the string «REL» if this is a release build. public static final String INCREMENTALThe internal value used by the underlying source control to represent this build. E.g., a perforce changelist number or a git hash. public static final int PREVIEW_SDK_INTThe developer preview revision of a prerelease SDK. This value will always be 0 on production platform builds/devices. When this value is nonzero, any new API added since the last officially published API level is only guaranteed to be present on that specific preview revision. For example, an API Activity.fooBar() might be present in preview revision 1 but renamed or removed entirely in preview revision 2, which may cause an app attempting to call it to crash at runtime. Experimental apps targeting preview APIs should check this value for equality ( == ) with the preview SDK revision they were built for before using any prerelease platform APIs. Apps that detect a preview SDK revision other than the specific one they expect should fall back to using APIs from the previously published API level only to avoid unwanted runtime exceptions. Источник Build and release an Android appDuring a typical development cycle, you test an app using flutter run at the command line, or by using the Run and Debug options in your IDE. By default, Flutter builds a debug version of your app. When you’re ready to prepare a release version of your app, for example to publish to the Google Play Store, this page can help. Before publishing, you might want to put some finishing touches on your app. This page covers the following topics: Note: Throughout this page, [project] refers to the directory that your application is in. While following these instructions, substitute [project] with your app’s directory. Adding a launcher iconWhen a new Flutter app is created, it has a default launcher icon. To customize this icon, you might want to check out the flutter_launcher_icons package. Alternatively, you can do it manually using the following steps: Review the Material Design product icons guidelines for icon design. In the [project]/android/app/src/main/res/ directory, place your icon files in folders named using configuration qualifiers. The default mipmap- folders demonstrate the correct naming convention. In AndroidManifest.xml , update the application tag’s android:icon attribute to reference icons from the previous step (for example, ). To verify that the icon has been replaced, run your app and inspect the app icon in the Launcher. Enabling Material ComponentsIf your app uses Platform Views, you may want to enable Material Components by following the steps described in the Getting Started guide for Android.
To find out the latest version, visit Google Maven.
Signing the appTo publish on the Play Store, you need to give your app a digital signature. Use the following instructions to sign your app. On Android, there are two signing keys: deployment and upload. The end-users download the .apk signed with the ‘deployment key’. An ‘upload key’ is used to authenticate the .aab / .apk uploaded by developers onto the Play Store and is re-signed with the deployment key once in the Play Store.
Create an upload keystoreIf you have an existing keystore, skip to the next step. If not, create one by either: Running the following at the command line: On Mac/Linux, use the following command: On Windows, use the following command: This command stores the upload-keystore.jks file in your home directory. If you want to store it elsewhere, change the argument you pass to the -keystore parameter. However, keep the keystore file private; don’t check it into public source control! Note: The keytool command might not be in your path—it’s part of Java, which is installed as part of Android Studio. For the concrete path, run flutter doctor -v and locate the path printed after ‘Java binary at:’. Then use that fully qualified path replacing java (at the end) with keytool . If your path includes space-separated names, such as Program Files , use platform-appropriate notation for the names. For example, on Mac/Linux use Program\ Files , and on Windows use «Program Files» . The -storetype JKS tag is only required for Java 9 or newer. As of the Java 9 release, the keystore type defaults to PKS12. Reference the keystore from the appCreate a file named [project]/android/key.properties that contains a reference to your keystore: Warning: Keep the key.properties file private; don’t check it into public source control. Configure signing in gradleConfigure gradle to use your upload key when building your app in release mode by editing the [project]/android/app/build.gradle file. Add the keystore information from your properties file before the android block: Load the key.properties file into the keystoreProperties object. Find the buildTypes block: And replace it with the following signing configuration info: Release builds of your app will now be signed automatically. Note: You may need to run flutter clean after changing the gradle file. This prevents cached builds from affecting the signing process. For more information on signing your app, see Sign your app on developer.android.com. Shrinking your code with R8R8 is the new code shrinker from Google, and it’s enabled by default when you build a release APK or AAB. To disable R8, pass the —no-shrink flag to flutter build apk or flutter build appbundle . Note: Obfuscation and minification can considerably extend compile time of the Android application. Enabling multidex supportWhen writing large apps or making use of large plugins, you may encounter Android’s dex limit of 64k methods when targeting a minimum API of 20 or below. This may also be encountered when running debug versions of your app via flutter run that does not have shrinking enabled. Flutter tool supports easily enabling multidex. The simplest way is to opt into multidex support when prompted. The tool detects multidex build errors and will ask before making changes to your Android project. Opting in allows Flutter to automatically depend on androidx.multidex:multidex and use a generated FlutterMultiDexApplication as the project’s application. Note: Multidex support is natively included when targeting min sdk 21+. You might also choose to manually support multidex by following Android’s guides and modifying your project’s Android directory configuration. A multidex keep file must be specified to include: Also, include any other classes used in app startup. See the official Android documentation for more detailed guidance on adding multidex support manually. Reviewing the app manifestReview the default App Manifest file, AndroidManifest.xml , located in [project]/android/app/src/main and verify that the values are correct, especially the following: application Edit the android:label in the application tag to reflect the final name of the app. uses-permission Add the android.permission.INTERNET permission if your application code needs Internet access. The standard template does not include this tag but allows Internet access during development to enable communication between Flutter tools and a running app. Reviewing the build configurationReview the default Gradle build file, build.gradle , located in [project]/android/app and verify the values are correct, especially the following values in the defaultConfig block: applicationId Specify the final, unique (Application Id)appid versionCode & versionName Specify the internal app version number, and the version number display string. You can do this by setting the version property in the pubspec.yaml file. Consult the version information guidance in the versions documentation. minSdkVersion , compilesdkVersion , & targetSdkVersion Specify the minimum API level, the API level on which the app was compiled, and the maximum API level on which the app is designed to run. Consult the API level section in the versions documentation for details. buildToolsVersion Specify the version of Android SDK Build Tools that your app uses. Alternatively, you can use the Android Gradle Plugin in Android Studio, which will automatically import the minimum required Build Tools for your app without the need for this property. Building the app for releaseYou have two possible release formats when publishing to the Play Store. Note: The Google Play Store prefers the app bundle format. For more information, see Android App Bundle and About Android App Bundles. Warning: Recently, the Flutter team has received several reports from developers indicating they are experiencing app crashes on certain devices on Android 6.0. If you are targeting Android 6.0, use the following steps: If you build an App Bundle Edit android/gradle.properties and add the flag: android.bundle.enableUncompressedNativeLibs=false . If you build an APK Make sure android/app/src/AndroidManifest.xml doesn’t set android:extractNativeLibs=false in the tag. For more information, see the public issue. Build an app bundleThis section describes how to build a release app bundle. If you completed the signing steps, the app bundle will be signed. At this point, you might consider obfuscating your Dart code to make it more difficult to reverse engineer. Obfuscating your code involves adding a couple flags to your build command, and maintaining additional files to de-obfuscate stack traces. From the command line:
The release bundle for your app is created at [project]/build/app/outputs/bundle/release/app.aab . By default, the app bundle contains your Dart code and the Flutter runtime compiled for armeabi-v7a (ARM 32-bit), arm64-v8a (ARM 64-bit), and x86-64 (x86 64-bit). Test the app bundleAn app bundle can be tested in multiple ways—this section describes two. Offline using the bundle tool
Online using Google Play
Build an APKAlthough app bundles are preferred over APKs, there are stores that don’t yet support app bundles. In this case, build a release APK for each target ABI (Application Binary Interface). If you completed the signing steps, the APK will be signed. At this point, you might consider obfuscating your Dart code to make it more difficult to reverse engineer. Obfuscating your code involves adding a couple flags to your build command. From the command line:
This command results in three APK files:
Removing the —split-per-abi flag results in a fat APK that contains your code compiled for all the target ABIs. Such APKs are larger in size than their split counterparts, causing the user to download native binaries that are not applicable to their device’s architecture. Install an APK on a deviceFollow these steps to install the APK on a connected Android device. From the command line:
Publishing to the Google Play StoreFor detailed instructions on publishing your app to the Google Play Store, see the Google Play launch documentation. Updating the app’s version numberThe default version number of the app is 1.0.0 . To update it, navigate to the pubspec.yaml file and update the following line: The version number is three numbers separated by dots, such as 1.0.0 in the example above, followed by an optional build number such as 1 in the example above, separated by a + . Both the version and the build number may be overridden in Flutter’s build by specifying —build-name and —build-number , respectively. In Android, build-name is used as versionName while build-number used as versionCode . For more information, see Version your app in the Android documentation. After updating the version number in the pubspec file, run flutter pub get from the top of the project, or use the Pub get button in your IDE. This updates the versionName and versionCode in the local.properties file, which are later updated in the build.gradle file when you rebuild the Flutter app. Android release FAQHere are some commonly asked questions about deployment for Android apps. When should I build app bundles versus APKs?The Google Play Store recommends that you deploy app bundles over APKs because they allow a more efficient delivery of the application to your users. However, if you’re distributing your application by means other than the Play Store, an APK may be your only option. What is a fat APK?A fat APK is a single APK that contains binaries for multiple ABIs embedded within it. This has the benefit that the single APK runs on multiple architectures and thus has wider compatibility, but it has the drawback that its file size is much larger, causing users to download and store more bytes when installing your application. When building APKs instead of app bundles, it is strongly recommended to build split APKs, as described in build an APK using the —split-per-abi flag. What are the supported target architectures?When building your application in release mode, Flutter apps can be compiled for armeabi-v7a (ARM 32-bit), arm64-v8a (ARM 64-bit), and x86-64 (x86 64-bit). Flutter does not currently support building for x86 Android (See Issue 9253). How do I sign the app bundle created by flutter build appbundle ?How do I build a release from within Android Studio?In Android Studio, open the existing android/ folder under your app’s folder. Then, select build.gradle (Module: app) in the project panel:
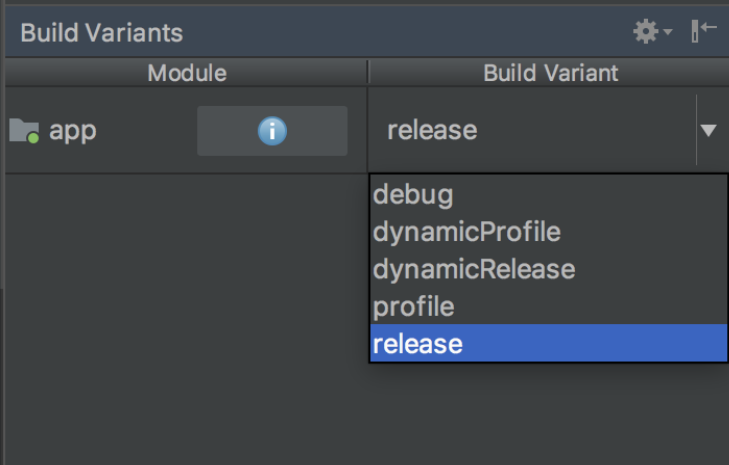
Next, select the build variant. Click Build > Select Build Variant in the main menu. Select any of the variants in the Build Variants panel (debug is the default):
The resulting app bundle or APK files are located in build/app/outputs within your app’s folder. Except as otherwise noted, this work is licensed under a Creative Commons Attribution 4.0 International License, and code samples are licensed under the BSD License. Источник  Когда к мобильному устройству присоединены наушники  ОС Google Android развивается, и по всему видимому |
|---|