- Burp suite install certificate android
- Prepare a Playground
- sebohdev/SniffMeApp
- An example app to practice Burp Suite Setup. Contribute to sebohdev/SniffMeApp development by creating an account on…
- Changes to Trusted Certificate Authorities in Android Nougat
- Posted by Chad Brubaker, Android Security team In Android Nougat, we’ve changed how Android handles trusted certificate…
- Setting up Burp Suite and Android
- 1. Install Burp Suite
- Download Burp Suite Community Edition
- Burp Suite Community Edition is a feature-limited set of manual tools for exploring web security. Proxy your HTTPS…
- 2. Export certificate
- 3. Install certificate on your phone
- 4. Proxy Configuration
- Smartphone
- Emulator
- Check the setup
- Modify an apk
- 1. Disassemble the APK
- 2. Modify the resources
- 3. Repackaging and self-signing the APK
- Configuring an Android Device to Work With Burp
- Configure the Burp Proxy listener
- Configure your device to use the proxy
- Test the configuration
- Installing Burp’s CA Certificate in an Android Device
Burp suite install certificate android

Aug 1, 2020 · 5 min read
Some month ago I tried to reverse engineer some Android Apps. The main challenge I had was to get Burp Suite running to check the network traffic. I like to share my approach to get it finally working.
Prepare a Playground
To get started I created a simple Android App, which contains one http request which we want to capture with Burp Suite.
sebohdev/SniffMeApp
An example app to practice Burp Suite Setup. Contribute to sebohdev/SniffMeApp development by creating an account on…
The application basically just has a button which triggers a http request to get a todo item from a list.

The minimum API leve l of the project is 24, which is important to notice. It’s a version which had breaking changes for Android OS handling user installed certificates.
Changes to Trusted Certificate Authorities in Android Nougat
Posted by Chad Brubaker, Android Security team In Android Nougat, we’ve changed how Android handles trusted certificate…
Basically all applications trust per default only pre installed system certificates. This can be changed by applying certain security configurations.
Setting up Burp Suite and Android
The plan is the following:
- Install Burp Suite
- Get a certificate, which we need to install on our Android Phone/Emulator
- Install the certificate
- Configure the Proxy
1. Install Burp Suite
The current Community Edition can be downloaded from here:
Download Burp Suite Community Edition
Burp Suite Community Edition is a feature-limited set of manual tools for exploring web security. Proxy your HTTPS…
2. Export certificate
After installing Burp Suite on your PC create a ‘ Temporary project’ in Burp Suite and navigate to ‘ Proxy -> Options -> Import / export CA certificate’

Choose ‘ Certificate in DER Format’ and save the file as ‘ burp.der’ on your computer. Create a copy of the file and rename it to ‘ burp.cer’. This file needs to be moved to our smartphone.
3. Install certificate on your phone
In Android go to ‘ Settings -> Security & location -> Advanced -> Encryption & credentials -> Install from SD Card’.

Choose the ‘ burp.cer’ file and install it. As a name enter ‘ Burp Certificate’ and tap ‘ OK’. Inside your ‘ User credentials’ overview you should see the certificate.

4. Proxy Configuration
To continue we need to know our local IP Address. Depending on your system the following commands are helpful.
Furthermore we need to prepare Burp Suite for intercepting. Go to ‘ Proxy -> Options’ and click on ‘ Add’. As a port I like to choose ‘ 8888’ and ‘ All interfaces’ for ‘ Bind to address’.

Smartphone
In Android go to ‘ Settings -> Network & Internet -> Wi-Fi’ and select the settings wheel next to the current connected Wi-Fi. Inside the ‘ Network details’ you tap on the pencil symbol at the top.
Open the ‘ Advanced options’ and choose for Proxy the option ‘ Manual’. Enter your IP Address, the port 8888 and save.

Emulator
For the emulator go to the “ Extend controls -> Settings -> Proxy”. Enter your credentials and click apply.

Check the setup
No it’s time to see what happens when enabling the proxy and triggering the request inside the app.
Open the app tap ‘ Send’. You should see the following message. (Make sure to disable the Interceptor in Burp Suite. Go to ‘Proxy -> Intercept’ and check if you can see the button ‘Intercept is off’)

It seems Android does not really like it, that Burp Suite is trying to get the request. Because Burp Suite needs to repackage the request and sign it with a custom certificate Android does not trust the request anymore. Even after installing it on the device it’s not getting applied inside the app per default.
For that reason we need to create a ‘ network_security_config.xml’ inside ‘ res/xml’.
This config tells Android, that the application not only trust system certificates but also user installed certificates. To apply the configuration we need to update the ‘ AndroidManifest.xml’ by adding the following to application.
Let’s reinstall the App and try again.

It works so we know how to modify an application to trust our installed certificate. Furthermore Burp Suite can now intercept each request and we are able to modify it.
Modify an apk
It’s time to use our knowledge to modify any app out in the world in a way to allow us capturing the network traffic with Burp Suite. So let’s build a release version of the original sample app without any network-configuration and modify it, with the help of apktool.
The plan is the following.
- Disassembling the APK
- Modify the resources
- Repackaging and self-signing the APK
1. Disassemble the APK
With the apktool in place just enter the following command
The option ‘ -s’ prevent any disassembly of the dex files which we don’t need to modify.
2. Modify the resources
Next we need to add our ‘network_security_config.xml’ inside ‘res/xml’. Also we need to modify the AndroidManifest.xml as already described.
3. Repackaging and self-signing the APK
Now we need to rebuild the APK and sign it.
To self-sign the app, use keytool to create a new keystore and key, then jarsigner to sign the APK:
In the end the modified APK can be installed via
Источник
Configuring an Android Device to Work With Burp
To test web applications using an Android device you need to configure your Burp Proxy listener to accept connections on all network interfaces, and then connect both your device and your computer to the same wireless network. If you do not have an existing wireless network that is suitable, you can set up an ad-hoc wireless network.
Configure the Burp Proxy listener
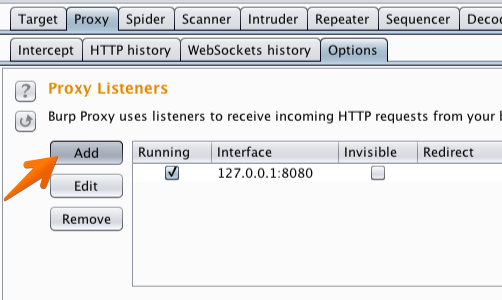
In Burp, go to the “Proxy” tab and then the “Options” tab.
In the “Proxy Listeners» section, click the “Add” button.

In the «Binding» tab, in the “Bind to port:” box, enter a port number that is not currently in use, e.g. “8082”.
Then select the “All interfaces” option, and click «OK».
Note: You could alternatively edit the existing default proxy listener to listen on all interfaces. However, using different listeners for desktop and mobile devices enables you to filter these in the Proxy history view.
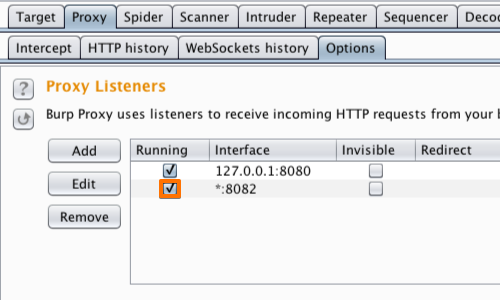
The Proxy listener should now be configured and running.
Configure your device to use the proxy
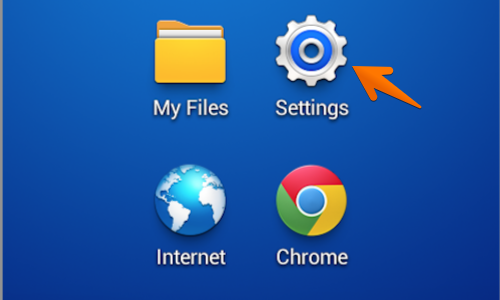
In your Android device, go to the“Settings” menu.
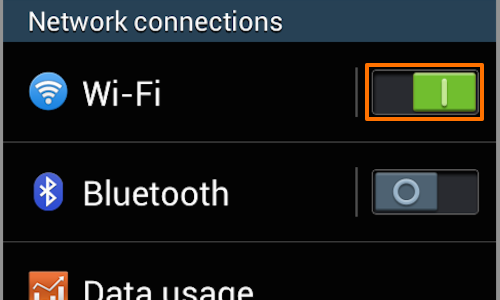
If your device is not already connected to the wireless network you are using, then switch the «Wi-Fi» button on, and tap the “Wi-Fi” button to access the «Wi-Fi» menu.
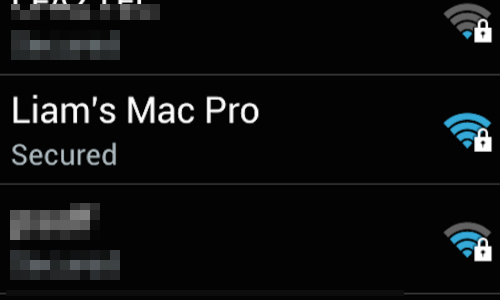
In the «Wi-Fi networks» table, find your network and tap it to bring up the connection menu.

If you have configured a password, enter it and continue.
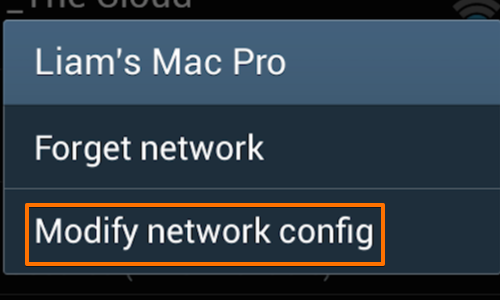
Once you are connected hold down on the network button to bring up the context menu.
Tap “Modify network config”.
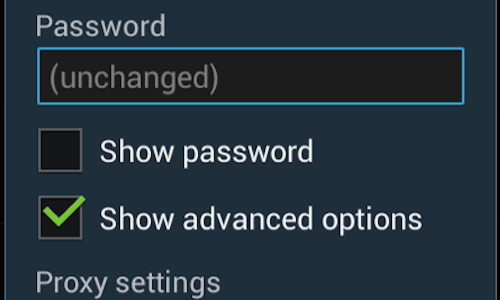
Ensure that the “Show advanced options” box is ticked.
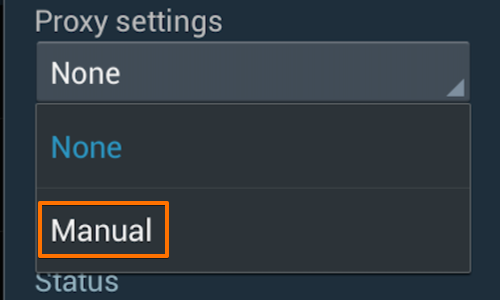
Change the “Proxy settings” to “Manual” by tapping the button.
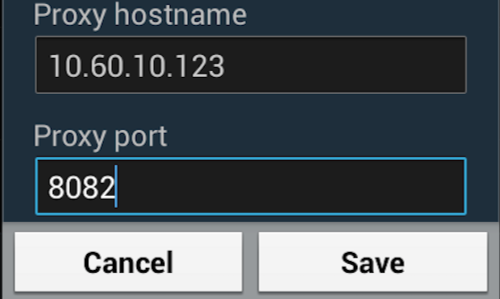
Then enter the IP of the computer running Burp into the “Proxy hostname”.
Enter the port number configured in the “Proxy Listeners” section earlier, in this example “8082”.
Test the configuration

In Burp, go to the «Proxy Intercept» tab, and ensure that intercept is “on” (if the button says “Intercept is off» then click it to toggle the interception status).
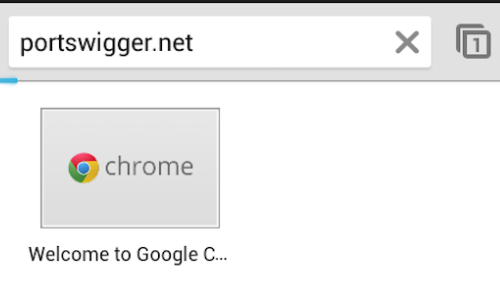
Open the browser on your Android device and go to an HTTP web page (you can visit an HTTPS web page when you have installed Burp’s CA Certificate in your Android device.)
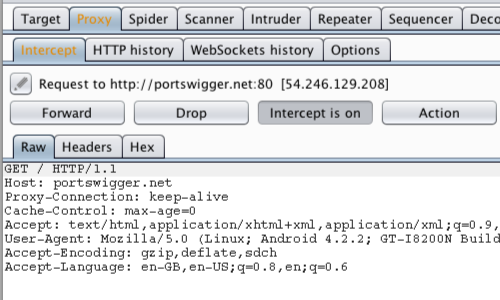
The request should be intercepted in Burp.
Note: On some Android emulators you will need to add the proxy details from the emulator settings menu rather than the native Network / Wifi settings on the emulated device.
Источник
Installing Burp’s CA Certificate in an Android Device
Before you start:
- Ensure you have configured your Android device to work with Burp.
- Ensure your Android device is able to receive email, and that your email filter does not block .cer files.
Note: Android Nougat no longer trusts user or admin supplied CA certificates. We recommend that you use an older version of Android for your testing. If you must use Android Nougat then you will need to install a trusted CA at the Android OS level on a rooted device or emulator.
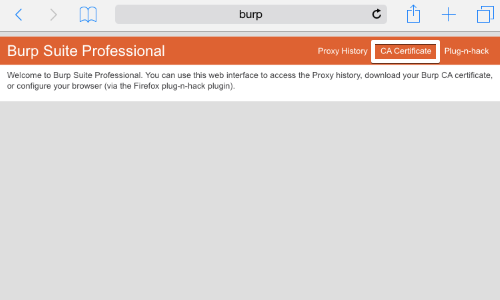
On your computer with Burp running, visit http://burpsuite and click the «CA Certificate» link. Save the certificate file on your computer.
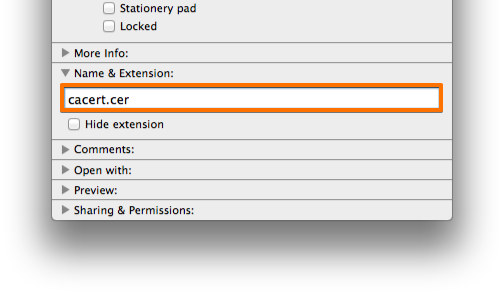
On your computer, rename the file with the .cer file extension, and send the file as an email attachment to an account that you can access from your Android device.
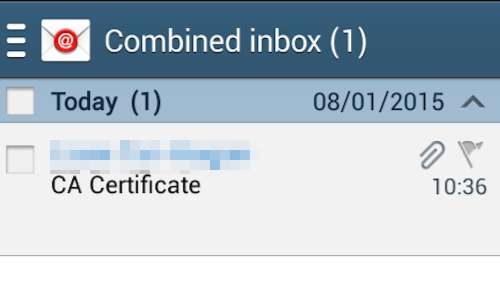
Check your email on the Android device.
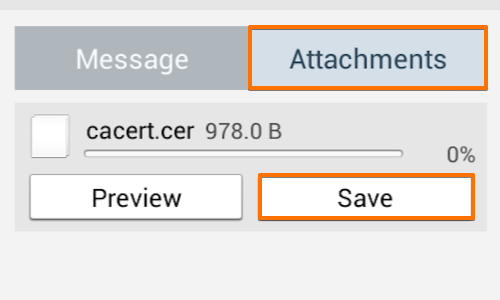
Open the email and tap the attachments button.
Then tap the save button. This should save the certificate file to your Android device’s “Download» folder.
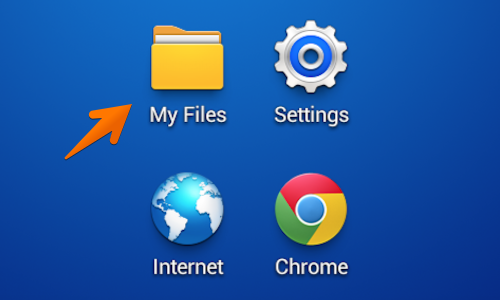
Find your “My Files” folder. This may be located in the “Apps” menu or on one of the device’s home screens.

In “My Files” tap the “All Files” folder.
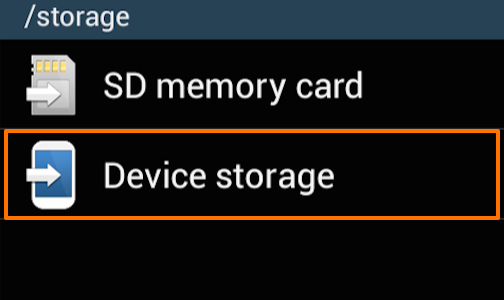
In the “All Files” folder tap “Device storage”.
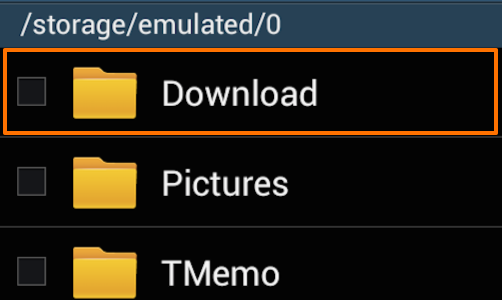
Open the “Download” folder and check that your certificate is correctly located in this folder.
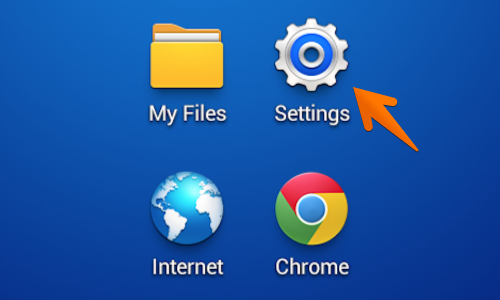
Next locate and tap the «Settings” icon. This may be located in the “Apps” menu or on one of the device’s home screens.
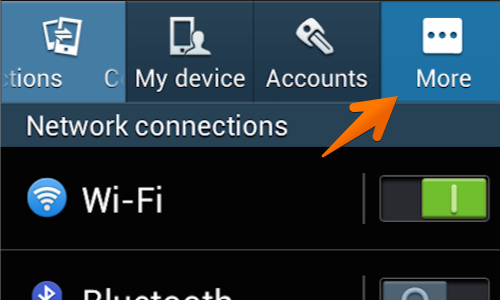
Tap the “More” button.
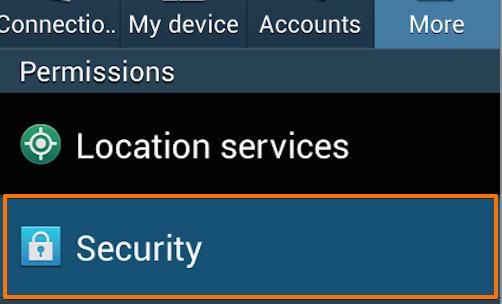
Beneath the “Permissions” header tap the “Security” button.
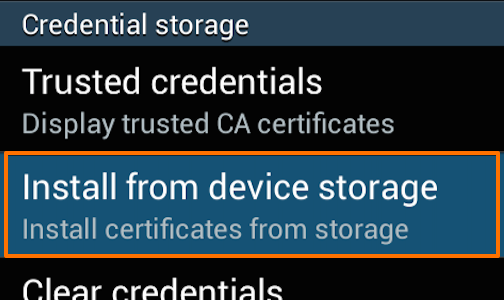
In the “Security” menu select the “Install from device storage” from beneath the «Credential storage» header.
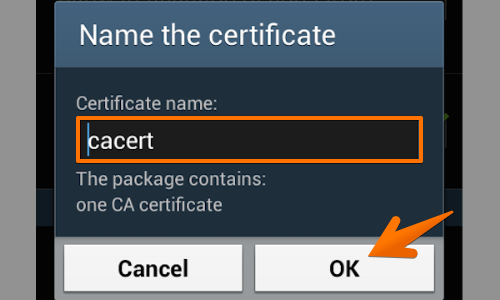
You will now be asked to “Name the certificate”, leave the certificate name as it is and tap “OK”.
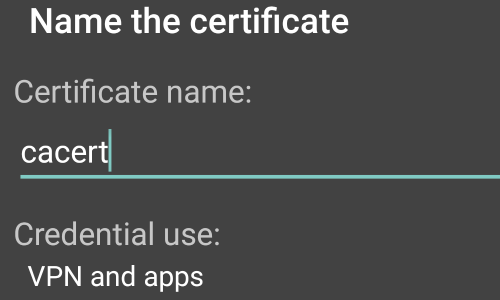
In some versions of Android, your device will ask if you want to use the certificate for «VPN and apps» or «WiFi».
In the «Credential use:» options, you should select «VPN and apps».

The phone will revert to the security menu and will inform you via a small pop up that the certificate is installed.
You can check the Certificate is installed by tapping the “Trusted credentials» button.
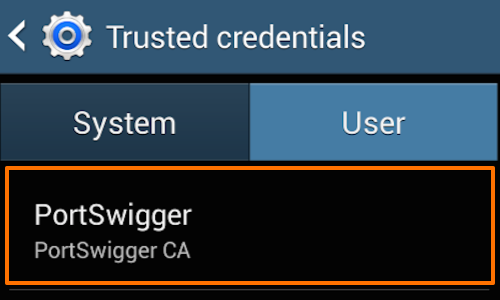
Tap the «User» tab in the “Trusted credentials” window to show the PortSwigger CA certificate.
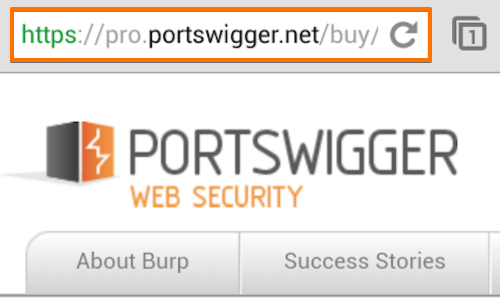
You should now be able to visit any HTTPS URL via Burp without any security warnings.
Note: It is also possible to import the Burp CA Certificate using a micro SD card. Ensure that you move the Burp CA Certificate from the micro SD card to the phones own storage before using the certificate install function in the “Security” menu.
This article is based on Android version 4.2.2 running on a Samsung mobile device.
Источник


