- 400+ Android & Flutter Code
- Monday, January 5, 2015
- How to display bold text in a TextView in android
- TextView bold text programmatically
- Button text bold android
- Attributes of Button in Android:
- Button Example In Android Studio:
- Как изменить текст на жирный в Android?
- Material Design Buttons in Android with Example
- Why MDC Buttons in Android?
- Approach
- Step 1: Create a New Project
- Step 2: Add Required Dependency
- Step 3: Change the Base application theme
400+ Android & Flutter Code
Example code for android + flutter app developers.
Monday, January 5, 2015
How to display bold text in a TextView in android
TextView widget display text on android app. we can render a TextView to display text as bold or italic both programmatically by java file and syntactically by xml layout file. we also can bold TextView text syntactically by using string ressource file. this first android app demonstrate us how can we render TextView text bold, italic, normal and even underlined by declarative syntax.
the android:textStyle attribute allow us to set the text style to normal, bold or italic. we can combine this style by separated them using keyboard pipe | symbol. so if we want to render TextView text as bold and italic then we need to set the android:textStyle attribute value as android:textStyle=»blod|italic». android:textStyle=»normal|italic» value display text as italic, android:textStyle=»bold» value display text only bold and android:textStyle=»normal» value define TextView text appearance as normal.
this is very interesting that we can render a TextView’s part of text as bold, italic or underlined by using string resource file. the string resource file allow us to declare a string resource which value contain html tags. so the final output show the stylish text on android app. strings.xml resource file exist under res/values folder.
in the following example code, we declare a string key value pair name stylish_text and its value. stylish_text key’s value contain html tags those make part of text bold, italic and underlined. in the xml layout file we can assign the string resource as android:text=»@string/stylish_text».


TextView bold text programmatically
the following android example app code demonstrate us how can we bold, italic or underline TextView text programmatically at run time in java file.
setTypeface() method allow us to set the typeface and style in which the text should be displayed in a widget. all Typeface families have not bold and italic variants. geTypeface() method allow us to get the current typeface and style in which the text is being displayed. we can define a TextView widget’s font and font variant by the setTypeface() method as setTypeface(Typeface.MONOSPACE, Typeface.BOLD_ITALIC). the setTypefce() method only render a TextView text to bold, italic and normal. it does not support underline text or any other formatting.
if we want to display bold and underlined text programmatically on an app, we need to take help the setText() method. to do this, we need to provide html tags with text as setText() method parameter. the setText() method render the html tags and display formatted text on application.
another way to render TextView text bold programmatically in java code by using style resource file. we can put a styles.xml file on res/values folder. then assign styles item and value to the style file. finally we can apply any style from this style file to the TextView by using the setTextAppearnce() method.
setTextAppearance() method allow us to set the text color, size, style, hint color etc from the specified TextAppearance resource.
Источник
Button text bold android
In Android, Button represents a push button. A Push buttons can be clicked, or pressed by the user to perform an action. There are different types of buttons used in android such as CompoundButton, ToggleButton, RadioButton.
 Button is a subclass of TextView class and compound button is the subclass of Button class. On a button we can perform different actions or events like click event, pressed event, touch event etc.
Android buttons are GUI components which are sensible to taps (clicks) by the user. When the user taps/clicks on button in an Android app, the app can respond to the click/tap. These buttons can be divided into two categories: the first is Buttons with text on, and second is buttons with an image on. A button with images on can contain both an image and a text. Android buttons with images on are also called ImageButton.
Button code in XML:
The below code will create Button and write “Abhi Android” text on it.
Table Of Contents
Attributes of Button in Android:
Now let’s we discuss some important attributes that helps us to configure a Button in your xml file (layout).
1. id: id is an attribute used to uniquely identify a text Button. Below is the example code in which we set the id of a Button.
2. gravity: The gravity attribute is an optional attribute which is used to control the alignment of the text like left, right, center, top, bottom, center_vertical, center_horizontal etc.
Below is the example code with explanation included in which we set the right and center vertical gravity for text of a Button.
3. text: text attribute is used to set the text in a Button. We can set the text in xml as well as in the java class.
Below is the example code with explanation included in which we set the text “Learning Android @ AbhiAndroid” in a Button.
Setting Text Using Java class:
Below is the example code in which we set the text on Button programmatically means in java class. The output will be same as the above.
4.textColor: textColor attribute is used to set the text color of a Button. Color value is in the form of “#argb”, “#rgb”, “#rrggbb”, or “#aarrggbb”.
Below is the example code with explanation included in which we set the red color for the displayed text of a Button.
Setting Text Color On Button Inside Java class:
Below is the example code in which we set the text color of a Button programmatically means in java class.
5. textSize: textSize attribute is used to set the size of the text on Button. We can set the text size in sp(scale independent pixel) or dp(density pixel).
Below is the example code in which we set the 25sp size for the text of a Button.
Setting textSize In Java class:
Below is the example code in which we set the text size of a Button programmatically means in java class.
6. textStyle: textStyle attribute is used to set the text style of a Button. The possible text styles are bold, italic and normal. If we need to use two or more styles for a Button then “|” operator is used for that.
Below is the example code with explanation included, in which we set the bold and italic text styles for text of a button.
7. background: background attribute is used to set the background of a Button. We can set a color or a drawable in the background of a Button.
Below is the example code in which we set the gren color for the background, Black color for the displayed text and set 15dp padding from all the side’s for Button.
Setting background in Button In Java class:
Below is the example code in which we set the background color of a Button programmatically means in java class.
8. padding: padding attribute is used to set the padding from left, right, top or bottom. In above example code of background we also set the 10dp padding from all the side’s of button.
9. drawableBottom: drawableBottom is the drawable to be drawn to the below of the text.
Below is the example code in which we set the icon to the below of the text.
Make sure you have image saved in your drawable folder name ic_launcher.
10. drawableTop, drawableRight And drawableLeft: Just like the above attribute we can draw drawable to the left, right or top of text.
In the Below example we set the icon to the right of the text. In the same way you can do for other two attribute by your own:
Button Example In Android Studio:
Below is the example of button in which we display two buttons with different background and whenever a user click on the button the text of the button will be displayed in a toast.
Step 1: Create a new project in Android Studio and name it ButtonExample.
Step 2: Now open res -> layout -> xml (or) activity_main.xml and add following code. Here we are designing the UI of two button in Relative Layout.
Step 3: Now Open app -> package -> MainActivity.java and the following code. Here using setOnClickListener() method on button and using Toast we will display which button is clicked by user.
Output:
Now start the AVD in Emulator and run the App. You will see two button. Click on any button and you will see the message on screen which button is clicked.
Источник
Как изменить текст на жирный в Android?
Как изменить настройки текста / шрифта в Android TextView ?
Например, как вы делаете текст жирным ?
Для этого в layout.xml файле:
Программно метод состоит в следующем:
Устанавливает шрифт и стиль, в котором должен отображаться текст. Обратите внимание, что не во всех Typeface семьях есть варианты, выделенные жирным шрифтом и курсивом, поэтому вам, возможно, придется использовать их, setTypeface(Typeface, int) чтобы получить тот вид, который вам действительно нужен.
Просто вы можете сделать следующее:
Установите атрибут в XML
Программно метод заключается в:
Надеюсь, это поможет вам поблагодарить вас.
Вы можете использовать только определенные шрифты sans , serif и monospace через XML, код Java может использовать пользовательские шрифты
Программно (код Java)
Для случая, когда вы используете пользовательские шрифты, но не имеете жирного шрифта для шрифта, который вы можете использовать:
Это очень просто
Если вы рисуете это, то это сделает это:
В идеальном мире вы бы задали атрибут стиля текста в своем определении XML макета следующим образом:
Существует простой способ динамического достижения того же результата в вашем коде с помощью setTypeface метода. Вам нужно передать и объект класса Typeface , который будет описывать стиль шрифта для этого TextView. Таким образом, чтобы достичь того же результата, что и в приведенном выше определении XML, вы можете сделать следующее:
Первая строка создаст объект в предопределенном стиле (в данном случае Typeface.BOLD , но есть еще много ). Когда у нас есть экземпляр гарнитуры, мы можем установить его в TextView. И это все, что наш контент будет отображаться в стиле, который мы определили.
Я надеюсь, что это вам очень поможет. Для более подробной информации вы можете посетить
Из XML вы можете установить TextStyle к жирному шрифту , как показано ниже
С программной точки зрения, вы можете установить TextView жирным шрифтом, как показано ниже
Определите новый стиль с нужным форматом в файле style.xml в папке значений
Затем примените этот стиль к TextView, написав следующий код со свойствами TextView.
Источник
Material Design Buttons in Android with Example
Material Design Components (MDC Android) offers designers and developers a way to implement Material Design in their Android application. Developed by a core team of engineers and UX designers at Google, these components enable a reliable development workflow to build beautiful and functional Android applications. If you like the way how the UI elements from Google Material Design Components for android which are designed by Google are pretty awesome, then here are some steps that need to be followed to get them, and one of them is Google Material Design Components (MDC) Buttons. A Button is a user interface that is used to perform some action when clicked or tapped. Under the Button category, there are mainly 4 types of buttons in Google material design components:
- Contained Button
- Outlined Button
- Text Button
- Toggle Button
Below is a demo for all types of Buttons that we are going to create in this project.

Why MDC Buttons in Android?
Before going to implement all types of Button let’s understand why choosing these material components over ordinary inbuilt components in android? Please refer to the following points to understand this.
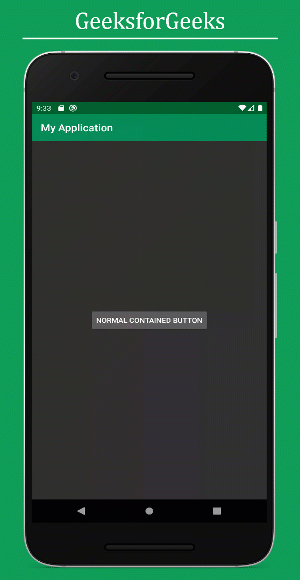
Normal Contained Button behavior under dark theme.
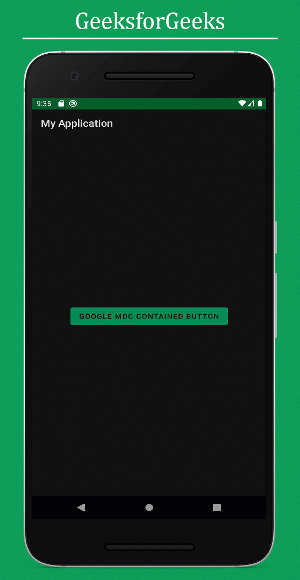
Google MDC button behavior under dark theme.
Approach
Step 1: Create a New Project
Step 2: Add Required Dependency
Include google material design components dependency in the build.gradle file. After adding the dependencies don’t forget to click on the “Sync Now” button present at the top right corner.
Note that while syncing your project you need to be connected to the network and make sure that you are adding the dependency to the app-level Gradle file as shown below.

Step 3: Change the Base application theme
Go to app -> src -> main -> res -> values -> styles.xml and change the base application theme. The MaterialComponents contains various action bar theme styles, one may invoke any of the MaterialComponents action bar theme styles, except AppCompat styles.
Why the theme needs to be changed:
Источник


