- Teleed.ru
- Блог Михаила Плюско по ремонту телефонов, планшетов, ноутбуков.
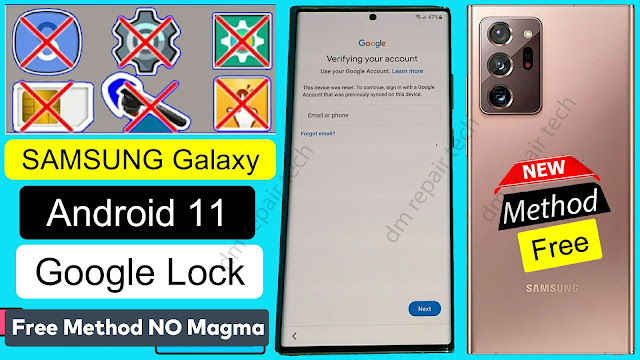
- FRP Samsung август 2021 года. 9/10/11 android. Новый метод.
- SAMSUNG Android 11 FRP Bypass 2021 NO Magma Tool — frp bypass dm
- How to Bypass FRP SAMSUNG Android 11
- How To Disable Factory Reset Protection
- Samsung Android 11 R FRP Bypass | Unlock Google Gmail lock Verification Latest 2021 Method Free (All Models)
- How To Disable Factory Reset Protection
- 2 Methods to Bypass frp Galaxy A21s Android 11, 10
- Method 1: Bypass FRP GALAXY A21s Android 11
- Required Tools:
- Let’s Start to Bypass FRP:
- Follow Steps in Other Samsung Device.
- Follow Steps in Galaxy A21s Device:
- Bypass FRP Galaxy A21s Through ADB Tool :
- Perform Factory Reset Task:
- Method 2: Bypass FRP Galaxy A21s [Android 10]
- Let’s Start the process to Bypass frp:
- Let’s Setup PIN:
Teleed.ru
Блог Михаила Плюско по ремонту телефонов, планшетов, ноутбуков.
FRP Samsung август 2021 года. 9/10/11 android. Новый метод.
Всем привет. Я очень хотел снять новую актуальную инструкцию по снятию блокировки FRP на всех современных прошивках от самсунга, но увы, как я сообщал ранее, я сильно приболел.
Инструкция не моя, это рерайт статьи многоуважаймого art930 с 4pda. Не поленитесь, перейдите по ссылке, и поставьте Артему + в карму. Спасибо ему огромное за его труд!
- Итак, находим и скачиваем в интернете программу All Samsung Tool V1 Frp 2020, или просто скачиваем ее в загрузках, в курилке моего телеграмм канала. Или так же, для этого можно использовать программу SamFirm, она в любом случае нам потом понадобится. (Кстати не забываем отключать антивирусы).
- Теперь берем в руки любой другой самсунг (желательно начиная с 9 андроида), на котором нет никаких блокировок. Вводим в него свой гугл аккаунт, и samsung аккаунт. Далее на этом втором телефоне переходим по ссылке и скачиваем Alliance Shield X. После установки открываем, внизу нажимаем «Пропустить», далее нажимаем «Регистр» и проходим регистрацию. АХТУНГ! Почта не должна содержать в себе никаких точек до собачки, в ином случае сайт вам выдаст ошибку. Также сайт категорически не принимает русскую почту («yandex.ru», «rambler.ru»). Можете даже не пытаться. Используем например gmail.com. После этого идём: Настройки > Учётные записи и архивация > Samsung Cloud. В программе выбираем «архивировать данные». Выполняем архивацию только приложений. Естественно архивацию данных делаем в тот самсунг аккаунт, который потом введете в заблокированном телефоне.
- Теперь берем заблокированный аппарат, и по аналогии с этим видеороликом, попадаем в магазин приложений samsung. Если программа пишет «Failed», то нужно во первых отключить обязательную проверку цифровой подписи драйверов, а если не поможет, то просто передергиваем вовремя кабель, как я показал в этой инструкции. Если Galaxy Store попросит обновление, значит нужно обновить и снова проделать этот этап.
- Мы с Вами попали в galaxy store, нам нужно установить лаунчер (Super S9 Launcher for Galaxy S9). И для его скачивания нужно войти в Samsung Account, в который вы загружали резервную копию ранее, на другом телефоне. Открываем установленный лаунчер и заходим в настройки устройства > Учётные записи и архивация > Samsung Cloud > Обновить. Ждём минуту-две. Открываем снова Samsung Cloud и выбираем «Восстановить данные». Далее снимаете галочку «Выбрать всё» и напротив графы «Приложения» нажать на стрелочку и выбрать только «Alliance Shield X». Нажимаете «Восстановить». Снова ждёте. После того, как все восстановится — возвращаемся в лаунчер. Открываем наш Alliance Shield X. Пролистываем до экрана входа, входим в аккаунт, который регистрировали из приложения. Далее выдаем программе права администратора (не путать с ROOT) и включаем Knox. В конце никаких импортов и экспортов не делаем. Просто жмём «Закончить».
- Теперь открываем «Менеджер», вверху Лупа. Ищем в Shield X программу «Service Mode». Открываем вкладку Активити и находим третий пункт с конца (смотрим фото)! Открываем его. Откроется окошко с выбором режима работы USB. Выбираем, не задумываясь, пункт «MTP + ADB».
- Теперь скачиваем и запускаем на ПК программу SamFirm. В SamFirm > Android Tools > ADB > Reset FRP. На устройстве ловите окошко с разрешением. После того, как выдадите разрешение смартфон ребутнется. Если после перезагрузки смартфон начало «штырить», то есть чёрный экран сменяется обоями, то нужно попробовать поймать шторку и открыть настройки. Далее «Приложения» > *Либо три точки > «Приложения по умолчанию», либо просто кнопка «Приложения по умолчанию»* > Главный экран > Главный экран One UI. Он может выкинуть снова на эту «красоту». Повторяем те же действия и у нас появится главный экран. Если всё же не вышло, то можно попробовать исправить ситуацию по-другому: зажимаем боковую клавишу > Экстренный режим > принимаем соглашения > *появляется окошко с информацией* Жмём «Включить». Далее также выходим из этого режима.


Это победа. Можно полноценно пользоваться телефоном. FRP снято. Если конкретно у Вас будут какие либо нюансы, опишите их пожалуйста в комментариях. СПАСИБО!
Повторюсь, инструкция не моя, это рерайт статьи многоуважаймого art930 с 4pda. Не поленитесь, перейдите по ссылке, и поставьте Артему + в карму. Спасибо ему огромное за его труд!
Источник
SAMSUNG Android 11 FRP Bypass 2021 NO Magma Tool — frp bypass dm
How to Bypass FRP SAMSUNG Android 11
Google has added a security feature (FRP = Factory Reset Protection) to all Android devices. After factory reset process completed, FRP will ask you to verify your account this device was reset, To continue, sign in with a Google account that you was before signed on this phone. This feature is very important and will that have a security to avoid misuse of the device during as theft or lost your Device. Occasionally, at the same time, The users get into trouble when they intentionally forget their Google Account or password credentials after a hard reset.. So, in this tutorial, we have come up with the latest method of Bypass FRP Samsung Android 11. If you follow some simple way you can unlock Google Lock.
All Samsung Android 11 Now strongly secure by FRP. After factory hard reset done your phones are you looking for remove google account lock Samsung Android 11 . So unlocking it will not be a difficult task for you if you follow the Our correct procedure method, if you can remember your Gmail account, you can easily bypass your Samsung Galaxy Android 11 FRP Google account, but if you forget your Gmail account to bypass FRP It will be a bit difficult.
How To Disable Factory Reset Protection
If you want to Remove the FRP lock feature from your Samsung phone then you need to delete the Gmail Account from the device Settings. follow the below how to disable the Factory Reset Protection successfully: go to the settings menu=>> Accounts=>> select the Gmail id =>> remove account =>> that’s it.
Источник
Samsung Android 11 R FRP Bypass | Unlock Google Gmail lock Verification Latest 2021 Method Free (All Models)

FRP is an inbuilt data protection feature for all present-day Android smartphones, It protects phones from unauthorized access. After performing a factory reset, If you forget the last active Gmail account which was used on your phone, then, you have to find a solution to unlock your phone. Here, more especially, I shared a detailed process to Samsung Android 11 R FRP Bypass | Unlock Google Gmail lock Verification Latest 2021 Method Free (All Models) successfully. So, follow the below process carefully.
Google provides the new FRP feature on Android Lollipop, Marshmallow, Nougat, Pie, Oreo, 10 Q, and 11 versions. The summarization of factory reset protection is FRP and it basically protects Android users’ personal data and Privacy during thefts. The process of unlocking FRP security has different with every new Android version and phone. So, always remember the Gmail account information to avoid FRP protection lock.
The FRP turns On automatically when you have setup a Google Account on your Samsung Phone. After Reset your phone without removing the Google Account, you have to log in with the same Google ID and password that you set up earlier on the device to bypass Google account verification lock on your Samsung Android 11 R.
In case, your device stuck at the FRP lock verification screen and you have forgotten the account information, Then these simple step-by-step instructions will help you to bypass google account lock from your device.
The Samsung Android 11 R FRP Unlock process has become very challenging, if this process not working then you can use any compatible FRP bypass tool apk & FRP APK according to your phone to unlock FRP. Here, I share the latest FRP Bypass process to eliminate FRP lock from your device.
How To Disable Factory Reset Protection
If you want to disable the FRP lock feature from your Samsung phone then you need to delete the Gmail Account from the device Settings. follow the below process completely to disable the Factory Reset Protection successfully: go to the settings menu=>> Accounts=>> select the Gmail id =>> remove account =>> that’s it.
Bypass FRP Files not responsible for any damage on your device please try this at your own risk.
Источник
2 Methods to Bypass frp Galaxy A21s Android 11, 10
Through these 2 methods, you will be able to Bypass frp Galaxy A21s (Android 11, 10), both methods are available here, just check your device android version, and then follow any one method, if you don’t aware of your device android version, so you can try both method.
| Method 1: Remove FRP Samsung A21s [Android 11] |
| Method 2: Remove FRP Samsung A21s [Android 10] |
Method 1: Bypass FRP GALAXY A21s Android 11
To Bypass FRP GALAXY A21s Android 11, we will use Samsung account, and will backup few apps in through a (Alliance Shielx X) app, so with this method, you can easily remove frp from Galaxy A21s device without any problem, just follow steps from here.
Warning: This process is only for device owner and for educational purpose only, through this process, your device will remain safe, no damage will be done.
Required Tools:
Arrange below tools before starting this method, you are required one more android device to accomplish this process, otherwise you won’t be able to remove frp.
1/ WiFi Connection
3/ Samsung USB Driver [Download]
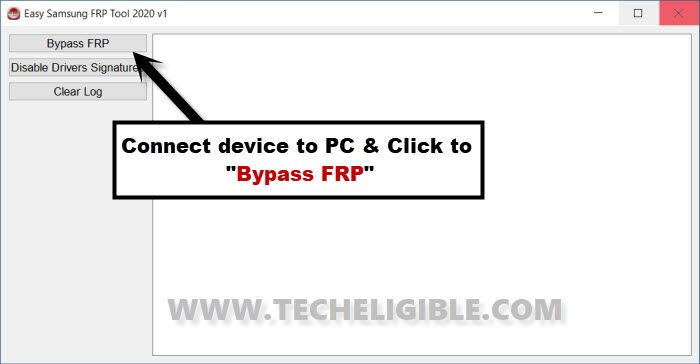
4/ Easy Samsung FRP Tools [Download]
5/ Any Other Android Device.
Let’s Start to Bypass FRP:
-Open “Easy Samsung FRP Tools” in PC.
-Turn on phone, connect WiFi, and Connect phone with PC.
-From the PC tool, Tap to > Bypass FRP > OK.
Note: In case, if the device is detected by PC, then install Samsung USB Driver, and then restart PC, after that open (Easy Samsung FRP Tools), and tap to “Disable Drivers Signature” button, and after that connect phone with PC, and then tap to “Bypass FRP” button, we hope this time your device will be detected.
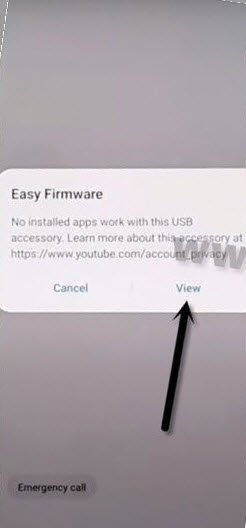
-You will receive a popup box of (Easy Firmware), tap to “View”.
–From the Chrome screen, tap to > Accept & Continue > Next > No Thanks.
-Once you accessed inside the browser, just search there “Samsung Galaxy Store”.
-From the searched result. tap to (Galaxy Store | Apps & Reviews | Samsung PK).
-Tap to > Agree > Update.
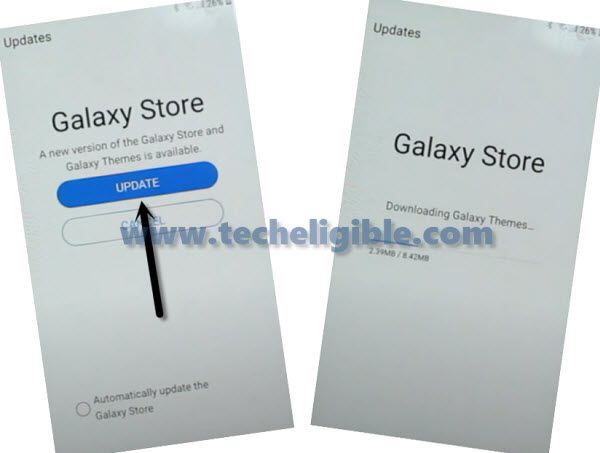
-Once the updating process completes, again hit on “TRY NOW” button.
-Search and Go to “S9 Launcher” app in galaxy store.
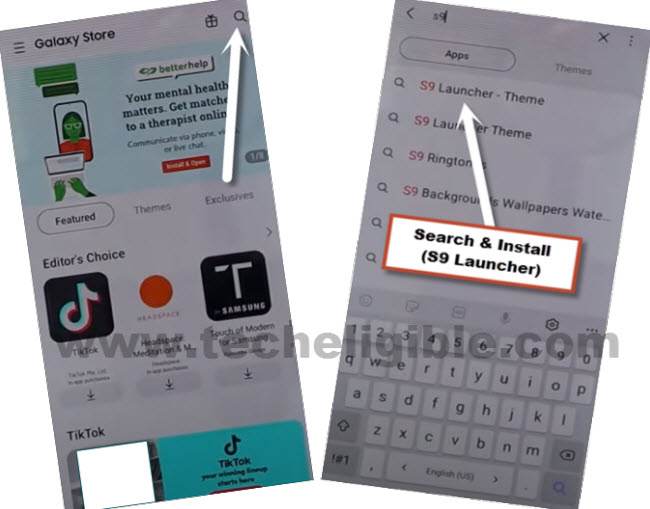
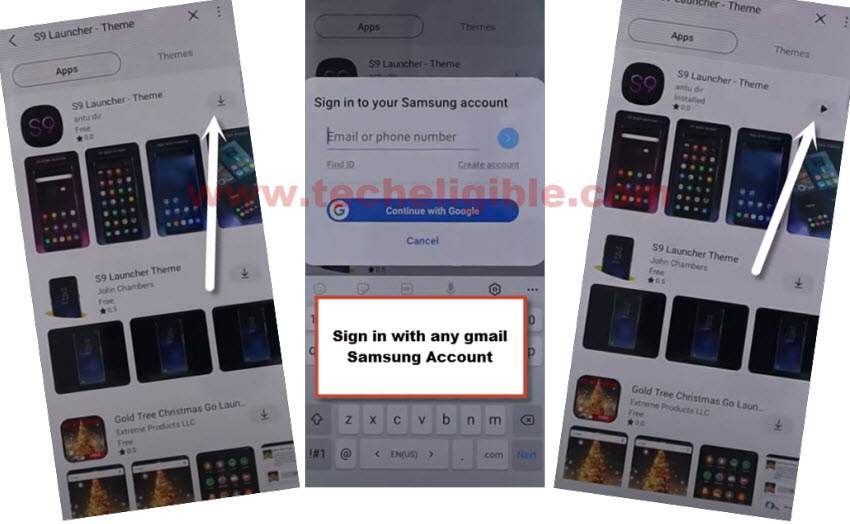
-Install & Open “S9 Launcher – Theme” app.
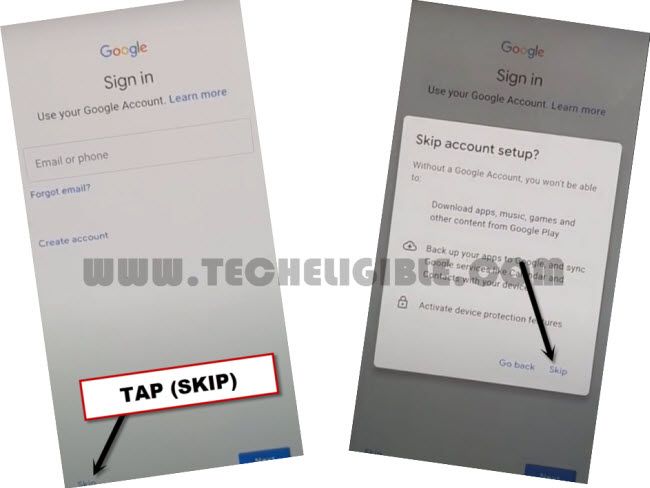
Note: Before the installation starts, you will have to sign in with your Gmail Account.
-Now you have accessed to your device home-screen.
Follow Steps in Other Samsung Device.
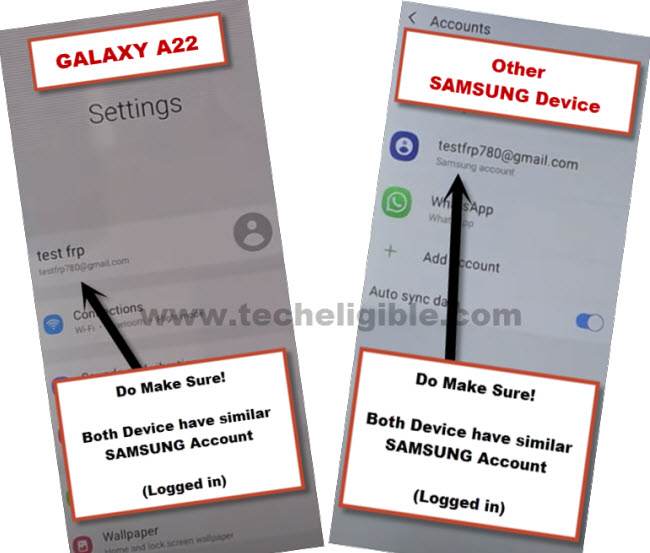
-From the other Samsung device, Go to > Settings > Accounts & Backup > Accounts.
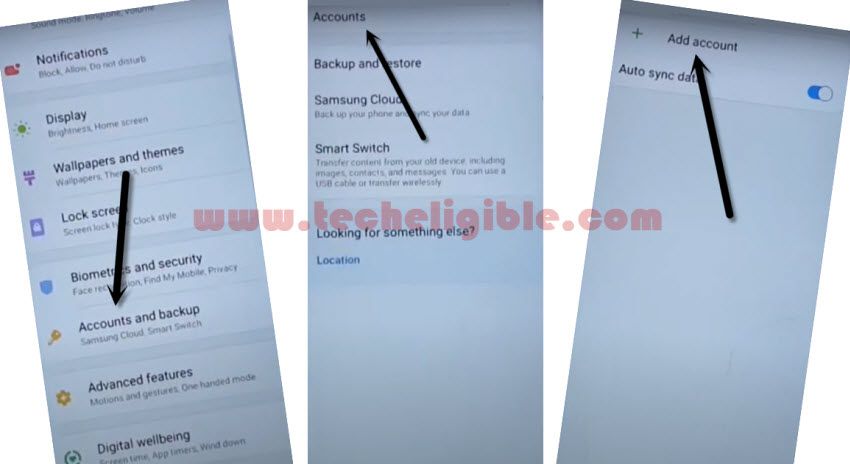
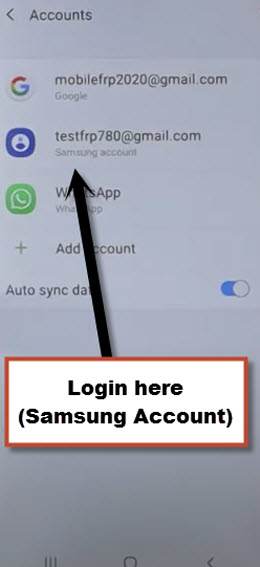
-Add your Same (Samsung Account) which you have already added in your Galaxy A21s.
Note: Make sure, your both android devices are on same WiFi network and on Same Samsung Account.
-Open “Play Store” in other android Samsung device.
-Afterwards, install & open “Alliance Shield X” by following below image.

-Hit on > Settings > Accounts and Backup > Backup And Restore > Back up data.
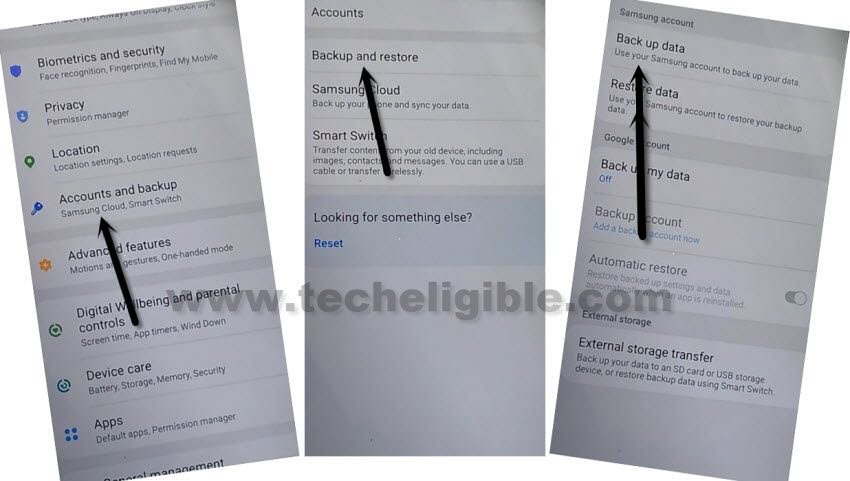
-Now we will backup all apps in our Samsung Account, so tap on “Back Up” button.
Follow Steps in Galaxy A21s Device:
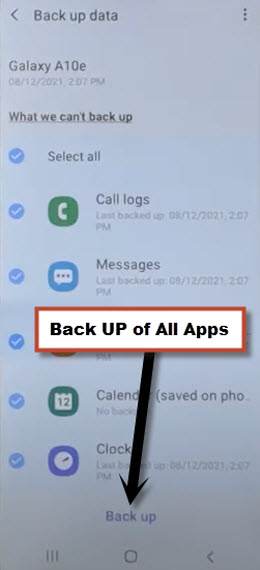
-In Samsung Galaxy A21s (frp Locked) device, we will restore all data.
-First of all, make sure your Galaxy A21s is successfully signed in with the same Samsung Account, that has already been added in other Samsung device.
-To check that, just go to “Settings”, and there at the top, you will see your signed in Samsung account detail in galaxy A21s.
-From (Settings), just go to > Accounts & Backup > Restore Data > Update.
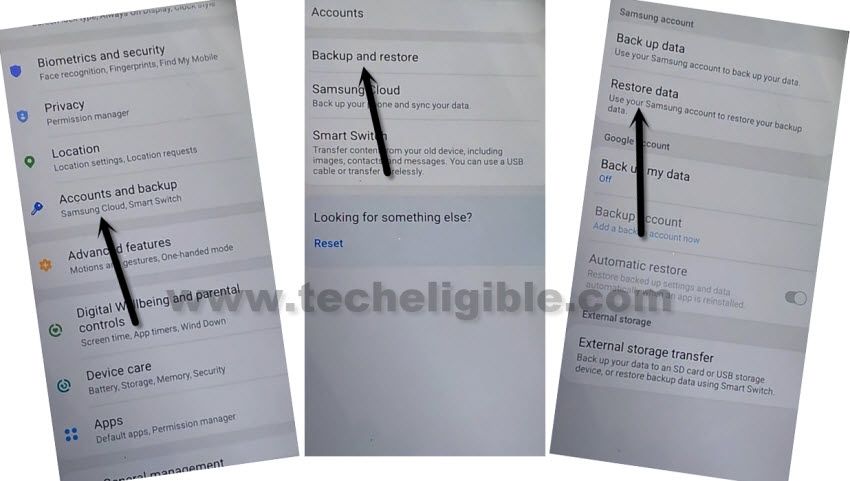
-Again hit on > Restore Data > Select all apps > Restore > Install, now wait until restoring data process completes.
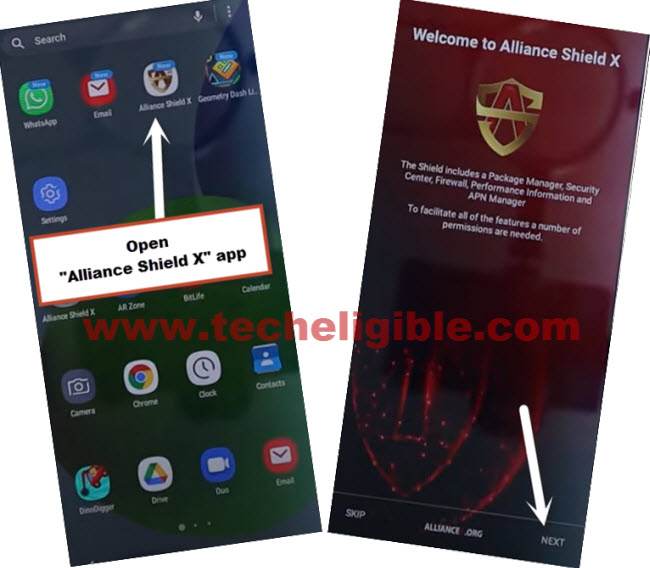
-Go to > MENU > Alliance Shield X.
-From the (Alliance Shield X) app, tap to > Next > Next > Next > Got it.
-Register your new account in (Alliance Shield X) .
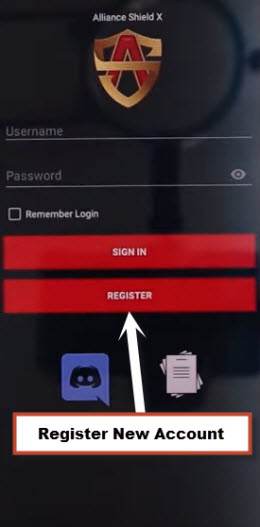
-Sign-in with your registered account in (Alliance Shield X) app.
-Type any “Device Name”, and then tap to “Next”.
-Turn on “Device Admin”, and hit on > Activate > Next.
-Turn on “Knox”, and select option (i have read and agree…), and tap to > Confirm > Next > Finish.
-Tap on “App Manager”, and tap to “Close” from popup box.
-Hit on “Search icon” from top corner, and search there “Mode”, and tap to “Service Mode”.
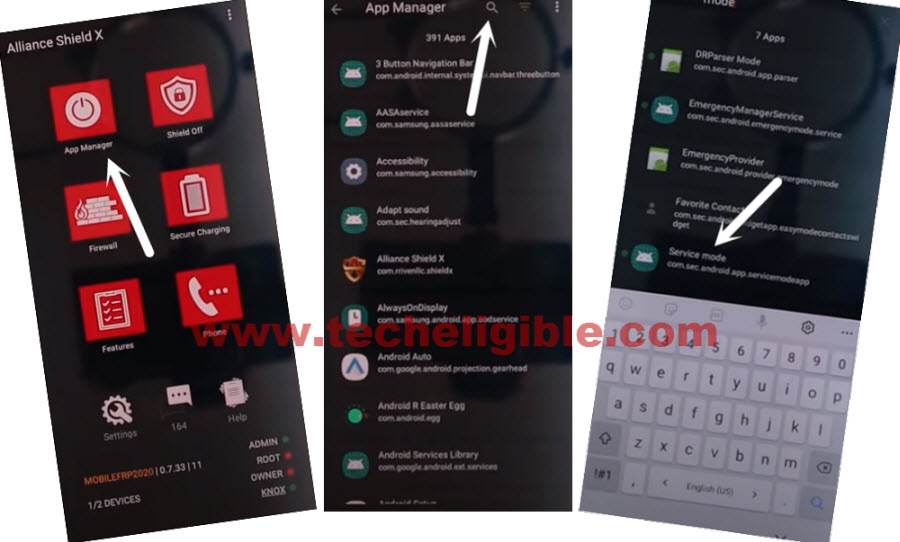
-Tap to “Activities”
-Go all the way down, and tap on option (com.sec.android.app.modemui.activities.usb.settings).
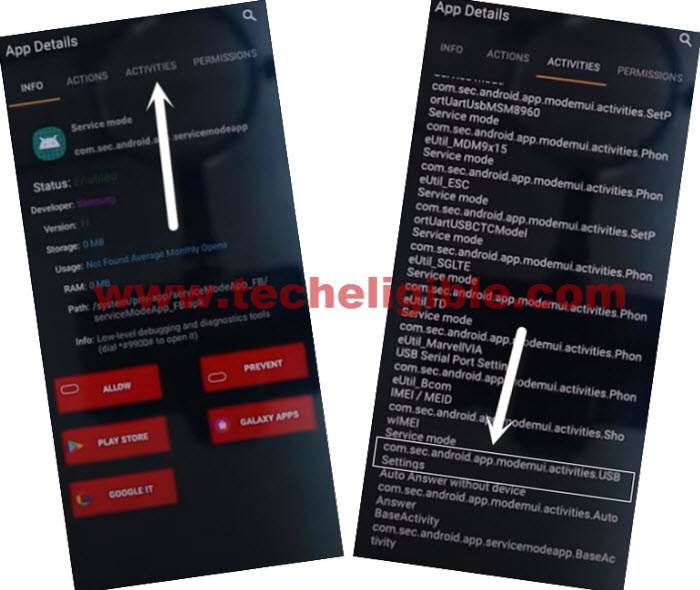
-Tap again on (com.sec.android.app.modemui.activities.usb.settings), and again hit on “OPEN”, and then select (DM+MODEM+ADB).
Bypass FRP Galaxy A21s Through ADB Tool :
-Download & Open (Samsung FRP ADB) tool in your PC
⇒ FRP-BYPASS-ADB Tool [DOWNLOAD]
-Connect Galaxy A21s to the PC using a USB Cable.
-Extract & Open “FRP Bypass ADB Tool” in PC
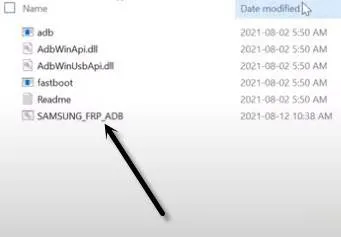
-This tool will start automatically, and will bypass frp Galaxy A21s in few seconds, wait until this process finishes.
Note: In your Samsung Device, you will have a popup widow, just tap to > Allow > Allow, afterwards, the ADB Tool will detect your device and will start bypassing frp lock.

-Now the device will be restart automatically.
-Select the (Setup Wizard) icon, and boom, you are in your device HOME SCREEN.
Perform Factory Reset Task:
-Go to > Settings > General Management > Reset > Factory Data Reset > Reset > Delete All.
-Enter your “Samsung Account Password”, and hit on “OK” option.
-The will restart automatically to be factory reset, and afterwards, you can easily access to your device just by completing setup wizard.
Method 2: Bypass FRP Galaxy A21s [Android 10]
This is the best and working method for Bypass frp Galaxy A21s android 10 without PC, and frp tools, only you have to turn on pin windows, and then setup your any desire 4 digits pin code to bypass google account.
Factory reset protection (frp) is is very good feature for keeping your data secure on stolen phone, but problem is that, if you forgot your own gmail account, then your phone will not be accessible until you enter your already signed google account, so just to help you in this situation, we are going to show you method, that how you can get your device back.
Let’s Start the process to Bypass frp:
-Turn on Phone & Connect Wifi.
-Go back to the first “Let’s Go” screen.
-Now tap on “ Next Arrow ” button, and then check mark the option “ i have read and agree all of the above “, and then tap to “ Next “.
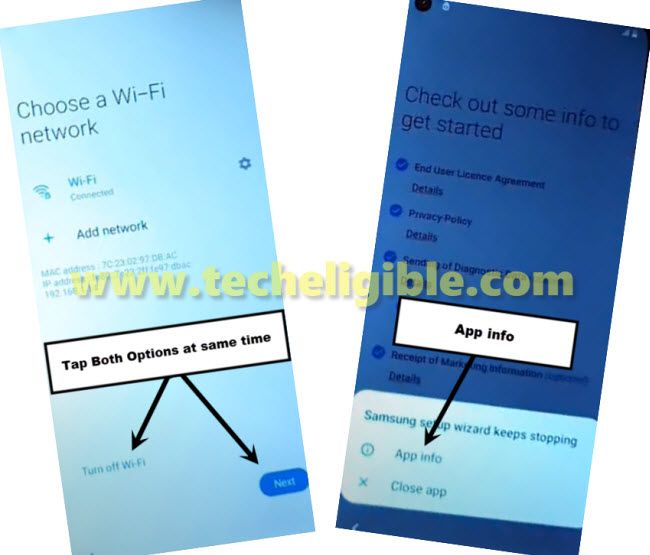
-You will have a screen of “Connect to a WiFi Network” same as shown in below image.
Note: We have to tap two options at same to get the popup window of “Samsung setup wizard keeps stopping”, but you will not be able to get popup window at first attempt, you will have to try 4-5 times or even more, but you will get that popup window. so lets do that.
-Tap two options at the same time using our two fingers together.
-Tap both options at very same time “ Turn off WiFi ” & “ Next “.
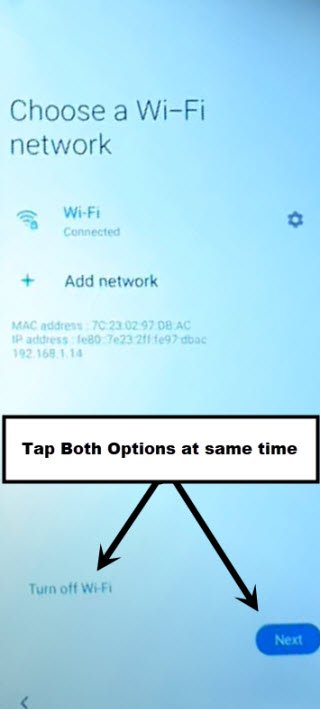
-If you fail, don’t worry, try again by turning on wifi again, and then do try by hitting both option at same time, you may fail at 5-6 attempts, but this will work after few attempts, and you will be to get popup window “Samsung setup wizard keeps stopping”.
-Once you got the popup window successfully, just hit on “ App info ” (See Below image).
-From there, Tap on “ Permission “, and then tap “ search icon ” from top right corner.
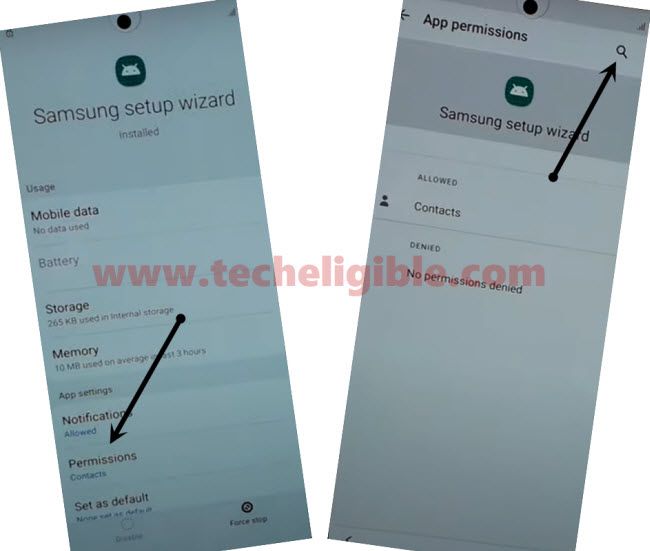
-There you will have a search box top of the screen, just type there “ Pin Windows “, and then tap on “ Pin Windows ” from searched result.
Let’s Setup PIN:
-To Bypass frp Galaxy A21s, we are going to setup any 4 digits pin code, this will help us to bypass frp while completing setup wizard or initial setup.
-Tap on “ Use screen lock type to unpin “, and then select “ PIN “.
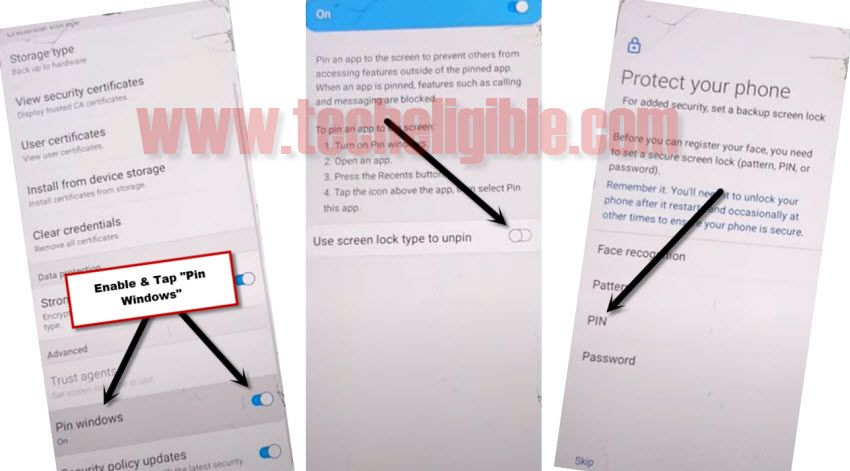
-Now setup your 4 digit pin code “1234”, and then tap on “OK”.
-Now you are all done to Bypass frp Galaxy A21s.
-You will be asked to enter pin code, just give same pin code that we have already setup.
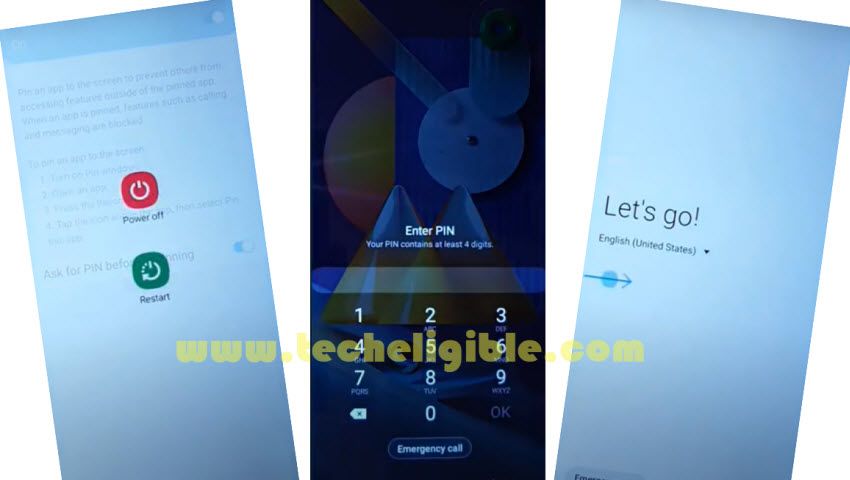
-Now you will be able to skip the “verify your google account” screen.
Related Frp Tutorials:
Источник


