- Способы обхода аккаунта Google FRP после сброса
- Способы обхода аккаунта Google FRP после сброса
- Небольшая предыстория
- Способы обхода аккаунта Google после сброса
- Официальный сброс/обход FRP
- Чтобы полностью отключить Factory Reset Protection/FRP
- Обход Factory Reset Protection/FRP или как обойти Гугл Аккаунт?(Неофициально)
- Вариант 1 обхода аккаунта Google после сброса
- Вариант 2 обхода аккаунта Google после сброса
- Вариант 3 обхода аккаунта Google после сброса
- Вариант 4 обхода аккаунта Google после сброса
- Вариант 5 обхода аккаунта Google после сброса
- Вариант 6 обхода аккаунта Google после сброса для устройств с чипом MTK (Mediatek)
- Вариант 7 обхода аккаунта Google после сброса
- Вариант 8 обхода аккаунта Google после сброса
- Вариант 9 обхода аккаунта Google после сброса
- Вариант 10 обхода аккаунта Google после сброса
- Вариант 11 сброс FRP. Для Xiaomi
- How to Bypass Google Account Verification FRP 2021
- What’s Google Account Verification and how it works?
- How to bypass Google account verification for Samsung phones
- How to bypass Google account verification for LG phones
- How to bypass Google account verification for HTC phones
- How to bypass Google account verification for ZTE phones
- How to bypass Google account verification for Alcatel phones
- Download FRP bypass apk
- How to solve special issues and situations which can occur during the bypassing process
- How to disable Factory Reset Protection on Android
- How to bypass Google account verification for Samsung phones
- FRP Bypass for Samsung instructions
- How to bypass Google account verification for LG phones
- FRP bypass for LG instructions
- How to bypass Google account verification for HTC phones
- FRP bypass for HTC instructions
- How to bypass Google account verification for ZTE
- FRP bypass for ZTE instructions
- How to bypass Google account verification for Alcatel
- FRP bypass for Alcatel instructions
- Download FRP bypass apk
- How to solve special issues and situations which can occur during the bypassing process
- Wrap-up
Способы обхода аккаунта Google FRP после сброса
вкл. 30 Апрель 2019 . Опубликовано в Android — Общее
Компания Google активно повышает безопасность ОС Android и внедряет такую «антиугонную» защиту как привязка устройства к аккаунту Google. В данной статье разбираемся как выполнить обход аккаунта Google после сброса.
Способы обхода аккаунта Google FRP после сброса
Содержание — Способы обхода аккаунта Google FRP после сброса:
Небольшая предыстория
Google с каждым новым выходом Android пытается поднять уровень безопасности данной мобильной операционной системы и внедряет все новые механизмы защиты.
Так с версии Android 5.1 Lollipop был добавлен новый механизм от краж, суть которого заключается в следующем: владелец смартфона или планшета после покупки привязывает данное устройство к себе когда вводит свой аккаунт Google, если девайс будет украден и злоумышленник сотрет все данные, то нарвется на защиту Google Device Protection под названием Factory Reset Protection или FRP.
Но не все пошло так гладко как хотелось, если вы купили телефон с рук или забыли свой аккаунт и выполнили сброс, то естественно вы нарываетесь на защиту FRP.
Способы обхода аккаунта Google после сброса
Есть рассматривать глобально, то существует два варианта сброса защиты:
- Официальный
- Неофициальный (обход Factory Reset Protection)
Давайте сначала рассмотрим официальный вариант сброса FRP или как не попасть в данную проблему при сбросе, а после рассмотрим все способы обхода Factory Reset Protection.
Официальный сброс/обход FRP
1. Ввести логин и пароль от учетной записи Google которая была до сброса, если устройство куплено с рук, то попросить данную информацию
2. С компьютера перейти в настройки аккаунт Google и отвязать Android устройство
3. При наличии чеков и гарантийных талонов обратиться в сервисный центр
4. При замене ключевых модулей или системной платы смартфона или планшета
Чтобы полностью отключить Factory Reset Protection/FRP
1. Для того чтобы отключить защиту после сброса (Factory Reset Protection / FRP) вам будет необходимо перед непосредственным сбросом зайти в «Настройки» Android -> «Аккаунты/Учетные записи» и удалить учетную запись Google.
2. Активировать « Режим Разработчика/(Отладка по USB) » и включить «Разблокировку OEM».
Если после сброса Andoid не принимает пароль
Если вы после сброса настроек Android пытаетесь ввести аккаунт Google, но пройти дальше не получается, то скорей всего вы не так давно сбрасывали пароль, если это так, то подождите 24-72 часа, после чего повторите попытки.
Обход Factory Reset Protection/FRP или как обойти Гугл Аккаунт?(Неофициально)
Ниже будет предложено множество методов как неофициально обойти защиту FRP, вам остается только испытать каждый, чтобы получить в итоге рабочий Android.
Вариант 1 обхода аккаунта Google после сброса
- Вставить Sim-карту в устройство на котором нужно удалить аккаунт Google
- Позвонить на данный Android девайс
- Принять вызов и нажмите кнопку добавить новый вызов
- В номеронабиратели написать любые цифры и «Добавить номер в существующий аккаунт»
- Ввести данные вашего аккаунта Google
- Сохранить контакт в вашем аккаунте
- Перезагрузить Android
Вариант 2 обхода аккаунта Google после сброса
- Вставить sim-карту в заблокированный Android
- Позвонить на данное устройство
- Принять вызов и создать/добавить новый звонок
- В номеронабиратели набираем следующий инженерный код *#*#4636#*#*
- После набора ваш Android должен автоматически перебросить в расширенное меню настроек
- Нажимаем кнопку назад и оказываемся в меню настроек
- Переходим в раздел «Восстановление и сброс» или «Архивация и Восстановление«
- Отключаем «Резервирование данных» и все что связанно восстановлением данных
- Выполняем сброс настроек
- При первоначальной настройке устройства вводим свой аккунт
Вариант 3 обхода аккаунта Google после сброса
Если ваше устройство Android поддерживает Fastboot, то можно попробовать выполнить сброс FRP через него.
Для этого вам понадобиться:
После чего можно ввести следующие команды:
fastboot oem clean_frp
или выполнить такую команду
fastboot erase persistent
fastboot erase frp
fastboot erase config
Вариант 4 обхода аккаунта Google после сброса
После сброса вам необходимо попытаться войти меню настроек после чего вам понадобиться:
- Компьютер
- Установленные драйвера Android
- Скачать ADB RUN на устройство
- Подключить Android к компьютеру и запустить ADB RUN
После чего ввести следующие команды:
adb shell content insert —uri content://settings/secure —bind name:s:user_setup_complete —bind value:s:1
adb shell am start -n com.google.android.gsf.login/
adb shell am start -n com.google.android.gsf.login.LoginActivity
Вариант 5 обхода аккаунта Google после сброса
- Проходим по меню первоначальной настройки устройства и подключаемся к Wi-Fi сети
- Вводим e-mail и пробуем его выделить, появиться сообщение «Отправить /Поделиться», выбираем данный пункт
- Открываем через приложение SMS
- В поле кому вводим номер 112 и в теле письма пишем вновь какой-то текст и отправляем
- Появиться уведомление, что SMS не было доставлено, выбираем данное сообщение
- В вверху будет кнопка «Вызов«, нажимаем на нее
- В номернобиратели стираем номер 112 и вводим *#*#4636#*#*
- Откроется меню для тестирования устройства, нажимаем на каждый пункт, один них переадресует вас в Настройки Android
- В настройках переходим в раздел «Сброс и Восстановление» и делаем полный сброс
Вариант 6 обхода аккаунта Google после сброса для устройств с чипом MTK (Mediatek)
Для данного способа вам понадобиться официальная прошивка для установки с помощью компьютера. В данной прошивки должен находиться scatter.txt файл.
1. Скачайте и установите драйвера на компьютер
2. Установите программу Notepad ++ на компьютер
3. В папке с прошивкой найдите файл scatter.txt и откройте его через программу Notepad ++
4. Найдите в текстовом файле «frp» partition b и далее скопируйте значение поля linear_start_addr и partition_size
Закройте scatter.txt файл
5. Запустите программу для прошивки SP Flash Tool и в поле «Scatter-loading file» указываем путь к файлу scatter.txt
6. Переключитесь к вкладке Format в SP Flash Tool и укажите
- Ручное форматирование — «Manual Format Flash»
- Region «EMMC_USER»
- В Begin Adress [HEX] значения linear_start_addr
- В Format Length[HEX] значения partition_size
7. После чего подключите смартфон к компьютеру и нажмите кнопку Start, чтобы стереть значения раздела FRP
Вариант 7 обхода аккаунта Google после сброса
- Устанавливаем Sim-карту, включаем Android и добираемся до ввода Google акаунта
- С другого телефона звоним на установленную Sim в заблокированом Android, принимаем звонок, удерживаем центральную клавишу до появления Google Now, завершаем вызов с другого уcтройтсва
- Нажимаем на кнопку Назад, в строке поиска вводим слово «настройки» и переходим к ним
- Далее перемещаемся в раздел «восстановление и сброс» и отключаем все галочки и выполняем сброс настроек Android
Вариант 8 обхода аккаунта Google после сброса
1. Извлекаем Sim карту
2. Включаем телефон, выбираем язык, пропускаем окно с SIM
3. В окне где необходимо ввести Email
4. Зажимаем кнопку @ (Google KeyBoard) и выбираем настройки
5. Далее нажимаем кнопку «Показать запущенные приложения » и в строке поиска Google пишем «настройки»
6. Выбираем приложение настройки
7. В настройках выбрать раздел «Восстановление и сброс» и выполнить сброс
Вариант 9 обхода аккаунта Google после сброса
Для данного способа вам необходимо иметь:
- Возможность установить SD карту
- установленное TWRP Recovery
- Скачать и сбросить файл FRP-False.zip на карту памяти
После чего перевести Android в режим Recovery и прошить файл FRP-False.zip.
Вариант 10 обхода аккаунта Google после сброса
- Подключаемся к Wi-FI
- Когда начнется проверка сети возвращаемся назад
- Выбираем другую Wi-FI сеть, без разницы какую
- В поле для ввода пароля набираем абсолютно любые символы, после чего их выделяем, и нажимаем на три точки (доп. меню) и «Показывать подсказки»
- В Google пишем «НАСТРОЙКИ» и открываем настройки телефона
- Далее выбираем «Восстановление и сброс» -> «Сброс лицензий DRM»
- Возвращаемся к подключению Wi-Fi, конектимся и вводим новый аккаунт
Вариант 11 сброс FRP. Для Xiaomi
- Выбираем язык
- Выберите регион (страна проживания)
- Подключитесь по Wi-Fi к интернет
- Вернитесь в самое начало с помощью клавиши назад
- Держите на странице приветствия 2мя пальцами, по ка не вкл. TalkBack
- Нарисуйте на экране букву L
- Выберите настройки TalkBack
- Зажмите одновременно клавиши громкости и отключаем TalkBack
- Листайте в самый низ и выберите «Справка Отзыв»
- Запустите видео ролик и перейдите на YouTube (при переходе нажать три точки)
- Находим видео, где есть ссылка в описание
- Жмем на ссылку и далее три точки, запускаем Chrome
- Входим в Chrome, вход в аккаунт пропустить
- Набираем в поиске «quickshortcutmaker«
- Скачайте найденное приложение
- Начните устанавливать приложение > Разрешите устанавливать приложения
- Снова загрузите приложение и установите его
- Запустите приложение
- Включите голосовой поиск и найдите «Настройки»
- Выберите просмотреть
- Перейдите в настройках в меню «О телефоне»
- Нажмите быстро семь раз на пункт «Версия Miui» 7 раз
- Вернитесь назад
- Перейдите в «Расширенные настройки» > «Для Разработчика»
- Выберите пункт «заводская разблокировка»
- Вернитесь назад
- меню «Восстановление и сброс» и выполните сброс
Источник
How to Bypass Google Account Verification FRP 2021
Along with the Android Lollipop 5.1 update, Google has introduced a new security feature designed to render the phone unavailable for usage in the unfortunate event when it might get stolen or lost, therefore protecting all the important data on it. However, this feature, despite being very useful, can cause some serious problems and put people in a situation in which they need to bypass Google account verification, so they can use the phone.
In this article, you will find a lot of technical instructions on how to remove a Google account from the phone. If you aren’t a techie person, then we strongly suggest you to start talking with the UnlockJunky team, which can help you unlock your phone .
What’s Google Account Verification and how it works?
Let’s say that you just lost your phone and another person finds it. Normally, this person will not be able to use the phone if you have already set up a screen lock pattern or a security PIN.
Before Android 5.1 Lollipop, this wasn’t such an issue, as a simple factory reset would’ve bypassed the lock.
However, after Google introduced the Google Account Verification or Factory Reset Protection (FRP), this didn’t work anymore. Thanks to the FRP lock, the phone becomes unavailable if the person who performs a factory reset doesn’t have the credentials of the Google account which was previously used to log on the phone.
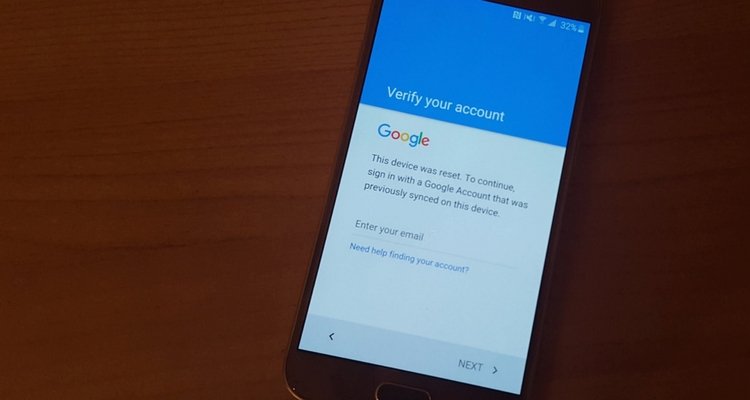
They will get the “ This device was reset, to continue to sign in with a google account that was previously synced on this device ” message, meaning that the phone is useless, unless they bypass the Google account.
Automatically, this can have a big impact on users who buy a phone from a third party seller and cannot get in touch with the person that sold them the phone. Most users reported not being able to use the phone because they ended with an FRP locked phone and they could not get past the screen where the phone asks for the Google Account . If you’re in the same situation, I bet that you have one this question: Is there any method to bypass the Google account lock?
If you are searching for a fast and sure way to bypass the google account, click here and one of the UnlockJunky technicians will take care of the unlocking process for you. It will take only 15 minutes before your phone will be unlocked.
Use the links below to jump directly to the section about your phone brand.
How to bypass Google account verification for Samsung phones
How to bypass Google account verification for LG phones
How to bypass Google account verification for HTC phones
How to bypass Google account verification for ZTE phones
How to bypass Google account verification for Alcatel phones
Download FRP bypass apk
How to solve special issues and situations which can occur during the bypassing process
How to disable Factory Reset Protection on Android
By default, the feature is automatically enabled once you add a Google account to your phone. In order to disable it, everything you need to do is remove your account.
Go to Settings > Accounts > Google and choose your account. Tap on it, then click on the icon on the top right corner. Here, you will see a menu with three options, including Remove account.
How to bypass Google account verification for Samsung phones
Samsung handsets are among the best selling devices in the world, so this issue is very often encountered by their users, especially those who get used phones. If you want to learn how to bypass a Google account on a Samsung Galaxy , you can use the method below.
FRP Bypass for Samsung instructions
After performing a factory reset on the phone, wait until it reboots and prompts to choose a language. After choosing it, proceed to the next steps:
- Connect the phone to a Wifi Network (preferably your Home network)
- The next screen will ask you for the Google Account
- Tap the text field in which the account should be inserted until the Keyboard comes up
- Tap and hold the “@” character until a Settings menu pops up
- Select Google Keyboard Settings
- Tap on the 3 dots in the top part of the screen (or More depending on what Android OS you are running)
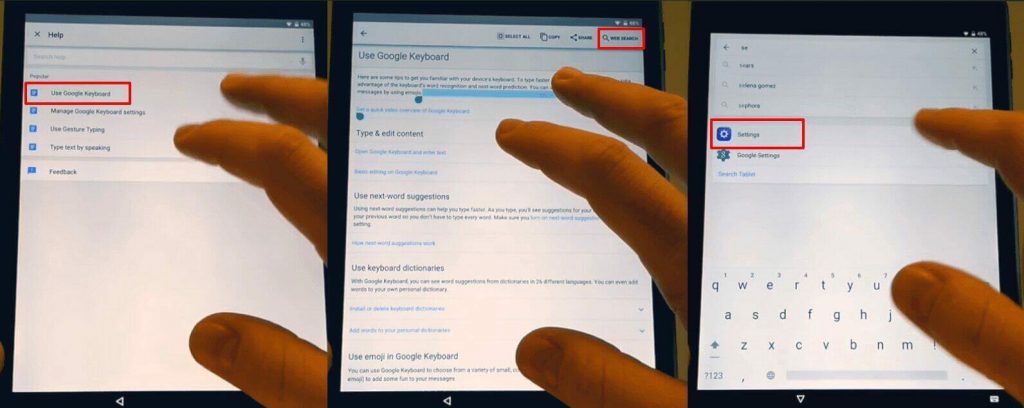
- Select the Help&Feedback item and select any item in the list that will follow
- From the Help section, tap on Using Google Keyboard.
- Long press to select any text on this page and click on Websearch in the upper right corner
- A search field will be shown (delete the text inside the search field)
- Type Settings in the search field
- Scroll down until you find “About Phone” and tap it.
- Enter the menu and look for Build Number. Tap 7 times on the Build Number to enable Developer Options
- Return to the previous menu and open the Developer Option that just appeared
- Allow OEM Unlocking and tap Back two times
- Restart the device
- Connect it to Wifi again
- Notice how you won’t be prompted to log in the previous Google Account and instead the phone will ask you to ADD a new Google Account
- Add the new account and your phone will be ready to use.
- And you’re done! This is how you can perform a FRP bypass for Samsung phones.
These steps should help you to easily perform a Samsung Galaxy J7 Google account bypass, for example, or for any other model running Android 5.1 Lollipop and above.
How to bypass Google account verification for LG phones
The procedure for an LG handset can look a bit tricky and complicated at first, but don’t get discouraged. Simply follow the steps below and you should be able to get rid of the FRP lock .
FRP bypass for LG instructions
- Connect the phone to a Wifi Network (preferably your Home network)
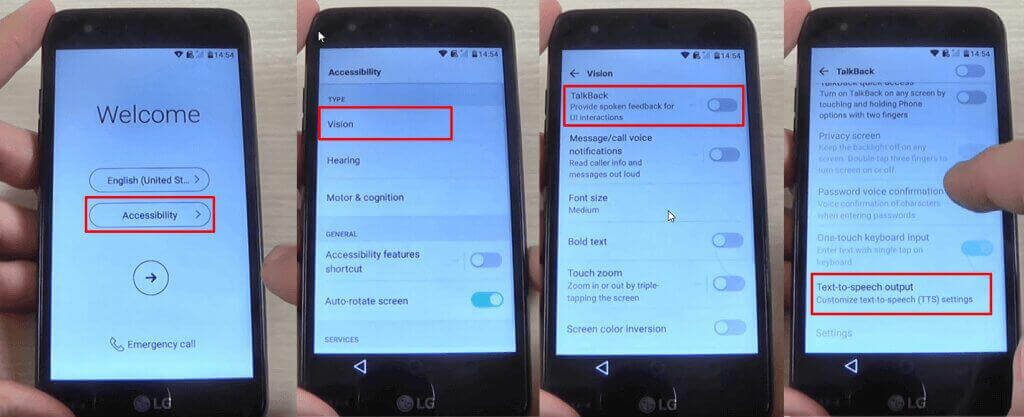
- Go back to the main Welcome screen and tap on Accessibility
- From this new menu, tap on Vision , followed by Talkbac k option, in the next menu
- Swipe up in this new menu and tap on Text-to-speech Output
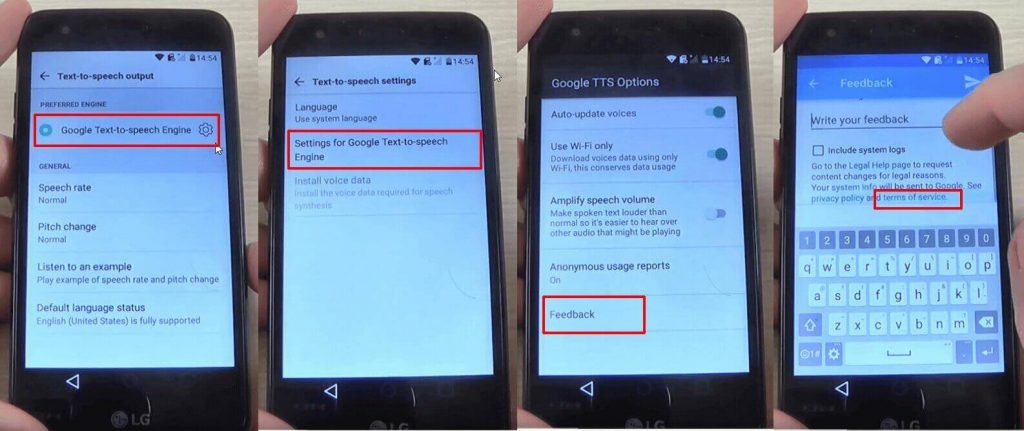
- Tap the Gear settings icon from Google Text-to-speech Engine
- Tap on Setting for Google Text-to-speech Engine
- Here, you should see the Feedback menu. Tap on it until a new submenu appears.
- You will see a field where you can type your feedback, as well as the “Include system logs” option. Right under it, you will see Terms of Service . Tap on those three words.
If you’ve reached this step, it’s great. You’re very close to the moment when you will bypass Google account verification on your LG.
After tapping on Terms of Service, a Google Chrome window will open. After it loads, follow these steps:
- Tap the No, Thanks button when asked to sign in
- Initially, you will be taken to the Terms of Service page. Tap the Google logo, in order to be taken to the homepage.
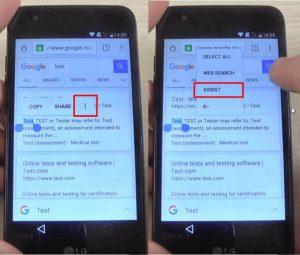
- Type “ Test ” in the search bar and search for it
- The first result should be from Wikipedia. Long press on the description under the title of the page. This will show a menu with two options: Copy and Share, as well as three vertical dots on the right side.
- Tap on the three dots . This will reveal a new menu, with three options: Select all, Web search, and Assist. Tap on Assist . This will reveal the phone’s search bar.
- Hit No, Thanks where you are asked to sign in.
- Type Settings in the search bar and open it
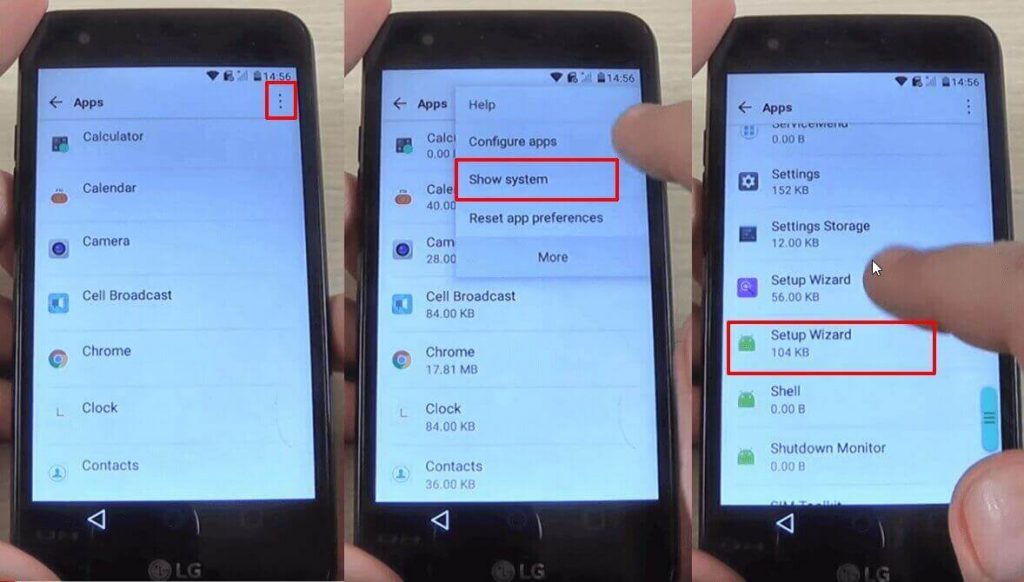
- After entering the Settings menu, look for Apps and tap on it
- In the Apps menu, tap on the three dots from the top right corner and pick the Show System option. You will see an entire list of your phone’s system apps
- In the list, look for Setup Wizard and tap on it
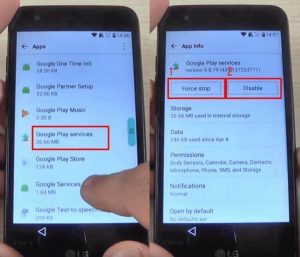
- Tap Force Stop , then OK
- Stay in the Setup Wizard menu, then tap on Storage . You will see the Clear Cache option. Tap on it
Another important step is ready. You’re almost done!
- Tap twice on the back key, in order to return to the Apps list
- From here, tap on Google Play services . Repeat the steps above: tap on Force Stop , then on Disable , followed by OK.
- Using the back key, go back to the Settings menu
- Restart your device. This will bypass Google account verification for LG
After the phone restarts, you need to complete your initial setup. Without connecting the phone to a Wi-Fi network, tap on the Next arrow from the phone’s welcome screen. After this, tap Skip.
If there is a Wi-Fi connection on your phone, long press on Wi-Fi network, then tap on Forget Network, then tap on Next. Tap Skip until you see the Protect this Device option, which needs to be unchecked .
After this, skip all screens until you get to the list with the Google Terms and Conditions. Check I agree and tap on Done .
Ok, just one more step. In order to successfully bypass Google verification, you need to reset the LG phone. Again, make sure you DO NOT connect it to Wi-Fi!
- Go to Settings > General > Backup & Reset
- Choose the Factory data reset option
- Go to Reset Phone > Delete all > Reset.
How to bypass Google account verification for HTC phones
Unlike the procedure for LG phones, if you want to skip Google account verification for an HTC you will need a bit of extra time since there’s one additional step. But don’t worry, it’s not difficult. Just go on with the steps below and you will be able to peform a FRP lock bypass on your HTC in no time.
FRP bypass for HTC instructions
- Reset the phone and power it back on
- Choose your preferred language, then tap on Start
- Connect the phone to a Wifi Network (preferably your Home network), then tap on Next
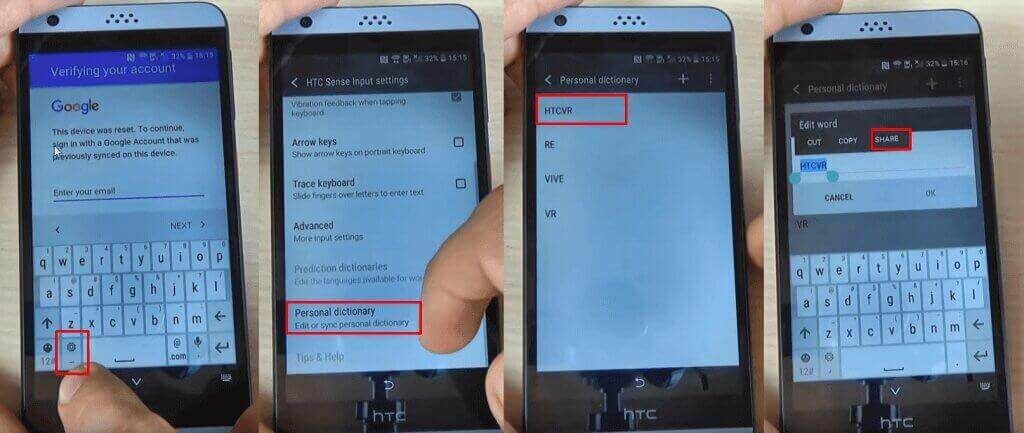
- When the Verify Your Account screen comes up, tap on the email/phone field . This will open the keyboard
- Long press on the Settings key. This will open the HTC Sense Input Settings screen
- Here, tap on Personal Dictionary , then long press on HTCVR . After this, tap Share
- You will see some sharing options. Long press on the Gmail icon , which will open the App info page
- Tap on Notifications , then on App Settings
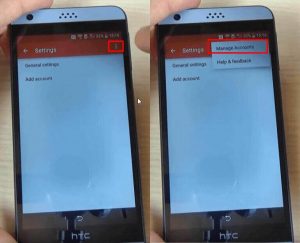
- Click on the three dots in the top right corner of the screen and select Manage Accounts . A pop-up message will appear. Tap Continue
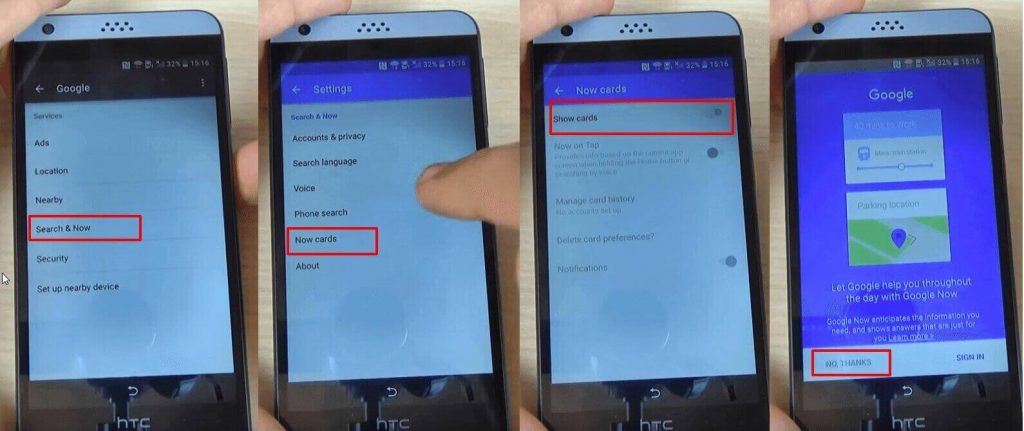
- You should be redirected to your phone’s Settings menu. Scroll until you find Google and tap on it
- From the Google submenu, tap on Search and Now , then select Now Cards and enable them, by tapping on Show Cards
- On the next screen, select “ No, Thanks ”. This will get you to the Google search bar
- In the search bar, type “ Google ” and tap on the first link that appears. When the page opens, tap on “ No, Thanks ” once again. This will take you to Google Search
- In search, type Google , then tap on the first result, which is Google Home. Tap on it
- You will be prompted to set up Chrome, so hit the “ No, Thank you ” button
- Search for Quick ShortcutMaker and open the second link that appears. From here, download “APK from APK 2.0”, using the link at the bottom of the page.
- After downloading the file, go back until you see the screen where you can enable Show Cards and enable them. You will be prompted once again to set up Chrome, so hit “ No, Thanks ”
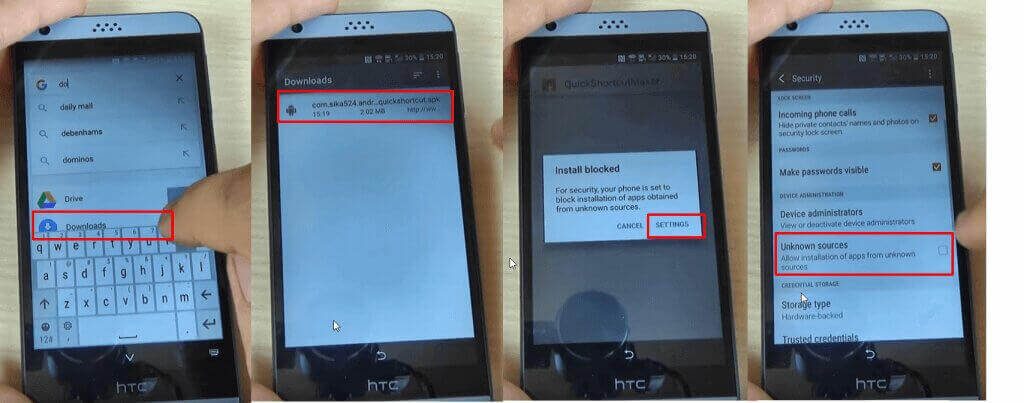
- You will be taken to Search. Here, type Downloads , in order to access the folder where you saved the app
- You will see the app, so tap on it, in order to begin installation
- The phone will say the installation is blocked, due to security reasons, so tap on Settings in the pop-up window
- Check Unknown Sources , then tap Ok
- Go back and tap on the downloaded app once again, then on the Install button
- Wait until the process is over
The app you’ve just installed is essential if you want to bypass Factory Reset Protection on HTC. And don’t worry, it’s completely safe and it won’t damage your phone. Ok, let’s see what’s next.
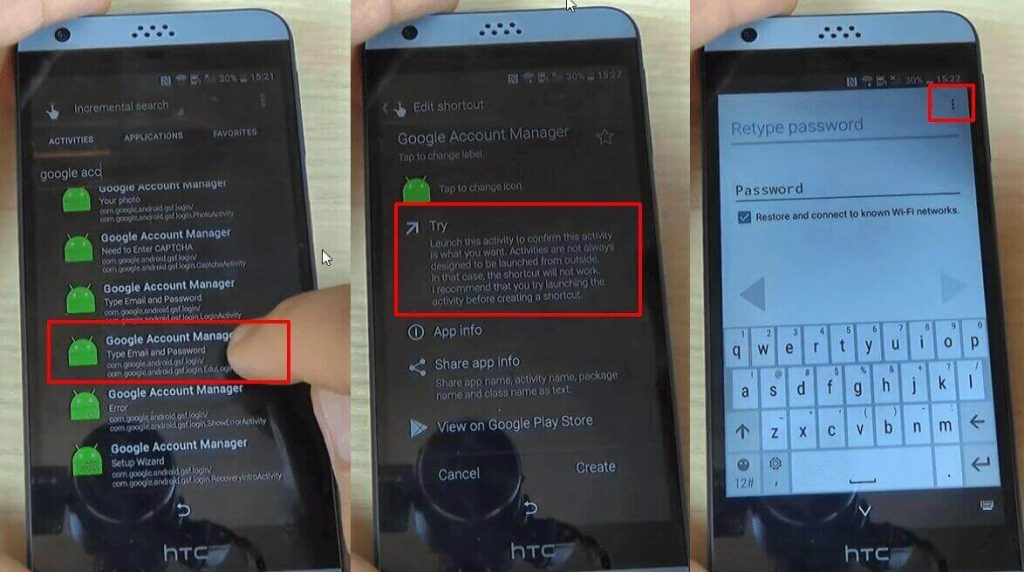
- After the installation is completed, click on Open and look for Google Account Manager , with “ Type E-mail and Password ” written under. Tap on it
- Tap on Try , then tap the three dots that appear in the Retype Password screen
- Select Browser Sign-in , then Ok
- Enter a fresh Google account
- Restart your phone and set it up again. You won’t see the FRP lock screen anymore
- Go to the Settings menu > Backup & reset. Perform a factory data reset, in order to complete the FRP lock removal process.
(Note: If you still have difficulties, start the conversation with UnlockJunky, as they can help you for sure .)
How to bypass Google account verification for ZTE
It looks like several owners are also dealing with this problem, so we’ve put together the instructions for a ZTE Google account bypass.
FRP bypass for ZTE instructions
- Reset the phone and power it back on
- Choose your preferred language, then tap on Start
- Connect the phone to a Wifi Network (preferably your Home network)
- Skip several steps of the setup until you reach the Verify Account screen
- Tap on the email field, in order to activate the keyboard
- Most ZTE phones come with the Swift Key keyboard, so you need to tap on the keyboard’s menu key .
- Select Settings from the menu
- From the Settings menu within SwiftKey select Languages
- Minimize the menu on the screen, then go to the Google search bar
- When prompted to sign in with a Google Account, choose “ No, Thanks ”
- In the Google search bar, type “ Settings ” and select it. If the SwiftKey menu pops up again, tap on Got it , then Not Now.
- From the Settings menu select Backup and Reset
- From this submenu, choose Factory Data Reset . Go through the entire process and reset your handset again. However, this time you won’t see the FRP lock.
If you had any trouble performing these above-mentioned steps here is a very helpful video that will guide you through the process. The method is slightly different and it will work just for devices featuring the same user’s interface, but it’s another working way to bypass Google account verification on ZTE phones. Additionally, there is a FRP bypass apk for ZTE, but it’s not recommended, since there’s no guarantee that it will work, so you can try it at your own risk.
How to bypass Google account verification for Alcatel
Another brand prone to dealing with FRP lock issues is Alcatel. Fortunately, we found some instructions on how to bypass Google verification on Alcatel One Touch models, Idol, Pixi, Fierce, and other models coming from this brand.
FRP bypass for Alcatel instructions
- Reset the phone and power it back on
- Choose your preferred language, then tap on Start
- Connect the phone to a Wifi Network (preferably your Home network)
- Skip several steps of the setup until you reach the Verify Account screen
- Tap on the email field, in order to activate the keyboard, and type anything you want
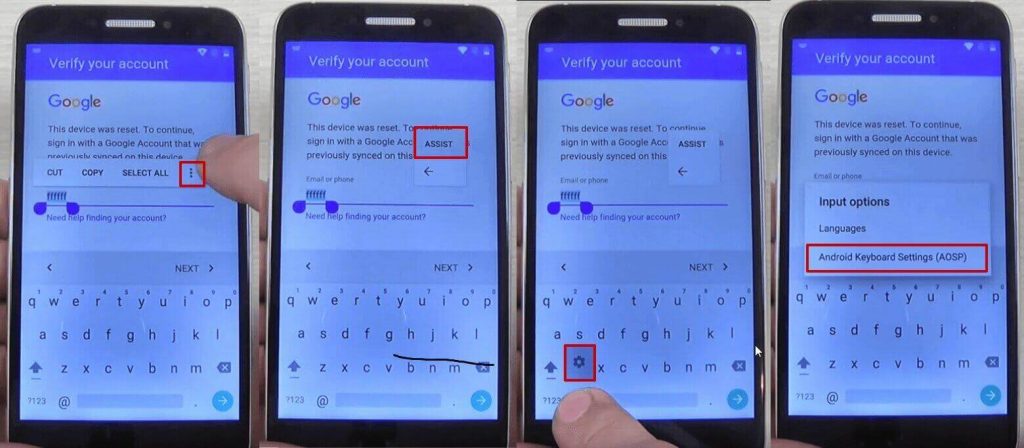
- Long press the text you entered, until a menu with Cut, Copy, Select all, and three dots appear. Press the three dots .
- The Assist option will appear. Tap on it. In most cases, this won’t work, so press the @ symbol at the bottom of the keyboard, until the Gear icon appears. Tap on that one.
- A new menu will appear. From here, tap on Android Keyboard Settings .
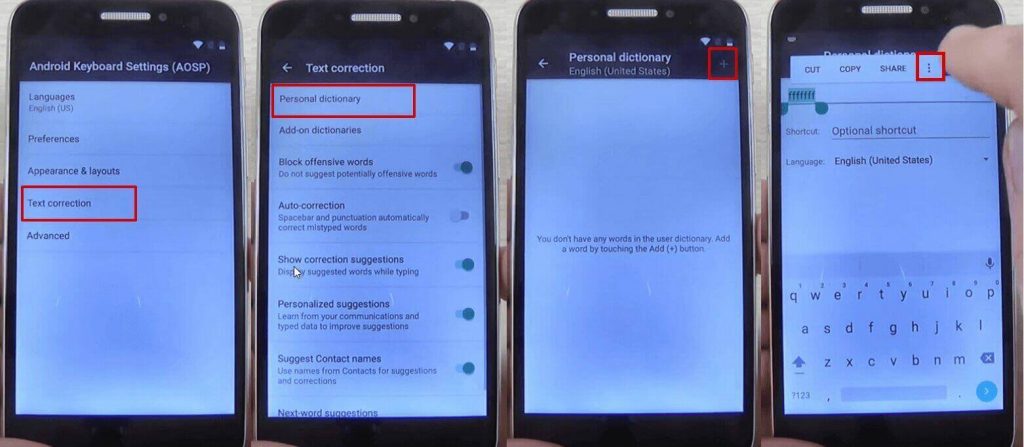
- From this new menu, tap on Text Correction , then go to Personal Dictionary and tap on English (United States)
- Tap on the + icon in the upper right corner
- On the first field, type anything you want and long press on the text until a menu appears, with Cut, Copy, Share, and three dots. Tap on the three dots
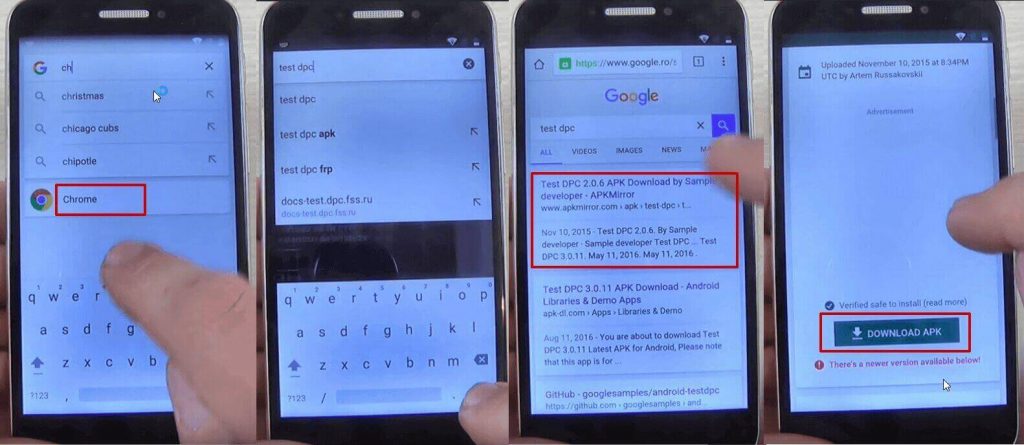
- You will be taken to Google Search. Here, type “ chrome ” in the search bar and tap on it from the drop-down menu
- Tap on Accept and Continue , then No, thanks
- In Chrome’s search bar, type “ test dpc ” and tap on it
- Tap on the first result
- Scroll to the bottom of the page and tap Download APK. This will begin the FRP bypass tool download.
- You will get a message saying that the download could harm your device since it’s from an external source. Tap Ok
- Wait for a few moments, until the FRP bypass tool is downloaded on your phone.
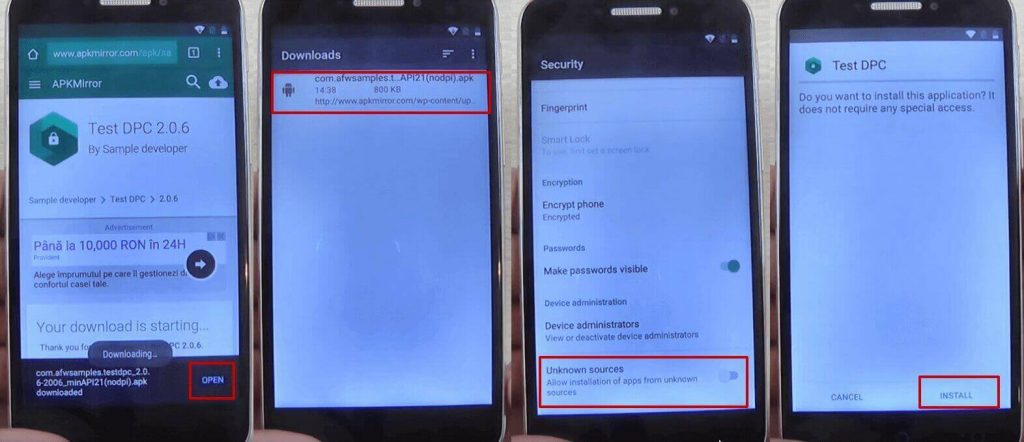
- Tap on the apk package you just downloaded, in order to start installing it. Your phone will show a pop-up, saying that the installation is blocked. Tap on the Settings button and allow installation from unknown sources , then tap Ok
- Hit the back key until you see the apk package again and tap on it
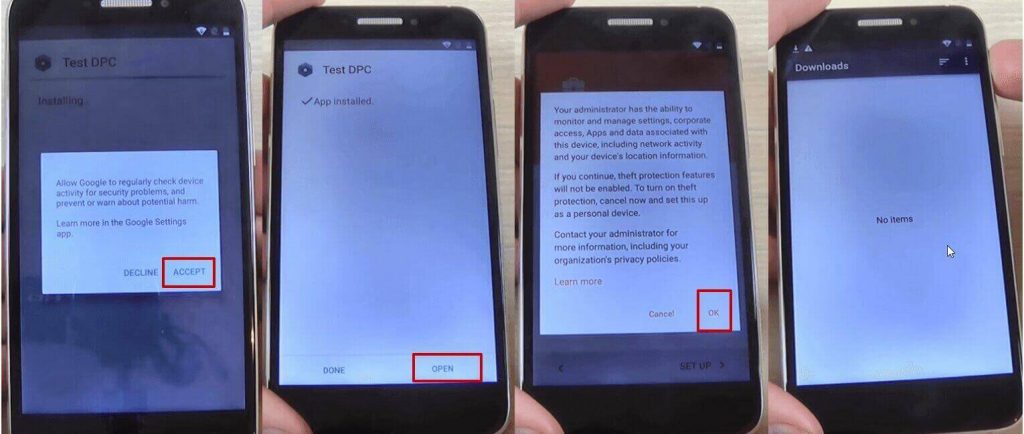
- You will be asked if you want to install Test DPC, the FRP bypass apk, so tap the install button
- During the installation process of the FRP lock app you will see a pop-up message. Tap on Accept
- Wait until the installation process is ready and tap on Open
- You will see the Setup Management screen. Tap on Set up device owner, then Set up
- In the next screen, tap on Set up . A new pop-up message will be shown. Tap on Ok
- Wait until the device owner is being set
- The FRP bypass apk for Android package will show once again, but will shortly disappear and the Downloads folder will be shown, with no items in it.
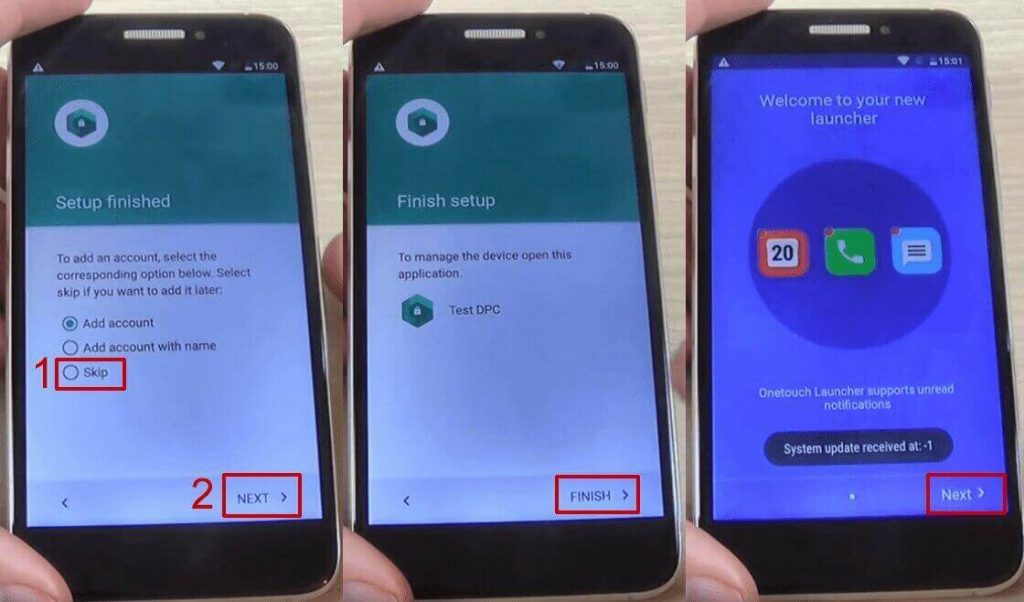
- Restart your phone
- Unlock the phone and you will be taken automatically to the Test DPC app, which will show the Set up finished screen
- Check Skip , then tap on Next
- On the next screen, tap Finish . You will be taken to the initial setup process. Click next until you are taken to the phone’s home screen
- Go to Settings > Backup and reset > Factory data reset and tap on Reset Phone
- Tap on Reset Everything
- Wait until the phone restarts and go through the setup process
- DO NOT connect to a Wi-Fi network, then hit Next until the setup is finished
- Configure the phone’s launcher
- That’s it, your phone won’t ask for the Google account anymore.
If this method doesn’t work, due to your phone coming with another keyboard, you can try the steps below:
- Reset the phone and power it back on
- Choose your preferred language, then tap on Start
- Connect the phone to a Wifi Network (preferably your Home network)
- Skip several steps of the setup until you reach the Verify Account screen
- Tap on the email field, in order to activate the keyboard, and type anything you want
- Tap on the hand key , in the bottom left corner. This will take you to the Swype keyboard’s menu
- From this menu, type on Gestures
- Scroll down until you find the Search option, with the “ Highlight some text and Swipe from the *swipe key* to the S to do a quick web search ” text
This previous step is very important since it actually shows you how you can make a search, even though the phone has a FRP Android lock.
- Tap the back key twice, until you get to the Verify your account screen again
- Type on the Enter your email field again, to make the keyboard pop up, and write a random text, like “ bypass tes t”
- Swipe from the bottom left corner button until the letter “ S ” on the keyboard. This should open the Google Search app
- In Search, type Settings and select it
- Go to Backup & Reset > Factory data reset and tap on it
- Tap the Reset Phone button, at the bottom. Confirm with the Erase Everything button.After this, your phone will restart
- You will be taken to the initial setup menu. Select English as your language, then tap the Next button
- Tap Skip/Next until you get to the phone’s home screen. While going through these steps, you will be asked to connect to a Wi-Fi network. DO NOT connect.
Download FRP bypass apk
Finally, let’s talk about another popular method to bypass Google account activation , done through cable and with a special app. Several users reported that they have used the FRP bypass apk for Samsung and it worked in most cases,, while the number of phones from other manufacturers which can be bypassed like this is reduced. However, it’s worth trying but it involves some tech skills. If you feel the need to get some help, start talking with UnlockJunky as they can help you for sure.
In order to use this method, you need the following things:
- OTG cable
- USB stick
- FRP bypass apk
- A stable Wi-Fi connection
Start the FRP bypass apk download and copy it on your USB stick. After making sure you have all these, you can try to bypass the Google account on Samsung by following the next steps:
- Restart the phone and select English as your language of choice, then tap on Next
- Skip the Insert SIM card screen, then connect the phone to a Wifi Network (preferably your Home network)
- Check the “ I understand and agree to the terms and conditions above ”, as well as the “ No thanks ”, then tap Next
- You will be taken to the Verifying your account page, where you will see the default message, generated by the FRP lock: “ This device was reset. To continue, sign in with a Google Account that was previously synced on this device .”
This is where the OTG cable and the USB stick come in. Insert the stick in your PC, then connect the phone, using the cable. In a few moments, the File Manager will appear on the phone’s screen.
- In the File Manager, you should see the Bypass Any Samsung Account Lock folder. Tap on it, then tap on the folder inside the folder as well. Here you should find two files: Guide.txt and Bypass Any Samsung Account Lock.apk . Tap on the latter
- In most cases, an Install Blocked message will appear. Tap on the Settings button
- In the next screen, check the Unknown sources option
- A new screen will appear. Here, check Allow this installation only , then hit Ok
- You will be taken to the Development Settings screen, where you will see the “ Do you want to install this application? It does not require any special access .” Tap on Install and wait until the process is over
- Tap on Open
The app is now installed, so you can access the phone’s settings menu easily.
- While in the Settings menu, scroll until you find Backup and Reset , then tap on it.
- Go to Factory data reset , tap on it, then tap the Erase everything button.This will take a few minutes.
- After the phone is erased, it will restart and take you to the initial setup screen again.
- Remove then OTG cable and go through the setup again. You won’t need to bypass Google account verification on Samsung again.
How to solve special issues and situations which can occur during the bypassing process
Even though the majority of users claim that the instructions presented above work and help them, there are some situations in which they get stuck at specific steps, due to various reasons.
We’ve identified some of the most common problems and offered some quick solutions, in order to make bypassing quicker.
The phone doesn’t have the Google keyboard: This happens because some phones have a custom UI the manufacturer installs. In this case, the solution is to opt for the last method to bypass Google account presented here, using a FRP bypass tool with computer and a cable or the UnlockJunky method .
Long-pressing doesn’t show any menu : This depends on the manufacturer and the type of display. If a long-press doesn’t reveal anything, just press for a few extra seconds or apply more pressure on the touchscreen.
The keyboard’s Settings menu doesn’t show : This depends on the version of the keyboard you’re using. In some cases, instead of @, you can press the comma or whatever button is in the bottom left corner to access this menu.
Wrap-up
This is how you can successfully bypass Google account verification on your phone, whether it’s a Samsung, LG, HTC or another popular brand.
Obviously, there are several others which you can use to get over this problem. As mentioned before, UnlockJunky is a very reliable way to deal with this kind of lock and provides on the information you need if you want to find out how to delete a Google account from a phone.
If you encounter any issues during the process or find a better way to remove the FRP lock on Android, please let us know, using the live chat section and we will do our best to offer a valid resolution.
Источник


