- Android — Phone Calls
- Intent Object — Action to make Phone Call
- Intent Object — Data/Type to make Phone Call
- Example
- Find Call Settings Option on Android Smartphone
- Where is the call settings on android smartphone?
- Sample VoIP Calling App in Android
- Key Components & Libraries Used
- Prerequisites
- PushNotificationService
- CallConnectionService
- CallConnection
- CallHandler
- Секреты MIUI 🉑 Убираем из смартфона бессмысленные приложения
- Начнём с простого
Android — Phone Calls
Android provides Built-in applications for phone calls, in some occasions we may need to make a phone call through our application. This could easily be done by using implicit Intent with appropriate actions. Also, we can use PhoneStateListener and TelephonyManager classes, in order to monitor the changes in some telephony states on the device.
This chapter lists down all the simple steps to create an application which can be used to make a Phone Call. You can use Android Intent to make phone call by calling built-in Phone Call functionality of the Android. Following section explains different parts of our Intent object required to make a call.
Intent Object — Action to make Phone Call
You will use ACTION_CALL action to trigger built-in phone call functionality available in Android device. Following is simple syntax to create an intent with ACTION_CALL action
You can use ACTION_DIAL action instead of ACTION_CALL, in that case you will have option to modify hardcoded phone number before making a call instead of making a direct call.
Intent Object — Data/Type to make Phone Call
To make a phone call at a given number 91-000-000-0000, you need to specify tel: as URI using setData() method as follows −
The interesting point is that, to make a phone call, you do not need to specify any extra data or data type.
Example
Following example shows you in practical how to use Android Intent to make phone call to the given mobile number.
To experiment with this example, you will need actual Mobile device equipped with latest Android OS, otherwise you will have to struggle with emulator which may not work.
| Step | Description |
|---|---|
| 1 | You will use Android studio IDE to create an Android application and name it as My Application under a package com.example.saira_000.myapplication. |
| 2 | Modify src/MainActivity.java file and add required code to take care of making a call. |
| 3 | Modify layout XML file res/layout/activity_main.xml add any GUI component if required. I’m adding a simple button to Call 91-000-000-0000 number |
| 4 | No need to define default string constants.Android studio takes care of default constants. |
| 5 | Modify AndroidManifest.xml as shown below |
| 6 | Run the application to launch Android emulator and verify the result of the changes done in the application. |
Following is the content of the modified main activity file src/MainActivity.java.
Following will be the content of res/layout/activity_main.xml file −
Following will be the content of res/values/strings.xml to define two new constants −
Following is the default content of AndroidManifest.xml −
Let’s try to run your My Application application. I assume you have connected your actual Android Mobile device with your computer. To run the app from Android studio, open one of your project’s activity files and click Run  icon from the toolbar.Select your mobile device as an option and then check your mobile device which will display following screen −
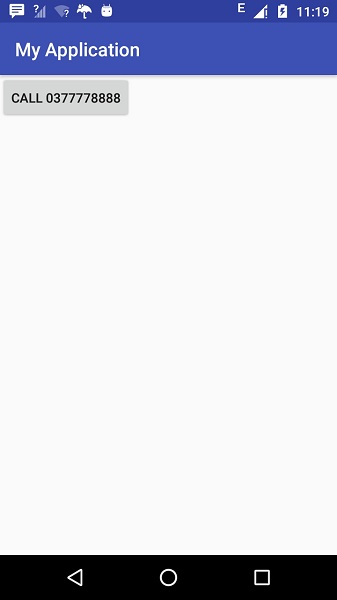
Now use Call button to make phone call as shown below −
Источник
Find Call Settings Option on Android Smartphone
Android 6.0 Marshmallow was one of the good versions of Android, and it comes with lots of features. But there are some issues in the new version, and it was due to the vendor customization. There are some functionality and customization which is difficult for regular users to handle.
One of that issue is Call Settings Option. Previously, the Call settings option was available in the setting section itself, but now it is removed and integrated with the Call Log section. The new modification was a big problem for most of the users.
Most users are searching for the Call Settings option to set up Call Waiting and Call Forward option, but it’s difficult to find it normally since the new Android 6.0 comes with lots of features too. Now i will explain how to access the Call Settings option in your Android 6.0 Marshmallow.
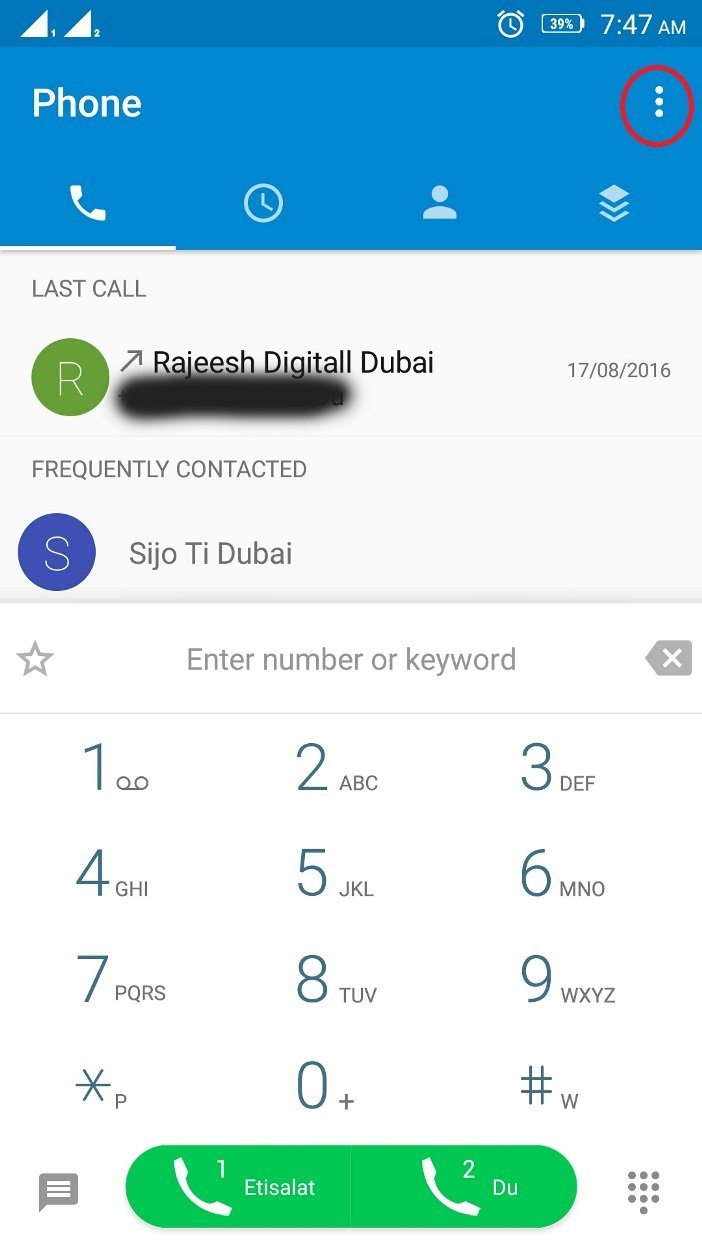
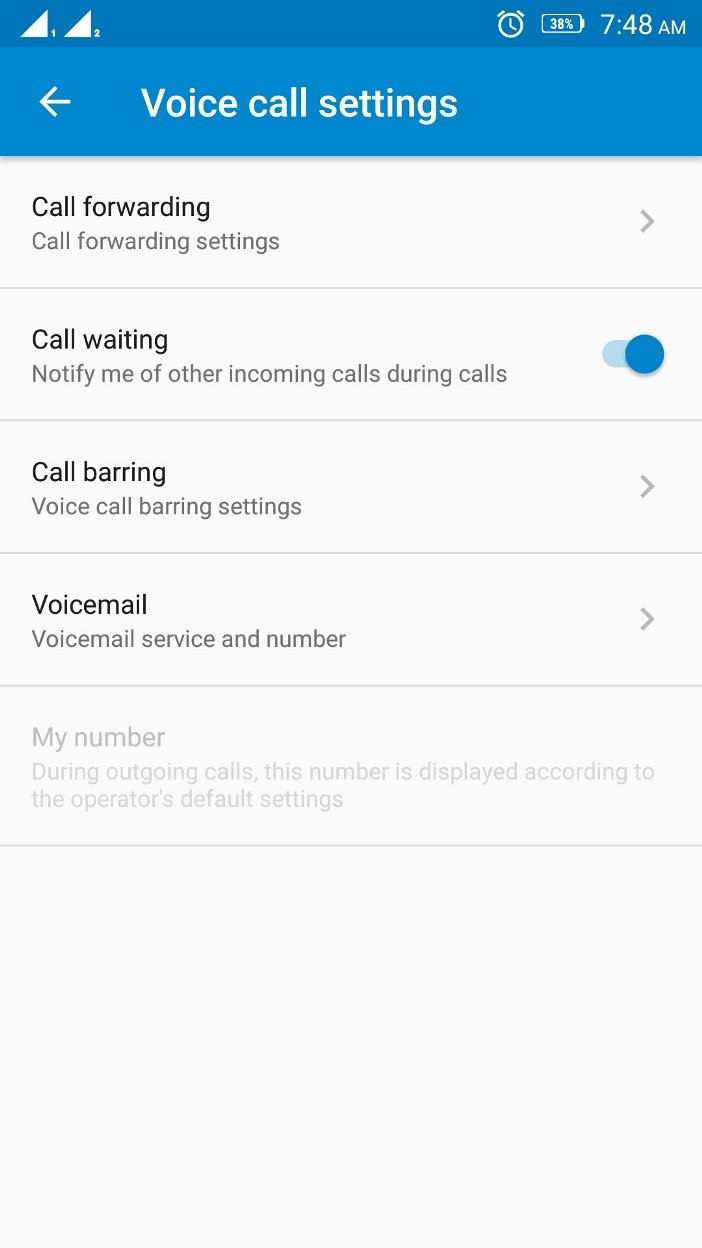
Step 1: Go to your Call logs section/Dialer section. Click on the Setting button on the top (3 dots at top).
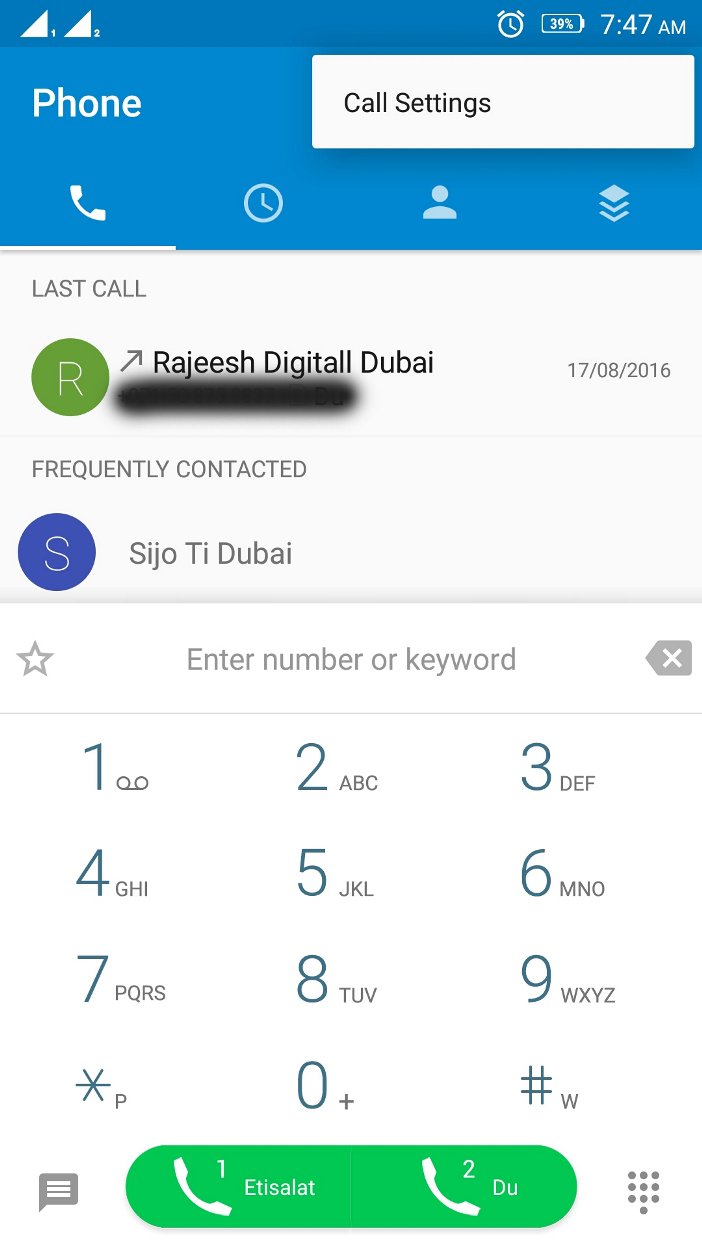
Step 2: Then, a ‘Call Setting’ option will come. Click on that.
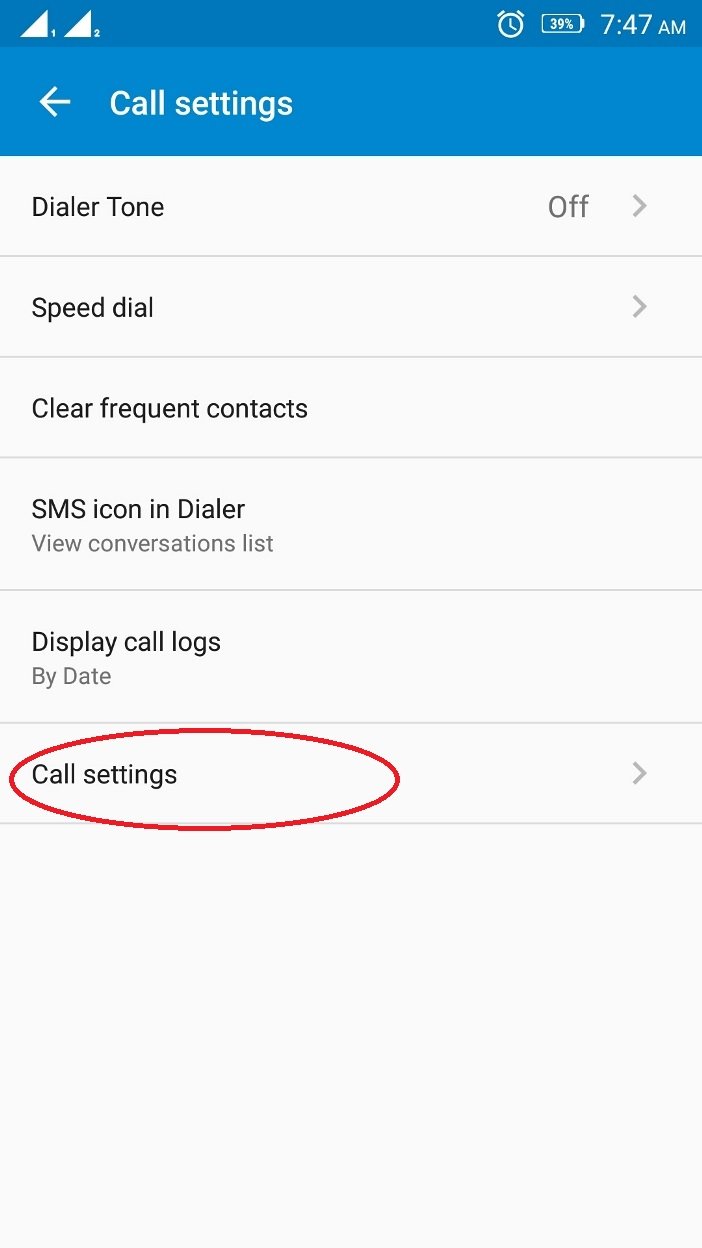
Step 3: In the next window, click on ‘Call Settings.’
Step 4: In the next screen, click on ‘Voice Call.’

Step 5: In the next window, you can see the SIM Option if you have a dual SIM phone. Click on the desired SIM.

Step 6: Now, you can see the Voice Call Settings section, where you can set call forwarding, call waiting, etc., like the older version.
Where is the call settings on android smartphone?
Even though the above steps are based on the old version of the Android phone, the settings option can be found something similar on all the phones, whether it is Android 9 Pie, Android 10, or even the latest Android 11. However, it is also to be noted that each smartphone manufacturer customizes each phone application based on their preference. Hence, the option can be a bit different for each device.
The general way to find the call setting is by clicking on the phone app on your mobile. Then click on the setting (3 dots at the top right corner). From the option, click on Settings. You can find all the options under the call settings in the next window, including Calling Account management, Call recording (if available), etc.
Click on the Calling account to manage the settings preferred to each SIM on your phone. Select the SIM as per choice, and you can find additional settings such as WiFi Calling, Video Calling option, Call Forwarding, Call barring, etc.
If you are using Google Phone as the default Phone app, the settings will be the same. But as said before, due to the customization by the manufacturer, some options might be disabled.
This article was last modified on October 11, 2021
Источник
Sample VoIP Calling App in Android

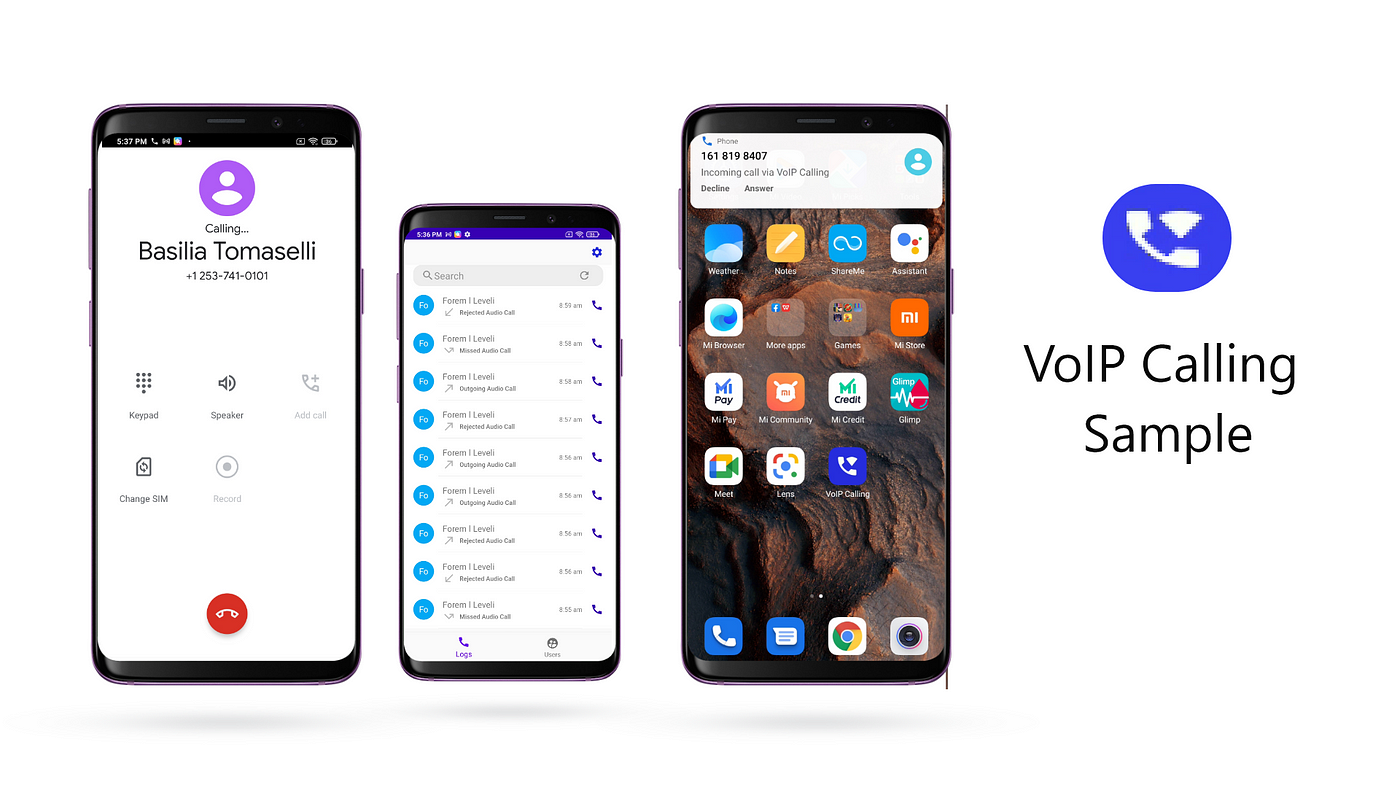
This article describes the designing & implementation of a sample VoIP calling app using CometChat Pro. CometChat Pro is Messaging & Call SDK that provides enormous features for developers to integrate chat. Using CometChat Pro UI Kit, developers can easily integrate real-time messaging & calling support in their app. By the end of this article, you will create a fully functioning Sample VoIP Calling App.
Key Components & Libraries Used
CometChat Android UI Kit — An ready to use UI Kit library which will help us to develop real-time messaging & call support in our sample app within a few minutes.
Firebase — To receive an event when the app is not in the foreground we will use Firebase Push Notification.
ConnectionService — An abstract class that will help you to build VoIP Calls in a sample app. It uses a built-in System UI to manage a call which is also called System Managed. If you wish to use your own UI to manage calls you can use Self-Managed Service.
Prerequisites
Before diving into more details please ensure that you have checked the below points.
— Android studio installed in your system.
— Android Device or Emulator to run your app.
- We will begin by fetching the code from GitHub.
You can clone the project from the Sample VoIP Calling repository.
- It’s necessary to have CometChat Account to run the app.
You can create your account in CometChat and replace the credentials with yours.

Also, please make sure to setup Push Notification Extension in CometChat.
Please click here to know How to setup Push Notification in CometChat.
- Next step is to setup Firebase Account and create a new project. Once the project is created, setup an Android App in the Firebase Project and add google-services.jsonfile in your “ app” folder
- Once the above mentioned configurations are done you can open the project in Android Studio. You will find the project contains two packages ‘ app’ which is our sample app and ‘ uiKit’ is a library provided by CometChat.
- In ‘ app’ you will find the ‘ utils’ package under which we have files to handle Push Notification and VoIP calls.
PushNotificationService
It extends FirebaseMessageService which is used to handle Push Notification received from Firebase. We are using it to notify the message sent to a user when they are not active. We are also handling incoming & outgoing calls through it.
onMessageReceived() : This method gets triggered whenever you receive a push notification from firebase.
CometChatHelper.processMessage() : This method is provided by CometChat SDK to get BaseMessage from “ data” received as JSON Object in Remote Message.
initiateCallService(call : Call) : This method is used to initiate a call through ConnectionService whenever a Call type message is received.
showMessageNotification(baseMessage: BaseMessage, title: String, alert: String) : This method is used to display and handle the notification for the message when is being received by the particular user.
CallConnectionService
CallConnectionService is custom connectionservice class which is binded with the app to handle incoming & outgoing calls. You will find onCreateIncomingConnection(), onCreateOutgoingConnection() methods in it.
onCreateIncomingConnection() : This method get triggered whenever telecomManager.addNewIncomingCall() get success on receiving a call.
onCreateIncomingConnectionFailed() : This method get triggered whenever telecomManager.addNewIncomingCall() fails to receive a call.
onCreateOutgoingConnection() : This method get triggered whenever telecomManager.placeCall() get successfully executed to place outgoing call.
onCreateOutgoingConnectionFailed() : This method get triggered whenever telecomManager.placeCall() get failed to place an outgoing call.
Currently, we are using CALL_PROVIDER as Capability of ConnectionService. So you can see your system’s native calling UI for incoming & outgoing calls.
You can change it SELF_MANAGED if you wan’t to show your own custom UI for incoming & outgoing calls.
CallConnection
It is a Connection class that is used to initiate a connection when a user receives an incoming or outgoing call. It usually helps the ConnectionService class to handle the connection requests and their callbacks. It includes certain methods like onAnswer(), onReject(), onHold(), onDestroy(),etc. Whenever the user receives an incoming call and if the user accepts the call then onAnswer() will be triggered. Similarly, if user rejects the call then onReject() is triggered.
onAnswer() : Whenever this method gets triggered, we use CometChat.acceptCall() which will start the CometChat Call Service and start the call session.
onReject() : Whenever this method gets triggered, we use CometChat.rejectCall() which will reject the CometChat Call Service and end the call session.
onDisconnect() : This method gets triggered whenever the initiator of a call ends the calls before the receiver accepts the call. This will ends the call session and make it a Missed Call.
CallHandler
It is a class that is used to handle and integrate ConnectionService in your app. Below are its methods that are used in your app.
Источник
Секреты MIUI 🉑 Убираем из смартфона бессмысленные приложения
Приветствую подписчиков и случайных читателей моего канала✋️
Для начала небольшое объявление:
«Это одна из последних статей на тему отключения различного программного хлама в MUI 12 на базе Android 10. Нам осталось отключить ещё около 5 приложений и сервисов, которые впустую тратят мобильный интернет, оперативную память и заряд батареи, после чего, я выпущу статью с финальным списком и пресетом для ADB App Control и перейду к изучению Android 11.
Как показывают отзывы читателей, многим удалось значительно улучшить работу своих смартфонов, чему я очень рад и надеюсь, что эта статья тоже окажется вам полезной».
Начнём с простого
Приложение «Smart-Divert» присутствует во многих смартфонах с двумя Sim-картами и если говорить простым языком, служит для того, чтобы в момент когда вы говорите по одной симке, а на вторую поступает входящий звонок, происходила переадресация.
Но его бессмысленность, заключается в техническом устройстве наших гаджетов, ведь в большинстве из них установлен только один радиомодуль, следовательно, он физически не может поддерживать одновременную работу двух Sim-карт. Проверьте есть ли это приложение в вашем смартфоне, воспользовавшись поиском в пункте «Все приложения». Только показ системных включить не забудьте.
Как вы видите, «Smart-Divert» постоянно находится в активном состоянии, расходуя ресурсы системы и оперативную память, которой как известно, много не бывает.
Поэтому я рекомендую отключить его, через уже знакомое вам приложение ADB App Control (если не знаете что это, ссылка на статью будет ниже). Замечу, что на всех своих смартфонах это приложение я отключил и никаких сбоев в работе не обнаружил.
Перед тем как я перейду к «вишенке на торте», небольшая предыстория: Обратился ко мне человек с проблемой плохой работы определения местоположения после одного из последних обновлений. Перепробовали всё, и местоположение Google отключали, и данные A-GPS чистили — результата ноль.
В итоге, на одном из форумов я вычитал, что проблема может крыться в приложении «LocationServices» от Qualcomm. А зайдя на своём смартфоне в «Настройки» —> Приложения —> Все приложения —> Три точки (Показать все приложения), обнаружил что оно постоянно висит в фоне и потребляет (в моём случае) 272 Мб оперативной памяти.
Начал интересоваться и выяснил, что работа GPS после отключения этого сервиса, остаётся такой же как была (подтверждение ниже).
На всех своих смартфонах Xiaomi я его отключил, весь день пользовался навигатором, тестировал приём спутников — никаких проблем нет. В итоге проблема обратившегося человека была решена, а в добавок ко всему, я нашёл ещё одну службу, которая расходовала достаточно большой объём памяти.
Более того, после отключения (в моём случае) расход аккумулятора, заметно уменьшился и уже потом я прочёл, что статистика расхода батареи «LocationServices» входит в строку «Система Android».
Можете последовать моему примеру и отключить её на своём смартфоне через ADB App Control, тем более, любое отключённое приложение можно восстановить без проблем.
Имена пакетов для отключения в ADB App Control (скопируйте в поисковую строку): Smart-Divert — com.qti.xdivert, LocationService — com.qualcomm.location
Надеюсь статья заслуживает вашего лайка и комментария👍
Источник


